
Combining Shapes
Complex shapes can be created from geometric primitives or freely drawn curves using the various boolean shape operations. The commands, used to create these combinations, can be found in the Object - Combine and Object - Composite menu. Complex shapes containing multiple paths can be broken apart using the Break Apart command to create individual objects from each path. The Object menu contains a number of additional commands to help with the shape and curve creation and editing process.
Boolean Shape Operations
The following composition operations are available to combine shapes and paths:
- Combine - combine the selected paths into a single complex path. Winding or even-odd fill modes will determine how overlapping parts of the paths are painted. The original paths will become sub-paths of the new object shape.
- Intersect - Creates an intersection of all shapes.
- Union - Creates a union of all shapes.
- Exclude - Exclude all shapes from the last shape.
- Exclude Last - Exclude the last shape from all shapes.
- Covered - Create regions covered with at least two shapes.
- Cut Out - Cut a shape into two or more parts using other shapes.
- Inside - Cut out parts that are inside the first shape.
- Outside - Cut out parts that are outside the first shape.
- Remove Overlaps - Remove overlapping parts.
- Exclude Back - Exclude all shapes from the first shape.
- Divide - Divide shapes by separating overlapping and non-overlapping parts.
- Trim - Trim (exclude) objects from objects below in the stacking order.
- Enclosure - Create a closed region from multiple open or closed shapes.
- Boundary - Create a boundary shape.
When combining shapes with the boolean operators, the user may choose between destructive or non-destructive combination modes. In destructive combination mode, the selected objects are replaced by a single object with a shape resulting from the composition. The original shapes and paths cannot be changed, unless the whole operation is undone (using the Undo command).
To combine shapes using destructive operations, select the objects whose shapes are to be combined. It is important to note that for some of the combination modes, the selection order is important. Select one of the shape composition commands from the Object - Combine menu. The selected objects are removed and replaced with objects containing the resulting shapes.
When combining in a destructive mode, the shapes are converted to curves and the resulting curves are combined into one or more objects.
In non-destructive mode, a new shape is created that will contain all the selected shapes and paths. This new shape is a Composite Shape, and its result is a composition of its member shapes. The member shapes remain editable, can be selected and edited using the Shape selector mode of the Pointer tool. The non-destructive Composite Shape mode has the advantage that the original shapes are retained and can be modified, saved as styles and presets, or replaced at any time.
To combine shapes in a non-destructive mode, select the objects whose shapes are to be combined, considering that the object order matters. Select one of the operations in the Object - Composite menu. The selected objects are removed and replaced with a single object having the composite shape. The members of this composite shape can be edited and modified at any time.
When combining in a non-destructive mode, a single composite shape type is created. The composite shape consists of the original shapes and a combination operator. Since they are just like regular shapes, composite shapes can also be used as clipping shapes on groups or layers.
A second non-destructive shape combination mode is to use groups of objects, and select a group composition mode from the Object - Composite menu. When a group of multiple objects is selected, applying a non-destructive shape composition will result in the creation of a single virtual object inside the group, with the style picked from the first object of the group, and a shape resulting from the combination of the grouped shapes.
To combine shapes using the grouping mode, select the objects and group them using the Object - Group command. The stacking order of objects can be important, depending on the combination operator. Having the group of objects selected, select one of the combination commands from the Object - Composite menu. The group content is replaced with a single object containing the resulting shape. The original members of the group are available for editing and changes at any time, and the combined shape will be remade after those changes are performed.
Using Composite Shapes
Composite Shapes are created using the combination operations from the Object - Composite menu, as described in the previous section. A composite shape (like any other shape) can be saved as a preset or style, and can be reused on other objects. This allows both editing and reusing of complex composite shapes created from geometric primitives or other shapes.
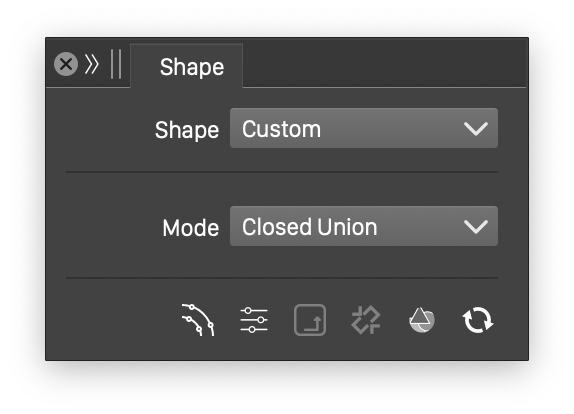
Shape panel with composite shape selection.
The combination operation used in a composite shape can be changed at any time. Select the object with the composite shape and open the Shape panel. When a composite shape is selected the shape panel contains a Mode field showing the current combination operation used in the composite shape. Use the drop-box of the Mode field to select another operation for the composite shape.
The member shapes of a composite shape can be selected and modified using the Shape Selector mode of the Pointer tool, available in the context panel. The shape selector mode can select individual shapes inside a composite shape and move, scale, rotate or skew these shapes. The selected member shape attributes can be edited from the Shape panel.
The Node tool can be used to interactively edit the properties of geometric shapes or the nodes of paths also for member shapes of a composite shape.
Options for Combining Shapes
The shape combine operations use several options to control how strokes or open shapes are handled, and how to deal with complex appearance of objects.
The shape combine operations options can be accessed with the Path panel menu Shape Combine Options command.
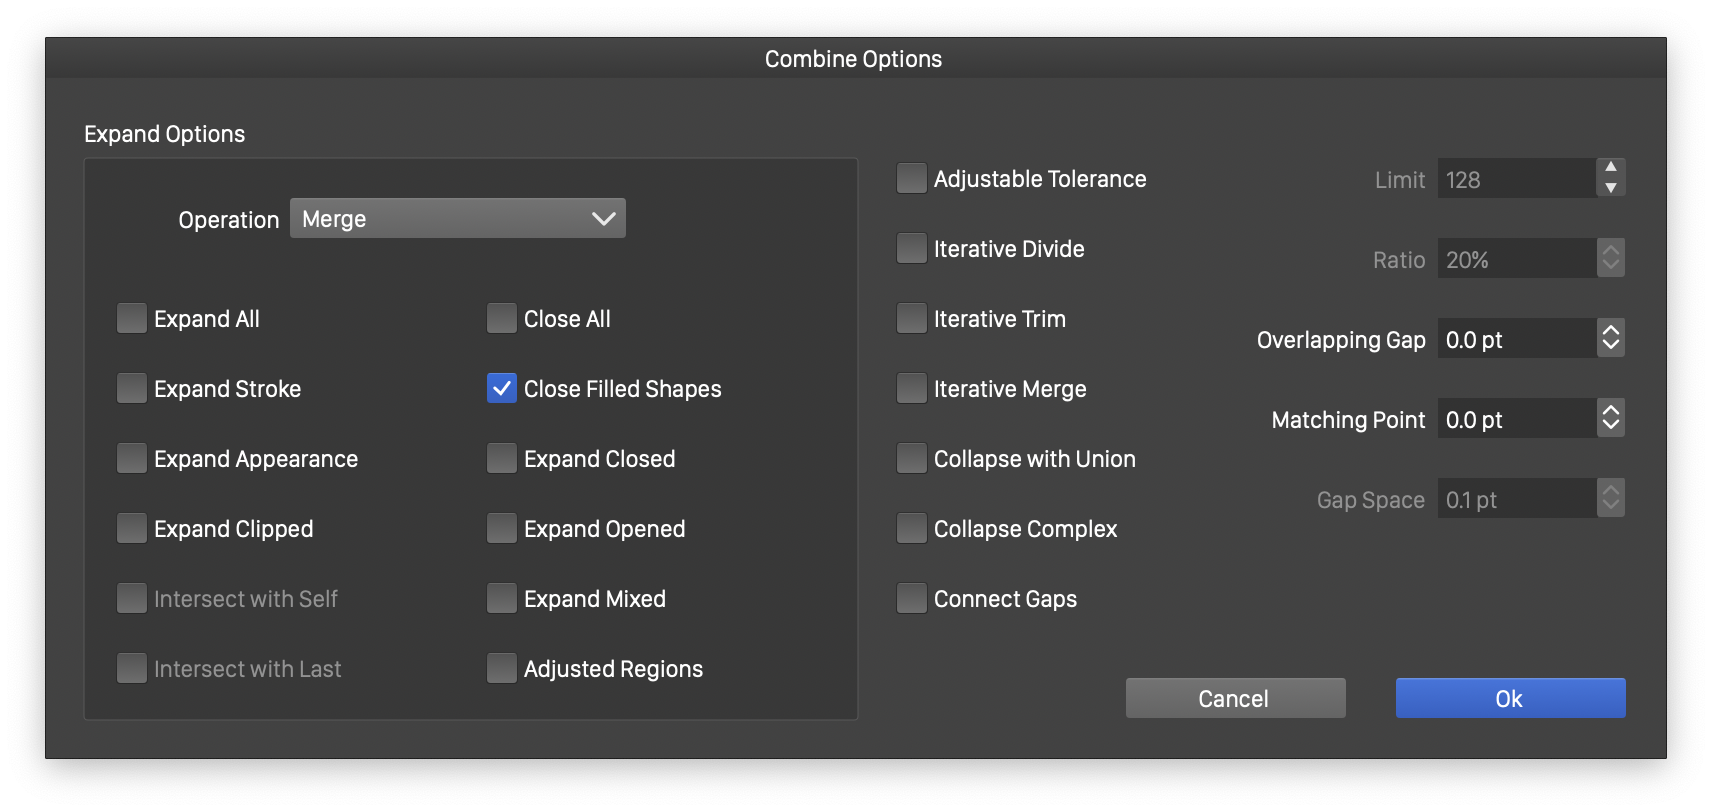
Options for Combining Shapes.
The Expand Options section contains options for expanding strokes and appearances before the shapes are combined, selected separately for each combine operation:
- The Operation drop down lists the shape operations for which thee options are adjustable. Select a shape operation from the list to show and edit its expansion options.
- Expand All - Expand all attributes of the combined objects.
- Expand Stroke - Expand the stroke of combined objects.
- Expand Appearance - Expand the appearance of the objects.
- Expand Clipped - Expand clipped groups.
- Intersect with Self - Check to cut shapes at self intersection points also, available only for the Cut at Intersections operator.
- Intersect with Last - Check to cut shapes with the shape of the last selected object, available only for the Cut at Intersections operator.
- Close All - Close all open shapes before the shape operation.
- Close Filled Shapes - Close filled shapes before the shape operation.
- Expand Closed - Expand the stroke of closed shapes.
- Expand Open - Expand the stroke of opened shapes.
- Expand Mixed - Expand the stroke of shapes containing both open and closed parts.
- Break Apart - Break the shapes apart before the combine operation.
The following options are common for all combine operators:
- Adjustable Tolerance - Check to use the zoom level as a parameter to adjust various tolerance levels in the shape combine operator, like matching nodes and overlapping curves.
- Iterative Divide - Check to iterative divide operator, suitable for not too complex divide cases.
- Iterative Trim - Check to iterative trim operator, suitable for not too complex trim cases.
- Iterative Merge - Check to iterative merge operator, suitable for not too complex merge cases.
- Collapse with Union - Check to collapse the shapes with the same style using union in the merge operator.
- Collapse Complex - Check to collapse the shapes with the same style using union in the merge operator on complex shape collections.
- Connect Gaps - Check connect small gaps between curves when doing a divide, trim or merge operation.
- Limit - Set the minimum number of shapes to collapse with union, when merging.
- Ratio - Set the ratio of shapes to be united, among all the shapes, when merging.
- Overlapping Gap - Set the overlapping tolerance between margins of shapes.
- Gap Space - Set the maximum gap used to connect two shape locations.
Modifying Shapes and Paths
The Object menu contains a number of commands that can be used to modify shapes of selected objects. These commands may be required when working on complex shapes and creating complex artwork.
The Break Apart command breaks a composite shape or a path containing multiple sub-paths into separate objects. A path may contain multiple sub-paths (from example after a Combine combination), filled using the winding or even-odd filling rule. The Break Apart command will separate these sub-paths into different objects. If a composite shape is selected, the Break Apart command creates separate objects using the member shapes of the composite shape. The original shape is removed in both cases.
The Shape menu from the Objects menu contains additional object shape adjustment commands.
Offsetting Paths
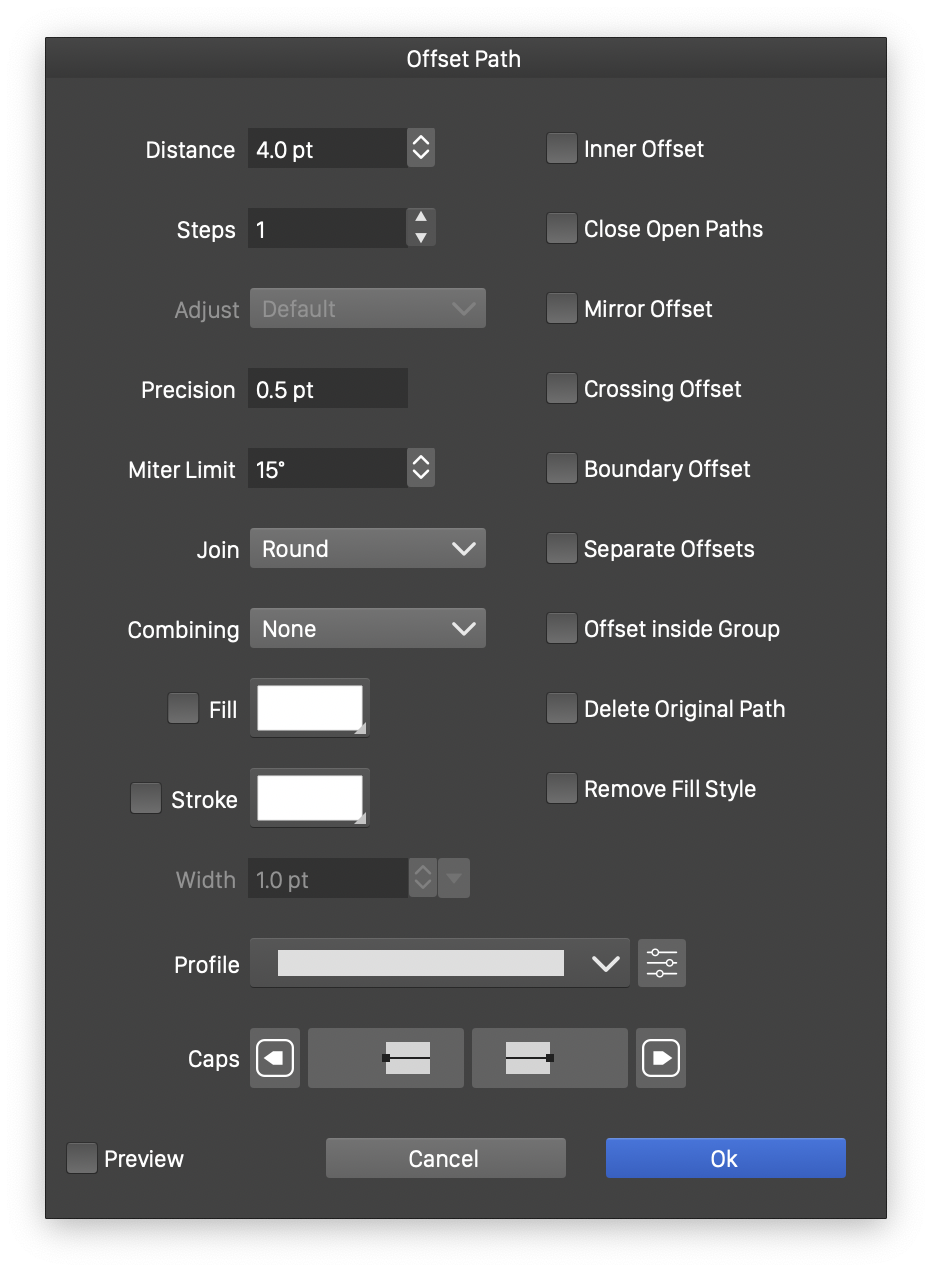
The *Offset Path* view.
The Offset Path command from the Objects - Shape menu, can be used to create new objects by offsetting the shape of the selected object. The following options are available.
- Distance - Edit the path offsetting distance. Positive distances will offset closed shapes outwards. Negative distances will offset closed shapes inwards.
- Steps - Set the number of offsets to create using the distance as spacing.
- Adjust - Select a distance distribution function when more than one offset steps are used. The distance distribution function can be used to decrease or increase the distance variation of multiple offsets.
- Precision - Edit the precision used to calculate the path offsets. The precision value is used to select between approximating the ideal path offset or using as few new shape nodes as possible.
- Miter Limit - Set the miter limit angle when expanding sharp angles. Angles below this limit always result in round or bevel corners when expanded.
- Join - Select the offsetting mode of sharp corners. The offsetting modes are the same as the stroke corner modes for sharp corners.
- Combining - Select the path combination phase used when there multiple paths in the offset. This can be:
- None - offsetting each path separately.
- Before - create a union of the multiple paths first, and then an offset of the union.
- After - create an offset of each path, and then an union of the resulting offsets.
- Fill - Select the fill style of the offset shape.
- Stroke - Select the stroke style of the offset shape.
- Width - Select the stroke width of the offset shape.
- Profile - Select the variable width profile preset or style, used in the path offsetting. The variable width profile controls the variation of the distance of the offset shape. To set custom variable width profiles, click on the
 button, or use the primary shape effect editor
  tool.
tool. - Cap - Select or edit the stroke cap shape used when expanding open paths. The editing and selection of stroke caps is described in more detail in the Stroke Caps section.
- Inner Offset - Create the offset on the other side of the shape. For closed shapes, this can be the inner side, for positive offset distances.
- Close Open Paths - Create closed offsets for open shapes, by turning around the endings.
- Mirror Offset - Create offsets on both sides of the shape.
- Crossing Offset - Create crossing offsets at self intersection locations.
- Boundary Offsets - Create offsets of the combined shape boundary.
- Separate Offsets - Create separate offsets of the selected shapes.
- Offset Inside Group - Create separate offsets for objects inside groups.
- Delete Original Path - Delete the original object.
- Remove Fill Style - Check to create offset paths with no fill style.
The Offset Path command creates one or more new objects, behind or above the selected object, with shapes that are offsets of the original selection. The style of these offset objects can be selected individually, using the common object styling tools. To create style transitions with offsets, that are dynamically linked to the original object, use the Contour effect, from the Panels -> Effects -> Contour panel.
Normalizing Winding Mode
The Normalize Winding command rearranges a path along its self-intersecting points, so that the winding and even-odd fill modes will result in the same filled region.
The Intersection Points command finds self intersection points in a path (may contain multiple sub-paths), and adds these as nodes to the path. The nodes created by the Intersection Points command can be then edited using the Node tool to rearrange the path.