Transparency Panel
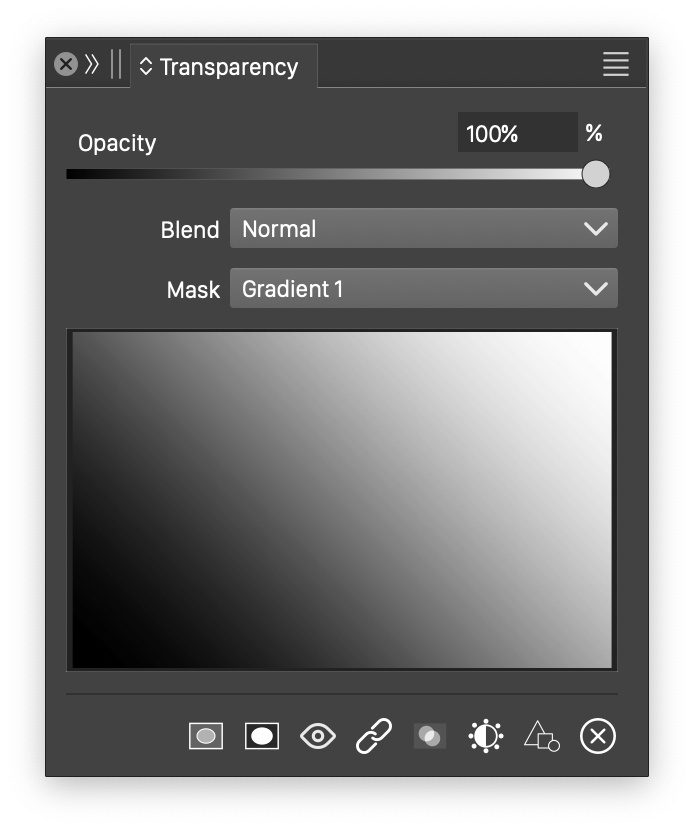
The Transparency panel, opened from the Window menu, is the primary tool used to setup transparency masks on selected objects and layers. The panel contains a preview of the current transparency mask (from the selected objects), and can be resized to adjust for a specific workflow.
The transparency panel.
The transparency panel contains fields to select the opacity, blending mode, transparency mask, and the object options controlling how objects are combined with a backdrop, when in a group.
- Opacity - Edit the uniform opacity of the selected objects. The opacity is given as a percentage of combining the backdrop with the object color. Edit the opacity numerically, or drag the slider to adjust the opacity value.
- Blend - Opens a list of blending modes, that can be set on the selected objects. The blending mode determines how the backdrop and object colors are combined into a new color.
- Mask - Opens a list of transparency mask types, presets and styles. When a transparency type is selected, a modal view is shown to set the fill style used in that transparency type. For the group transparency type, the group is created and isolated so that objects can be drawn into it, to setup a transparency. This list also contains available fill presets and styles, like gradients, patterns and noises.
- The transparency preview shows the current transparency mask. Double clicking the mask launches the transparency style editing. This is specific to the transparency type. For solid, gradient, pattern and noise, a modal view is shown to edit the properties of the fill style (see the relevant fill style chapter for detailed description of these views). For a transparency group, the group of objects defining the transparency are isolated for editing.
- The panel icon section contains a set of transparency options that control how the objects and groups are composited.
Object references with Transparency Content role are also shown in the Mask list for selection. The easiest way to set up complex transparency groups is to use named object groups with the Transparency Content role, as it provides both easy selection of the transparency mask, and the object group is available for editing with the usual tools of VectorStyler.
The opacity of an object can be lined to the opacity of an other object using measurement number variables. To do this, create a measurement number variable that is picked from the source object opacity. Then select the new object and Control + click on the Opacity number field in the Transparency panel. From the menu, select the new variable. Adjusting the opacity of the source object will also update the opacity of the new object.
The transparency mask of an object can be linked to the mask of another object using the Transparency Mask Style object role. Select the source object (already having a transparency mask) and set a name and the Transparency Mask Style role in the Object Options. A new transparency mask style will be show in the Styles panel and in the Mask drop down list of the Transparency panel. This style can be selected as a transparency mask of other objects, linking the mask to the mask of the original object.
Transparency Options
The transparency panel icon section contains the following options:
 - Enable or disable the clipping mask mode when using a transparency mask. When enabled, the regions of the object outside of a transparency mask are fully transparent (clipped to the mask). When disabled, the regions of the object not covered by the transparency mask will be opaque.
 - Enable or disable the mask inversion. When enabled, the transparency mask is inverted before it is used to combine the object with the backdrop. This option can be used to control how a transparency group is applied as a mask.
 - Enable or disable the use of the transparency mask. When disabled, the transparency mask and related options still remain associated with the object, but it will not be used when rendering the object. This option can be used to quickly show or hide the transparency mask on an object, without removing it completely.
 - Enable or disable the relative mask positioning mode. This option is useful when the transparency mask is defined by a group of objects. When enabled, the transparency group position is moved with the object. When disabled, the transparency group remains at its position when the object is moved. This option can be used in combination with using transparency groups that are object references with the Transparency Content role. When disabled, multiple objects can have the same, seamlessly overlapping, transparency mask, enabling the easy creation of complex artwork effects.
 - Enable or disable the isolated mode rendering of the selected object group. This option is useful on a group of object that contains one or more blending modes other than the Normal mode. When enabled, the group of objects is rendered as an isolated layer and then composited with the backdrop. When disabled, the objects inside the group are composited individually with the backdrop.
 - Set the knockout mode of the selected object group. The knockout mode determines the backdrop of the objects in a group. This may have three states: disabled, inherited or enabled. When set to the inherited mode, the group uses the parent groups knockout mode. When set to disabled mode, the objects are composited inside the group into a common backdrop. When enabled, each object is composited separately with the backdrop, without considering the other objects inside the group that may fall under the object.
 - Enable or disable the use of the transparency mask as a shape. When enabled, the transparency mask is combined with the shape of the object and the resulting shape is composited with the backdrop without transparency.
Transparency Menu
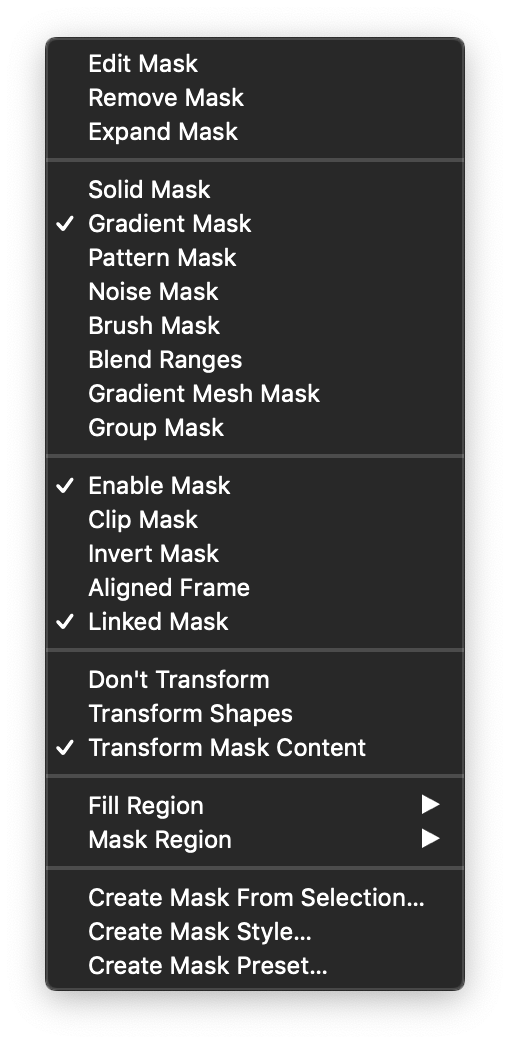
The Transparency panel menu contains additional commands and options to control how transparency masks are used in objects, and to assist with the creation and editing of transparency mask types.
The transparency panel menu.
The following commands and options are accessible from the panel menu:
- Edit Mask - Open the editor of the current transparency mask type. This can be a modal view for gradient, pattern and noise transparency types, or the isolated editing mode for a transparency group mask. This command is equivalent of double clicking on the mask preview area in the panel.
- Remove Mask - Remove the transparency mask from the selected objects, but it will leave the opacity and blending modes intact.
- Expand Mask - Expand the transparency mask style or reference into a local mask. When a style is used to set the transparency mask (or its content group), the changes to the style will automatically reflect on the objects using that style. To detach the transparency style of an object, use the Expand Mask command.
- Solid Mask - Select a solid transparency mask, by opening the color selector view to set the solid color tone for the mask.
- Gradient Mask - Select a gradient transparency mask, by opening the gradient selector view to set up a mask gradient.
- Pattern Mask - Select a tiling pattern transparency mask, by opening the pattern selector view to set up a mask pattern.
- Noise Mask - Select a noise transparency mask, by opening the noise selector view to set up a mask noise.
- Gradient Mesh Mask - Create a mesh gradient as a transparency mask, and activate the transparency mesh gradient editing mode to create or select the mesh nodes and to set opacity values at the mesh nodes.
- Brush Mask - Select a brush style as a mask content, suitable to mask outlines.
- Blend Ranges - Select blend ranges from the source image to generate a mask.
- Group Mask - Create a new object group for a transparency mask, and enter into isolated mode to draw and edit objects inside this group.
- Enable Mask - Enable or disable the transparency mask. This option can be used to quickly show or hide the transparency mask on an object, without removing it completely.
- Clip Mask - Enable or disable the clipping mode of the transparency mask. When enabled, the regions of the object outside of a transparency mask are fully transparent (clipped to the mask). When disabled, the regions of the object not covered by the transparency mask will be opaque.
- Invert Mask - Enable or disable the mask inversion. When enabled, the transparency mask is inverted before it is used to combine the object with the backdrop. This option can be used to control how a transparency group is applied as a mask.
- Linked Mask - Enable or disable the relative mask position mode. This option is useful when the transparency mask is defined by a group of objects. When enabled, the transparency group position is moved with the object. When disabled, the transparency group remains at its position when the object is moved. This option can be used in combination with using transparency groups that are object references with the Transparency Content role. When disabled, multiple objects can have the same exactly overlapping transparency mask, enabling the easy creation of complex artwork effects.
- Don’t Transform - Disable the transparency group transformation. When the object using the transparency is transformed (scaled, rotated or skewed), the transparency group will remain in its original form. This is the default mode, as it enables the precise overlap of transparency group masks between multiple objects.
- Transform Shape - Enable the transformation of shapes inside a transparency group, according to the object transformations.
- Transform Mask Content - Enable the transformation of the transparency group, according to the object transformations.


