Discovering VectorStyler
This tutorial introduces VectorStyler to illustrators and designers, and briefly browses through some of the more interesting features. VectorStyler is a vector graphics software, with many new features and workflow improvements. Covering all the aspects of VectorStyler in a single tutorial would be an impossible task. VectorStyler is different from other drawing applications in both its basic functionality, but also in the details of more advanced tools, and the depth of its new tools.
Some of the basic aspects of VectorStyler are considered here, focusing on the new user, and mentioning features that are both interesting and different from the tools designers are familiar with. More detailed tutorials will address these new or improved features later. The feature descriptions page contains a brief enumeration of those new or improved features.
When launched, VectorStyler opens with an empty main window, without creating or opening any document. In the initial configuration, a number of panels are opened and docked into the application window.
A new document can be created by pressing Command+N or selecting File - New Document. An existing document can be opened by pressing Command+O or selecting File - Open, or by dropping the file into the empty application window (including support for drag&drop opening of AI files).
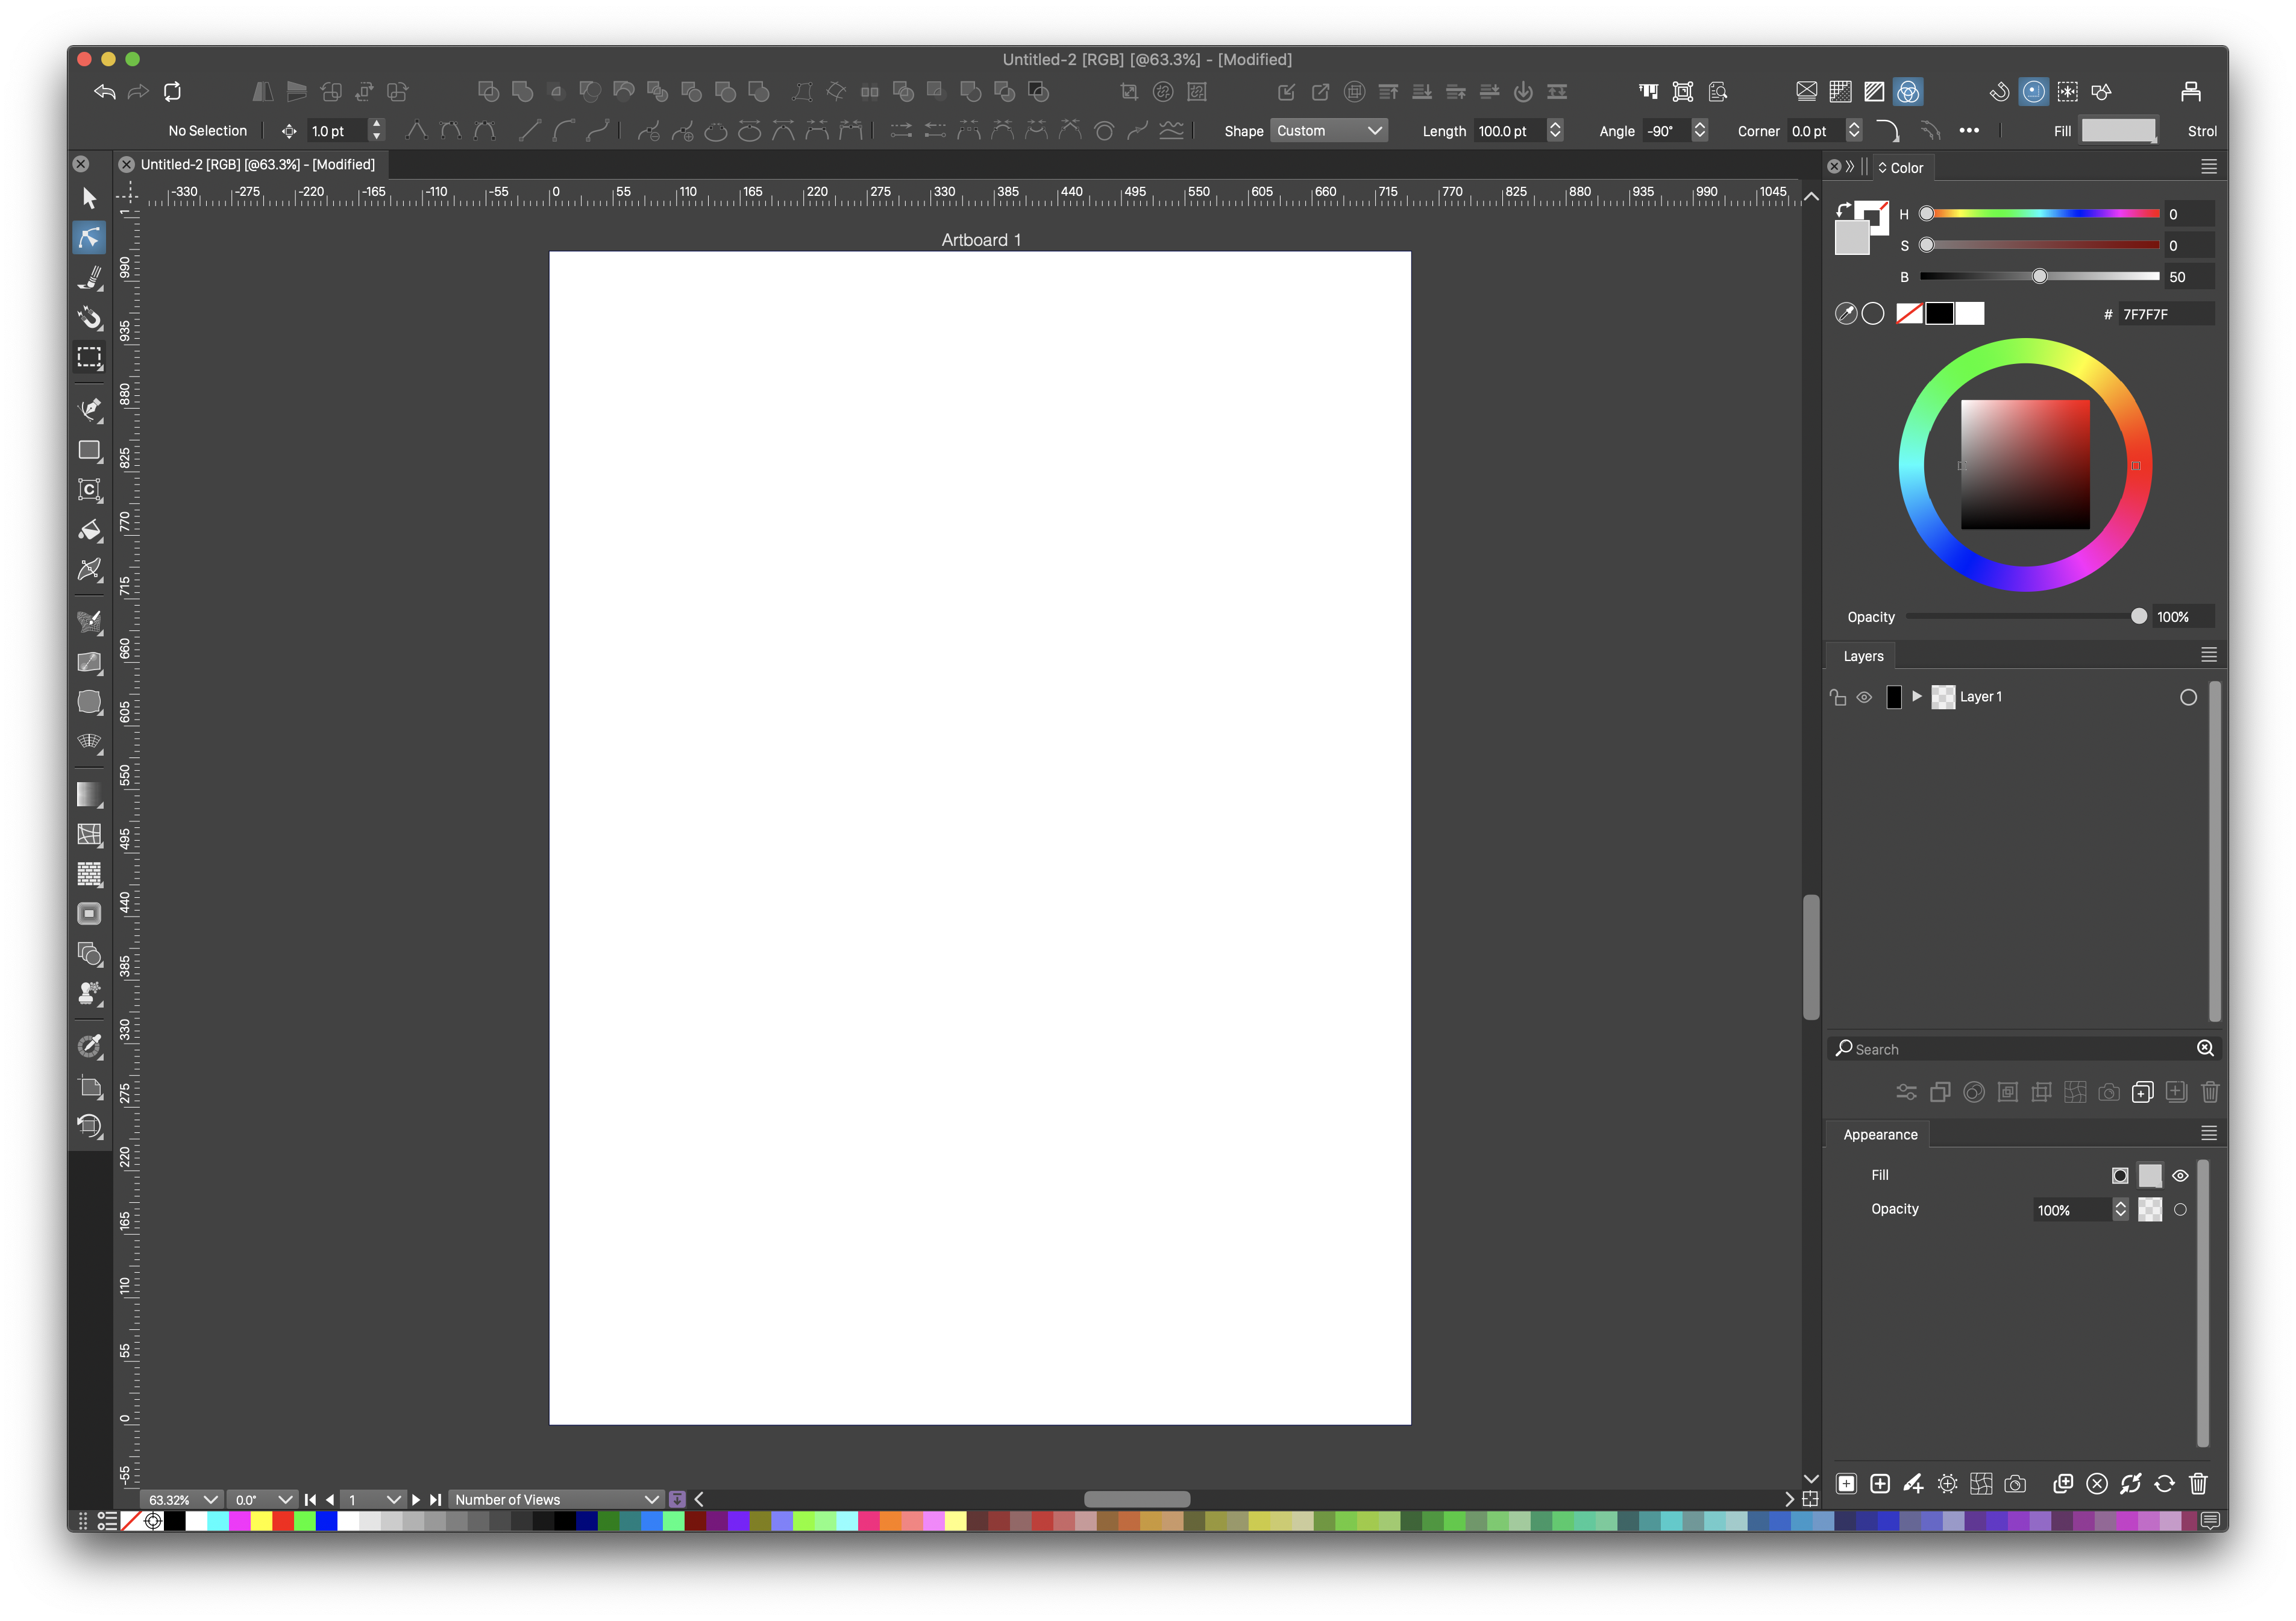
VectorStyler with a new document and initial panels.
The application toolbox, found on the left-side, contains most (but not all) of the tools used to interactively create and edit an illustration. Some of the tools are activated from panels specific to the tool (like shape or image effect editor tools). The features and tools available in VectorStyler are accessed from the application menu, toolbox or from the various panels available under the Panels menu.
Panels can be opened and positioned freely around the screen, or docked at the left or right margin of the document window. Panels can also be grouped into a single panel window, with one panel active at a time. Some panels can also be docked horizontally on the top or bottom of the application window.

The contextual tool bar shows a customizable set of actions (upper row), and a set of context dependent properties (lower row).
A set of context dependent, commonly used properties and actions are available in the Context panel or the Properties panel opened from the Window menu.
The Document View
The bottom section of the document view contains several quick access tools, to assist with the viewing and managing of the document.
- The color palette bar shows the color palette stored in the document. The palette can be extended into multiple rows (right corner), or docked at the four sides of the document view.
- The zooming amount field (leftmost) can be used to set a specific zooming value, or to select from predefined zoom levels.
- The document view rotation field can be used to set a specific rotation amount for the document view.
- The artboard navigation field is used to directly jump to a specific artboard.
- A brief info about the current selection is shown in the info field.
- The quick save button
 is used to save the document, and it indicates the level of unsaved changes by turning to a red color as the document is edited.
Rotating the View
In VectorStyler, the document view can be rotated to any angle. This can be done in three ways:
- using the
 from the application toolbox,
 - the Command+{ and Command+} keys, or
- the rotation field at the bottom section of the view. The document view can also be rotated and zoomed using touchpad gestures.
Rotating the view is used not just to look at the illustration from a different angle, but also to provide a default input for many of the drawing and other tools available in VectorStyler. Some of the input adjustments done by rotating the view are:
- Rectangles, ellipses and other shapes are drawn at the rotation angle, resulting in rotated shapes.
- Object alignment and smart guides take into account the view rotation, when positioning objects.
- The gradient mesh grid will split the object shape, considering the current view rotation angle.
- Text input ids done at the rotation angle, resulting in a rotated text.
- Object nudging (moving using the arrow keys) is done considering the view rotation angle.
- Pasting and importing vector art is done at the rotation angle.
Guidelines and Collisions
The easiest (and well known) method to create a guideline is drag and drop from the document ruler. This creates a single horizontal or vertical guideline. Guidelines can also be created using the Canvas - Create Guidelines command, or using the Window - Editing - Guidelines panel.
In VectorStyler, guidelines can be rotated to any angle, and rotated guidelines work as regular guidelines when snapping objects. To rotate a guideline, hover the mouse over the guideline close to the view margin. The cursor should indicate guideline rotation (instead of movement). Press and drag the mouse to rotate the guideline around its current position. Guideline angles can also be set numerically in the Guidelines panel, found at Window - Editing - Guidelines.
VectorStyler provides the following object guiding options:
- Multiple grids per artboard and over a canvas. Grids can be point or line, and can be limited to horizontal or vertical direction. A grid can be rotated to any angle.
- Multiple guideline groups, each with a separate color, visibility and activation options. Guideline groups can be created and managed in the Guidelines panel.
- Snapping to other object boundaries (also known as smart guides) takes into account the viewing angle as well.
- When rotating objects, the rotation angle snaps to the active guideline angles.
- When resizing objects, the object size snaps to selected object sizes (set by Object - Size Reference).
- Collision snapping mode positions objects by detecting collisions between arbitrary shapes.
- Formation snapping mode positions objects at geometric formations.
Shape Corners
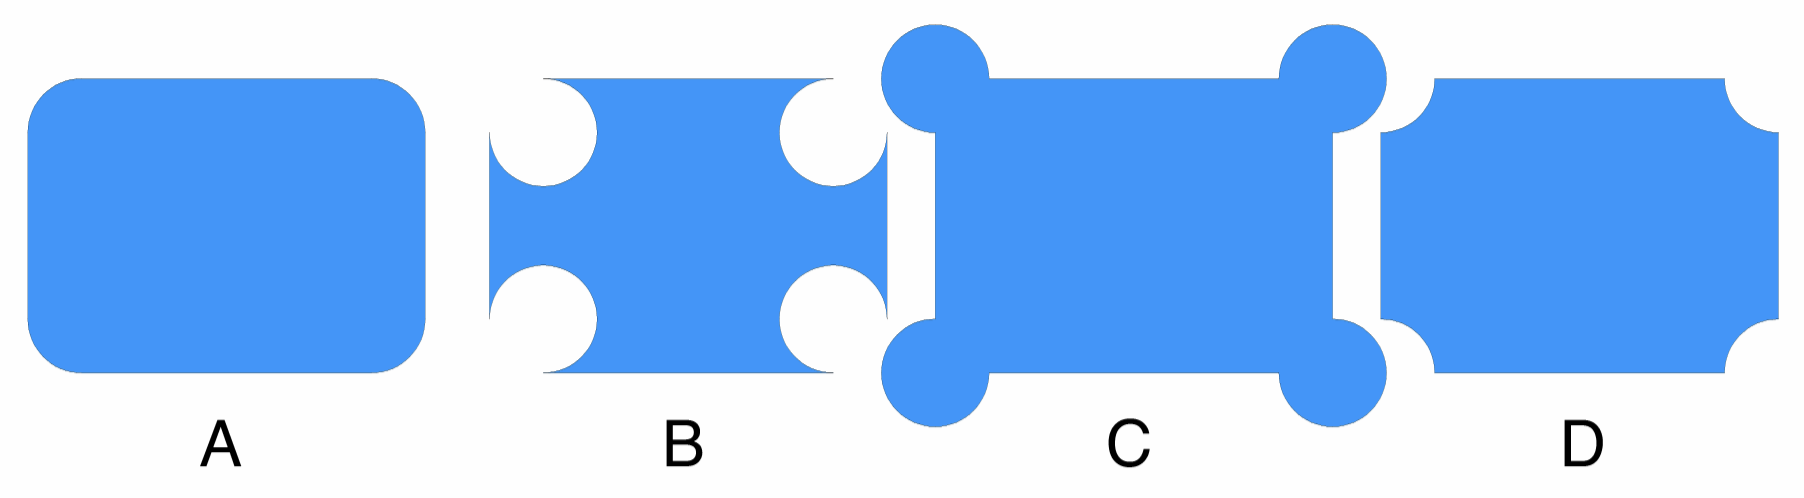
(A) normal round corner, (B) inverted round corner, (C) reverse round corner, (C) inverted reverse round corner.
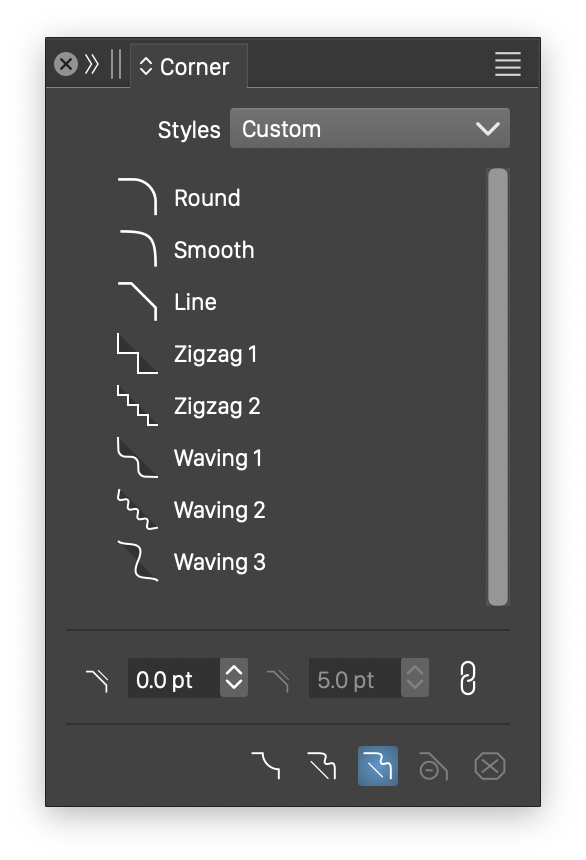
The Corner panel.
The Corner  tool, from the application toolbox, is used to adjust corner sizes, at sharp corners of a shape. Corners are round by default, and in VectorStyler corners can be of any shape.
The Corner panel is used to select the corner shape, size and other attributes. Custom corner shapes can be created from any object shape, using the Styles - Create Styles - Create Corner Shape Style or Create Corner Shape Preset commands. Corner shapes created by the user will show up in the Corner panel, next to the predefined shapes.
The corner options include inverting and reversing the corner direction, controlling the direction, and the region of the corner shape added to the object shape.
The Corner tool can be enabled also when the Pointer  or the Node
  tool is active, by enabling the Edit Corners in Transform Tool or Edit Corners in Node Tool options in the Changing section of the Preferences command.
Pencil and Brush tools
The Pencil  and Brush
  tools are used to draw shapes, styled with stroke (Pencil tool) or vector brush (Brush tool) styles. The normal pencil and brush tools will ignore the pressure input when tablets are used, enabling the creation of uniform width stroke and brush outlines.
The Pencil and Brush tools can use the pressure input from tablets to create a variable width profile for the stroke or brush outline. The pencil and rbush tool pressure modes are selected from the context panel.
The pencil and brush tool options include various stroke stabilization schemes, using averaging or rope tracking. Double click on the tool icons, to select the available stabilization modes and options. For example: using the rope stabilization mechanism, the shapes painted with the pencil or brush tools will become smoother.
Object Styling and Masking
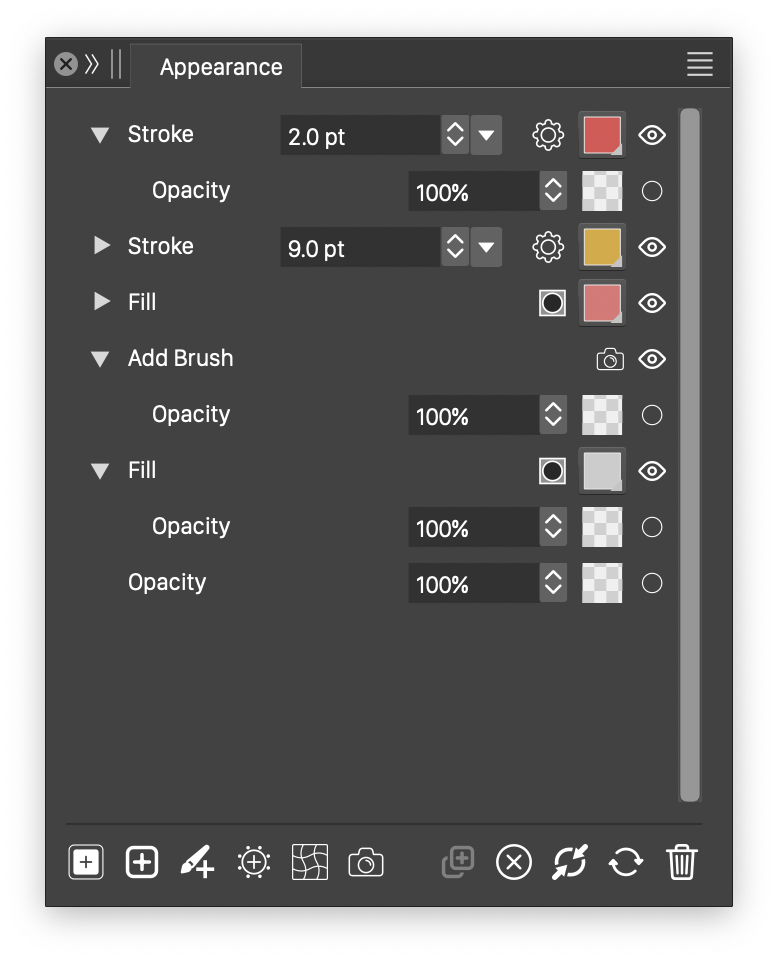
The Appearance panel.
An object with a shape may contain multiple fill and stroke styles. Fill and stroke styles are drawn in the order of appearance. The appearance order can be rearranged in the Appearance panel. New fill, stroke and brush styles can be added to the selected object. Brush style options can also be adjusted in the Appearance panel.
When multiple objects are selected, the Appearance panel shows a merged list of styles from these objects. Each style item of this list contains an actual style from one of the objects to facilitate quick editing and change.
Individual fill, stroke and brush styles can also contain image or shape effects. For example: a stroke style may contain a Gaussian blur to smooth out edges. Shape effects can be used to alter the object shape when drawing a specific style.
Multiple fill and stroke styles can also be assigned to a selected set of characters, in both text shapes and text flows.
Gradient Shapes
Gradient shapes can be customized, and freely adjusted using the Gradient Shape tool (grouped with the Gradient tool in the application toolbox). New gradient shapes can be defined using any object shape. For linear and concentric gradients, use open shapes to define new gradient shape types. For concentric gradients, use closed shapes to define new types. User defined gradient shape types are shown in the gradient type list of the Gradient panel.

Using shapes in linear (A. B), concentric (C, D, E) and conical gradients (F).
Symbols, Styles and Presets
A symbol can be defined from any object or group of objects. The list of available symbols are managed in the Symbols panel. A symbol can be reused in the document (by drag&drop from the symbols panel), or inserted into a text flow as a character. Symbol instances may contain additional shape or image effects, modifying the symbol appearance. Styles used in symbols (shapes, colors, fills, outlines, transparency, effects, and others) can be redefined in symbol instances using the Overrides panel.
In VectorStyler, object styles and other attributes can be organized into styles or presets. Any attribute of an object, including its shape, color, fill or stroke style, opacity and transparency options, image or shape effects, can be saved and reused as a style or as a preset.
When applying styles on objects, the objects will store a link to the style (instead of copying the attribute). For example: applying a gradient style will store a link to the gradient style in the object, instead of copying the gradient style definition. This results in dynamic links between objects and used styles. When a style is modified, edited in the Styles panel, or overwritten by other style, all objects using that style are automatically updated.
Using styles enables a more structured workflow of creating and modifying complex designs. Objects with similar attributes (shape, color, gradient, pattern, effects) can use the same style. Styles can be modified in a single place (the Styles panel), and all objects are updated automatically. Styles can be used to enable the customization of symbol instances. If objects in a symbol use style definitions, these styles will show up in the Overrides panel and can be edited. The changes made in the Overrides panel are applied only to the selected objects, other instances of the same symbol can be shown with their original (or customized) styles.
When using presets, the attribute of the object is copied, and changes to the preset are not reflected on the objects using that preset. Presets are similar to the concept of swatches in other applications, with the difference that presets are organized by type (color, gradient, pattern, shape, etc).
It is important to note, that a color palette (including the main color palette stored with the document), can only contain colors. This is different from some other applications, where the swatches may contain different fill styles. Presets should be used in VectorStyler for swatches like functionality.
Object References and Roles.
Object references and object roles are a new features introduced by VectorStyler, to improve working with symbols and styles. In typical workflows, when a symbol or a style is created, it is stored in an internal place (swatches or symbols list) of the document, and it is not easily accessible for editing. VectorStyler simplifies this, by providing direct editing access to symbols, styles and presets from the respective panels.
To further reduce the complexity of working with symbols and styles, VectorStyler introduces the concept of object roles, used to quickly define a symbol or a style from an object.
When an object (with a name) is assigned a role, it will act as a style or symbol definition, and the object name will show up in the various style or symbol lists throughout the user interface.
For example: a new color style can be defined by assigning a name to an object, and selecting the Color Style role for the object (with the Objects - Object Option command). The new color style, with the name from the object, will show up in the list of styles. Modifying the object color, using the regular color selection tools, will automatically update the style and all uses of that style.
Working with symbols is simplified when using object references. Assigning a name to an object (or typically a group of objects in case of a symbol), and selecting the Symbol role, will define a new symbol with content mirroring the object. The object defining the symbol remains readily editable, using the typical editing tools available in VectorStyler. Whenever the object is modified, all symbol instances are updated automatically.
The Bend Effect
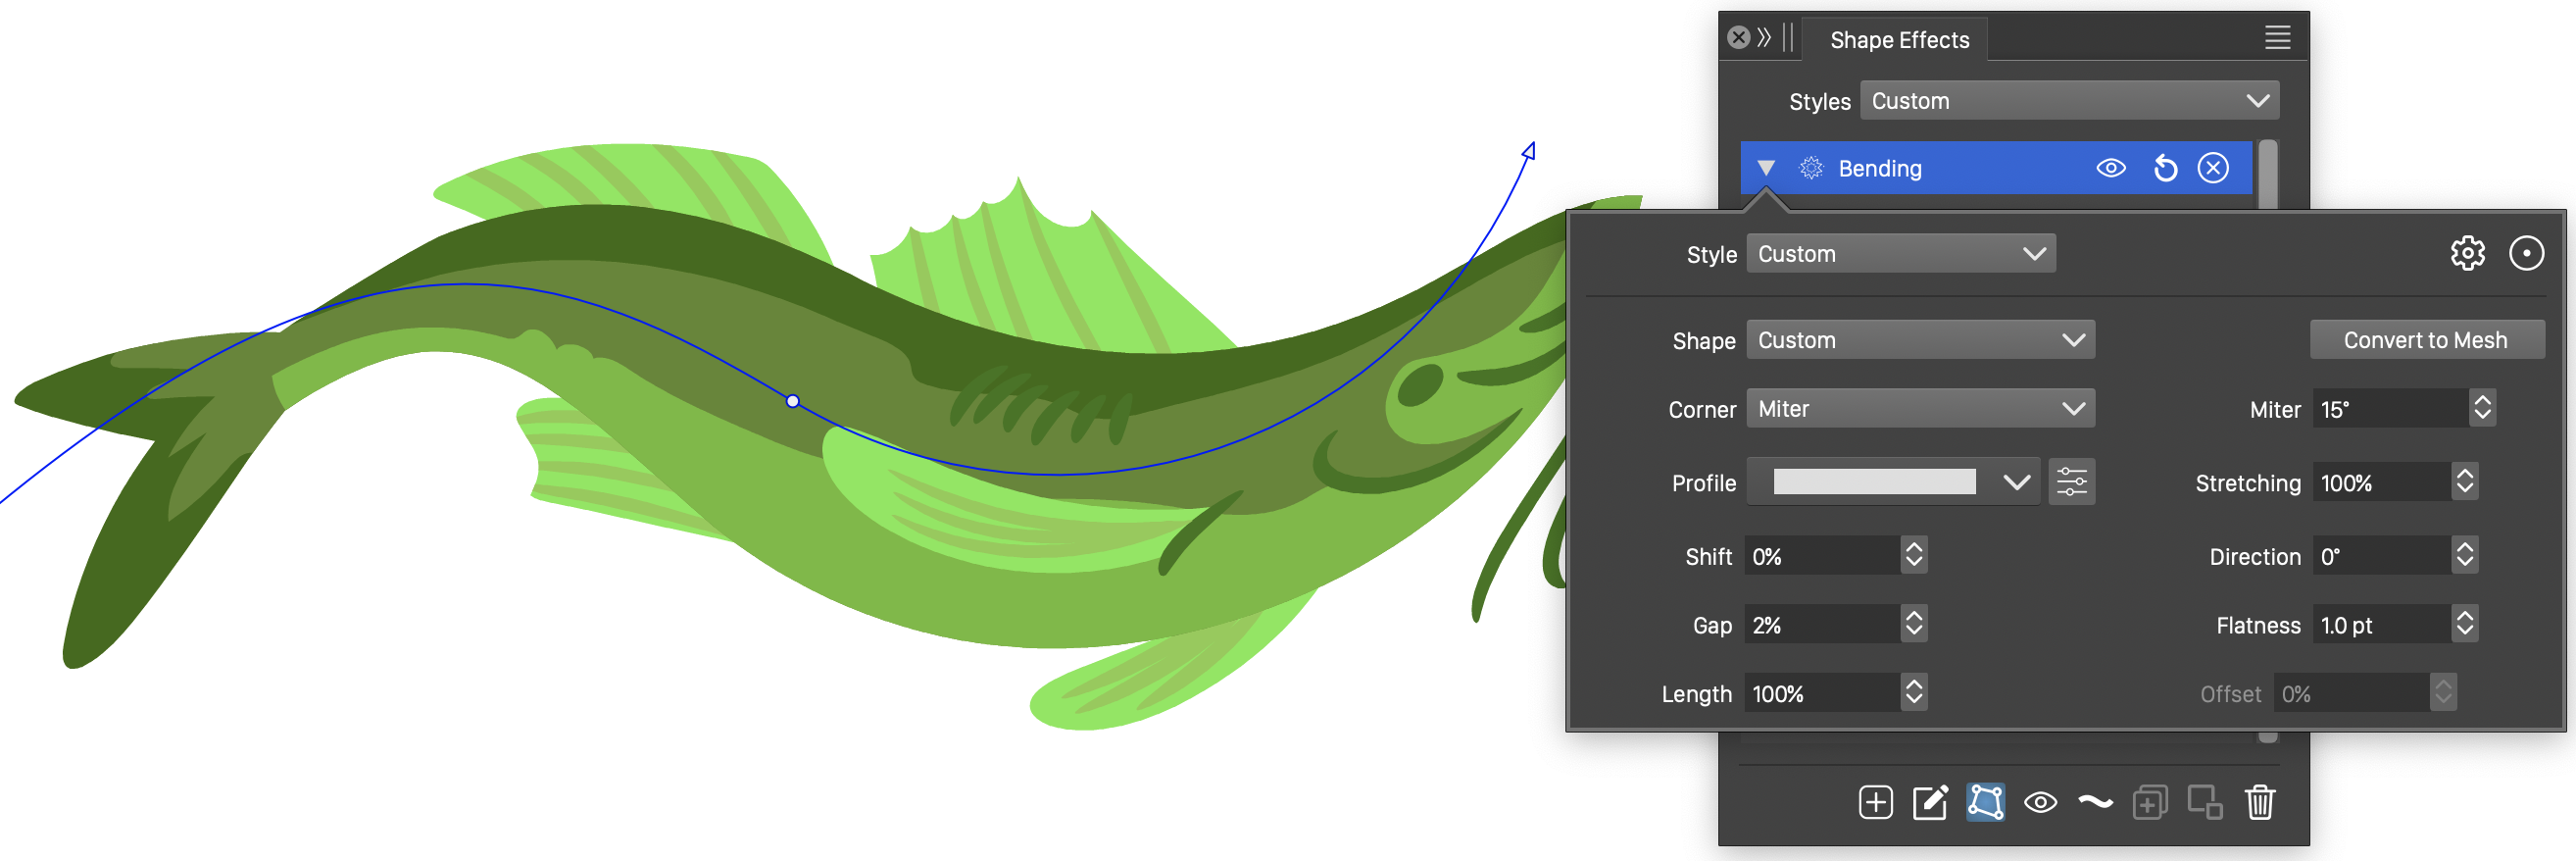
Bending objects along a shape.
VectorStyler introduces many new shape distortion effects, that can be used to modify shapes of objects in a group. One of these new distortion effect is the bend distortion, used to stretch a group of objects along a shape.
The bending distortion effect can be selected from the Shape Effects panel, or from the Effect menu Shape Effects section. The shape of the distortion can be edited interactively, using the shape effect tool  from the Shape Effects panel.
The bending distortion can also use a variable width profile, to control the width of the distorted object along the shape. The variable width profile of the distortion can be edited interactively, using the effect parameter tool  from the Shape Effects panel.
Custom Stroke Caps and Arrows
Custom arrow shapes can be created from any object shape, using the Styles - Create Styles - Create Arrow Style or Create Arrow Preset commands. When creating an arrow style (but not for a preset), it is possible to link the new arrow style to the object shape. When an arrow shape is linked to an object shape, modifying the object shape (with the shape editing tools) will automatically update all arrow instances in the document.
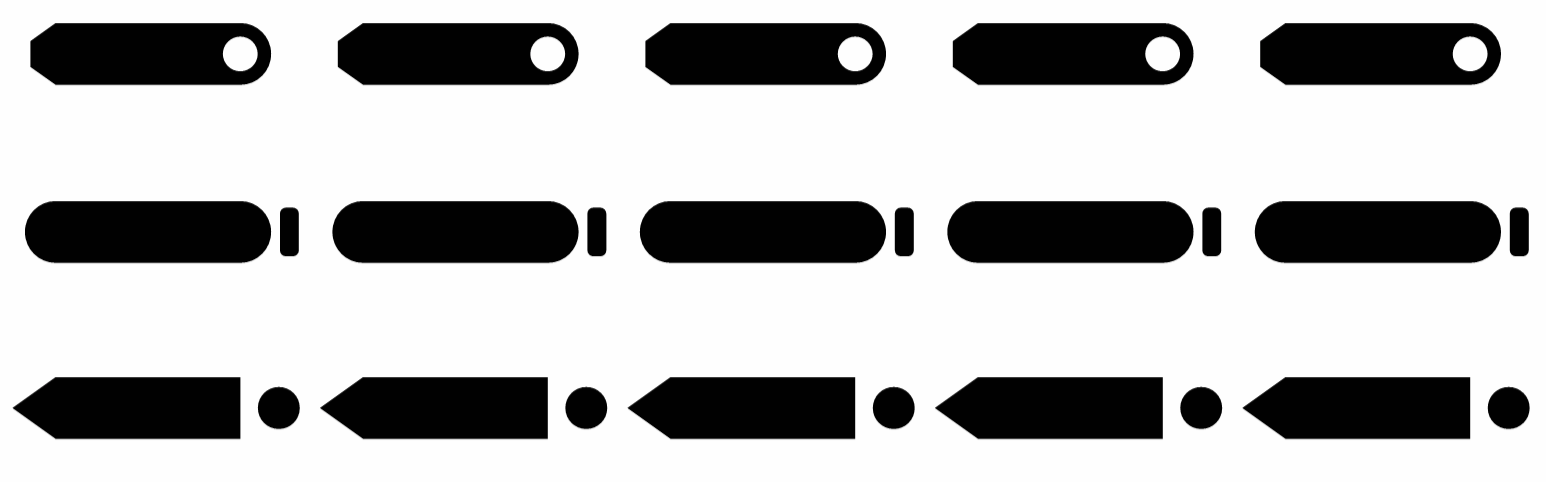
Various predefined stroke cap styles.
The stroke cap shape can also be customized. Stroke caps are used to close the end of open or dashed stroke shapes. Traditionally, the stroke cap could only be selected from three fixed cap types. In VectorStyler, any object shape can be used to define a new stroke cap shape. This includes objects containing composite shapes (as shown in the example above).
Path Offset
The shape of an object can be offset to a distance from the original, both as a shape effect or as a stroke attribute. When using stroke attributes, the distance of the stroke center from the outline can be set in absolute, or relative (to the stroke width) amounts in the Stroke panel.
The Offset Path effect (Shape Effects panel) is a shape distortion effect that creates an offset of the object shape, without destroying the original shape. The original object shape remains editable, and all changes on the original shape are reflected on the offset shape.
The path offset can use variable width profiles, to set different offsetting amounts at different locations along the shape. The shape effect tool from the Shape Effects panel, can be used to interactively edit the offsetting distance, and to interactively set different distances at different locations along the shape.
Align Objects Along a Path
The Alignment panel contains several object alignment options. These include the traditional align and distribute, but also aligning object sizes, and aligning objects along a path.
The size of selected objects can be aligned (horizontally or vertically) to the smallest, largest, medium or the key object size. This alignment option provides a quick resizing step for multiple objects.
Aligning objects along a path can be done by selecting the objects, selecting the path to align to (the key object is the last selected), and selecting the align to path option from the panel. The aligned objects can be positioned interactively along the path, using the align tool  from the panel.
Image Tracing
Images (photographs or bitmap images) imported into a VectorStyler document can be converted to vector objects using the Image Trace panel.
An important aspect of the image vectorization feature, is the ability to detect stroke shapes from complex, hand drawn sketches. The various predefined image tracing presets can be used, to select how to convert an image to vector shapes. It is important to note, that some of the predefined image trace presets are specially designed to detect stroke outlines from sketches, and are explicitly set to ignore large, filled areas. To obtain a proper image tracing output, select the preset that best fits the image content.
Multiple Canvases
A VectorStyler document consist of a hierarchy of canvases, where each canvas may contain multiple artboards. A typical vector graphics application uses a single canvas, and multiple artboard of that canvas. In VectorStyler, multiple canvases are used to enable a better workflow in the creation and editing if symbols, icons or various graphics assets.
There are three predefined canvas types, each with a specific role:
- Reference canvases contain symbols or reference objects with styling roles. It is possible to select a common role for all objects on a reference canvas. There can be multiple reference canvases in a single document.
- Template canvases are used to create a default content template for regular canvases, including artboards, layers and objects.
- Regular Canvases contain the main design or artwork of the document. Multiple regular canvases can be used for variations of a single design (using style overrides), or to organize a large number of icons, graphics assets, slices or artboards into multiple groups, for easy overview and access.
For example: when importing native AI files, the artistic brush or tiling pattern definitions are each placed on a separate reference canvas. These brushes and patterns then are used in the objects of the main canvas. This provides a simplified workflow for editing a brush or a pattern content.
The multiple canvases and artboards of a VectorStyler document can be managed using the Canvas & Artboard panel.
Wrapping Up
There are many other new features or enhancements in VectorStyler, mostly focused on making the work of designers and illustrators easier. There will be more detailed tutorials, published on these and the above features. VectorStyler is a new vector graphics application, and there are many new aspects and features that can be discovered over time as it is used. To discover features of VectorStyler, hover over icons, panel or view widgets with the mouse. A short tool tip provides a basic description of the particular tool or widget.


