SVG Effects
The SVG section contains image effects specific for the SVG file format. These image effects are presented in a separate group, with some effects being also present in other groups, in order to easily identify effects that can be exported into SVG files.
Combination of these effects are used to create complex SVG image effects. SVG effect definitions can be imported as presets, and selected from the effects menu to be applied on objects. SVG effect compositions can be imported as regular SVG files, and then saved as image effect presets.
Alternatively, SVG filter compositions can be imported by copying the SVG files into a separate folder, and setting up a user preset group on that folder. Declaring SVG files as presets is described in the introduction of the Image Effects chapter.
These effects are typically applied as part of an imported SVG effect composition, and in some cases are not suitable for individual use. The SVG filter composition can be edited by opening the attribute editor of individual effects in the Image Effects panel.
Color Transform
The Color Transform SVG filter, transforms the colors of the original image using predefined adjustments, or color component weights.
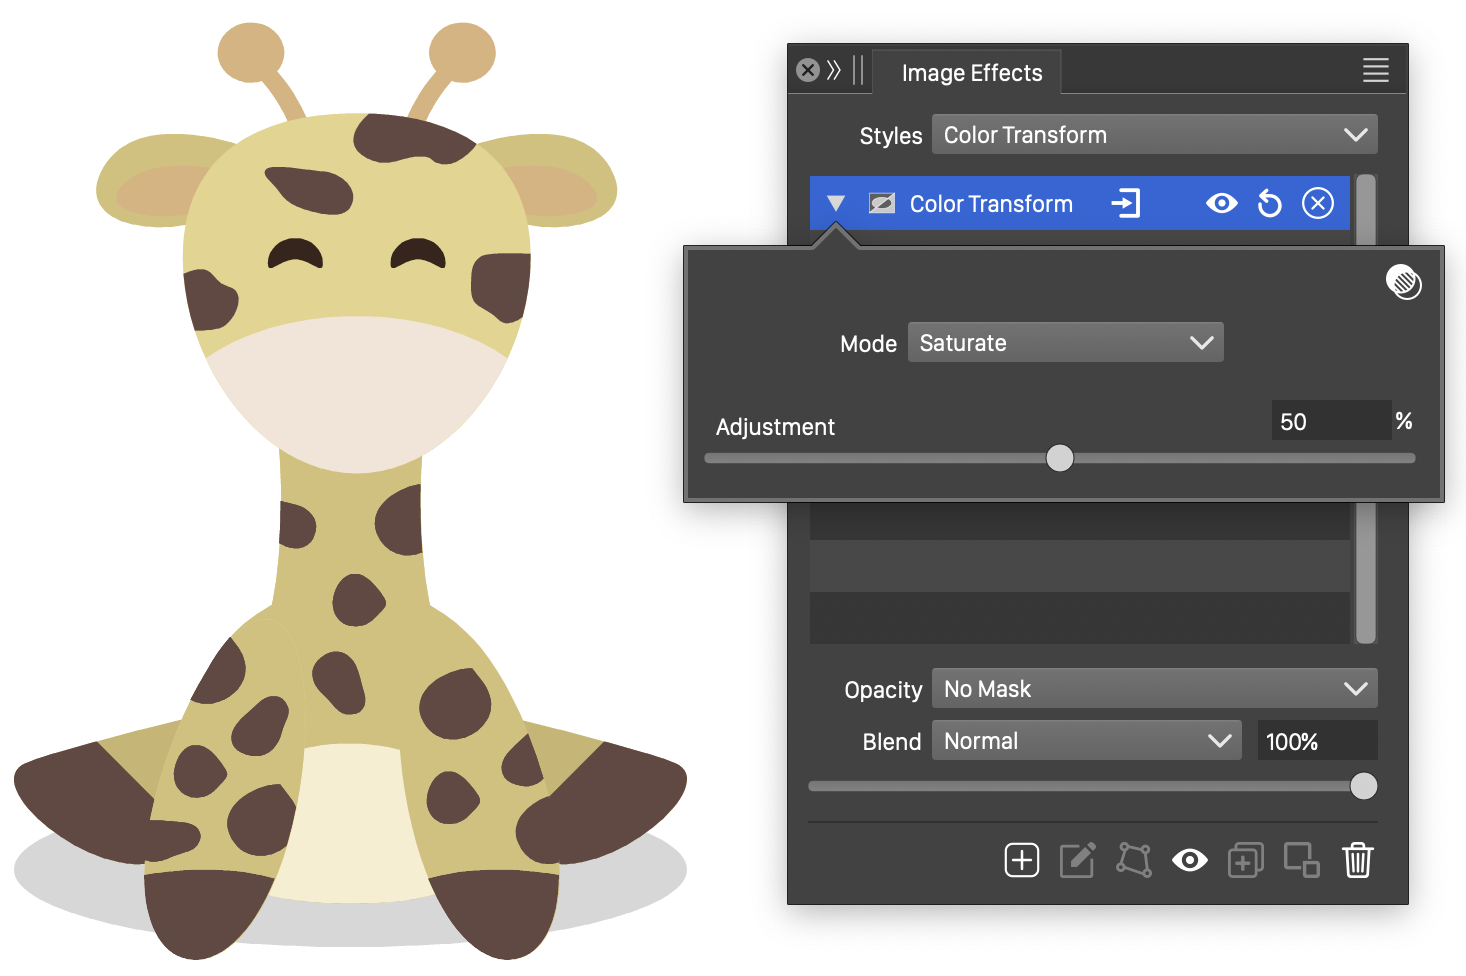
The Color Transform filter and its options.
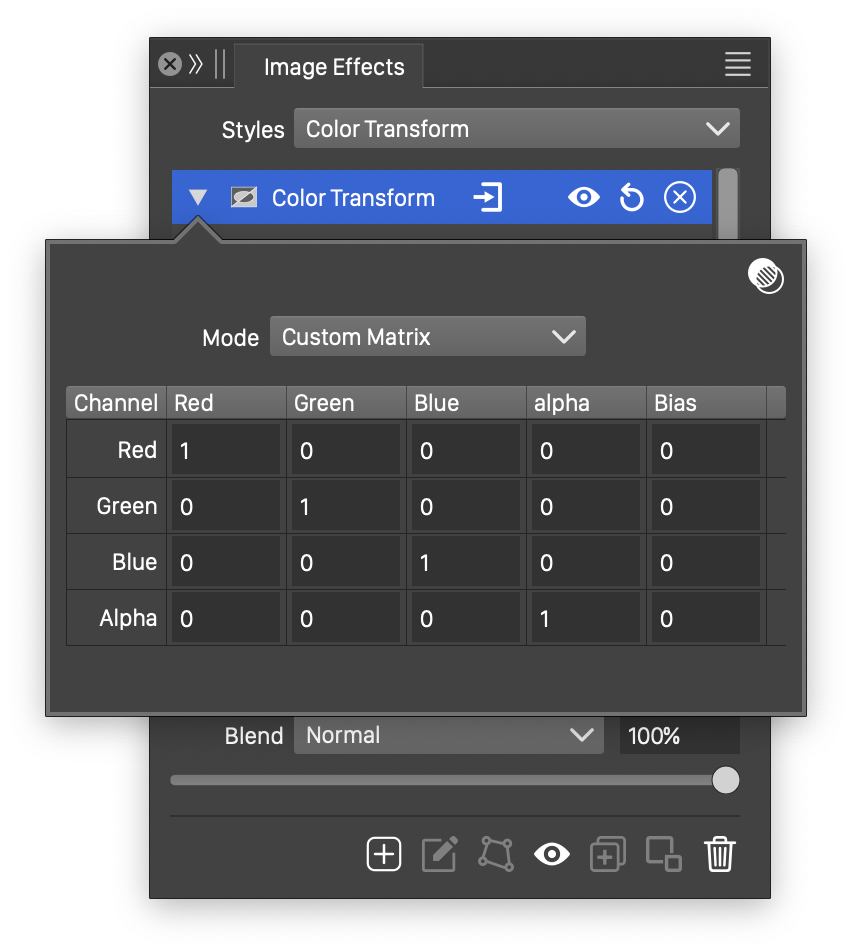
The Color Transform filter with a user defined weight matrix.
The Color Transform image filter uses the following options:
- Mode - Set the color transformation mode. This can be:
- Custom Matrix - Edit a user defined matrix, using weights to map RGBA color components of the input image into RGBA component of the output image.
- Saturate - Adjust the saturation of the colors.
- Rotate Hue - Rotate the hue value of the colors.
- Luminance to Alpha - Map the color luminance to the alpha channel.
- Amount - The amount of saturation or hue rotation.
- For the Custom Matrix color transformation mode, a color weight matrix is shown. The matrix contains weights for each input RGBA and output RGBA value, and a bias for each output component.
Composite Image
The Composite Image SVG effect, combines two input images using an image composition mode.
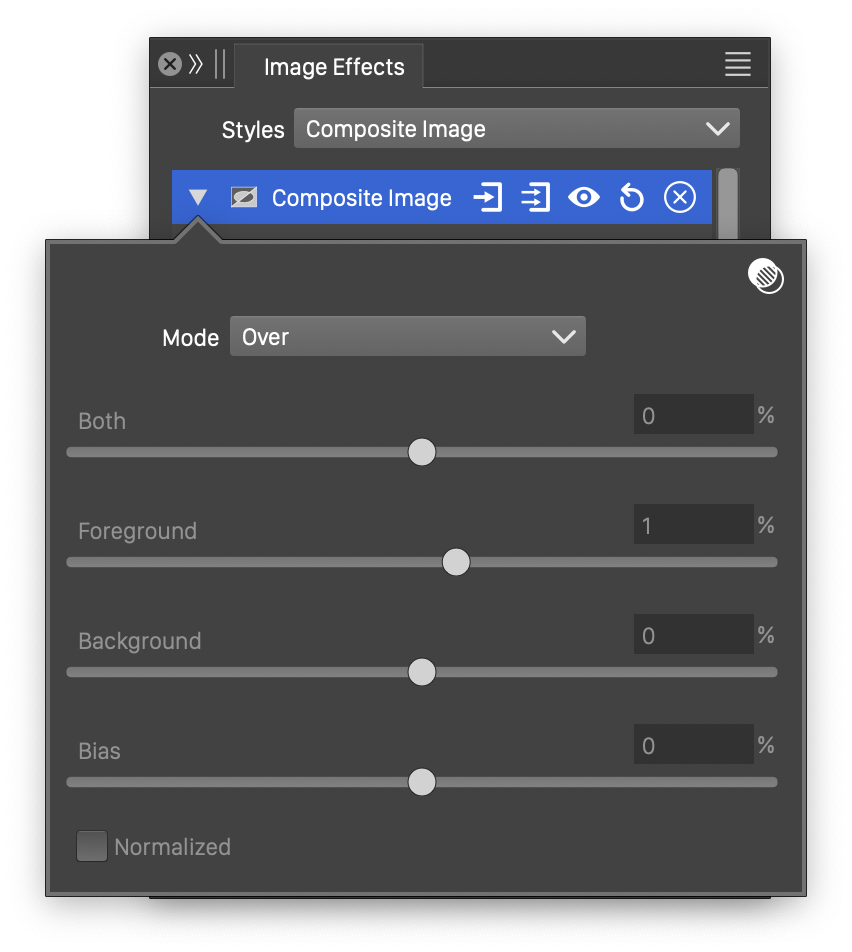
The Composite Image filter with a user defined weight matrix.
The Composite Image image filter uses the following options:
- Mode - Set the image composition mode. This can be:
- Arithmetic - Use multipliers for the two input image colors to produce the output image. In case of the arithmetic composition, the weight are set in the enabled sliders and numeric editors.
- Over - Composite the second image over the first image.
- In - Composite the second image with the combined alpha from the first.
- Out - Composite the second image without the second image.
- ATop - Composite the second image with the first image.
- Xor - Combine the two images using the xor operator. Either one of the inputs are visible, but not both.
- Both - The weight used for the product of the components from both images.
- Foreground - The weight used for the foreground image.
- Background - The weight used for the background image.
- Bias - The shift in the resulting color tone.
- Normalized - Enable or disable the normalization of the resulting color tone, by the sum of the weights.
Curves
The Curves SVG filter, is used to adjust the individual color channels in a color mode, by user defined curves. The adjustment is applied to each color channel separately.
The curve of the adjustment determines how to change a color component. The adjustment curve can be interactively edited by the user, in the curve viewing area.
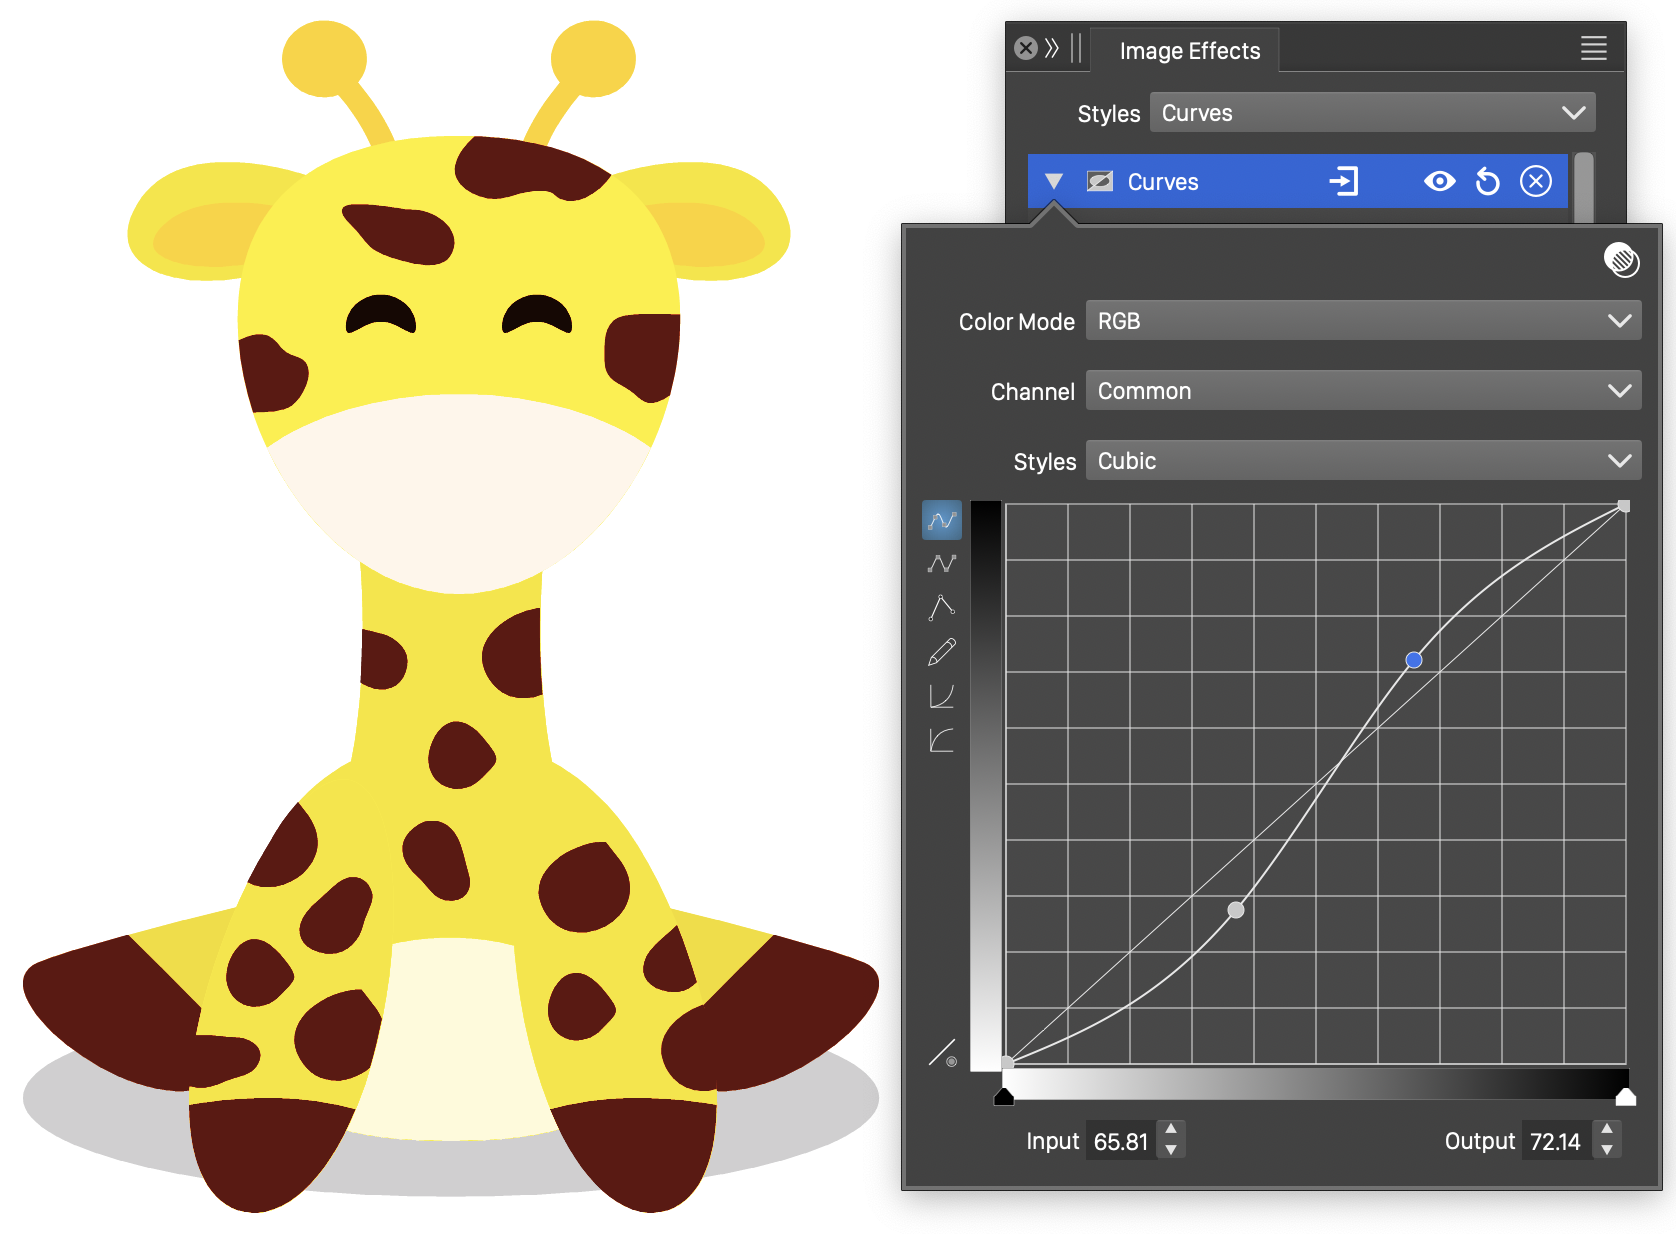
The Curves effect and its options.
- Color Mode - Select the color mode used to make the color component adjustments. Colors of the image are converted into the selected color mode and the adjustments are made on the color channels in this mode.
- Channel - Select the current color channel, to edit the adjustment curve for that channel. Selecting the color mode name will edit an adjustment curve for all channels.
- Styles - Select a function style or preset, used to make the color adjustments. New function styles and presets can be created by saving the current function as a style (Create Style) or as a preset (Create Preset)
- The adjustment curve is edited interactively in the curve preview region, by dragging a location of the curve with the mouse.
- The adjustment curve editing mode can be:
 - Cubic curve, adjusted by modifying a few locations along the curve. Cubic curves may overshoot between two locations.
 - Monotone cubic curve, between locations selected by the user. Monotone cubic curves will not overshot between two locations.
 - Freely drawn curve. This mode allows the drawing of an arbitrary color adjustment curve.
 - Select gamma adjustment curve. Tones are adjusted using a uniform speed of variation.
 - Select reverse gamma adjustment curve. Tones are adjusted using a uniform speed of variation.
 - Restore the edited curve to the identity state.
- The triangular sliders, at the bottom of the adjustment curve region, are used to adjust the input interval of the color channels. Color channel values outside of this interval will not be modified.
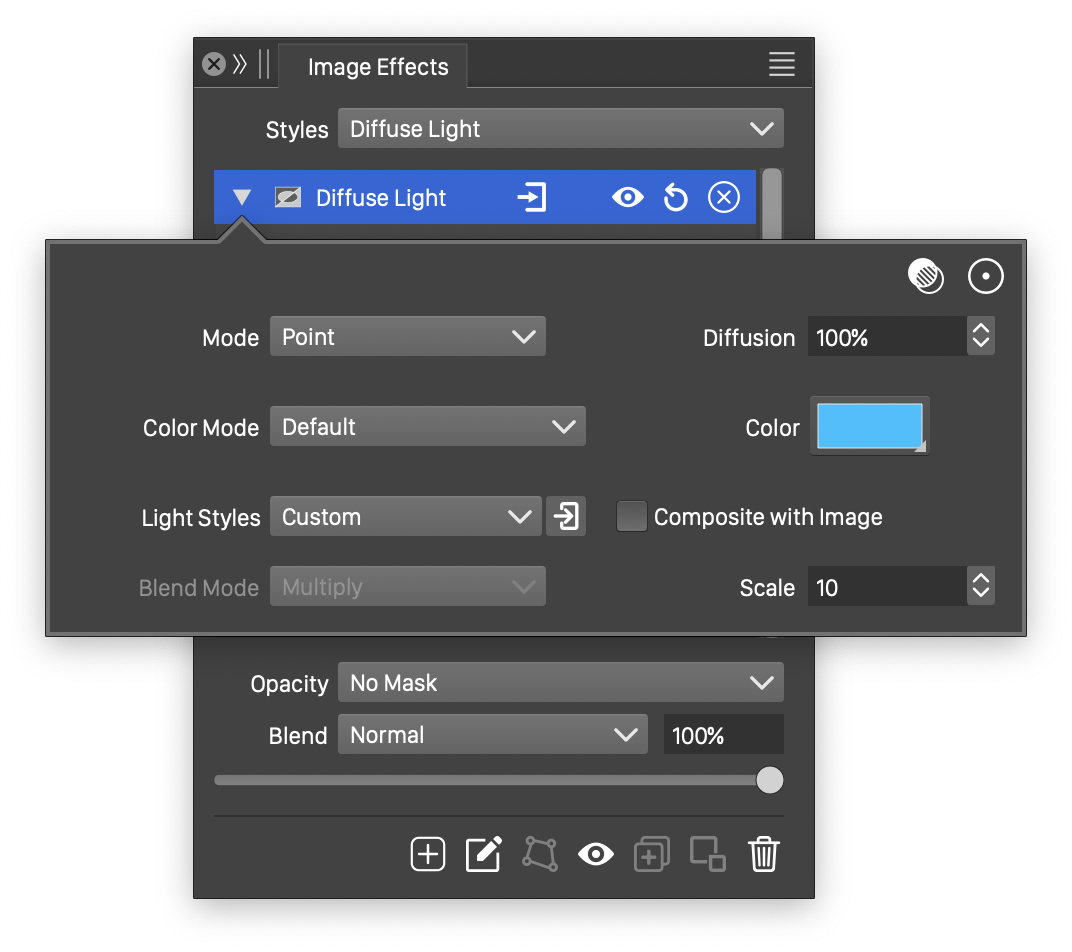
Diffuse Light
The Diffuse Light SVG filter, lights the image using the alpha channel as a bump map, to create relief.
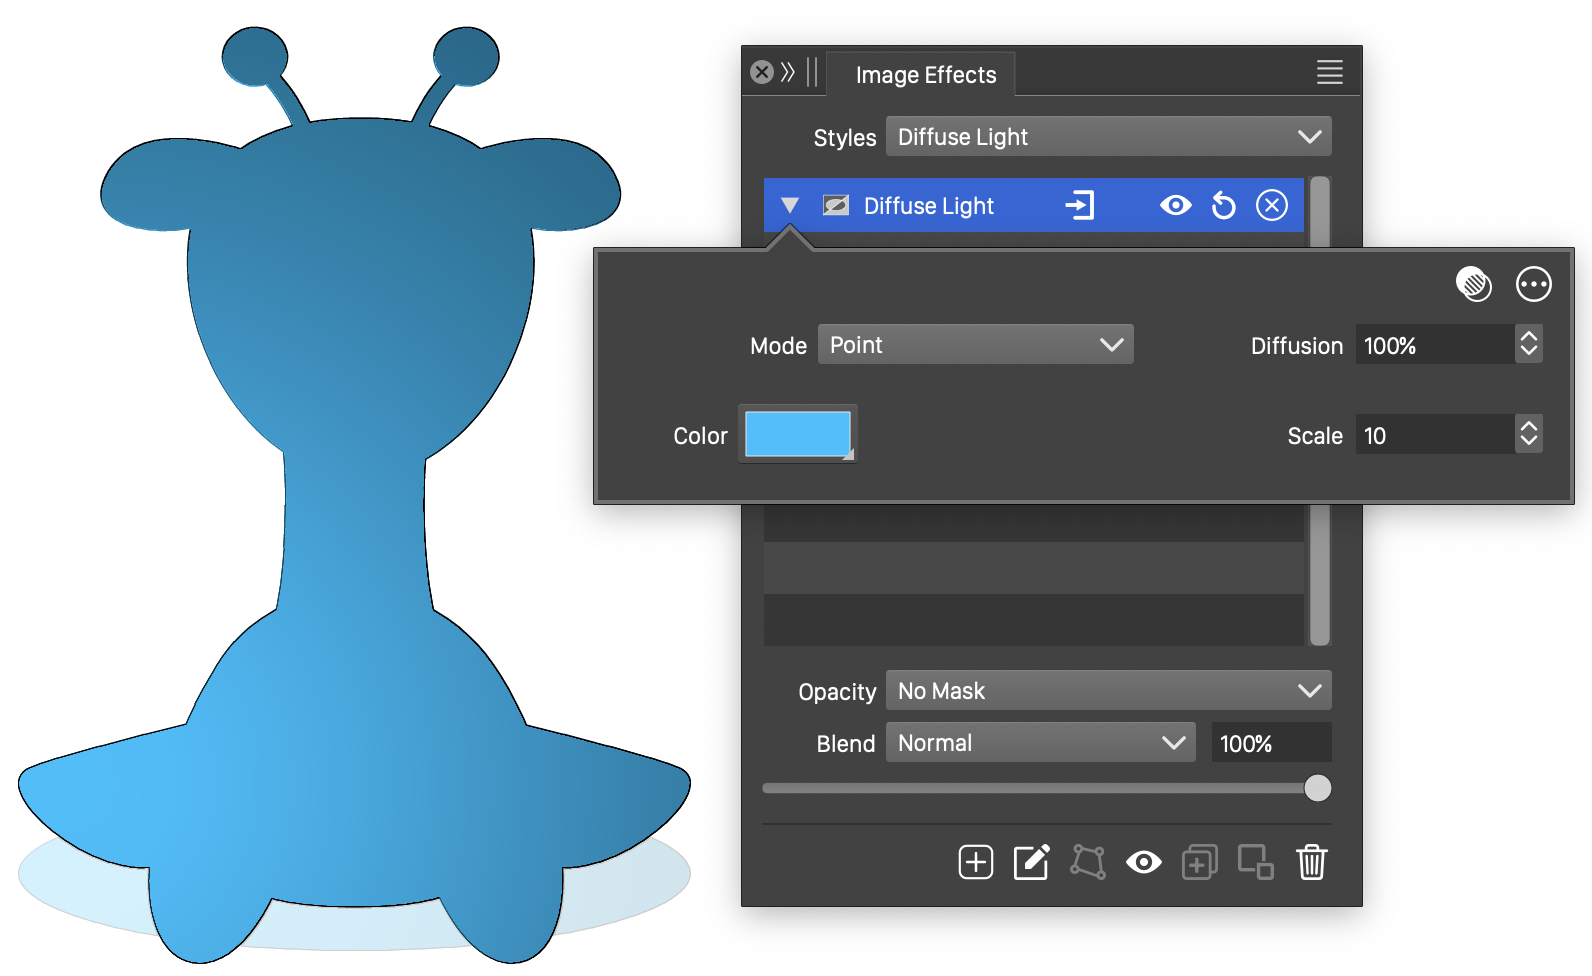
The Diffuse Light filter with basic options.
The Diffuse Light filter with basic options.
The Diffuse Light image filter uses the following basic options:
- Mode - Set the light source mode. This can be:
- Distant - Selects a uniform, distant light source.
- Point - Selects a light source from a specific point.
- Spot - Selects a light source pointing at a specific point, from another point.
- Color - Select the color of the diffuse light.
- Scale - Set the surface scaling amount of the diffuse light.
- Diffusion - The diffusion amount of the light.
The advanced options of the Diffuse Light effect can be accessed, by clicking on the  button.
- Light Styles - Select from the list of previously defined light presets. The light options can be edited by clicking on the
 button. The light options are described below.
 - Color Mode - Select the color mode used to generate the diffuse light effect.
- Blend Mode - Select a blend mode, used to composite the resulting image with the original image. The blend mode can be selected only when the Composite with Image option is enabled.
- Composite with Image - Enable or disable compositing of the diffuse light image with the original image, using a blend mode.
Light Source
The Diffuse Light and Specular Light SVG filters use light source options to create a relief light effect of the input image.
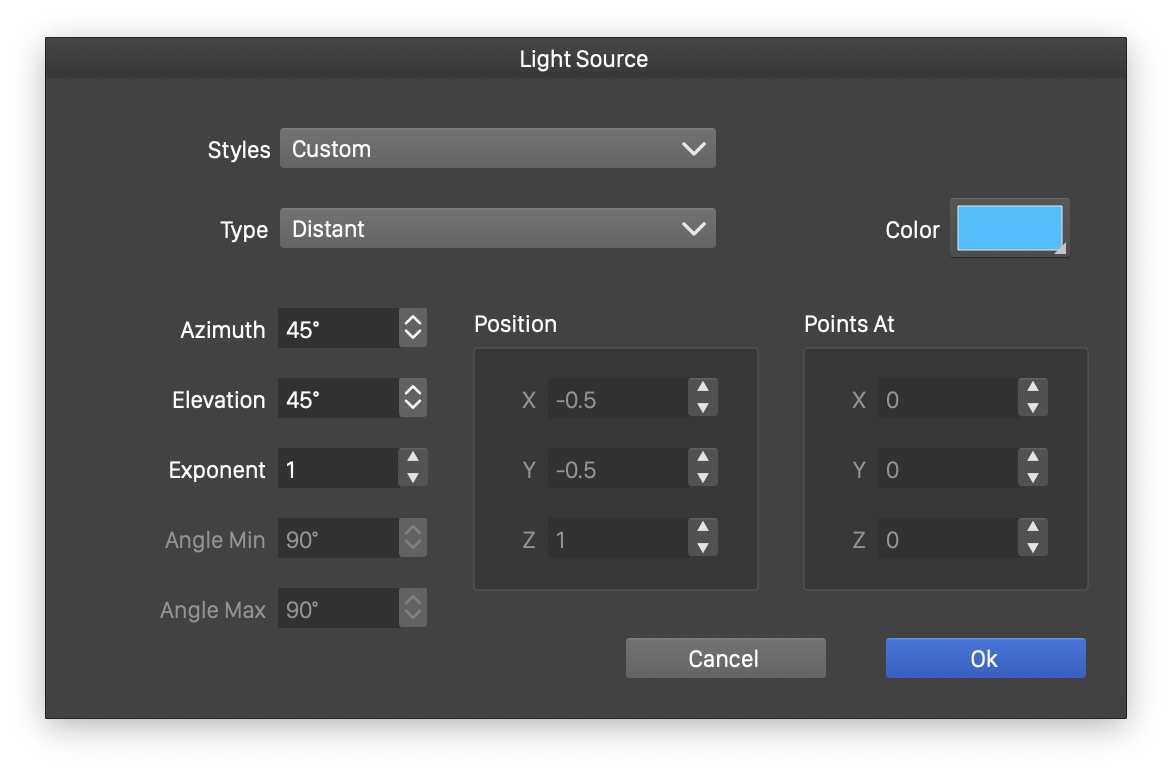
Editing the Light Source options.
The following light source options are available:
- Styles - Select from previously saved light source presets, or create new presets.
- Type - Select the type of the light source. The available light source options depend on the selected type. The following light types are available:
- Distant - Selects a uniform, distant light source.
- Point - Selects a light source from a specific point.
- Spot - Selects a light source pointing at a specific point, from another point.
- Color - Set the color of the light source.
- Azimuth - Set the azimuth of the Distant light source.
- Elevation - Set the elevation of the Distant light source.
- Exponent - Set the strength of variation of the lighting tones.
- Angle Min - Set the minimum angle of the Spot light mode.
- Angle Max - Set the maximum angle of the Spot light mode.
- Positions - Set the position relative to the image extent, of the Point and Spot light sources.
- Points At - Set the location pointed by the Spot light mode, relative to the image extent.
Displacement
The Displacement SVG filter distorts the image by using an other image as a displacement map. The displacement map can be an image output by a previous SVG filter, or can be an image selected as a transparency mask. Two color channels of the displacement map image are extracted and used as horizontal and vertical displacement of the pixel positions in the filtered image.
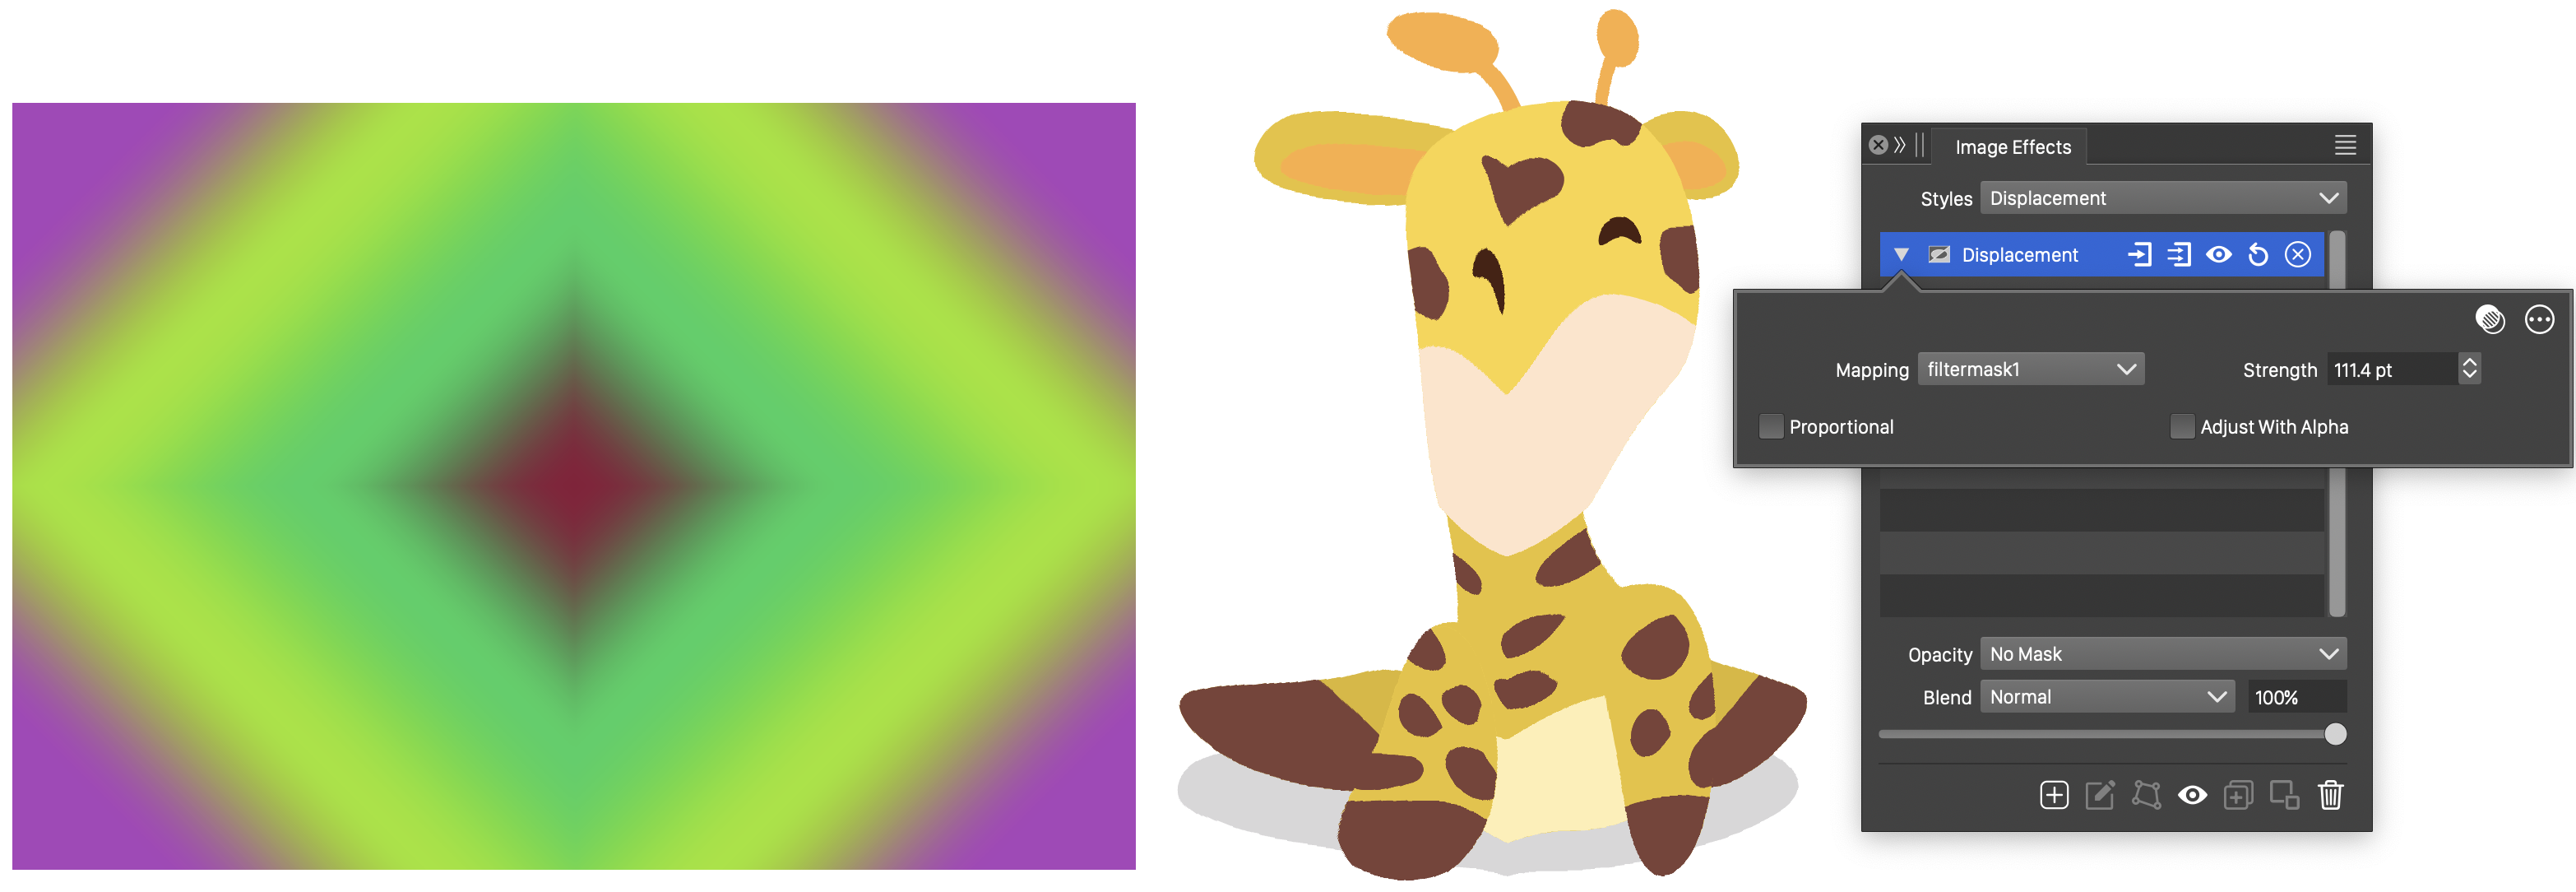
The Displacement filter and its basic options.

The Displacement filter with advanced options.
The Displacement image filter uses the following basic options:
- Mapping - Select a displacement image to be used to transform the filtered image.
- Strength - Set the strength of the displacement.
- Adjust with Alpha - Enable or disable the adjustment of displacement amounts by the alpha channel.
- Exponent - Set the strength of variation of the lighting tones.
- Proportional - Enable or disable the proportional scaling of the displacement map image to the filtered image size.
The advanced options of the displacement effect can be accessed, by clicking on the button.
- Mode - Select a color mode used to render the displacement map image. The color mode determines the color channels available to set the horizontal and vertical displacement.
- Channel X - Select the color channel used for the horizontal displacement.
- Channel Y - Select the color channel used for the vertical displacement.
- Expansion - Adjust the transformed image region expansion relative to the original frame.
- Reverse X - Enable or disable the reversing of the horizontal displacement values.
- Reverse Y - Enable or disable the reversing of the vertical displacement values.
- Polar Mode - Enable or disable the displacement of polar coordinates by the color intensities in the displacement map image.
- Separate Maps - Enable or disable the use of separate images for the horizontal and vertical displacement maps.
Fill with Color
The Fill with Color SVG filter, sets the image content to a uniform color. This SVG filter primitive is used in combination with other filters to create composite SVG effects..
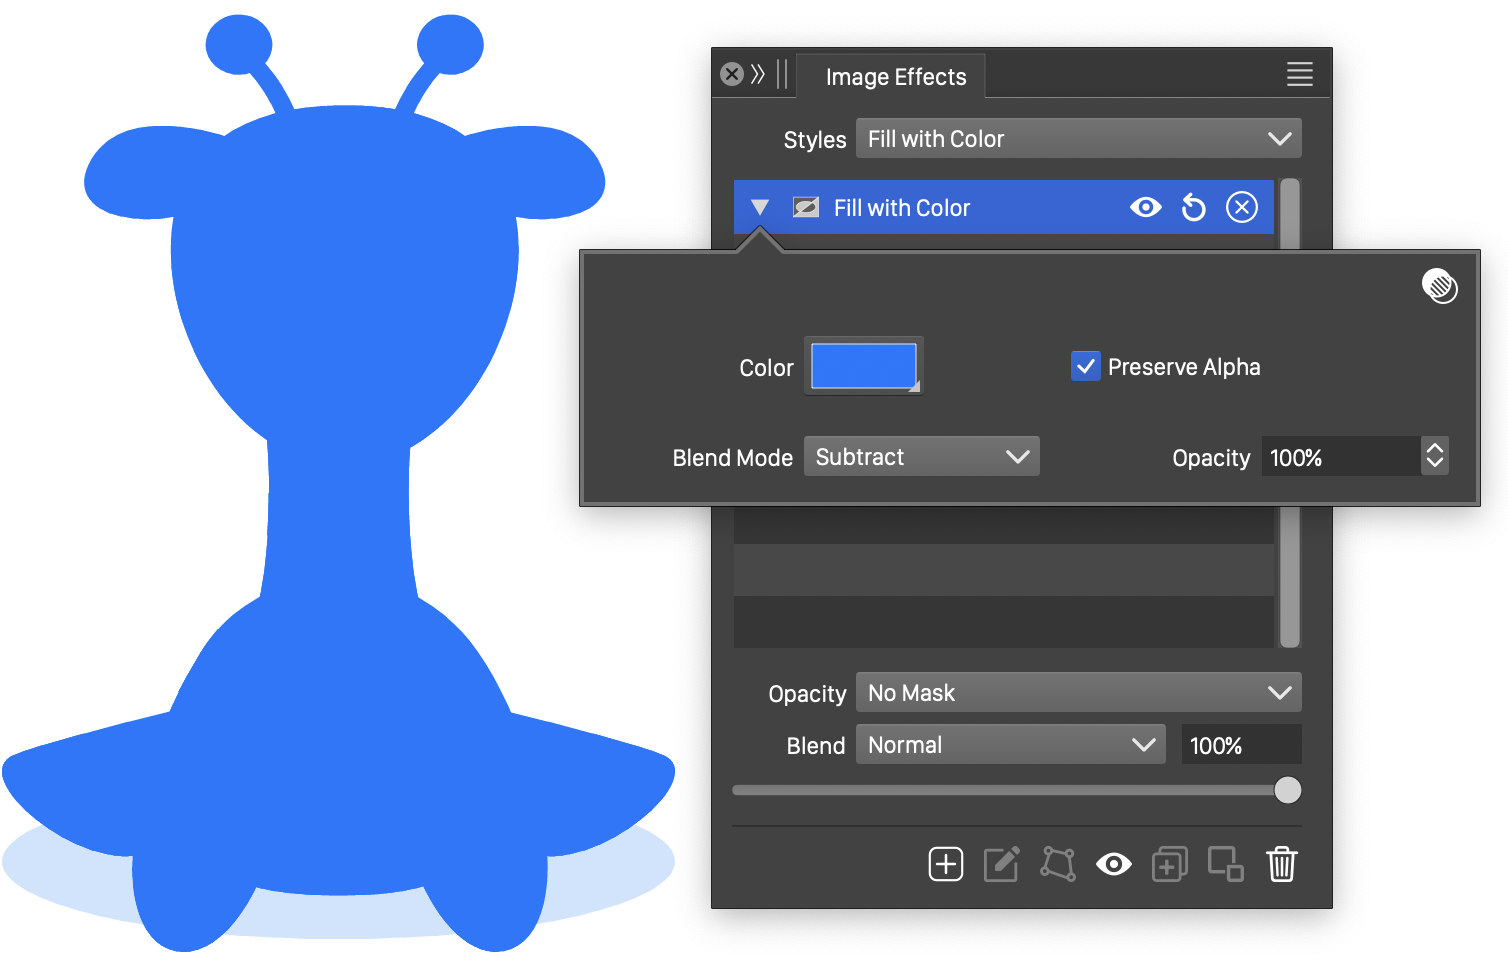
The Fill with Color filter and its options.
The Fill with Color filter uses the following options:
- Color - Select the color used to fill the image.
- Blend Mode - Select a blend mode, to combine the color with the original image color.
- Opacity - Fill the alpha channel of the image with a solid opacity value.
- Preserve Alpha - Enable or disable the preserving of the original alpha channel content.
Gaussian Blur
The Gaussian Blur effect is the most common blur effect used to smooth images and edges. In the Gaussian Blur a circular region is used to smooth pixel colors, emphasizing pixels closer to the center.
The Gaussian Blur region can be stretched and rotated to create elliptical blur regions.
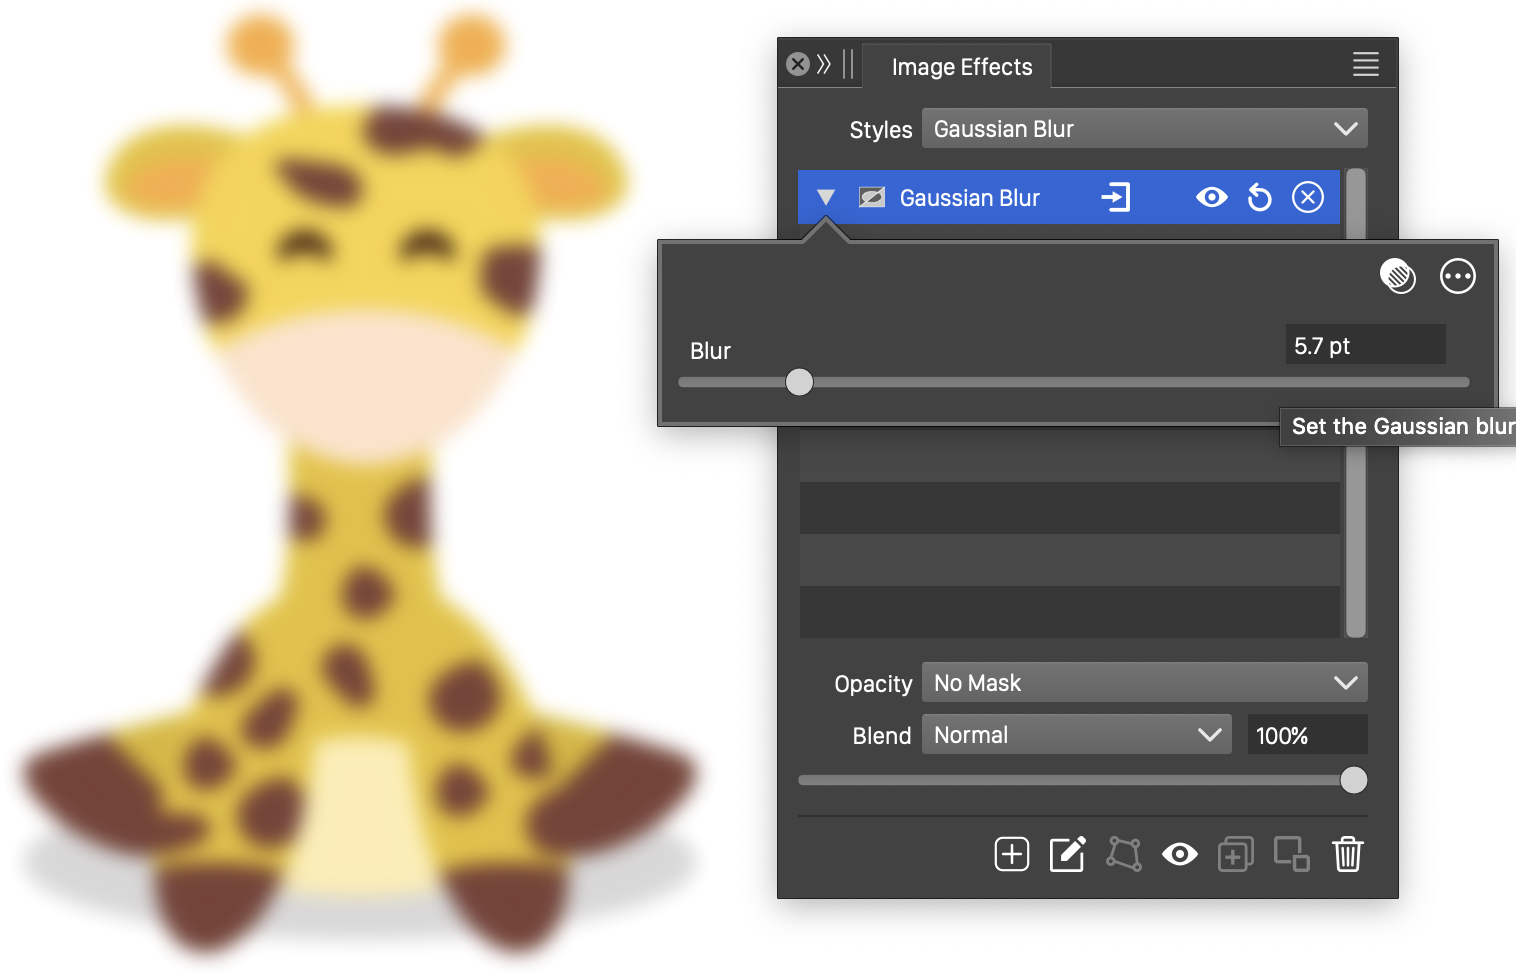
The Gaussian Blur effect, with basic options.
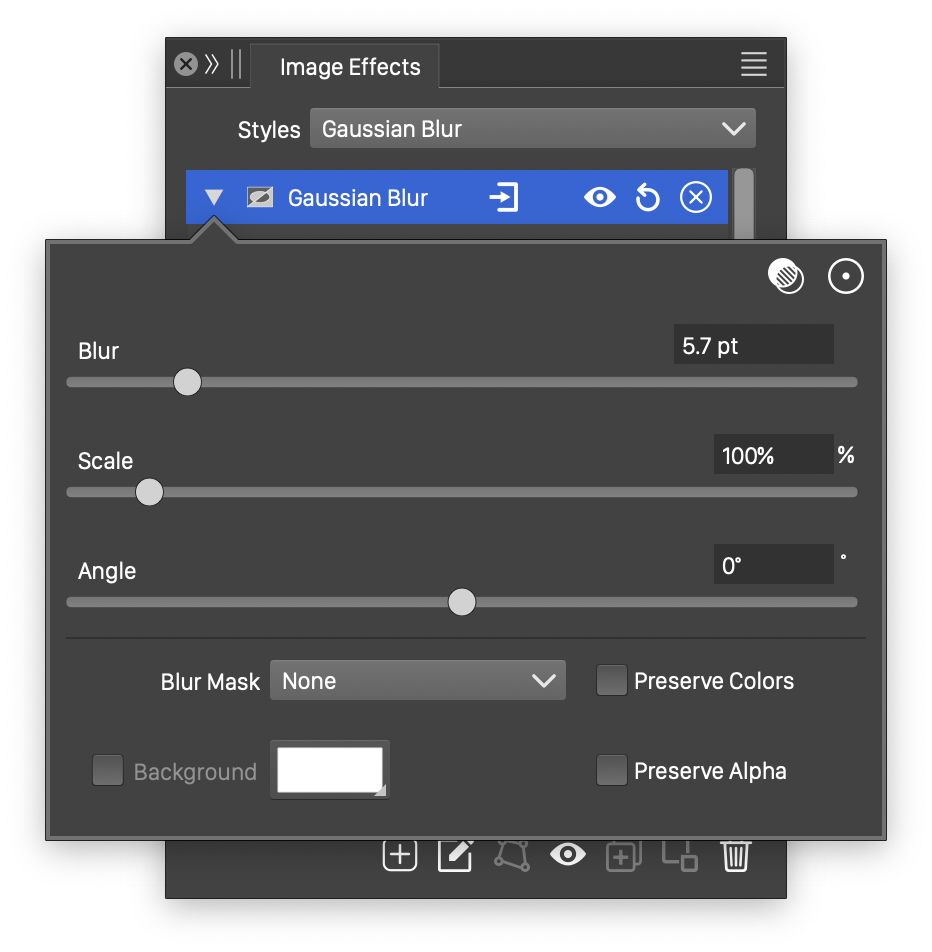
Advanced options of the Gaussian Blur effect.
The Gaussian Blur effect uses the following basic options:
- Amount - Set the extent of the Gaussian blur.
The advanced options of the Gaussian Blur effect are available, by clicking on the button.
- Scale - Set the vertical stretching of the blurring region.
- Angle - Set the rotation of the Gaussian blur region.
- Mask - Select a transparency mask controlling the blurring strength locally. The transparency mask is aligned with the filtered object, and the mask intensities are used to adjust the blur strength. The masking options are the same as described in the Transparency chapter.
- Background - Check to enable the use of a background color, when colors are preserved. The background color can be selected by clicking on the color preview box. The background color option is available and used only when the Preserve Colors option is enabled. In this case, only the alpha channel is blurred, allowing the use of a color to create a halo around the image.
- Preserve Colors - Enables the preserving of colors. If checked, the colors are not blurred, and a background color can be used to expand an image with a halo, caused by the blurred alpha channel.
- Preserve Alpha - Enables the preserving of the alpha channel. If checked, the alpha channel of the object is not blurred, resulting in sharp edges, but blurred content.
The  button from the Image Effects panel, activates the image effect tool used to interactively edit the Gaussian Blur effect attributes.
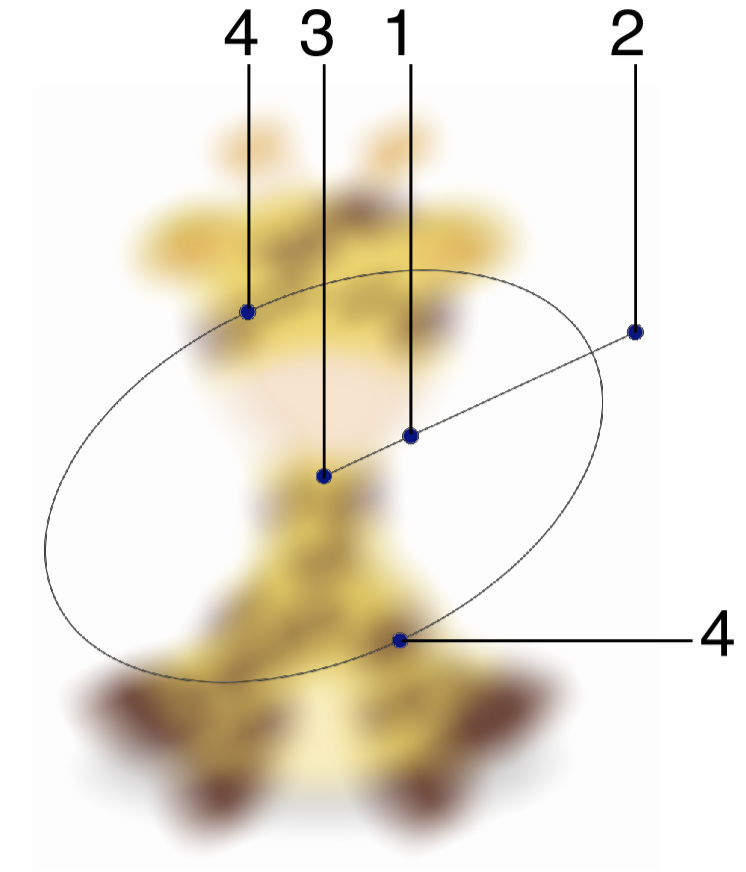
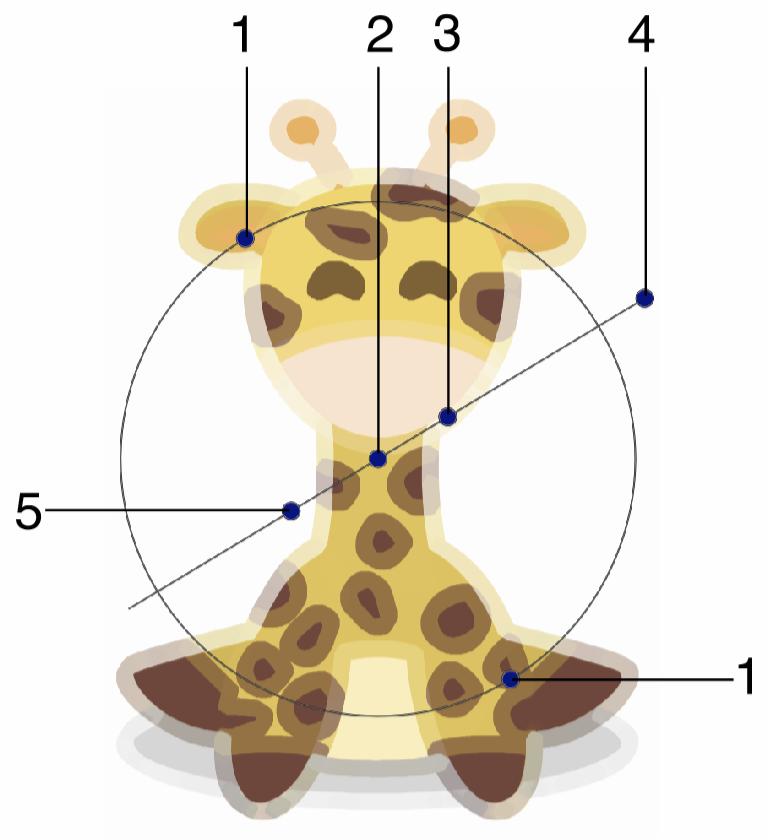
Interactive editing of the Gaussian Blur effect.
Interactive editing of the Gaussian Blur effect is done by dragging the handles to change an attribute value:
- (1) - Set the strength of the Gaussian blur, by dragging this handle away or towards the center.
- (2) - Set the rotation of the Gaussian blur region, by dragging this handle around the center.
- (3) - Set the center of the Gaussian blur effect.
- (4) - Set the vertical stretching of the Gaussian blur, resulting in an elliptical region.
Image
The Image SVG filter primitive generates an image from a fill style or an object of the current document. Objects with the Filter Image roles can be used as images in composite filters.
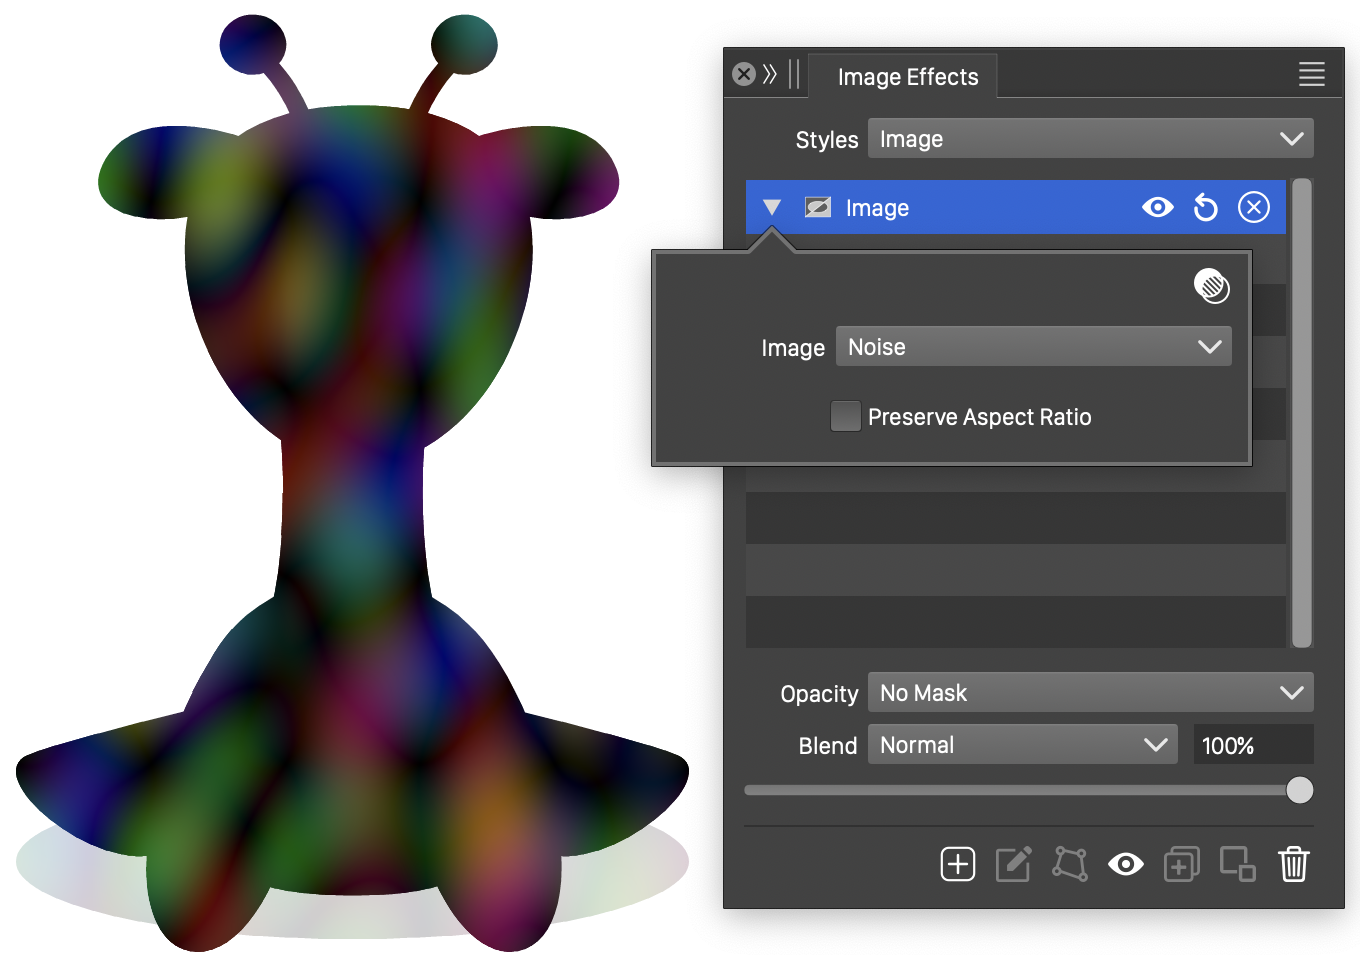
The Image filter and its options.
The Image filter uses the following options:
- Image - Select an image loading mode. This can be any fill style or preset, or an object with the Filter Image role.
- Preserve Aspect Ratio - Enable or disable the preserving of the aspect ratio of the original filtered image.
Merge Image
The Merge Image SVG filter primitive, merges two or more images from previous filter outputs. The Merge Image filter is used to combine outputs of other filters in a composite filter hierarchy.
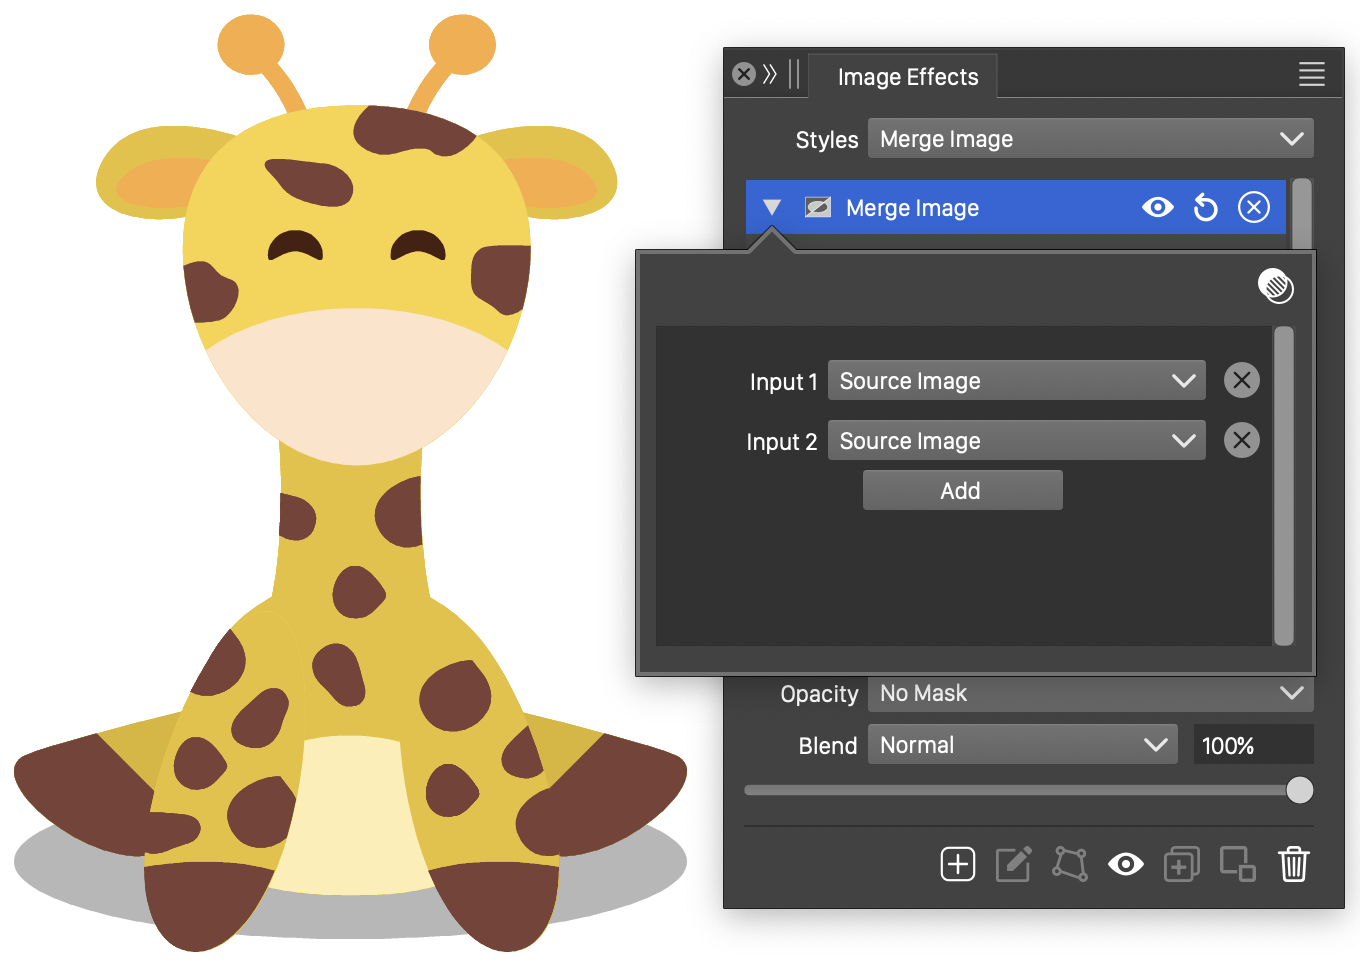
The Merge Image filter and its options.
The Image filter uses the following options:
- Each input image is shown as a drop box widget with an Image label.
- The input sources can be selected from outputs of previous filters.
- To remove an input source, click on the
 button.
 - To add a new input source, click on the Add button.
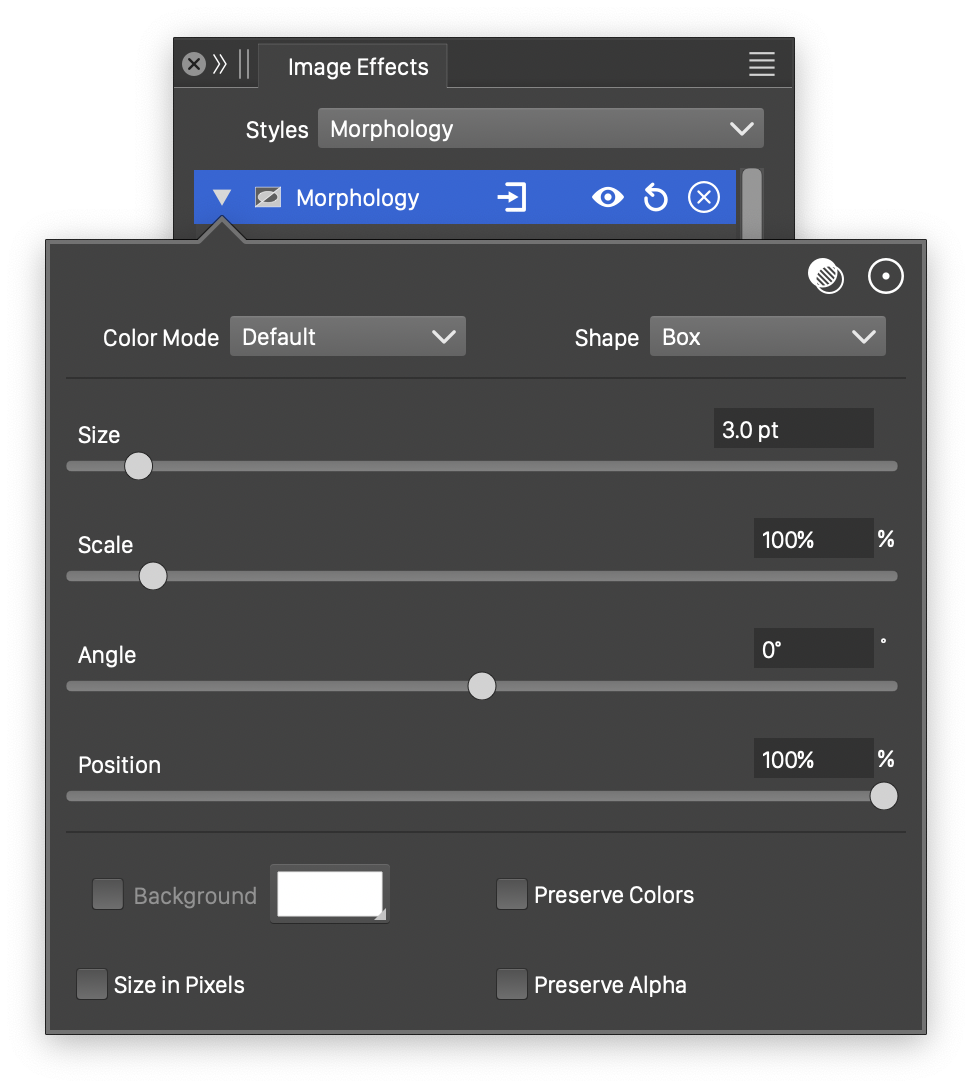
Morphology
The Morphology SVG effect expands or reduces the region around edges of an image. The morphology filter is used to erode or dilate an image.
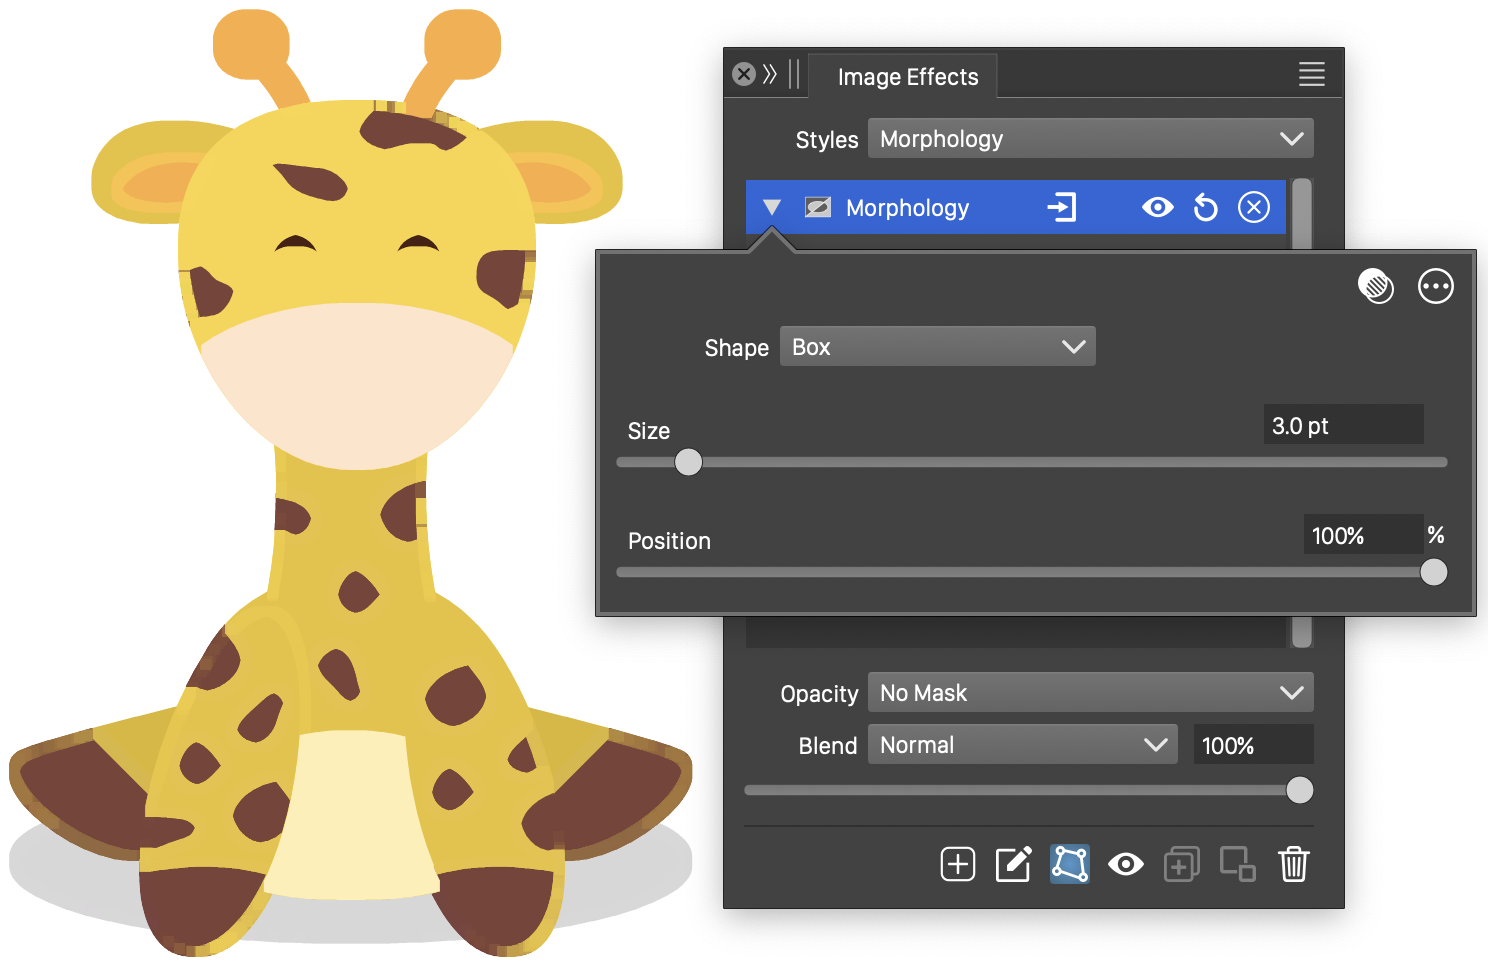
The Morphology effect, with basic options.
Advanced options of the Morphology effect.
The Morphology effect uses the following basic options:
- Shape - Select a shape of the region used to erode or dilate the image pixels. The shape can be selected from a list of shape styles, presets and object references with the Shape role. The predefined Gaussian and Disc shapes can be used to set default edge shapes.
- Size - Set the extent of the erosion or dilation.
- Position - Select between erosion and dilation of the image.
The advanced options of the Morphology effect are available, by clicking on the button.
- Color Mode - Select the color mode used to erode or dilate color intensities.
- Scale - Set the vertical stretching of the morphing region.
- Angle - Set the rotation of the morphing region.
- Background - Check to enable the use of a background color, when colors are preserved. The background color can be selected by clicking on the color preview box. The background color option is available and used only when the Preserve Colors option is enabled. In this case, only the alpha channel is adjusted, allowing the use of a color to create a halo around the image.
- Preserve Colors - Enables the preserving of colors. If checked, the colors are not adjusted, and a background color can be used to erode or dilate an image, creating a margin with the selected background.
- Preserve Alpha - Enables the preserving of the alpha channel. If checked, the alpha channel of the object is not dilated or eroded.
The button from the Image Effects panel, activates the image effect tool used to interactively edit the Morphology effect attributes.
Interactive editing of the Morphology effect.
Interactive editing of the Morphology effect is done by dragging the handles to change an attribute value:
- (1) - Set the strength of the morphing, by dragging this handle away or towards the center.
- (2) - Set the rotation of the morphing region, by dragging this handle around the center.
- (3) - Set the center of the morphing effect handles. The center will not affect the resulting image.
- (4) - Set the vertical stretching of the morphing region.
Offset Image
The Offset Image SVG filter primitive moves the image content horizontally and vertically, by a user selected offset.
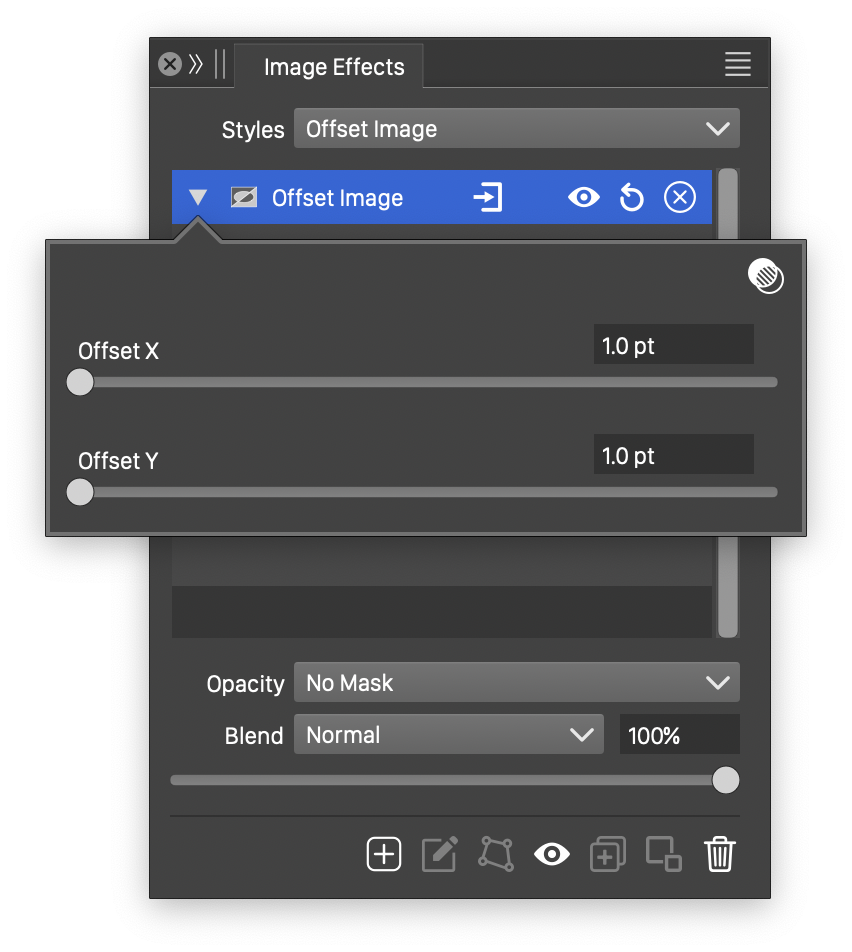
The Offset Image filter and its options.
The Offset Image filter uses the following options:
- Offset X - Adjust the horizontal offset of the filtered image.
- Offset Y - Adjust the vertical offset of the filtered image.
Specular Light
The Specular Light SVG filter, lights the image using the alpha channel as a bump map, to create relief.
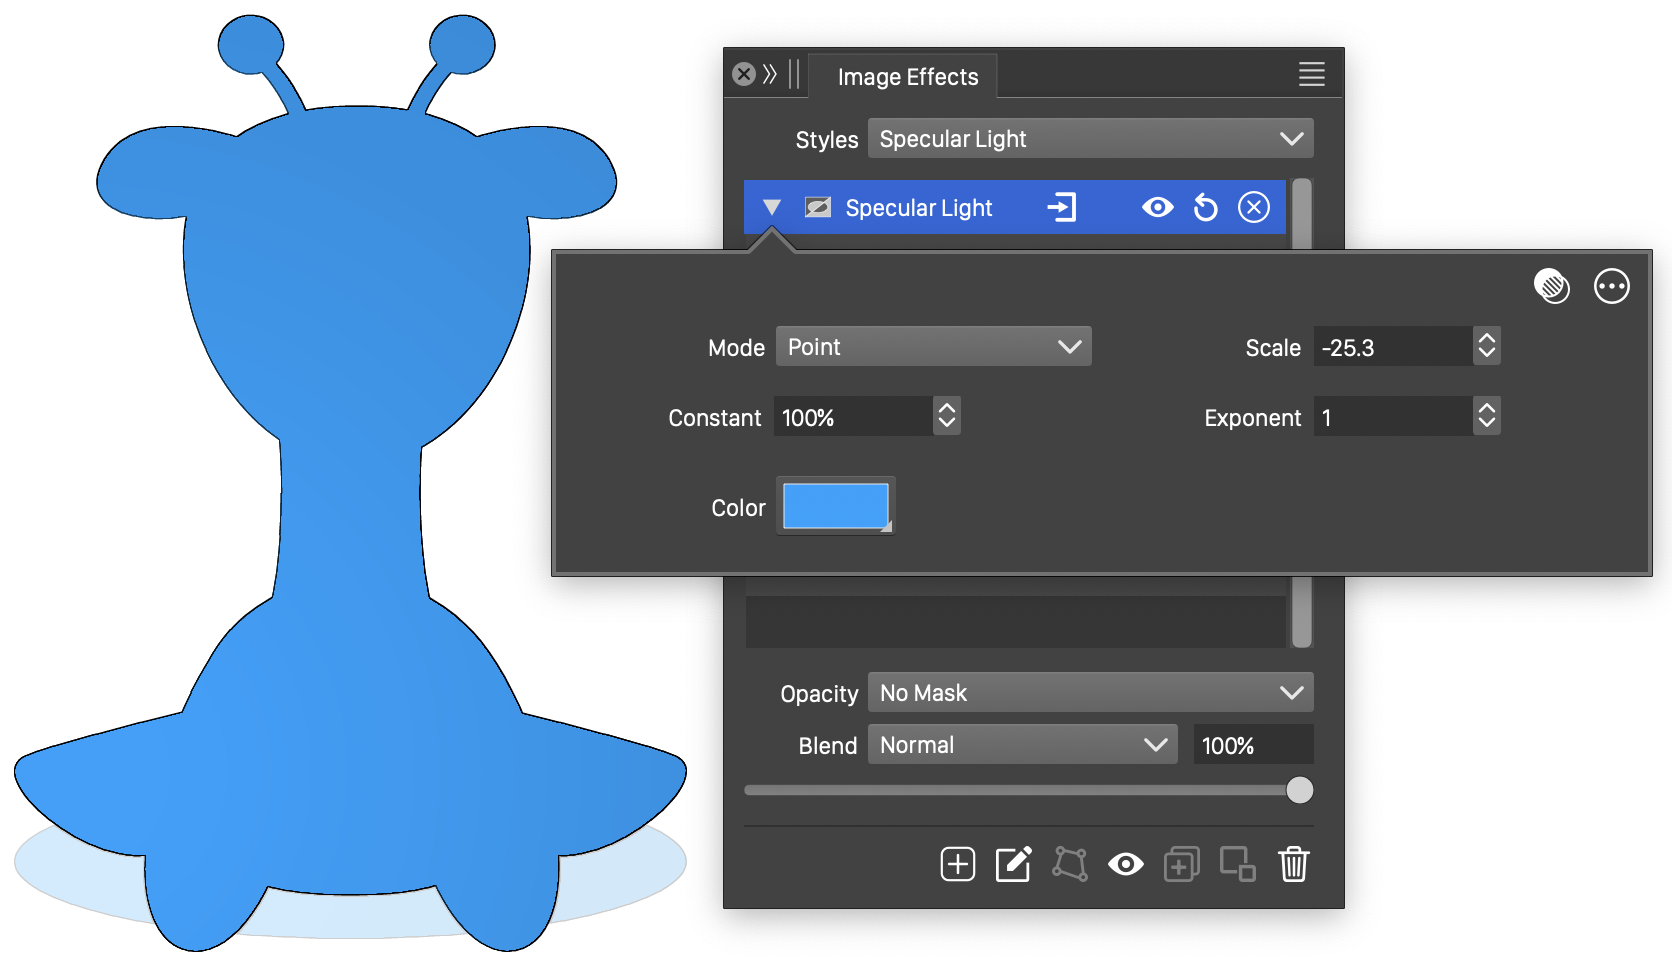
The Specular Light filter with basic options.
Advanced options of the Specular Light filter.
The Specular Light image filter uses the following basic options:
- Mode - Set the light source mode. This can be:
- Distant - Selects a uniform, distant light source.
- Point - Selects a light source from a specific point.
- Spot - Selects a light source pointing at a specific point, from another point.
- Color - Select the color of the specular light.
- Scale - Set the surface scaling amount of the specular light.
- Diffusion - The diffusion amount of the light.
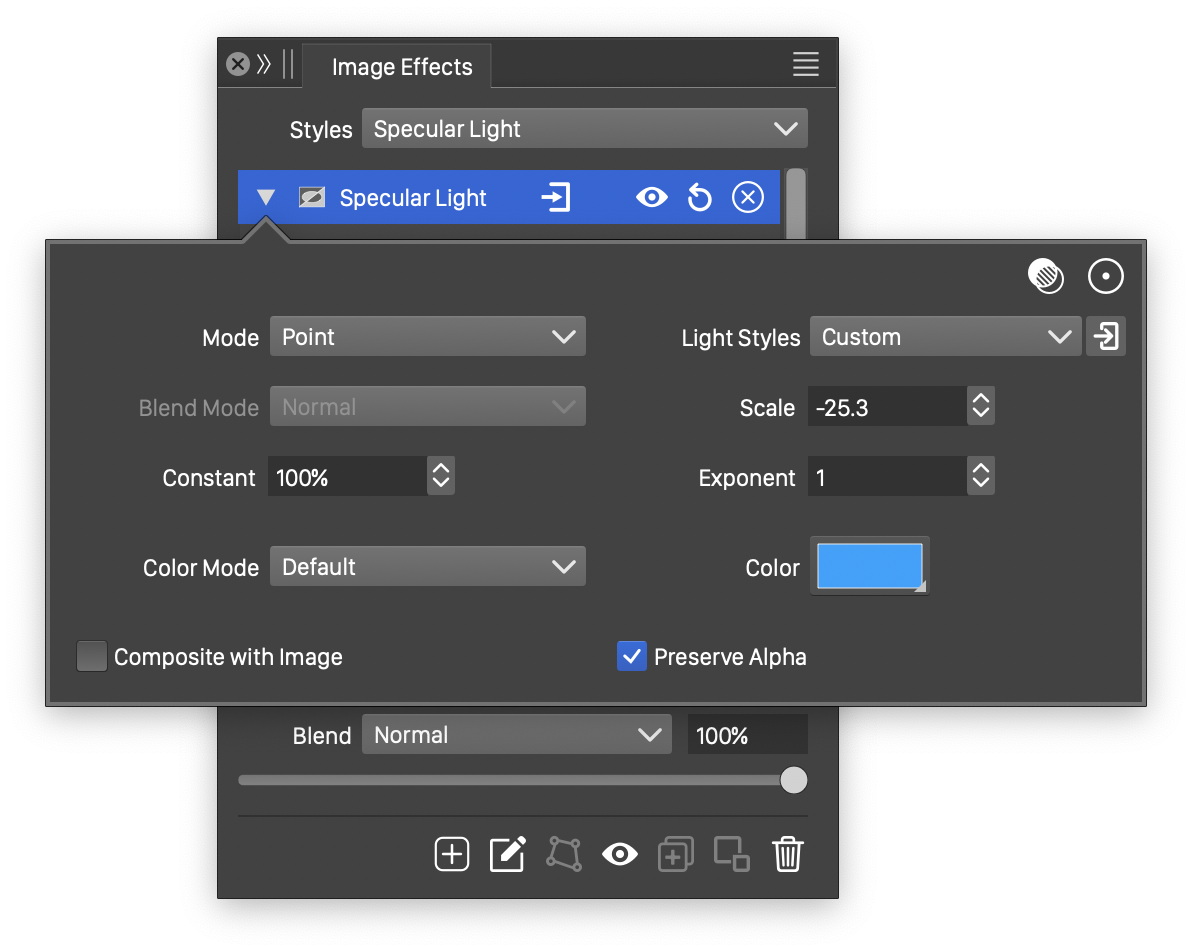
The advanced options of the Specular Light effect can be accessed, by clicking on the button.
- Light Styles - Select from the list of previously defined light presets. The light options can be edited by clicking on the button. The light options are described below.
- Color Mode - Select the color mode used to generate the specular light effect.
- Blend Mode - Select a blend mode, used to composite the resulting image with the original image. The blend mode can be selected only when the Composite with Image option is enabled.
- Composite with Image - Enable or disable compositing of the specular light image with the original image, using a blend mode.
SVG Convolution
The SVG Convolution filter primitive, creates a convolution of the filtered image. The convolution kernel size and values can be set by the user.
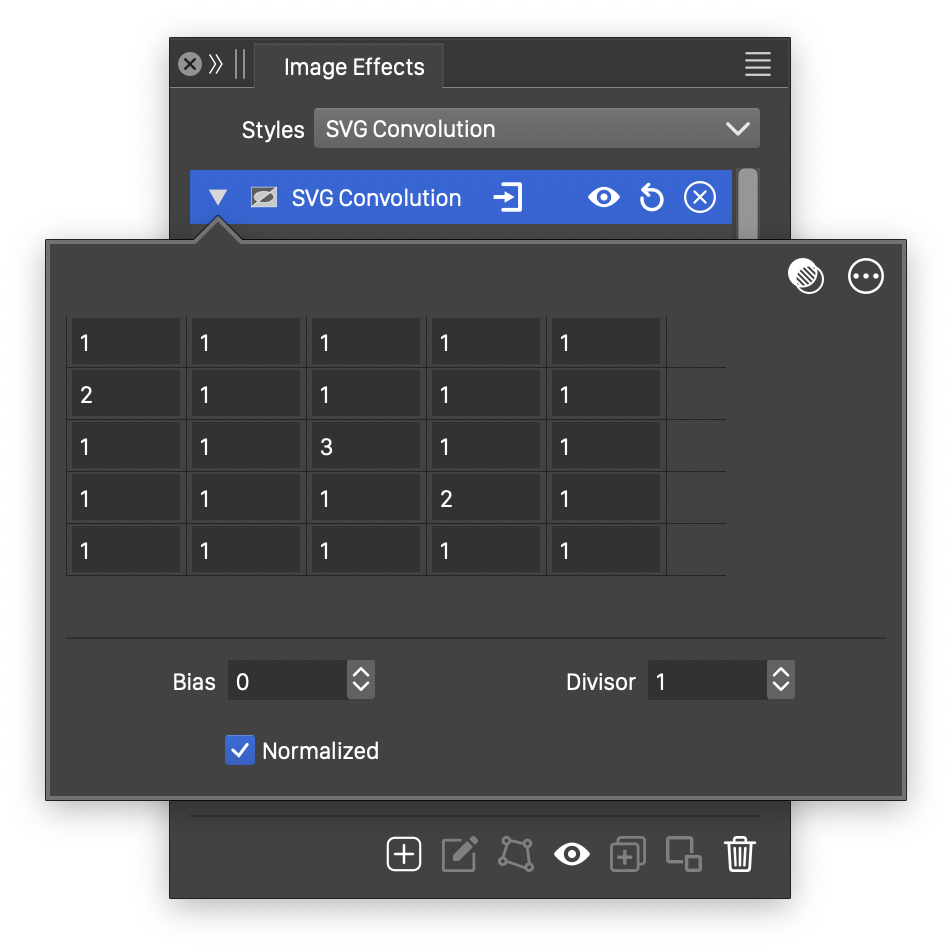
The SVG Convolution filter and its options.
The SVG Convolution filter uses the following options:
- The convolution kernel is edged in the numeric matrix of the filter editor.
- The convolution kernel contains numeric weights for individual pixel intensities in a pixel neighborhood.
- Bias - Adjust the pixel intensity resulting from the convolution of the neighboring pixels.
- Divisor - Divide the pixel intensity resulting from the convolution of the neighboring pixels.
- Normalize - Normalize the convolution kernel values.
Additional options of the SVG Convolution filter can be accessed, by clicking on the button. This includes the possibility of changing the convolution kernel size.
- Width - Set the convolution kernel width.
- Height - Set the convolution kernel height.
- Offset X - Set the horizontal offset of the convolution kernel center alignment over the adjusted pixel.
- Offset Y - Set the vertical offset of the convolution kernel center alignment over the adjusted pixel.
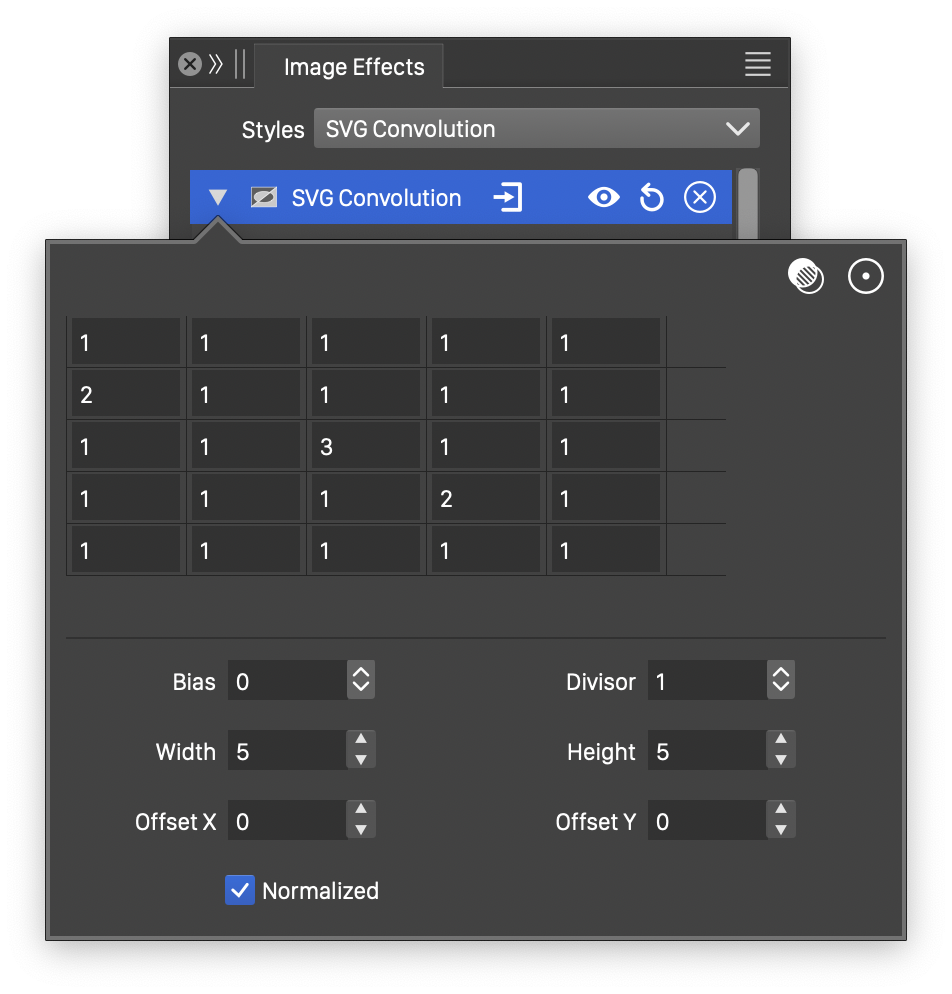
Additonal options of the SVG Convolution filter.
Tile Image
The Tile Image SVG filter primitive creates a tiling of the input image.
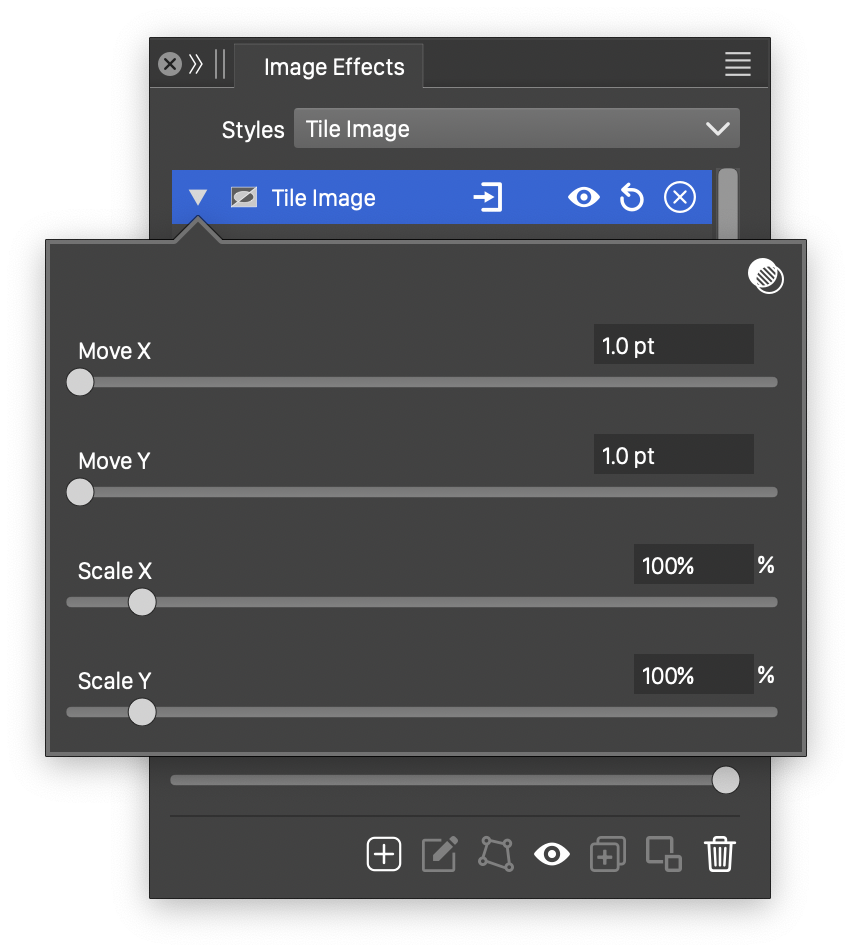
The Tile Image filter and its options.
The Tile Image filter uses the following options:
- Move X - Adjust the horizontal offset of the filtered image.
- Move Y - Adjust the vertical offset of the filtered image.
- Scale X - Adjust the reduction of the image width to create tiled images.
- Scale Y - Adjust the reduction of the image height to create tiled images.
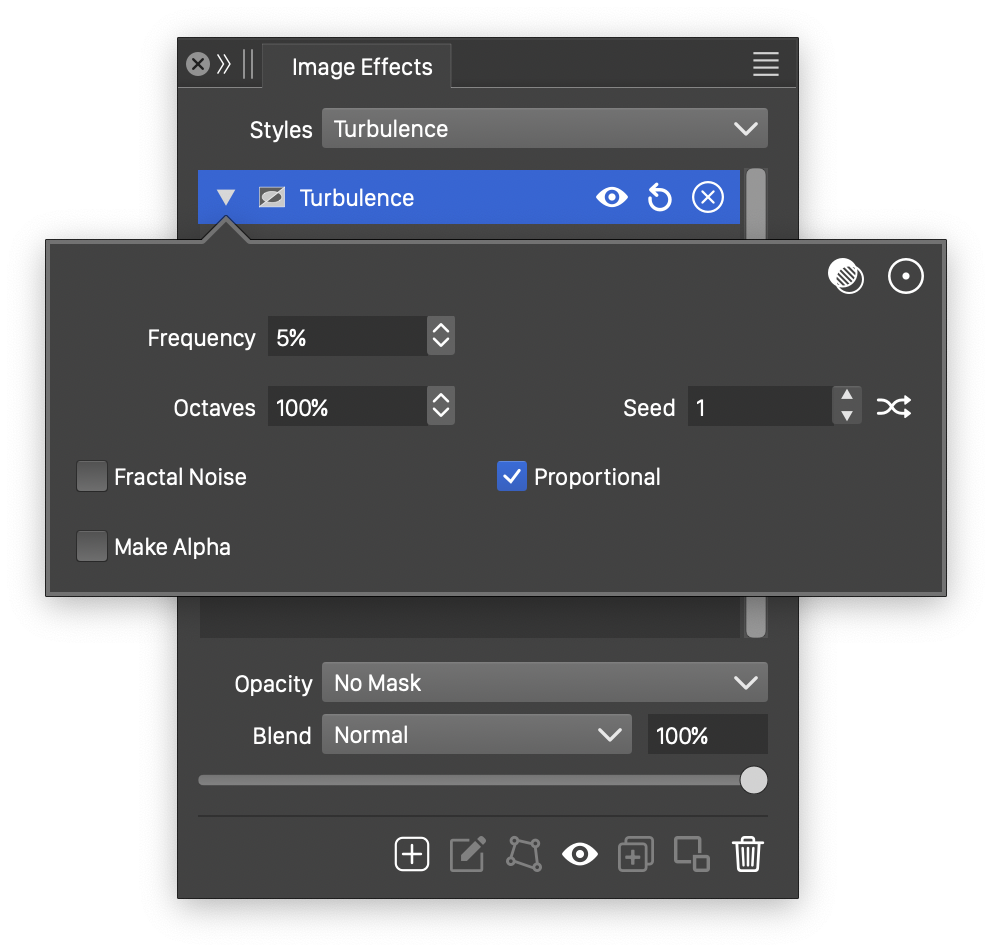
Turbulence
The Turbulence SVG filter, creates a synthetic noise using the Turbulence noise type, with a restricted set of options. The Turbulence effect is a special case of the Noise effect, and it can be created and adjusted separately, to allow exporting to SVG file format without generating an image.
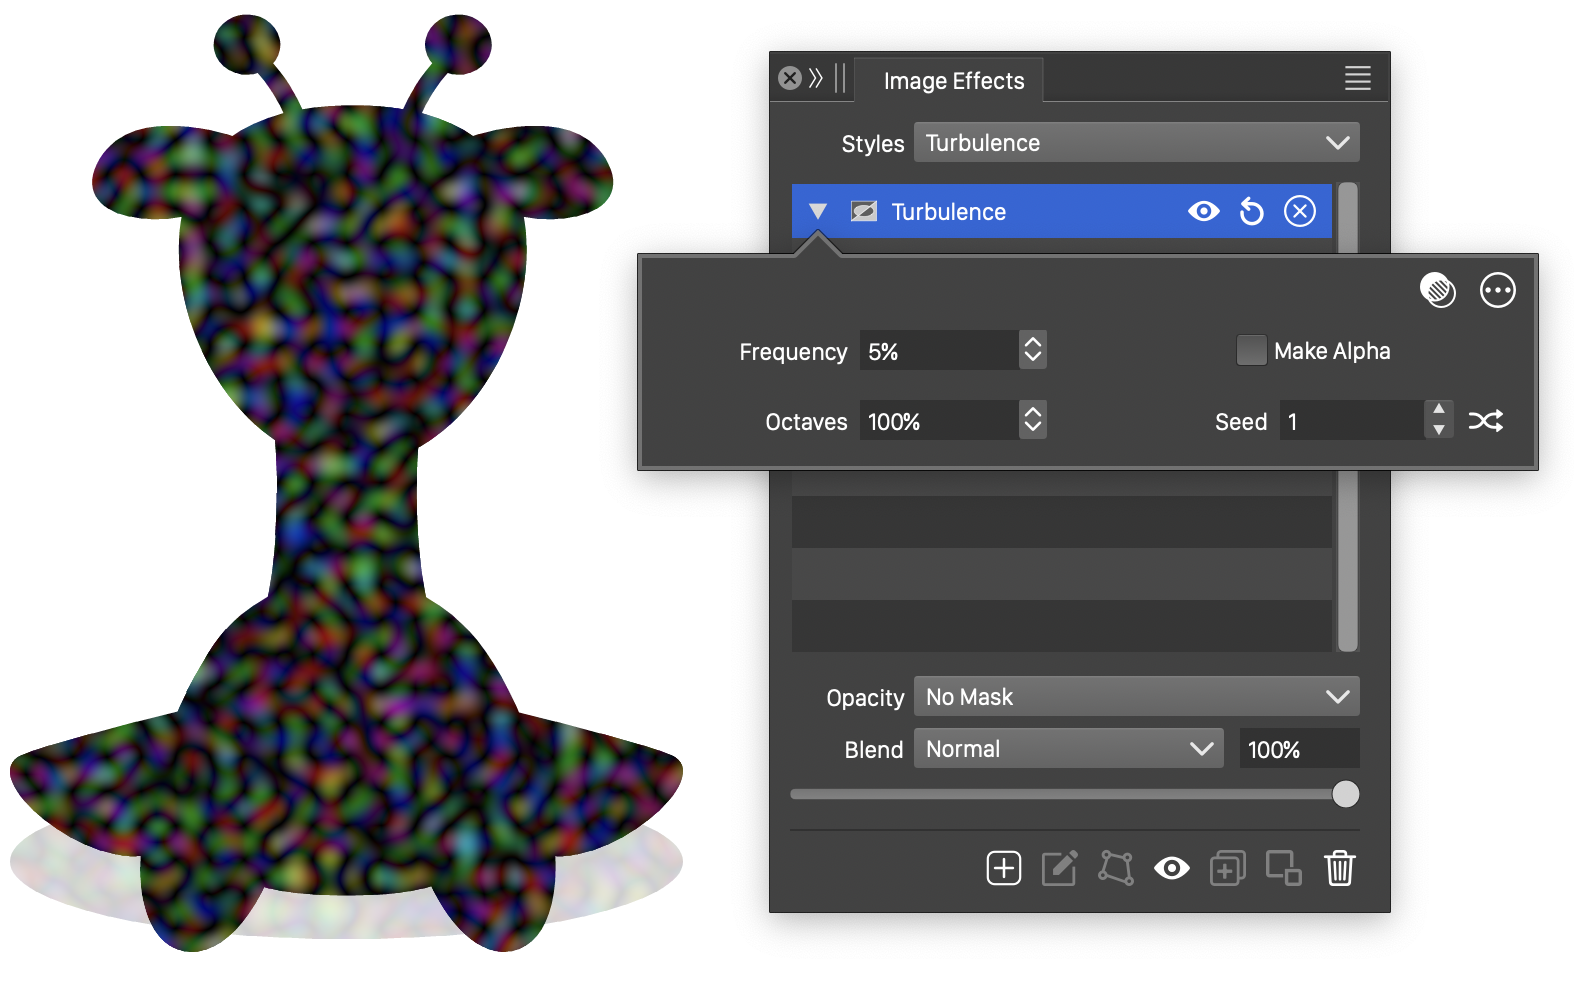
The Turbulence effect and its options.
Advanced options of the Turbulence effect.
The Noise generator effect uses the following basic options:
- Frequency - Set the frequency of the turbulence noise.
- Octaves - Set the number of octaves used to generate the turbulence. Higher octaves result in more detail.
- Seed - Set the randomization seed used to generate the turbulence noise. The
 button can be used to pick random seed values.
 - Make Alpha - Enable or disable the adjustment of the alpha channel by the noise.
The advanced options of the Noise effect can be accessed, by clicking on the button.
- Frequency X - Set the frequency in the horizontal direction, when proportional mode is disabled.
- Frequency Y - Set the frequency in the vertical direction, when proportional mode is disabled.
- Fractal Noise - Enable or disable the generation of the fractal turbulence mode.
- Proportional - Enable or disable proportional frequency mode.


