Pixelating Effects
The Pixelate section contains image effects to generate low resolution renderings of an image using various geometric schemes, to approximate image colors and tone variation.
When simulating low resolution rendering of an image, the image colors are approximated as larger regions of some shape, depending on the type of the effect.
Some of these effects allow interactive adjustment of the effect attributes, using the image effect tool.
Crystalize
The Crystalize image effect, creates a reduced resolution rendering of the image by making color uniform inside small, randomly generated regions.
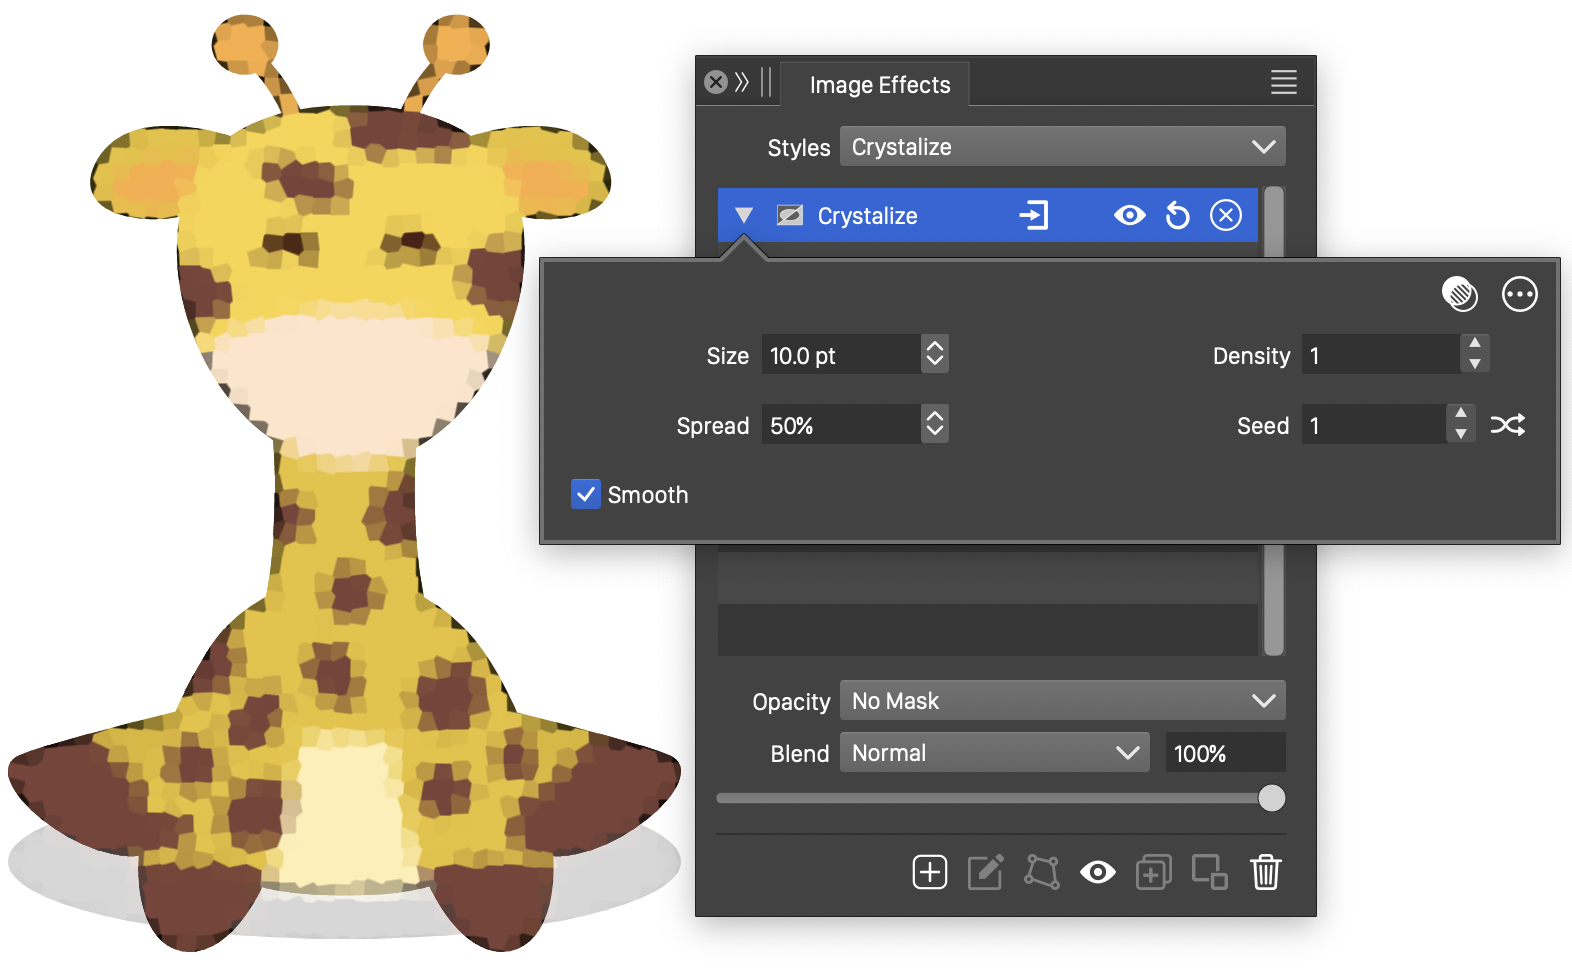
The Crystalize effect and its options.
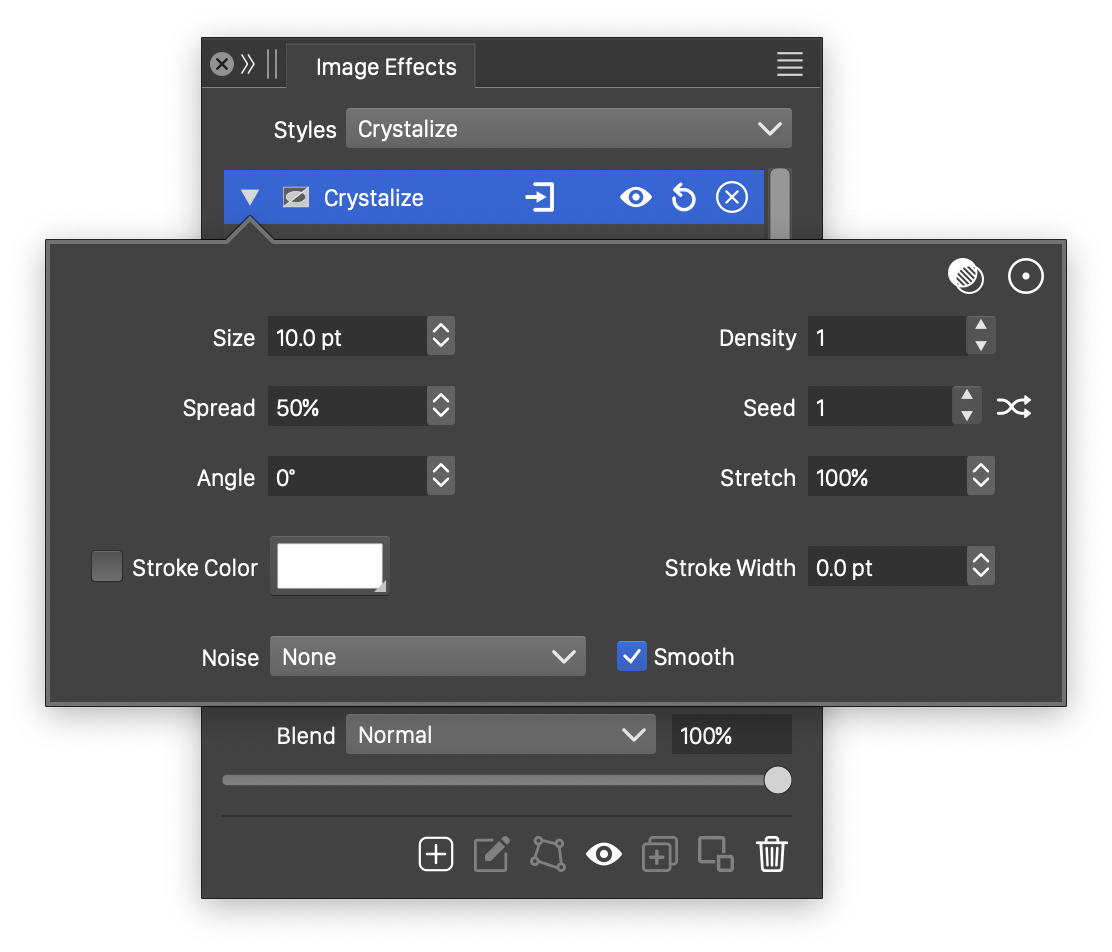
Advanced options of the Crystalize effect.
The Crystalize image effect uses the following basic options:
- Size - Set the size of the crystals used to approximate colors.
- Spread - Set the extent of randomization used in the shape of the crystals. If set to zero, the crystals are rectangular.
- Density - Set the density of color variation allowed inside a single crystal.
- Seed - Set the randomization seed used to generate the brush tracks. The
 button can be used to pick random seed values.
 - Smooth - Enable or disable the smooth crystal margin.
The advanced options of the Crystalize effect can be accessed, by clicking on the  button.
- Noise - Select the noise style from the list of predefined noise types, or user defined noise presets and styles. The noise is used to create local variations of the crystal sides. To browse randomly generated synthetic noise styles, select the Browse Styles command. To edit the noise attributes, select the Edit Noise command. Selecting noise is described with more detail in the Noise chapter.
- Stroke Color - Select a stroke color, used to render the crystal margins.
- Stretch - Set the vertical stretching of the crystal sizes.
- Stroke Width - Set the width of the crystal margin stroke.
- Angle - Set the rotation of the crystals.
Halftone
The Halftone image effect, reduces the number of color levels in the image, using geometric shapes called halftones, to simulate color tone variations. The shape and type of the halftone determines how the color tones are simulated.
The options of the halftone effect, depend on the selected halftone type.
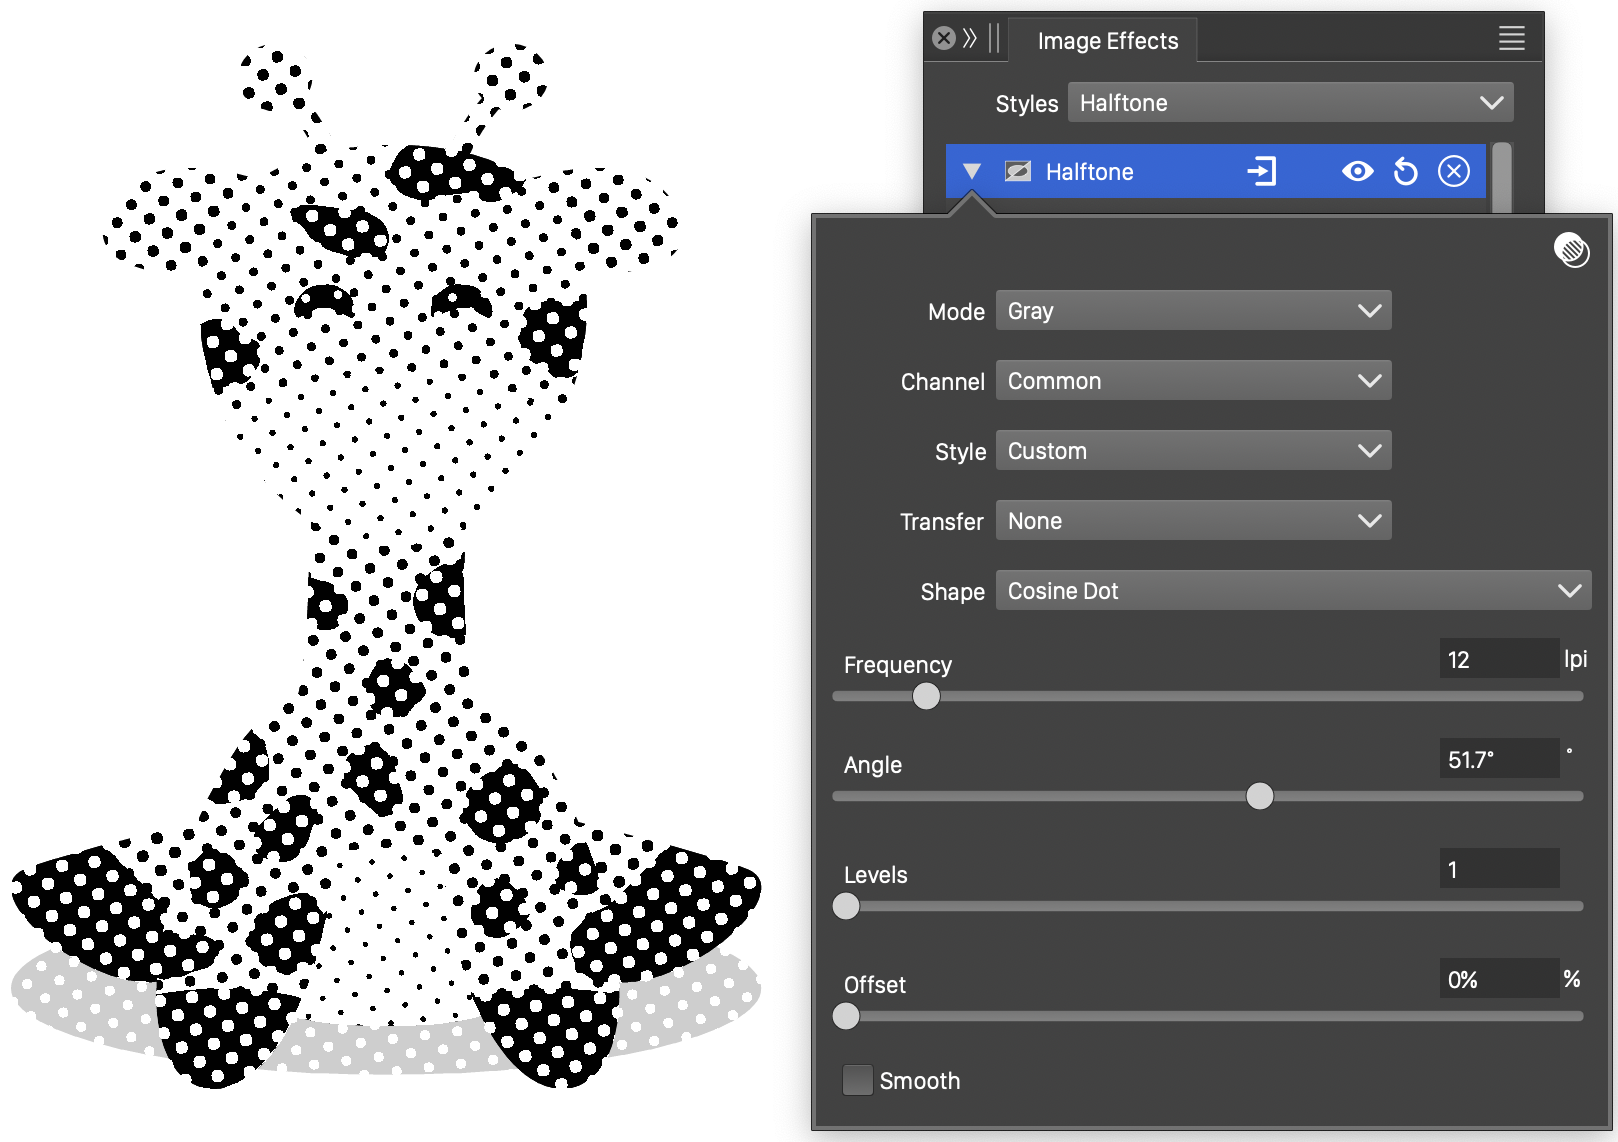
The Halftone effect with Elliptical halftone type.
The Halftone image effect uses the following options:
- Mode - Select the color mode used to reduce the number of color tones. Tones of a color channel are reduced and approximated using the selected halftone type.
- Channel - Select the color channel, to set the halftone options specific for that channel. Using the Common color channel will set the halftone options for all channels.
- Style - Select a halftone type, or previously saved style or preset. The halftone options can be saved as styles using the Create Style command or as presets using the Create Preset command. The following predefined halftone types are available:
- Elliptical - Use concentric circles or ellipses to simulate color tone levels.
- Rectangular - Use concentric squares or rectangles to simulate color tone levels.
- Concentric - Set user defined concentric shapes to simulate color tone levels.
- Wave - Select user defined open shapes to simulate a waving halftone effect.
- Point - Use Postscript style halftones to create color tone approximations.
- Shape - Select a shape style or preset for the Concentric or Wave halftone shapes. In case of the Point halftone, the shape list contains the various point shapes used to generate the halftone levels.
- Scaling - Edit the vertical stretching used in the Elliptical, Rectangular and Concentric halftone types.
- Angle - Edit the rotation of the halftone direction.
- Thickness - Edit the thickness of the halftone bands if applicable (depending on the halftone type).
- Tone - Set the sharpness of the color tone reproduction.
- Levels - Set the number of color tone levels in the halftone.
- Smooth - Create smooth margins between different halftone levels.
- Frequency - Set the Wave or Point halftone frequency.
- Amplitude - Set the Wave halftone amplitude.
The  button from the Image Effects panel, activates the image effect tool used to interactively edit the halftone effect attributes.
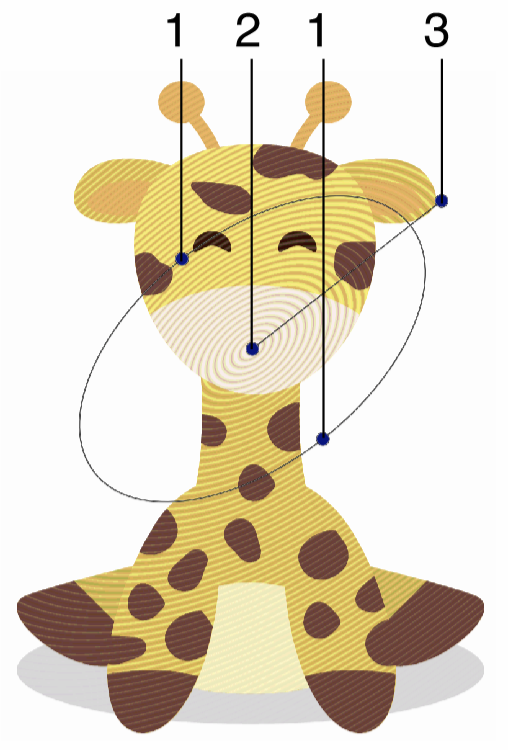
Interactive editing of the Halftone image effect.
Interactive editing of the halftone effect is done by dragging the handles to change an attribute value:
- (1) - Adjust the vertical stretching of the halftone shape.
- (2) - Adjust the center of the halftone effect.
- (3) - Adjust the halftone direction.
In the case of Concentric and Wave halftone types, the secondary image effect  tool can be used to edit the shape of the concentric or wave halftones. The shape is edited using the regular path editing tools.
Pixelate
The Pixelate image effect, simulates a reduced resolution of the image, by averaging pixels inside a region.
The Pixelate effect and its options.
The Pixelate image effect uses the following options:
- Shape - Select the shape of the region with the same color:
- Rectangle - Select a rectangular region for a pixel color.
- Hexagon - Select a hexagonal region for a pixel color.
- Triangle - Select a triangular region for a pixel color.
- Trapezoid - Select a trapezoid shape for a pixel color.
- Size - Set the size of the pixel regions.
- Stretch - Set the horizontal stretching of the pixel regions.
- Angle - Set the rotation of the pixel shapes.
- Offset X and Offset Y - Set the relative origin of the pixel shapes.
- Smooth - Enable or disable the smooth pixel margins.
- Relative - Enable or disable relative pixel positioning. By default, this option is disabled, positioning pixel shapes to an absolute grid. When enabled, the pixel shape positions are moved with the object.
Pointilize
The Pointilize image effect, creates large point-like approximations of the image color, with points positioned at random location. The shape of the points can be any user defined and editable shape.
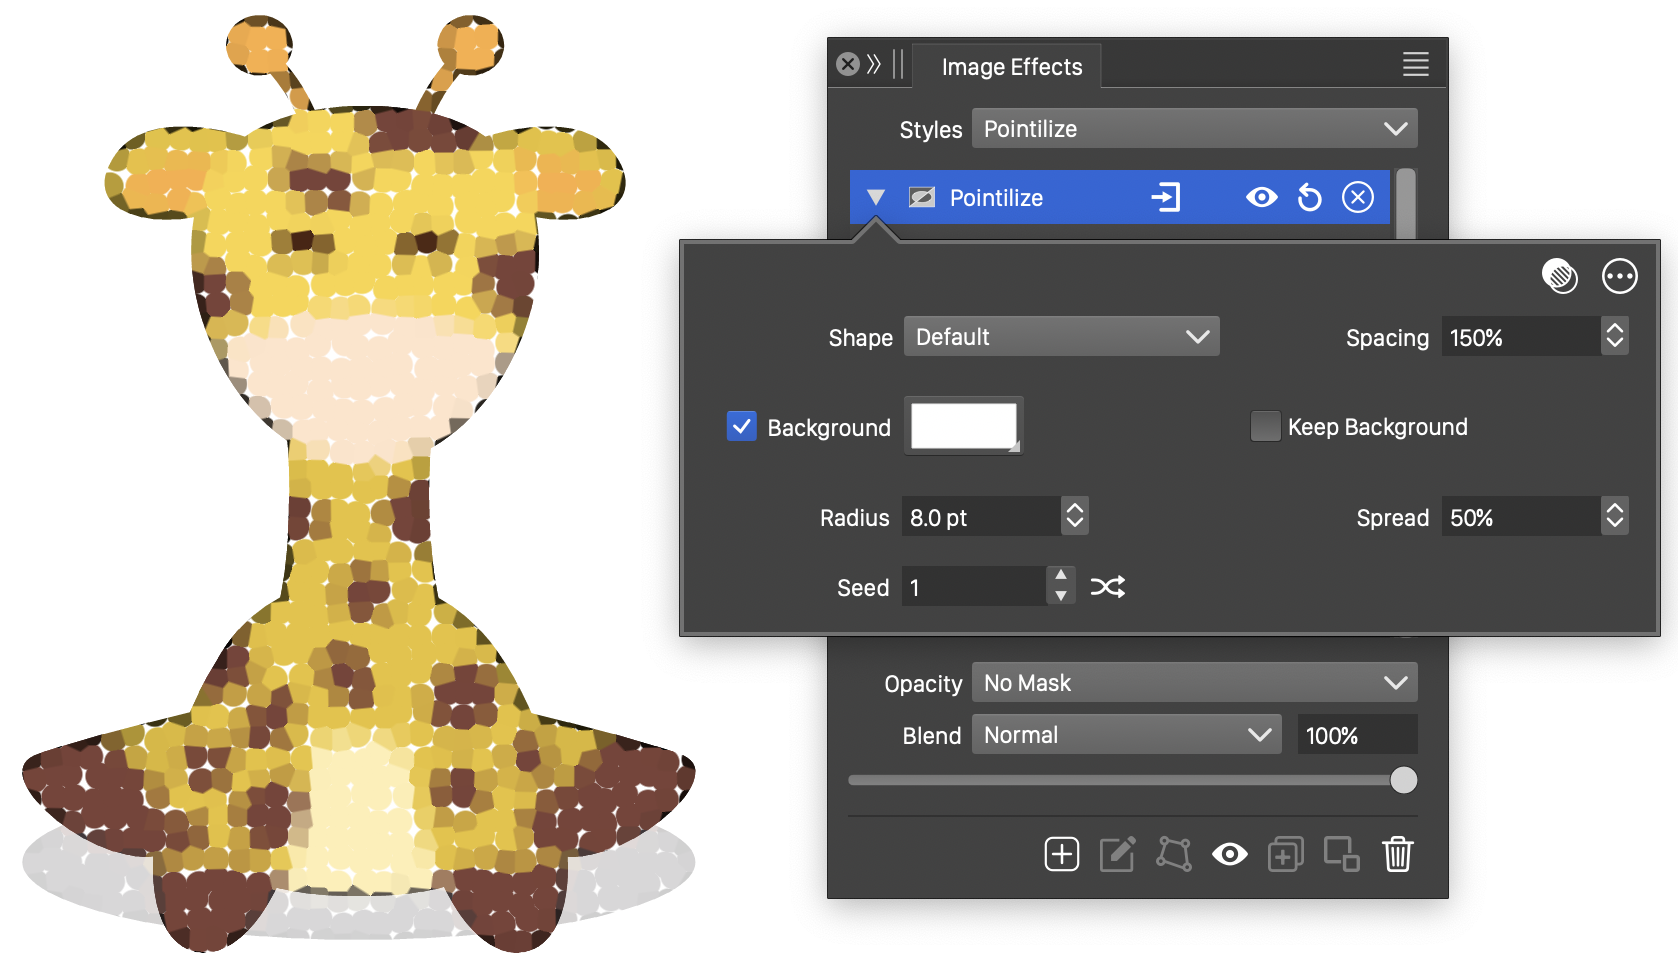
The Pointilize effect and its options.
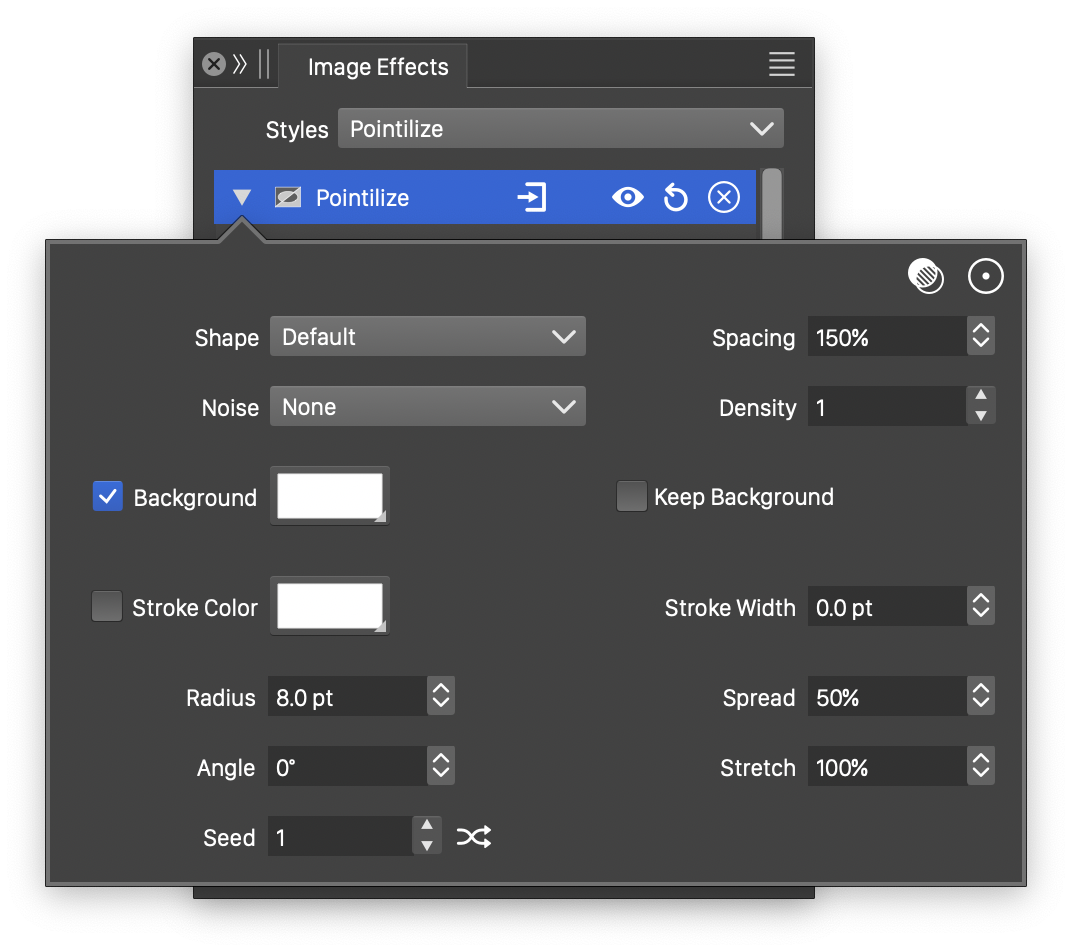
Advanced options of the Pointilize effect.
The Pointilize image effect uses the following basic options:
- Shape - Select a shape style or preset used to render the points of the pointilize effect. The shape can also be from an object with the Shape role.
- Background - Select a background color to fill the region between the points. If disabled, the region can be the original image, or an image resulting from the approximation of color regions with random shaped tiles. When enabled, the background color is used to fill the region left out by the points with user defined shapes.
- Radius - Set the radius of the points used to approximate color regions.
- Spacing - Set the average spacing between points, relative to the radius. The actual spacing between neighboring points is set randomly.
- Spread - Set the amount of randomness in the spacing between the points.
- Seed - Set the randomization seed used to generate the point positions. The button can be used to pick random seed values.
- Keep Background - Enable or disable the keeping of the original image in the empty regions between the points.
The advanced options of the Pointilize effect can be accessed, by clicking on the button.
- Noise - Select the noise style from the list of predefined noise types, or user defined noise presets and styles. The noise is used to create local variations in the point positions. To browse randomly generated synthetic noise styles, select the Browse Styles command. To edit the noise attributes, select the Edit Noise command. Selecting noise is described with more detail in the Noise chapter.
- Stroke Color - Select a stroke color, used to render the point shape margins.
- Stretch - Set the vertical stretching of the point sizes.
- Stroke Width - Set the width of the crystal margin stroke.
- Angle - Set the rotation of the point positions.
- Density - Set the density of points inside a randomly generated point region.
Spot Grid
The Spot Grid image effect, creates large point-like approximations of the image color, using a regular grid to position points. The shape of the points can be any user defined and editable shape.
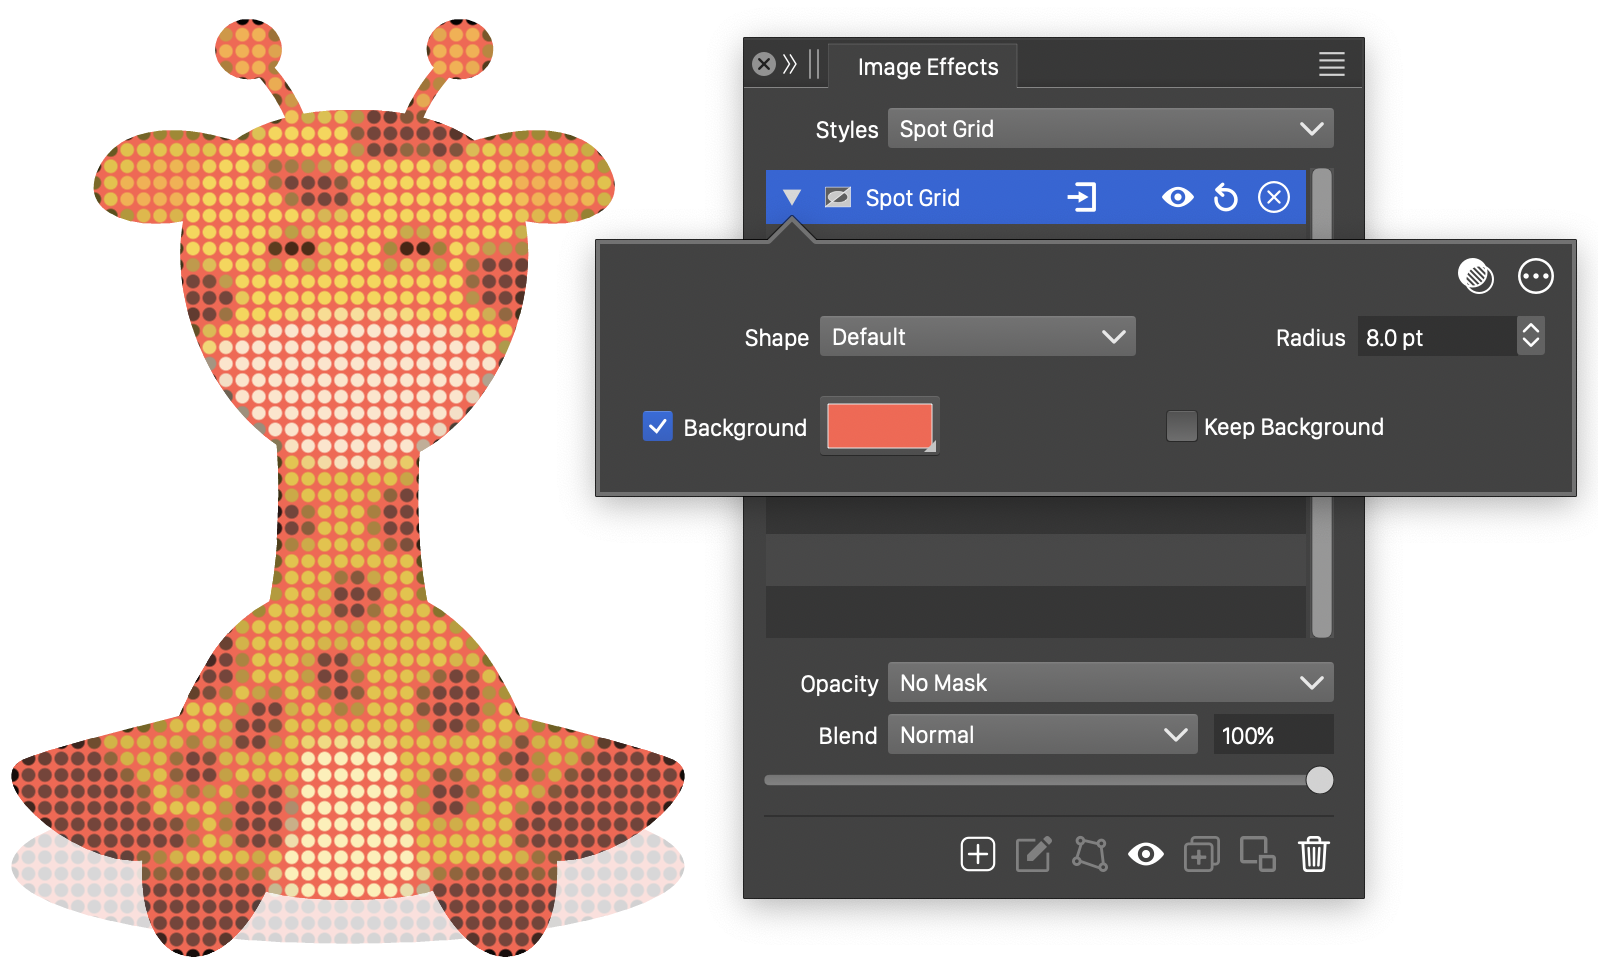
The Spot Grid effect and its options.

Advanced options of the Spot Grid effect.
The Spot Grid image effect uses the following basic options:
- Shape - Select a shape style or preset used to render the points of the spot grid effect. The shape can also be from an object with the Shape role.
- Background - Select a background color to fill the region between the points. If disabled, the region can be the original image, or an image resulting from the approximation of color regions with random shaped tiles. When enabled, the background color is used to fill the region between the points.
- Radius - Set the radius of the points used to approximate color regions.
- Keep Background - Enable or disable the keeping of the original image in the empty regions between the points.
The advanced options of the Spot Grid effect can be accessed, by clicking on the button.
- Stroke Color - Select a stroke color, used to render the point shape margins.
- Spacing - Set the spacing between the points, relative to the radius.
- Stroke Width - Set the width of the crystal margin stroke.
- Angle - Set the direction of the spot grid.
- Scale - Set the vertical stretching of the point sizes.
White Noise
The White Noise image effect, adds a white noise over the colors of the image. The noise is added by adjusting individual pixel colors. The color used in the noise can be selected by the user.
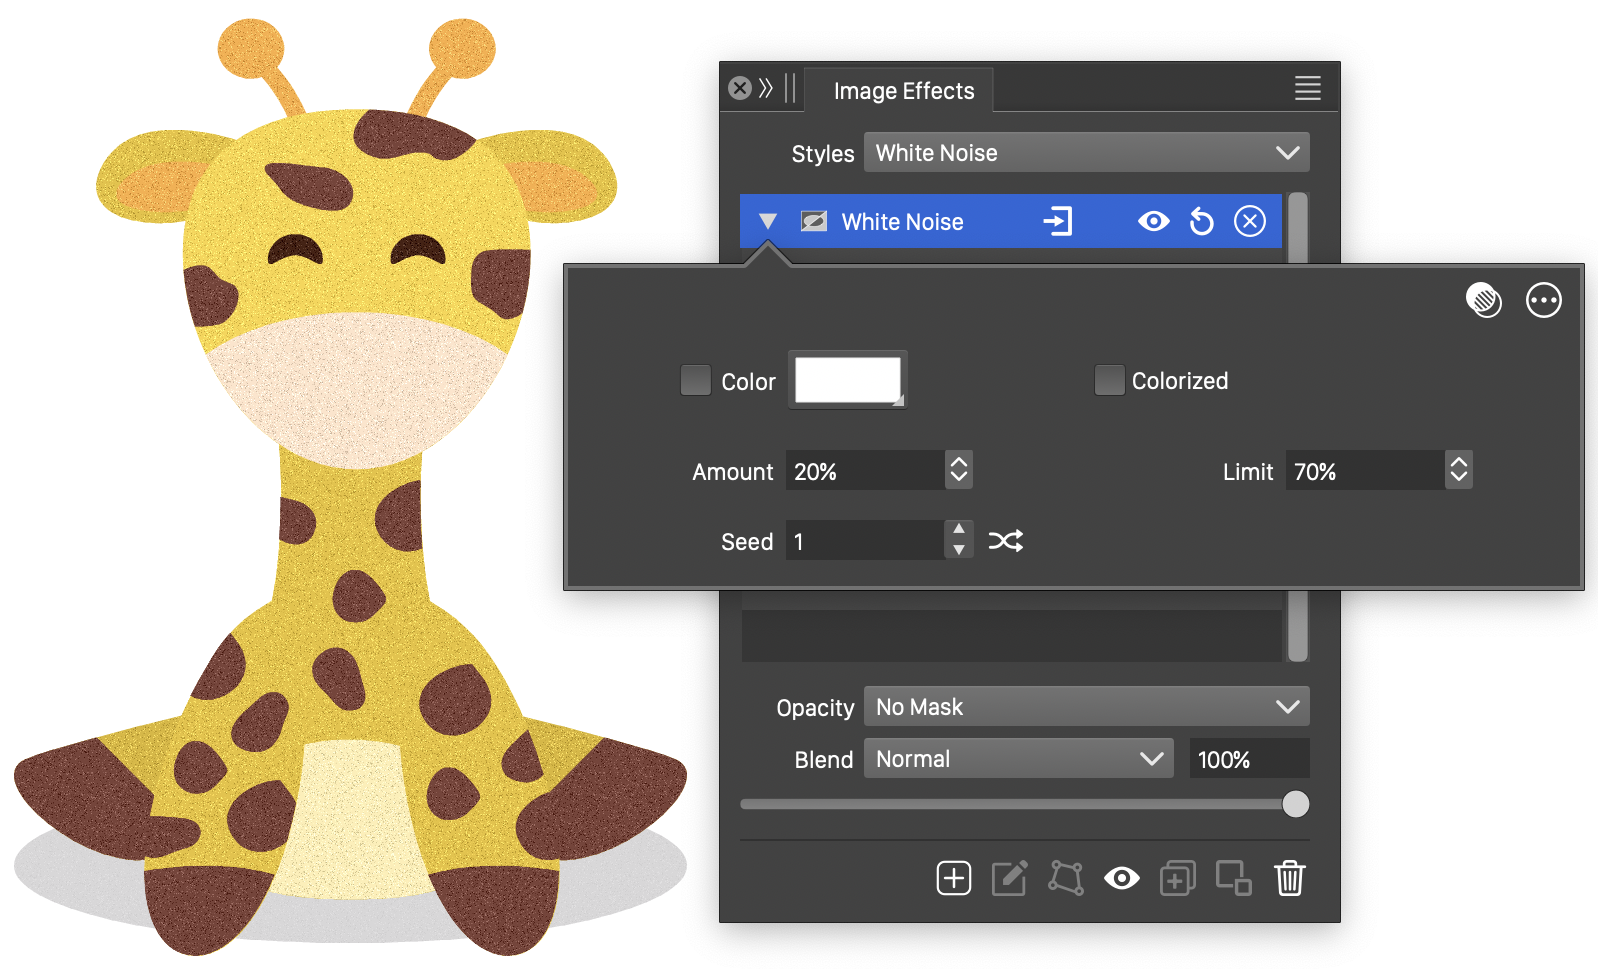
The White Noise effect and its options.
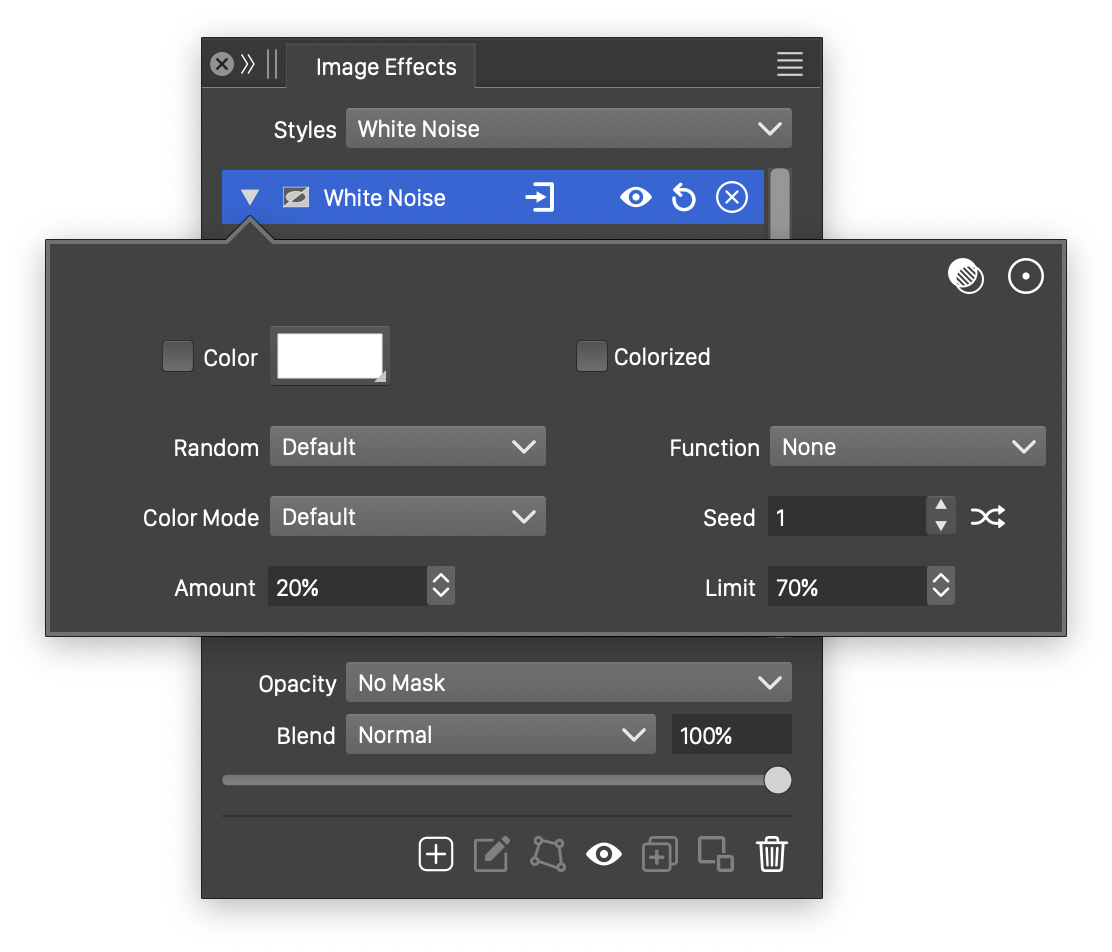
Advanced options of the White Noise effect.
The White Noise image effect uses the following basic options:
- Limit - Set the density limit of the white noise. Higher values result in less noise.
- Amount - Set the strength of the adjustment made to the pixel colors by the white noise.
- Seed - Set the randomization seed used to generate the white noise. The button can be used to pick random seed values.
- Color - Select a color of the noisy pixels. If disabled, the color will be the original image color adjusted by the white noise. When enabled, the original color is adjusted towards the selected color.
- Colorized - Enable or disable individual color channel white noise. When enabled, each color channel is adjusted by a separate white noise. When disabled, the color channels are adjusted by a single common white noise.
The advanced options of the White Noise effect can be accessed, by clicking on the button.
- Random - Select a randomization mode used to generate the white noise. The randomization mode determines the distribution of the noisy pixels.
- Transfer - Select or edit the white noise distribution adjustment curve.
- Color Mode - Select the color mode used to adjust the image pixel colors. The colors are converted into the selected color mode, and the adjustments are made to the selected color channels of this color mode. The active color channels can be selected by clicking on the
 button.


