Glyphs
A glyph is a visual symbol, representing one or more characters of a script or a language, in a font. Different fonts contain different glyphs for the same character, providing alternate renderings of the same concept or symbol.
Typically, glyphs are stored in font files, where a font file may contain hundreds or thousands of glyphs.
Font files, and the glyphs in these font files, can also be used to define pictograms, or monochrome icons. This can be unrelated to the concept or character at the code point where the glyph is stored in the font. For example, it is common to store large collections of monochrome icons, as sets of shapes in TrueType or OpenType formats. These icons can be easily included in web pages, due to the common font format support.
Glyphs of a font can be individually accessed and used using the Glyphs panel. Some of the important features, when working with glyphs are:
- Glyphs can be used as a shape of an object. A glyph shape is a parametric shape containing a font name and glyph index. Glyph shapes work like any other shape, can be saved as styles or presets, and can be used as clipping shapes on object groups or layers.
- Glyphs can be used from any font file, even from fonts not installed in the operating system, just by selecting the font file.
- Glyphs of SVG fonts can be listed in the Glyphs panel, and used as shapes.
- Multiple instances of the Glyphs panel can be opened to browser and use glyphs from different fonts.
- Glyphs can be inserted into both vector text shapes and text flows.
- The Inline Shape object role is used to define new glyph shapes from any object shape.
- The Inline Object object role is used to create glyphs with colors and style from any object.
- Inline shapes and objects can be inserted into both text shapes and text flows.
Glyphs Panel
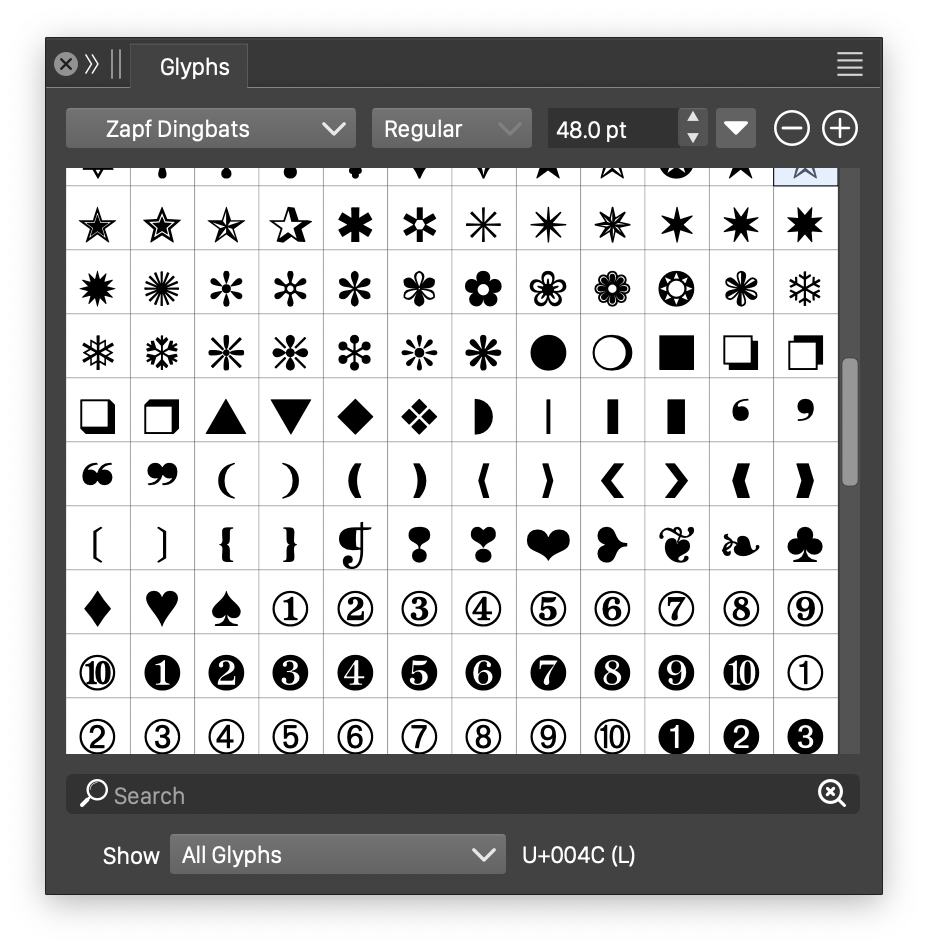
The Glyphs panel
The Glyphs panel, opened from the Window - Text menu, is used to browse and select glyphs, to be inserted into text or as a shapes of objects. The Glyphs panel shows the glyphs from a single font at a time. This can be a specific font selected in the panel, or the current font from the selected text.
The Glyphs panel contains a grid of glyphs from the current font. The size of the glyph grid in the panel can be decreased using the  button, and increased using the
  button.
The upper row of widgets in the Glyphs panel is used to select the font and the size of the font used to insert glyphs into the document. The font is selected by clicking on the font name (Zapf Dingbats in the example). This opens the font selector view, described in Fonts section. If the current typeface contains multiple styles, the style can be selected from the drop box next to the font name.
The font size is selected in the numeric field next to the font style. The font size is used when inserting glyphs into text, or as shapes of objects into the document. The size can be adjusted later, by selecting the font size from the Character panel for text, or by resizing the object with the glyph shape.
The Show field at the bottom of the Glyphs panel, is used to select the type of glyphs to show. This can be various OpenType alternates or glyph types, if available. It is also possible to show inline shapes and objects, defined in the current document. The list of inline shapes and object does not depend on the selected font.
Glyphs can be inserted into the document as follows:
- To insert a glyph at a position of a text, set the cursor position at the insertion location and double click on the glyph in the grid.
- To create a new object with a shape using a glyph, deselect any current selections, and double click on the glyph. This will create a new object at the center of the document view, using the glyph shape.
- A new object can also be inserted by dragging and dropping a glyph at the desired location in the document.
- The size of the inserted glyph will be the font size selected in the numeric field in the upper row of the Glyphs panel.
- To change the shape of an object to a glyph shape, select the object and double click on the glyph.
The Glyphs panel menu contains additional options and commands used for glyph selection:
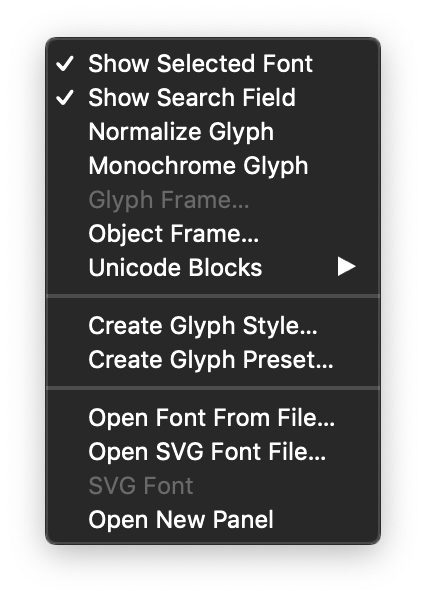
The Glyphs panel menu
- Show Selection Font - Enable or disable the automatic switching of the font to the font from the selected text. This option is disabled by default, allowing the browsing and selection of glyphs from a specific font, selected with the font selector. When enabled, the font is automatically switched to the font from the selected text. This can be useful to show available glyphs from the current font.
- Show Search Field - Enable or disable the search field at the bottom of the glyph list. The search field can be used to search for glyphs by their name. The glyph names are font specific, and some fonts may not provide names with the glyphs. Typically, fonts should use standardized glyph names.
- Normalize Glyph - Remove overlapping parts of glyph shapes for better outline styling. Certain OpenType variable font glyphs may result in overlapping paths due to the parameter values. Normalizing these glyphs will make the outline shape follow the filled region.
- Monochrome Glyph - Render the monochrome version of color fonts.
- Glyph Frame - Open the glyph frame editor for the highlighted inline shape or object in the Glyph panel. The glyph frame editor is used to set the margins and axis of a user defined inline shape or object. The margins and the axes are used to position the inline shape or object in the text.
- Object Frame - Open the glyph frame editor, to edit the glyph frame for the selected object. The glyph frame is stored with the object and it is used whenever the object is inserted into text as an inline shape or object. The details of editing the glyph frame are described below.
- Unicode Blocks - Select Unicode standard characters blocks to limit the list of glyph.
- Create Glyph Style - Create a new glyph style from the selected glyph. Glyphs styles can be used as glyphs in text, as object shapes or as bullet points for paragraphs. A glyph style can be edited in the Styles panel, or Document Styles command. Editing a glyph style will update all instances of that style used in the document.
- Create Glyph Preset - Create a new glyph preset from the selected glyph. Glyphs presets can be used as glyphs in text, as object shapes or as bullet points for paragraphs.
- Open Font From File - Select a font file, to show the glyphs in that font file in the Glyphs panel. Any font file can be selected, including fonts not installed into the operating system.
- Open SVG Font File - Select an SVG font file, to show the glyphs defined in an SVG fonts. SVG glyphs are inserted into text or document as shapes.
- SVG Font - Shows the SVG fonts available in the selected SVG font file, if multiple fonts are available. Select an SVG font from the list, to show its glyphs in the panel.
- Open New Panel - Open a new instance of the Glyphs panel. Multiple Glyphs panels can be opened to browser and work with glyphs from different fonts at the same time.
Glyph Frames
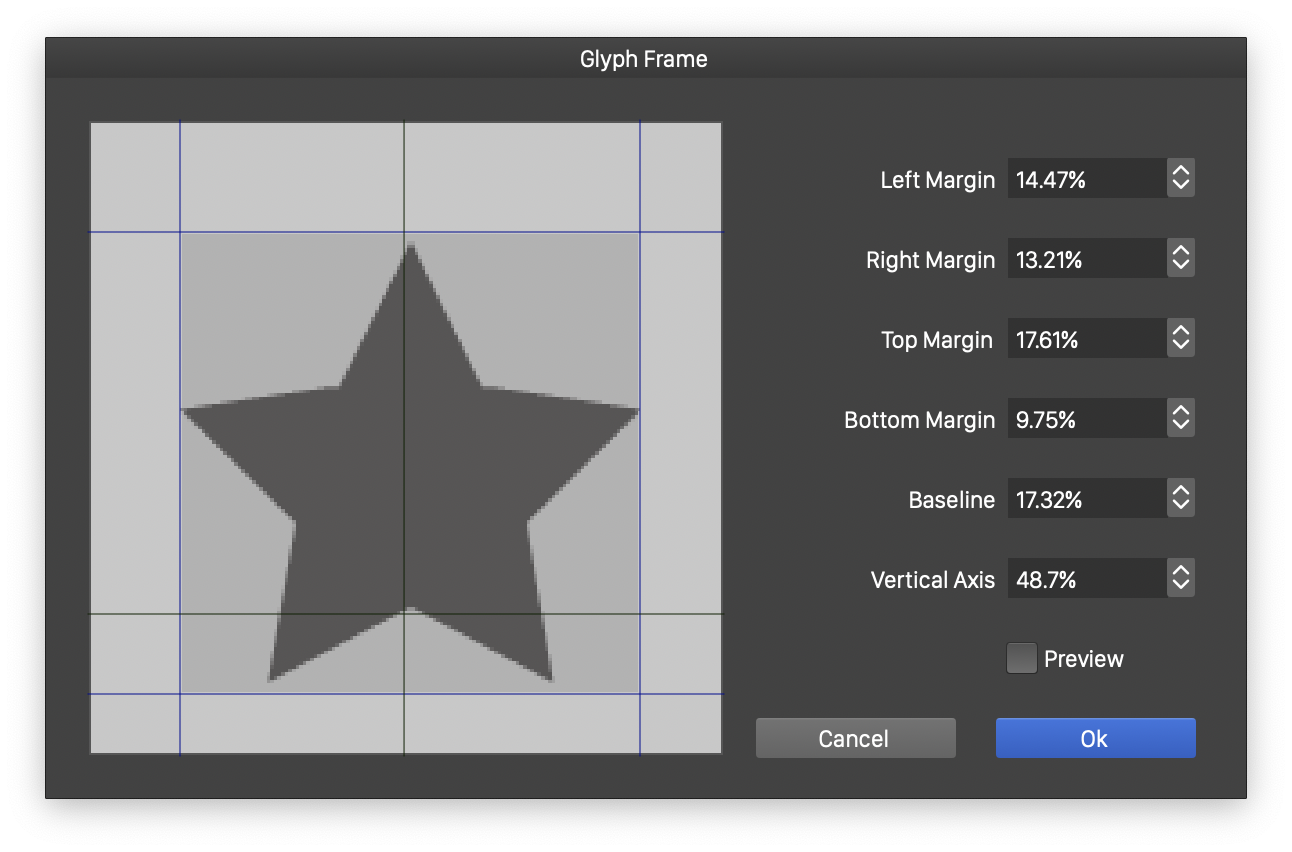
The Glyph Frame editor
The glyph frame, is a set of typographic measures, used when a shape or object is placed inside a text as a glyph. The glyph frame settings can be associated with an object, and will be stored with the document. The glyph frame can be adjusted for an inline object or shape, to properly position the glyph inside a text.
The glyph frame consists of:
- Left Margin - The amount of space before the glyph.
- Right Margin - The amount of space after the glyph.
- Top Margin - The amount of space above the glyph, in vertical text.
- Bottom Margin - The amount of space below the glyph, in vertical text.
- Baseline - The baseline position in the glyph. This will be the location of the text baseline when placing this shape or object inside the text.
- Vertical Axis - The vertical axis of the glyph, used to position the glyph in vertical text layout.
The margins, baseline and axis can be adjusted interactively in the glyph preview, by dragging the indicator lines. The default margin values are zero, and by default, the margin lines will be at the margin of the preview area.
Inline Shapes
The Inline Shape object role can be used to create new inline shapes that can be inserted into a text as a user defined glyph shape.
- Select the object, with the shape that will be used as an inline shape in text.
- Select the Object Options command from the Object menu.
- Set the object name and enable the Inline Shape role using the Role button.
- Confirm the object options.
- To show the available inline shapes, select the Inline Shapes mode in the Show field of the Glyphs panel.
- Position the cursor in the text at the insertion location, and double click the shape in the Glyphs panel.
- The inline shape is inserted as a regular text glyph, and it can be styled and sized as a glyph with the surrounding text, or individually.
Inline shapes can also be used to create special stretching symbols inside a text. This can be done by selecting the Stretching Mode option in the character options, and setting up the shape stretching amounts in the paragraph options, as described in the Paragraph Style section.
Inline Objects
The Inline Object role can be used to create new inline objects that can be inserted into a text as a user defined glyphs. The object shape, style, effects and other attributes will be used from the original object, when inserted into the text.
- Select the object, that will be used as an inline object in text.
- Select the Object Options command from the Object menu.
- Set the object name and enable the Inline Object role using the Role button.
- Confirm the object options.
- To show the available inline objects, select the Inline Objects mode in the Show field of the Glyphs panel.
- Position the cursor in the text at the insertion location, and double click the object in the Glyphs panel.
- The inline object is inserted as a regular text glyph, and sized as a glyph with the surrounding text, or individually. The object will be rendered using its original styles and effects.
Inline objects can also be used to create special stretching symbols inside a text. This can be done by selecting the Stretching Mode option in the character options, and setting up the object stretching amounts in the paragraph options, as described in the Paragraph Style section.


