CJK Options
VectorStyler provides additional typography features for languages with vertical typesetting. These features enable traditional typesetting of vertical text, and a finer control of how paragraphs are split into lines, or how glyphs are spaced.
The vertical typography features of VectorStyler use character mappings to organize glyphs into groups (or classes). A character mapping is used for example in mojikumi to assign special spacing between different character classes. In VectorStyler, character mappings can be edited and customized, and user defined character mappings can be used in all of these features.
The following vertical typesetting specific features are provided:
- Setup kinsoku rules to break paragraphs into lines, including hanging punctuation modes.
- Setup mojikumi options to add space around characters for paragraph justification.
- Automatically rotate roman text inside vertical text.
- Use tate-chu-yoko to set a few characters horizontally inside vertical text.
- Use warichu to set part of the vertical into two or more columns inside a single line.
- Add ruby text to set kanji yomi next to the main text. The ruby text can be edited directly in the text editor along with the main text.
- Set the aki and tsume of selected characters to adjust spacing locally.
- Add kenten to selected text. Kenten may also contain inline symbols or shapes.
- Set shatai to create a oblique distortion of selected characters.
When working with kinsoku or mojikumi options, the selected options must be stored as a style in the document, to be used by the paragraph composer. When selecting a kinsoku or mojikumi preset in the paragraph options, it will automatically add a corresponding style to the document. To adjust these options, it is recommended to edit the style, instead of the preset.
Paragraph Options
The various Japanese composition options are selected in the Japanese Composition section of the Paragraph Options view.

Japanese Composition Options
The following options are available:
- Allow Joining Classes - Enables the use of joining classes selected in the kinsoku style of the paragraph. Joining classes are used to keep certian characters like numbers in a single line.
- Automatic Tate-chu-yoko - Enables the automatic creation of tate-chu-toko character style in the paragraph text, using the kumi number and the character classes selected in the Tate-chu-toko drop down.
- Kumi Number - Set the number of characters in a single automatic tate-chu-toko section.
- Tate-chu-toko - Select the character class for tate-chu-toko characters in the first drop down. In the second drop down select character classes that aere neutral for tate-chu-toko (that is, they take the tate-chu-toko state from the surrounding characters). In the third drop down, select the character mapping style used to classify the characters.
- Spacing - Select the character classes automatic spacing of characters in a stretching paragraph text. These classes are used by the Spacing stretching mode to uniformly adjust space around certain characters. By default, the spacing locations are determined by line breaking opportunities. This can be augmented, by selecting character classes (first drop down) where spacing is allowed, or character classes (second drop down) where spacing is disabled. In the third drop down, select the character mapping style used to classify the characters.
- Vertical Glyphs - Select the character classes and the character mapping used to set glyphs vertically. All other glyphs are rotated automatically, when in vertical text.
- Kenten Skip - Select the character classes and the character mapping used to determine which characters to skip when using kenten.
- Mojikumi - Select the mojikumi style used for the paragraph text stretching. The mojikumi style defines stretching options based on character class pairs.
- Kinsoku - Select the kinsoku style used for the breaking the paragraph text into lines. The default line breaking rules defined by the Unicode standard are used, in addition to rules defined in the kinsoku style.
Character Mappings
Character mapping styles are used in various typography features to organize characters into named classes. This is required to be able to separate characters for various roles in different features.
Character mappings can be edited and customized, and user defined character mappings can be created to enable more detailed control over the various typographic features.
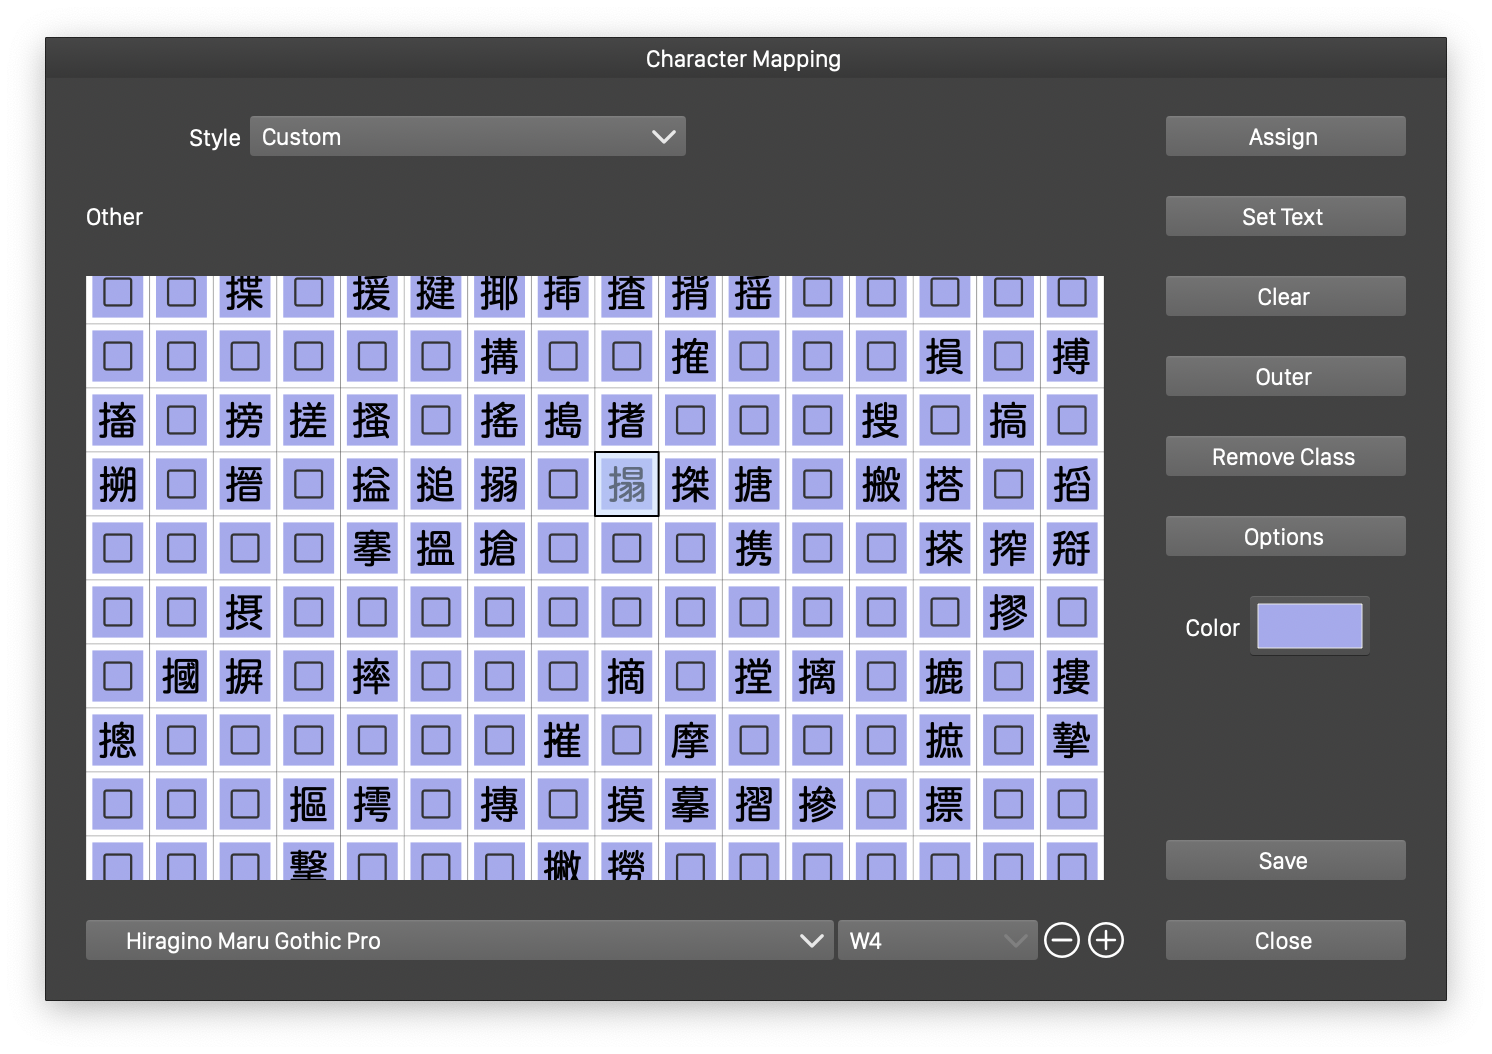
The Character Mapping editor
To edit the character mapping styles, select the Character Mappings command from the Text menu. This opens the Character Mapping editor view. The characters are shown in a grid, using colors associated with the character classes. These colors re used only for labeling purpose, to help identify the different classes in the character grid.
The Character Mapping editor view allows the creation of new character mapping styles, or new character classes inside the edited character mapping style.
- Style - Select a character mapping style or preset to edit. The edited character mapping must be saved as a style, before closing the view, for changes to take effect.
- The character grid shows the characters as defined by the Unicode standard, using the selected font. Some characters my be missing from the fonts, which is indicated with a square glyph.
- The font used in the character grid can be selected at the bottom of the editor view. The font is used only to help in the editing of the character mapping.
- Select one or more characters in the grid to change their assigned style
- Assign - Opens a menu of the character classes available in the edited character mapping. Select a character class to assign to the highlighted characters.
- Set Text - Assign specific characters to a character class, by inputing the characters in a text editor.
- Clear - Remove the character class assignments form the selected characters.
- Outer - Set an outer character class for character codes above the selected character.
- Remove Class - Remove a character class and all its assignments of character codes.
- Color - Assign a color to the character class of the selected character. Colors are used as a labeling mechanism of character classes.
- Save - Saves the edited character mapping as a style in the current document.
The Options opens a menu of additional character mapping editor options:
- New Mapping - Create a new character mapping, by copying the existing character mapping.
- New Class - Create a new character class, by setting its name and color label.
- Clear Mapping - Removes all character code associations with classes, but keeps the class name definitions.
- Clear All - Empties the character mapping, by removing all character classes and associations of character codes.
- Import Mapping - Imports a character mapping from a file.
- Export Mapping - Exports the edited character mapping to a file.
Kinsoku Options
Kinsoku options are used control the location of line breaks. By default, line breaks a determined using the line breaking rules defined by the Unicode standard. In addition to this, some characters may be forbidden to be at the start or the end of a line. Kinsoku also defines hanging punctuation characters, optionally placed outside of the text frame when adjusting paragraph text.
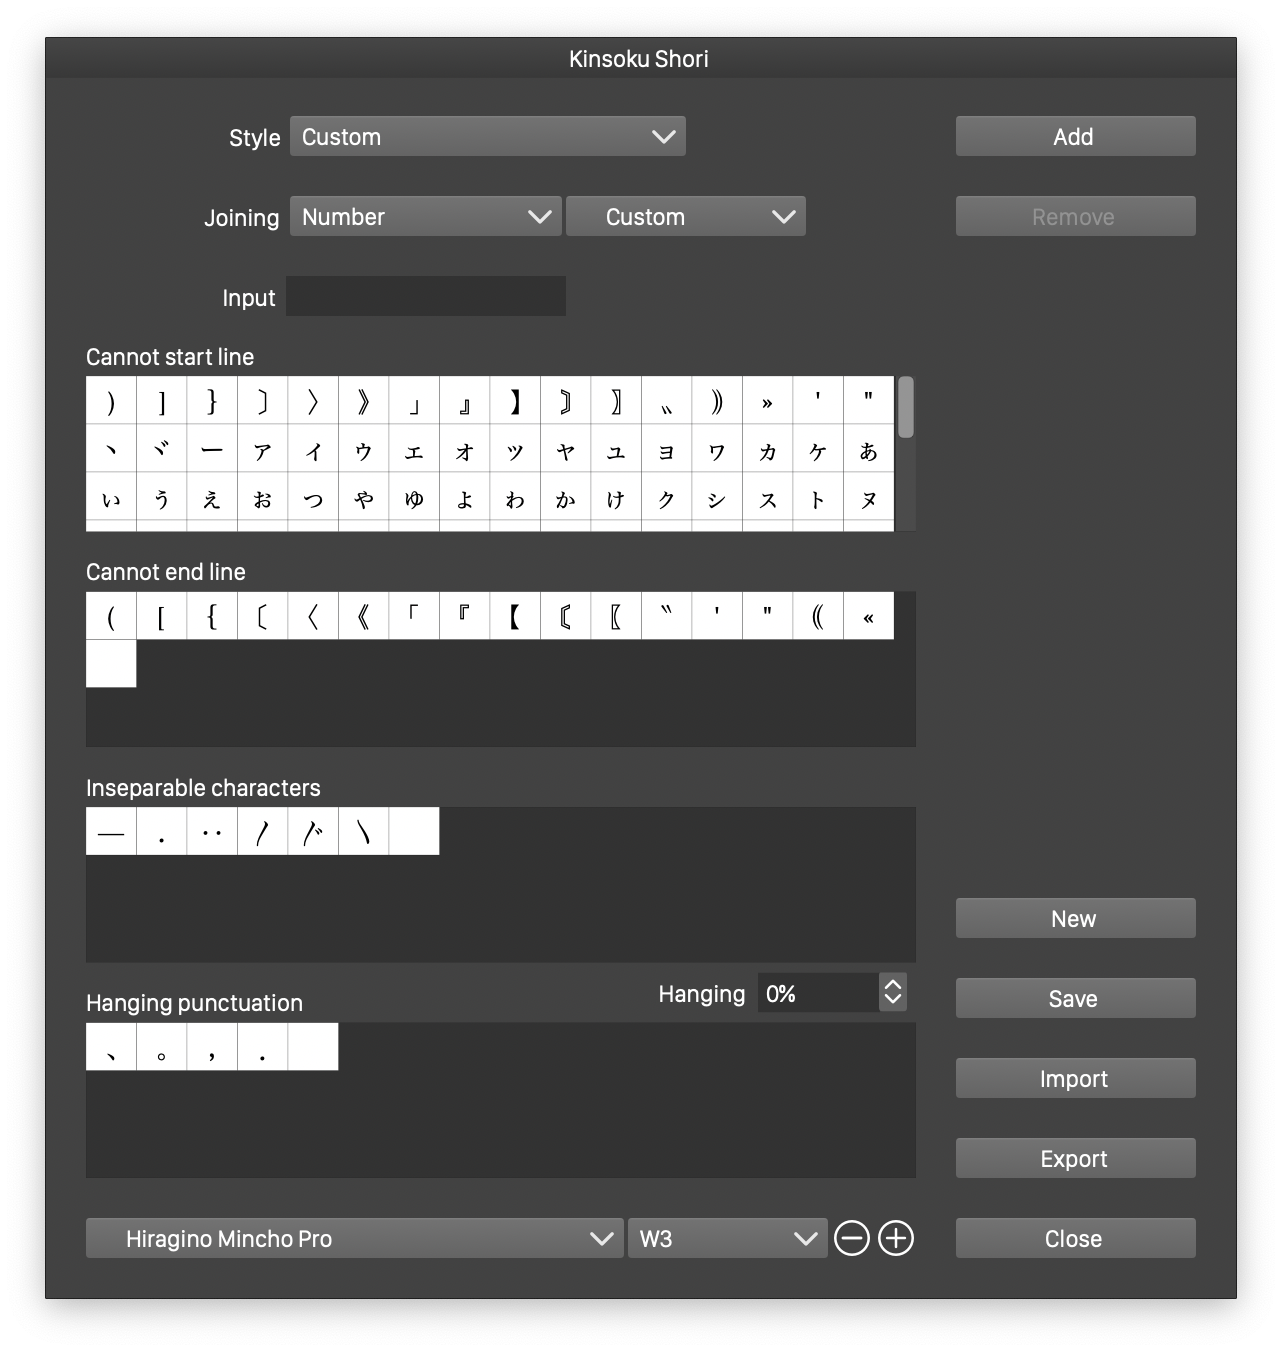
The Kinsoku options view
The kinsoku options of a paragraph can be selected in the paragraph panel, or in the Japanese Composition section of the Paragraph Options view. The kinsoku options are edited using the Kinsoku Options command from the Text menu. It is recommended that kinsoku options are saved as styles in the document, and selected as such in the paragraph options.
The Kinsoku Shori view contains the following editing options:
- Style - Select a previously saved kinsoku style or preset.
- Joining - Select the joining classes and the character mapping used to determine joining classes. Joining classes are enabled with the paragraph Allow Joining Classes options.
- Cannot start line - Shows a grid of characters that cannot be placed at the start of a line.
- Cannot end line - Shows a grid of characters that cannot be placed at the end of a line.
- Inseparable characters - Shows a grid of characters that cannot be separated.
- Hanging punctuations - Shows a grid of characters used in hanging punctuation.
- The font used to preview the characters can be selected at the bottom of the view.
- To add new characters to a group, select the grid (selection shown by a blue highlight), type the characters in the Input field, and press the Add button.
- To remove the selected characters from the highlighted grid, press the Remove button.
- New - Creates a new kinsoku set, by copying the edited options.
- Save - Saves the edited kinsoku options as a style in the current document.
- Import - Import kinsoku options from a file.
- Export - Export kinsoku options to a file.
Mojikumi Options
Mojikumi options are used to set spacing or scaling rules between pairs of character classes, used when stretching lines of a justified paragraph text.
It is possible to use multiple different mojikumi styles in a single paragraph, by adding a mojikumi style to multiple stretching levels, in the Stretching Style editor. This creates a prioritized mojikumi, where the increasing levels are used to space the text of a paragraph.
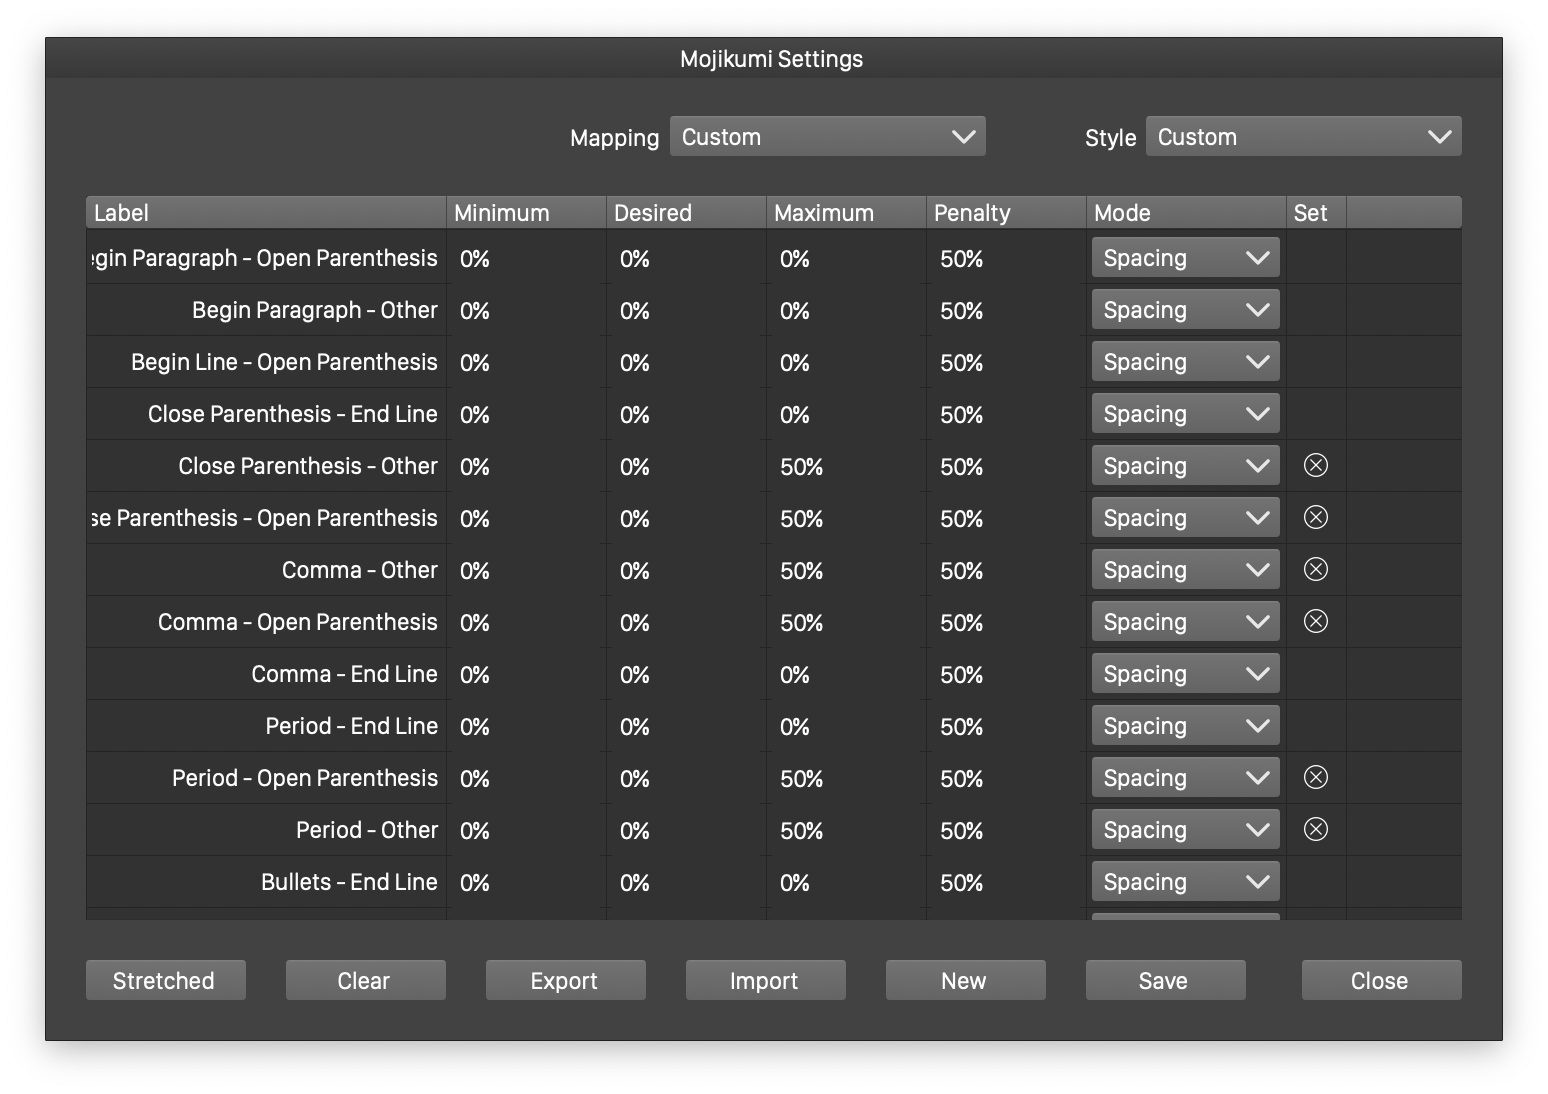
The Mojikumi options view
The mojikumi options of a paragraph can be selected in the paragraph panel, or in the Japanese Composition section of the Paragraph Options view. The mojikumi options are edited using the Mojikumi Options command from the Text menu. It is recommended that mojikumi options are saved as styles in the document, and selected as such in the paragraph options.
The Mojikumi view contains the following editing options:
- Style - Select a previously saved mojikumi style or preset.
- Mapping - Select a character mapping used to specify mojikumi pairs. Character mappings can be customized using the Character Mapping command of the Text menu.
- Previous - Available only in Detailed mode, selects the previous character class, that is paired with the classes listed in the view.
- The table in the mojikumi view shows the stretching pairs for the selected pair of classes (basic or stretched view), or the pairs formed with the character class selected in the Previous field, and the classes of the character mapping.
- Set the Minimum, Desired and Maximum spacing between character classes, by editing the numbers in the table.
- To use glyph scaling, instead of spacing, select the Scaling mode, in the Mode column.
- The Penalty columns contains the penalty values associated with the specific mojikumi pair, used in the multi-line paragraph composer.
- The Set column indicates if a mojikumi pair is adjusted.
- The Basic column can be used to mark mojikumi pairs shown in then Basic mode. This allows the user definition of a limited set of mojokumi pairs for easy editing.
- The Basic, Detailed or Stretched buttons are used to swap between various modes of the mojkumi view.
- To set the mojikumi spacing values to default, click on the Clear button.
- The mojikumi options can be exported to files, and imported back using the Export and Import buttons.
- To create a new mojikumi style, click on the New button. This will copy the existing mojikumi options into a new style.
- To save the edited mojikumi options, click on the Save button. Mojikumi options should be saved as styles in the document, to be available in the paragraph options view or panel.
Setting Aki and Tsume
Aki and Tsume are fixed character spacing options, available in the Japanese Options section of the Character Style view, or in the Character panel.
-
Aki adds a fixed amount of space around the selected characters. Aki can be set separately before and after the character. The Fixed Aki option can be used to block mojikumi adjusting the aki around specific characters.
-
Tsume reduces the extra whitespace around a glyph, down to the glyph boundary.
Rotating Roman Text
By default, roman text should be rotated when composed in vertical layout. This is controlled using character mappings, to determine which glyphs are vertical (and not rotated) and which ones are horizontal (and rotated).
The Vertical Glyphs field of the Japanese Composition section in the Paragraph Options view, is used to select character classes for vertical text, while the classes that are not selected will be automatically rotated in vertical layout.
To disable automatic rotation for a character selection, disable the Auto Vertical Roman option in the Japanese Options section of the Character Style view.
Characters can also be rotated in vertical layout, regardless of their type, by checking the Rotate Vertical option of the character style.
When inserting inline symbols or shapes into text, these can also be rotated automatically, by enabling the Rotate Long Inline option of the character style.
Tate-chu-yoko
Decimal characters (and in some cases other characters) may be formatted with a horizontal layout inside a vertical text, by place two or three characters horizontally as a single glyph. This is controlled by the tate-chu-yoko options of the character style.
Tate-chu-yoko can be enabled for the selected text using the Tate-chu-yoko command from the Character panel menu. The tate-chu-yoko text formatting is controlled using the Tate-chu-yoko Options command from the character panel menu, or the Tate-chu-yoko Options section of the Character Style view.
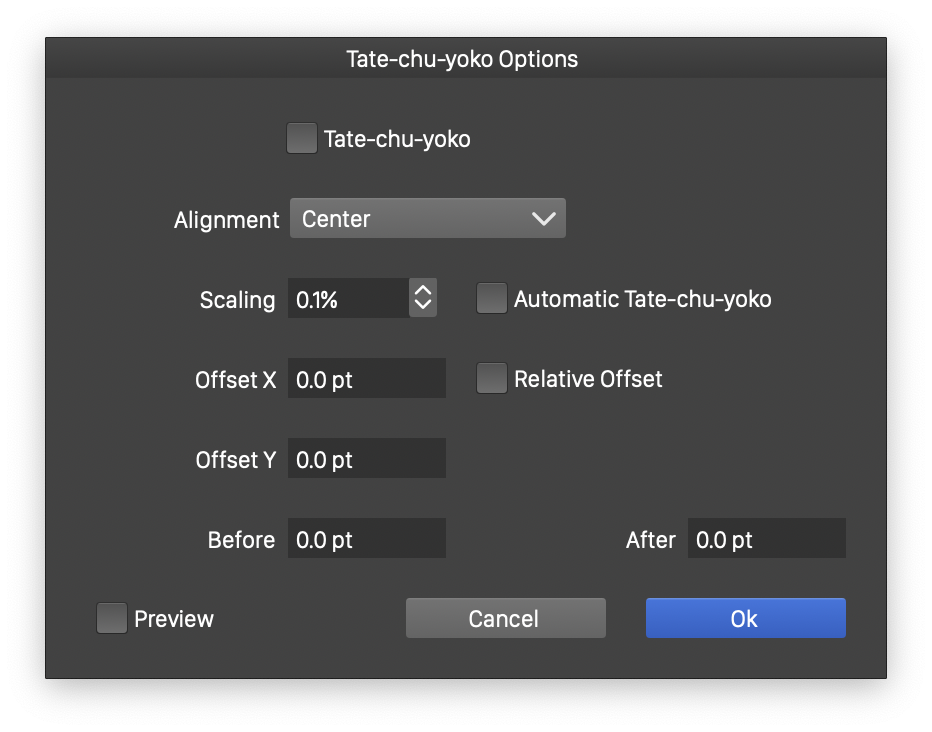
The Tate-chu-yoko options view
The following tate-chu-yoko formatting options are available:
- Tate-chu-yoko - Check to enable tate-chu-yoko formatting of the selected text.
- Alignment - Select the alignment of the tate-chu-yoko text, relative to the vertical baseline.
- Scaling - Adjust the size of the tate-chu-yoko text. The default font size is set to the parent text font size.
- Automatic Tate-chu-yoko - Enables or disables automatic tate-chu-yoko on the selected text. Automatic tate-chu-yoko can be enabled at paragraph level.
- Offset X and Offset Y - Adjust the position of the tate-chu-yoko text.
- Relative Offset - Check to specify the tate-chu-yoko text offset relative to the font size. Otherwise the offset is specified in absolute values.
- Before and After - Set an extra space added before and after the tate-chu-yoko text, to separate it from the vertical layout part.
Warichu
Warichu is a section of the characters in vertical layout, arranged into two lines using the amount of space available for one line. It is typically used as an inline text.
To create a warichu text, select the characters in the text editor, and select the Warichu command from the Character panel menu. The selected characters will be arranged in two columns with using a half-size font.
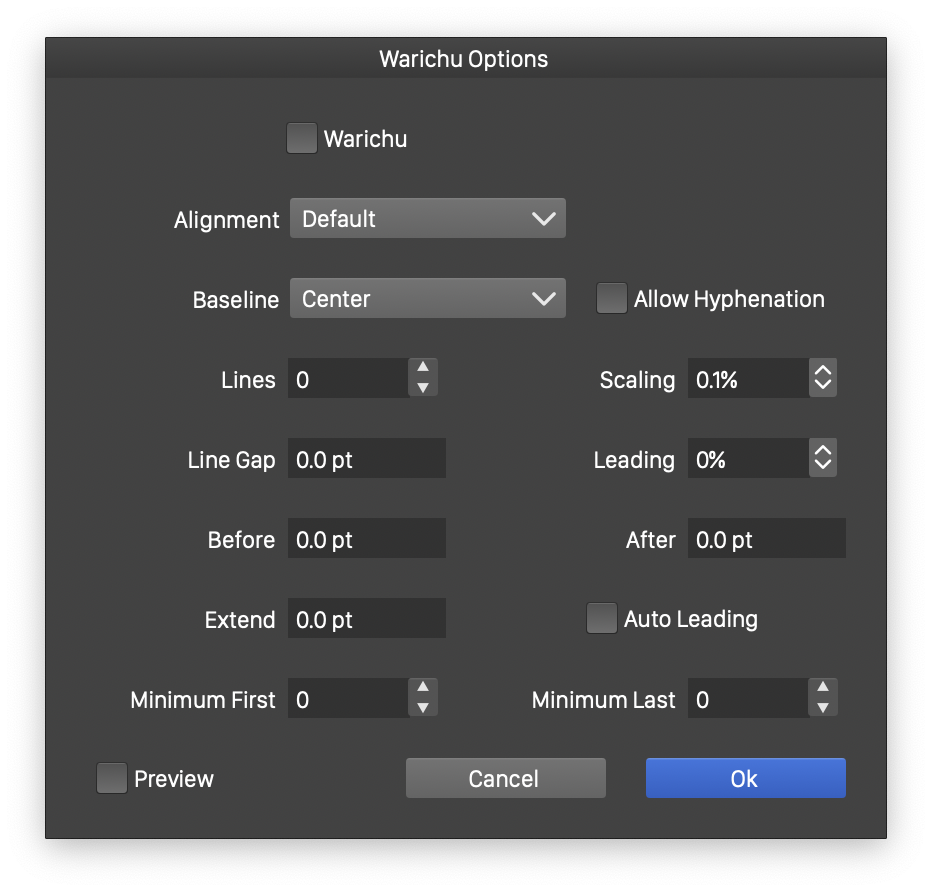
The Warichu options view
The warichu text options can be set using the Warichu Options command from the character panel menu, or the Warichu Options section of the Character Style view.
- Warichu - Enables or disables the warichu layout mode of the selected characters.
- Alignment - Sets the alignment of the warichu text lines.
- Baseline - Sets baseline alignment of the warichu text.
- Allow Hyphenation - Enables or disables roman hyphenation inside warichu text.
- Lines - Sets the number of lines in the warichu text. This is typically two.
- Scaling - Sets the scaling of the font size used in the typically text.
- Line Gap - Sets the hap between warichu lines.
- Leading - Adjust the leading using the warichu line widths.
- Before and After - Add extra space before and after the warichu text.
- Extend - Add an extra space to the warichu text height, used when justifying the warichu text.
- Minimum First and Minimum Last - Set the minimum number of characters in the first and last line of the warichu text.
Ruby
Ruby text is an annotation attached to the main text, displayed with smaller fonts, typically used as pronunciation guides for characters.
In VectorStyler, ruby text can be associated with a selection of characters using the Create Ruby command of the Character panel menu. Ruby text can be edited, selected and formatted freely in the text editor, just like the regular text.
Ruby text can be created by selecting the characters, and then selecting the Create Ruby command from the Character panel menu. This opens the Create Ruby view to set the ruby text and options.
Ruby Options
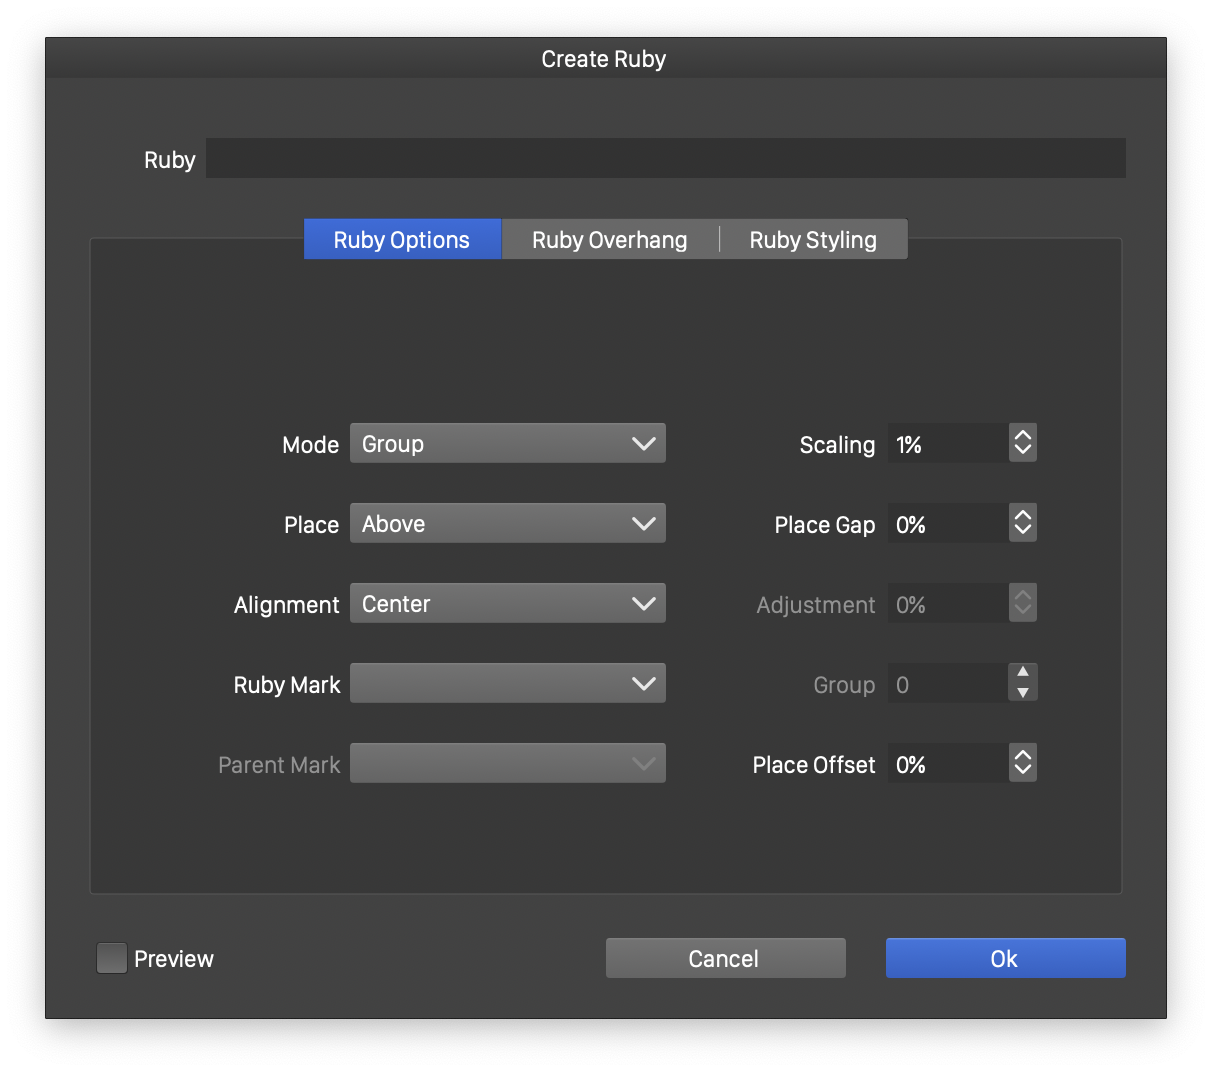
Ruby options
The following ruby options are available:
- Mode - Select the ruby grouping mode. This can be:
- Group - Aligns the whole ruby text with the parent as a single group.
- Per-Character - Sets separated (by space) ruby text to individual characters of the parent text.
- Separated - Separates the parent text using a special character (by default space) and assigns to each section the separated ruby text.
- Fixed Characters - Separates the ruby text and assigns each to a number of characters from the parent text.
- Place - Select the place of the ruby text.
- Alignment - Select the alignment of the ruby text relative to its parent.
- Ruby Mark - Set the separator character for the ruby text.
- Parent Mark - Set the separator character for the parent text.
- Scaling - Sets the scaling factor for the default ruby text font size. Once created, the ruby text can be selected, edited and formatted as regular text.
- Place Gap - Sets a gap between the ruby and parent text.
- Group - Sets the number of characters in the Fixed Character ruby grouping mode.
- Place Offset - Offsets the ruby text along the parent text direction.
Ruby Overhang
When the ruby text is longer than the parent text, by default the ruby is overhang over the characters before and after the parent. The overhang mode can be adjusted using the “Ruby Overhang” section of the ruby options view.
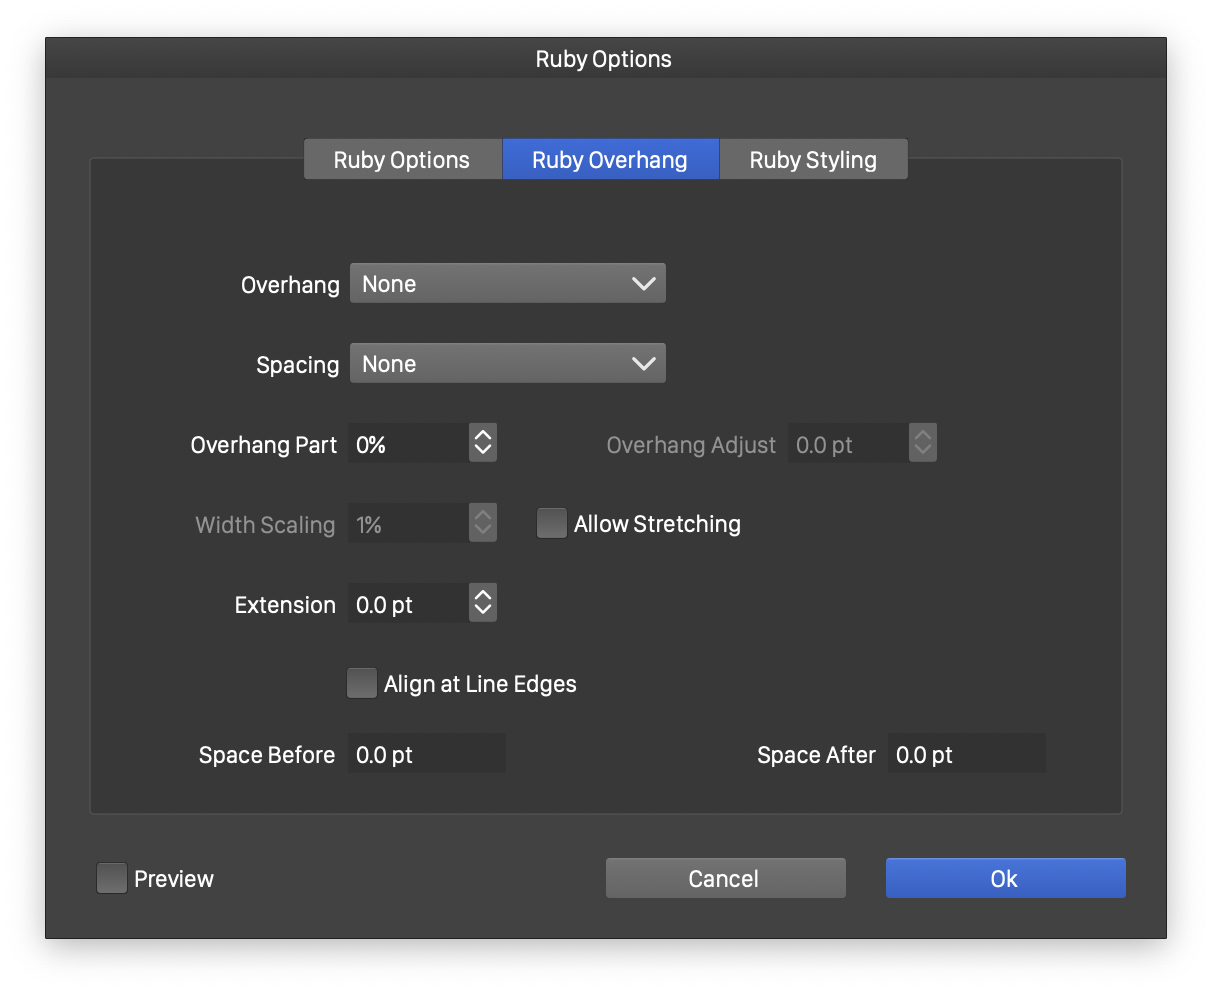
Overhang options
The following overhang options are available:
- Overhang - Select the overhang mode of the ruby text. In Partial mode, the overhang can be only a part of the extra text length.
- Spacing - Select the spacing mode in the parent text to adjust for overhang.
- Overhang Part - Select the amount of overhang relative to the extra text length.
- Overhang Adjust - Select a specific overhang amount of the ruby text, available in Partial overhang mode.
- Width Scaling - Select the extent of characters in the ruby text to adjust for overhang.
- Allow Stretching - Enable or disable automatic stretching of ruby text extent to reduce overhang.
- Extension - Set an extra amount of space to stretch the ruby text outwards.
- Align Line Edges - Check to automatically align ruby at line starting and ending.
- Space Before and Space After - Add an extra space before and after the parent text for this section of ruby.
Ruby Styling
The ruby text can be selected, edited and formatted using the text editor tool. Some styling options can also be set in the ruby options view.
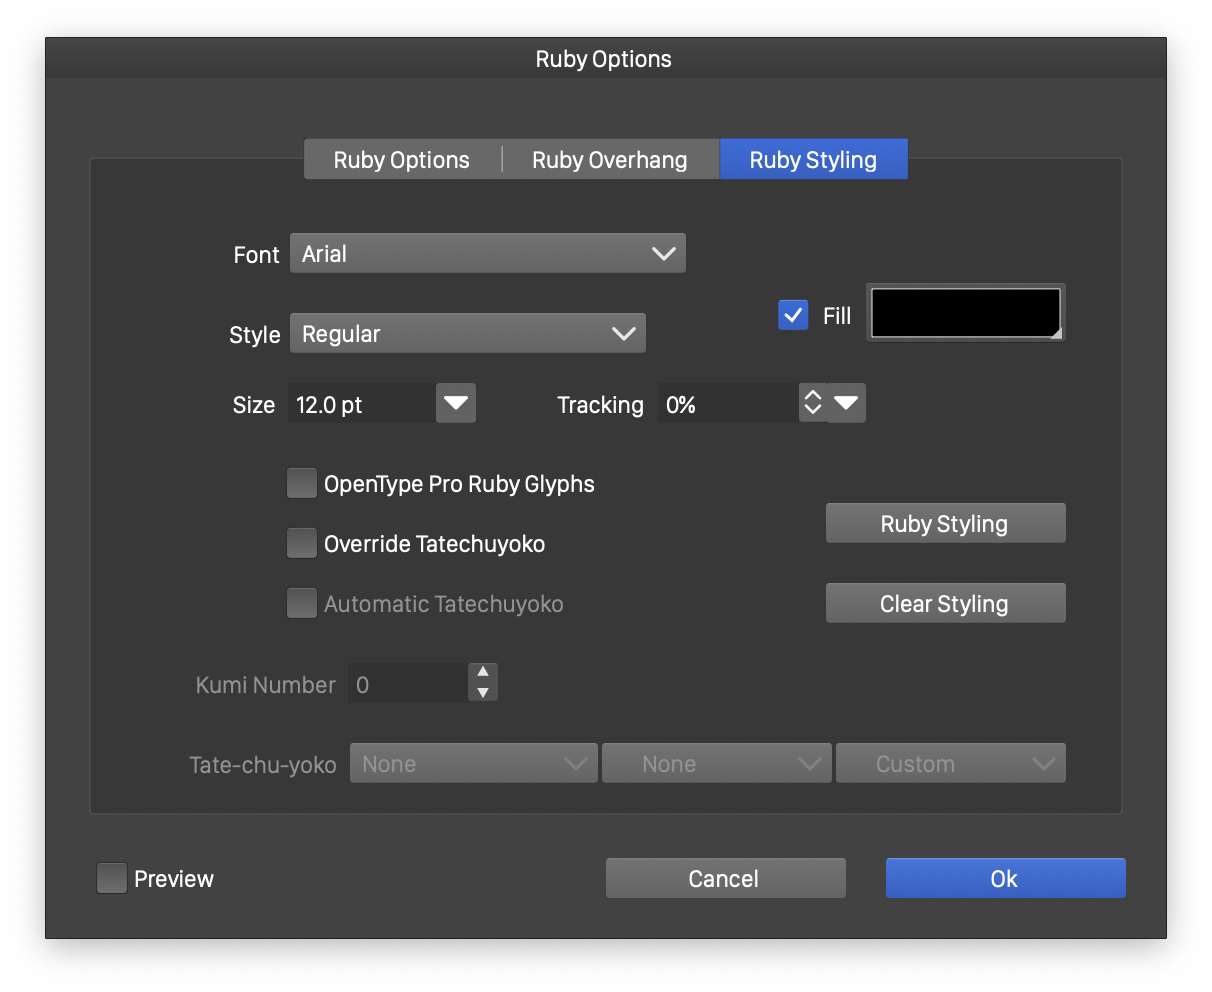
Ruby styling options
The following styling options are available:
- Font - Select the font used in the ruby text. By default the parent text font is inherited.
- Style - Select the font style for the ruby text.
- Size - Select the size of the font used in the ruby text.
- Tracking - Select the tracking amount between the characters of the ruby text.
- Fill - Select a fill style for the ruby text.
- Ruby Styling - Opens the Character Style view to edit detailed formatting options of the ruby text.
- Clear Styling - Removes all style overrides of the ruby text.
- OpenType Pro Ruby Glyphs - Enables the ruby OpenType feature, to select special glyphs suitable for ruby if available.
- Override Tate-chu-yoko - Check to override the default tate-chu-yoko settings of the parent text paragraph options.
- Automatic Tate-chu-yoko - Check to enable automatic tate-chu-yoko in the ruby text.
- Kumi Number - Set the kumi number for the automatic tate-chu-yoko in the ruby text.
- Tate-chu-yoko - Select the character classes used for detecting and creating tate-chu-yoko text inside the ruby text.
Kenten
Kenten are decorative marks placed next to glyphs as a highlight. Kenten may be added using a character of the current font, a character from another font or a user defined inline symbol or shape.
To assign kenten to the highlighted text, select the Kenten command from the Character panel menu. This opens the kenten options view.
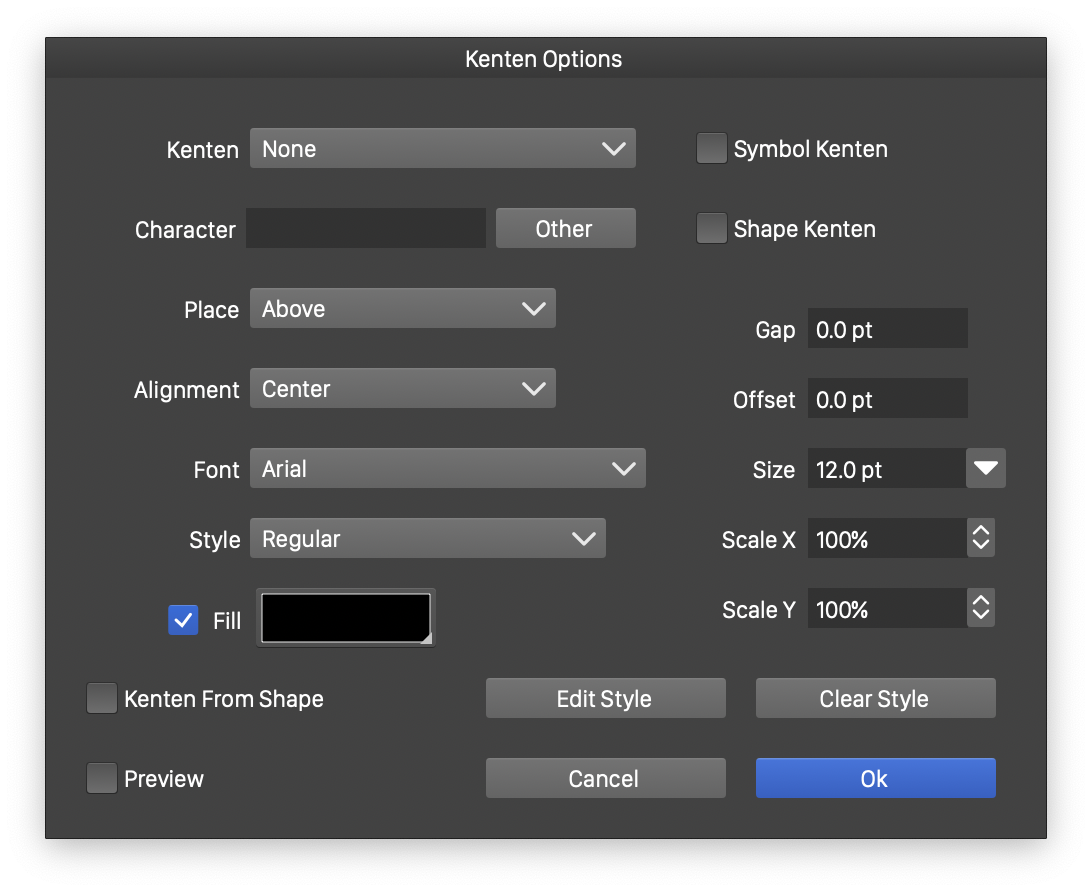
Kenten options
The following kenten options are available:
- Kenten - Select a predefined glyph from the current font, or a inline symbol or shape from the current document.
- Character - Input a character for the kenten.
- Symbol Kenten - Enable kenten around inline symbols.
- Shape Kenten - Enable kenten around inline shapes.
- Place - Select the place of the kenten, relative to the parent text.
- Alignment - Select the alignment of the kenten glyphs, relative to the parent characters.
- Gap - Set the gap between the parent text and the kenten glyph.
- Offset - Set the offset of the kenten glyph along the parent text.
- Font - Select a font used for the kenten glyph. By default the parent text font is used.
- Style - Select the font style used for the kenten glyph.
- Size - Select the size of the font used for the kenten glyph.
- Scale X and Scale Y - Scale the size of the kenten glyph.
- Fill - Select a fill style for the kenten glyph.
- Edit Style - Opens the Character Style view to edit additional formatting options of the kenten glyphs.
- Clear Style - Clears all character formatting overrides set for the kenten. The kenten glyph will be displayed using the parent text font.
- Kentent From Shape - Create a kenten from the shape of the symbol selected in the Kenten field.
Shatai
Shatai options can be used to distort the glyphs of Japanese text using an oblique scaling.
To set the shatai options of the highlighted characters, select the Shatai command from the Character panel menu.
Shatai options
The following shatai options are available:
- Shatai Angle - Set the shatai distortion angle.
- Shatai Scale - Set the shatai distortion scaling.
- Adjust Shatai Rotation - Adjust the rotation of the shatai effect to line up the margins of the characters.
- Adjust Shatai Tsume - Adjust the tsume of the shatai effect for closer spacing of the shatai characters.


