
Stroke Panel
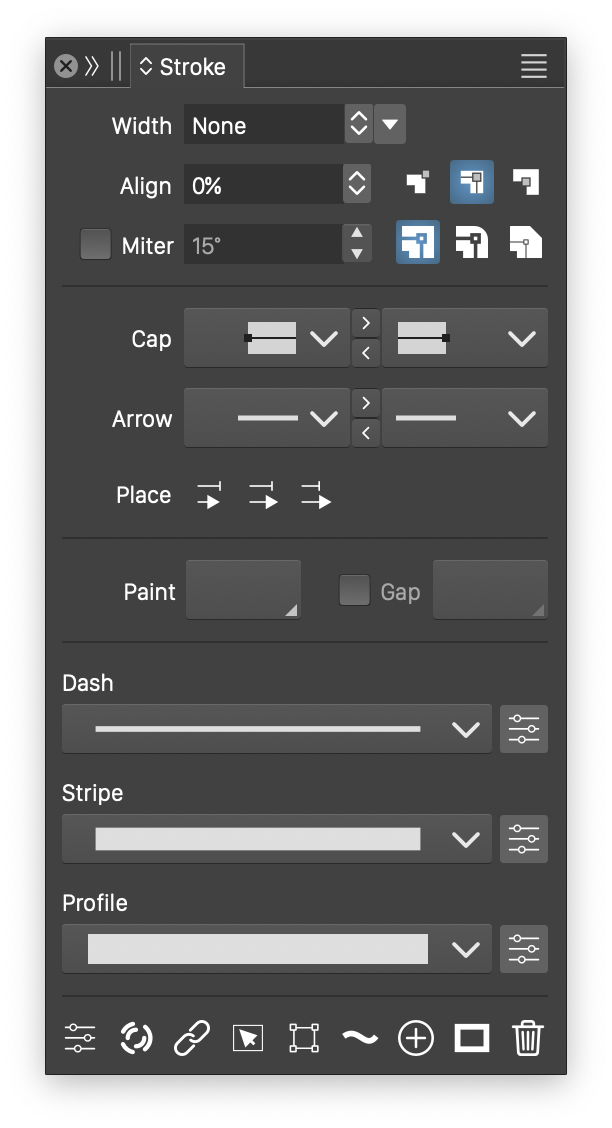
The stroke panel.
The Stroke panel, opened from the Window menu, is the primary place of setting various stroke attributes of the selected objects. The stroke panel provides a quick access to the most commonly used attributes of a stroke. When selecting an object (or objects), the stroke panel is updated with the stroke attributes of the selected object.
Changing a stroke attribute in the stroke panel, will immediately set that attribute on the selected object (or objects). Additional stroke attributes can be accessed in the Stroke Selector view, by using the Edit Stroke command of the stroke panel menu.
The panel contains a set of buttons to edit various aspects of the stroke attributes of the selected objects. The panel menu provides commands to create and edit details of stroke attributes like cap, arrow, dash, stripe and profile, and to setup and use stroke presets and styles.
Stroke Attributes
The following stroke attributes can be selected directly from the panel:
- Width - Set the stroke width in absolute units. A set of predefined stroke widths can be selected by pressing the
 button. The list of predefined stroke widths can be modified in the application settings Size Amounts section. Setting the stroke width to 0 (or Hairline), will set it to the thinnest possible width at any resolution and zoom.
 - Align - Set the stroke alignment relative to the actual outline shape. The alignment can be set to relative (to the width) or absolute amounts. The mode of setting the alignment can be selected from the panel menu. A set of three predefined stroke alignments can be selected using the buttons next to the Align field, these can be: Inner
 , Centered
  , and Outer
  , setting the stroke alignment to -100%, 0%, and 100%. For other alignment values, enter the value in the Align field and press enter to confirm.
 - Miter Limit - Enable or disable local miter limit for the stroke attribute. The miter limit controls the use of miter joins at sharp cusp corners. When a corner angle is too sharp (has a small angle), using miter corners results in very long corner spikes. Setting a limit to the corner angle for miter corners, enables the use of bevel corners in case of sharp angles. By default, a common miter limit is used, set in the Display Options, or in the exporting or printing options. Object specific, local miter limits can be enabled by checking the Miter Limit check box and editing the limit in the field next to the check box.
- Corner - Select one of the three possible cusp corner types. The cusp corner types can be: Miter
 , Round
  or Bevel
  .
. - Cap - Two buttons used to select the start and end cap of the stroke. The start and end caps can be set separately, allowing different starting and ending cap shapes on open or dashed paths. To select the start cap, click the first button. To select the end cap, click the second button. When clicked, the cap button opens a menu containing the current cap shape styles and presets. To edit the stroke cap attributes, hold the Option (Mac) or Alt (Windows) key while clicking one of the cap buttons. The details of editing the stroke cap are documented in the Stroke Caps section. To set both the starting and ending caps to the same style, hold the Command (Mac) or Control (Windows) key before clicking on the buttons.
- Arrow -Two buttons used to select the start and end arrows of the stroke style. When clicked, a list of arrow presets and styles are shown for selection. Holding the Option (Mac) or Alt (Windows) key, before clicking an arrow button will open the arrow options view to edit the attributes of the arrow shape. The details of editing the stroke arrow attributes are documented in the Stroke Arrows section. Holding the Command (Mac) or Control (Windows) key, before clicking an arrow button will select both the starting and ending arrows to the same style.
- Fill - Open the fill style selector popover, used to select the foreground fill style of the stroke. The foreground fill style is the style used to fill the region covered by the stroke (leaving out the gaps from dashes and stripes). The fill style selector can be used to select any of the supported fill types, including color, gradient, pattern or noise. It can also be used to select from various fill type presets or styles.
- Gap - Enable or disable a fill style for the background region of a stroke. The background region of a stroke is the empty region created when using dashes or stripes. The background region can be filled using a different fill style than the foreground region, or left empty. Use the button next to the Gap check box, to select a fill style for the background region of the stroke.
- Dash - Open a list of dash presets and styles available from the application or the document. When custom dash presets or styles are defined, they are shown in this list for selection. The
 button next to the dash list opens the dash selector view. The details of using the dash selector view are documented in the Stroke Dash section.
 - Stripe - Open a list of stripe presets and styles available from the application or the document. When custom stripe presets or styles are defined, they are shown in this list for selection. The button next to the stripe list opens the stripe selector view. The details of using the stripe selector view are documented in the Stroke Stripe section.
- Profile - Open a list of variable width profile presets and styles available from the application or the document. When custom variable width profile presets or styles are defined, they are shown in this list for selection. The button next to the profile list opens the profile selector view. The details of using the profile selector view are documented in the Stroke Profile section.
Panel Buttons
The lower part of the stroke panel contains a set of buttons used to access various stroke editing commands:
 - Opens the stroke selector view to edit more attributes of the stroke style, including the calligraphic shape. The use of the stroke selector view is described in the Stroke Selector section.
 - Enable or disable the alignment of dashed segments between cusp nodes. When enabled, the dash lengths are adjusted so that cusp nodes of the outline shape will fall inside dash segments. When disabled. cusp nodes may fall inside a dash segment or gap.
 - Enable or disable the relative stroke alignment mode. By default, this option is enabled, and the stroke alignment amount is set as a percentage of the stroke width (relative mode). When disabled, the stroke alignment can be set using an absolute amount, independently of the stroke width.
 - Enable or disable the transformation of the arrow shape using the calligraphic angle and scale. When enabled, a stroke shape is transformed using the scaling and rotation amounts set for the stroke calligraphy. If disabled, the arrow shapes remain proportional.
 - Enable or disable the transformation of the stroke with the objects in the selection.
 - Enable or disable the conversion of the stroke region into filled path for rendering. When enabled, the stroke is expanded internally into a filled path. When shape effects are applied to the object, these will distort the expanded stroke path, not the original object shape. The original shape of the object remains editable, and any changes to the shape or the stroke attributes will result in a new expanded stroke. This allows the creation of rich shape effect variations of the stroke region, without expanding the stroke and loosing editable stroke attributes. When disabled (the default mode), the shape effects are first applied to the object shape, and the resulting shape is then rendered with the stroke style.
 - Create a new stroke style from the current stroke attributes. The stroke style can be selected from the Styles menu of the stroke panel menu, or from the Styles panel.
 - Clears all stroke attributes except the width and turns the stroke on the selected objects into a solid stroke style.
 - Remove the stroke from the selected objects, leaving the objects with no outline style.
Panel Menu
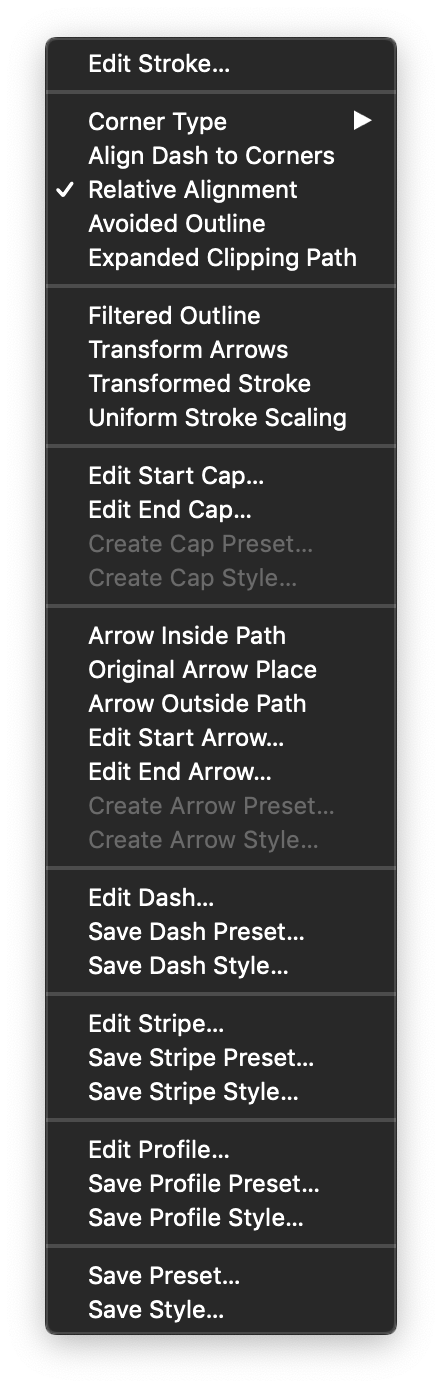
The stroke panel menu.
The stroke panel menu contains additional commands used to edit details for various stroke attributes, and to create and use stroke presets and styles. The following commands can be accessed from the stroke panel menu:
- Edit Stroke - Opens the stroke selector view. The Stroke Selector view contains additional attributes of the stroke style.
- Corner Type - Select the stroke corner type.
- Align Dash to Corners - Enable or disable the alignment of dash segments to cusp corners of the object shape.
- Relative Shift - Enable or disable the stroke alignment mode between relative (to the width) and absolute mode. When enabled, the stroke alignment is set in percentages relative to the stroke width. When disabled, the stroke alignment is set in absolute values as a distance from the object outline.
- Avoided Outline - Enable or disable the outline intersection gap marked on the selected objects. Intersecting outlines can be cut by a specified gap (see the Stroke Selector) at the intersecting locations.
- Expanded Clipping Path - Expand the clipping path of group objects to include the stroke area also.
- Filtered Outline - Enable or disable the conversion of the stroke into a path filled with the stroke fill style. When enabled, the stroke is expanded internally into a path. Shape effects applied to the object, will distort the expanded stroke path, not the original object shape. The original shape of the object remains editable, and any changes to the shape or the stroke attributes will result in a new expanded stroke. When disabled (the default mode), the shape effects are first applied to the object shape, and the resulting shape is then rendered with the stroke style.
- Transform Arrows - Enable or disable the transformation of the arrow shape using the calligraphic angle and scale. When enabled, a stroke shape is transformed using the scaling and rotation amounts set for the stroke calligraphy. If disabled, the arrow shapes remain proportional.
- Transformed Stroke - Enable or disable the transformation of stroke attributes inside the object.
- Uniform Stroke Scaling - Transform the stroke using uniform scaling.
- Edit Start Cap - Opens the stroke cap selector view to edit the starting stroke cap options. The Stroke Caps section contains a description on the stroke cap options.
- Edit End Cap - Opens the stroke cap selector view to edit the ending stroke cap options.
- Create Cap Preset - Create a new stroke cap preset from the shape of the selected object. A stroke cap options view is shown, where the preset group and name can be selected.
- Create Cap Style - Create a new stroke cap style from the shape of the selected object. The stroke cap options view is used to set the name of the new cap style. The Link to Object check box can be used to link the cap shape to the shape of the object, enabling automatic update of all cap shapes using the new style.
- Edit Start Arrow - Opens the stroke arrow selector view to edit the starting stroke arrow options. The Stroke Arrows section contains a description on the stroke arrow options.
- Edit End Arrow - Opens the stroke arrow selector view to edit the ending stroke arrow options.
- Create Arrow Preset - Create a new stroke arrow preset from the shape of the selected object. A stroke arrow options view is shown, where the preset group and name can be selected.
- Create Arrow Style - Create a new stroke arrow style from the shape of the selected object. The stroke arrow options view is used to set the name of the new arrow style. The Link to Object check box can be used to link the arrow shape to the shape of the object, enabling automatic update of all arrow shapes using the new style.
- Edit Dash - Opens the stroke dash editor view to edit the current dash style. The Stroke Dashes section contains a description on how to edit dash styles.
- Save Dash Preset - Create a new dash preset from the current stroke dash options.
- Save Dash Style - Create a new dash style from the current stroke dash options.
- Edit Stripe - Opens the stroke stripe editor view to edit the current stripe style. The Stroke Stripes section contains a description on how to edit stripe styles.
- Save Stripe Preset - Create a new stripe preset from the current stroke stripe options.
- Save Stripe Style - Create a new stripe style from the current stroke stripe options.
- Edit Profile - Opens the variable width profile editor view to edit the current width profile. The Stroke Profile section contains a description on how to edit variable width profiles.
- Save Profile Preset - Create a new variable width profile preset from the current stroke profile options.
- Save Profile Style - Create a new variable width profile style from the current stroke profile options.
- Save Preset - Create a new preset from the current stroke attributes. Stroke presets can be applied to objects from the Presets panel.
- Presets - Opens the list of stroke presets. Selecting a stroke preset will apply it to the selected objects.
- Save Style - Create a new stroke style from the current stroke attributes. Stroke styles can be applied to objects from the Styles panel. When using stroke styles on objects, editing a stroke style (in the Styles panel) will automatically update all stroke attributes on objects using the style.
- Styles - Opens the list of stroke styles. Selecting a stroke style will apply it to the selected objects.