Viewing Options
The appearance of a VectorStyler illustrations and documents on the screen can be controlled using various options from the View menu. A VectorStyler document is displayed in a document view inside the application window. The document view has a title label (used to select the active view) and may have a visible ruler.
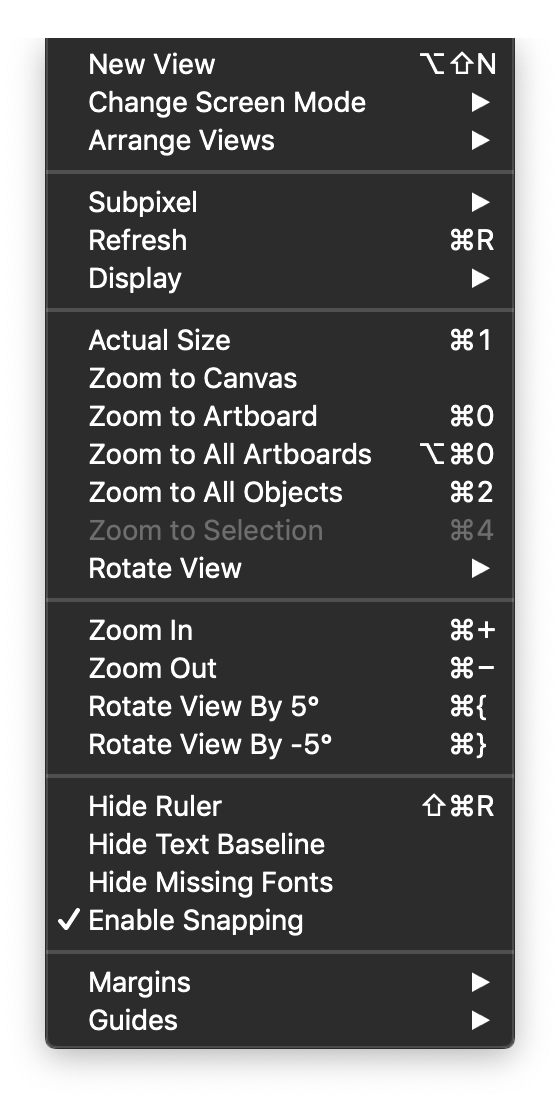
Viewing options menu.
The commands available from the view menu were described in the Application Menu section of this chapter. This section contains a description of how to use these commands to control the viewing details of a VectorStyler document.
Document views
A VectorStyler document can be displayed in multiple views at the same time. When the document is opened, a single view is created for the document. To open additional views for the current document use the New View command. Multiple views of a document can be used to display different canvases or different regions of the same canvas, at the same time. For example, a reference object (a symbol, shape or style) can be placed on a reference canvas, while the instances of the symbol displayed in another view.
To show a document in full screen mode, use the options in the Change Screen Mode menu. The full screen mode can be exited by hovering on the top of the sreen, and pressing the window size restore button.
Display quality
When displaying the document on a screen (or exporting to an image file format), a single pixel may be split into a number of virtual pixels to increase rendering resolution, this is also known as anti-aliasing. This will result in smooth shapes and boundaries, even in low resolution screens. Use the Subpixel menu to select the size of the grid used to split a single pixel. This feature can result in smoother shape edges even on retina screens. Displaying a document using high values of anti-aliasing, may have an impact on performance for documents using large number of objects (over tens of thousands). In such cases, sub-pixel rendering can be reduced, or turned off by selecting the None option.
The Refresh command will reset and redraw the document view. This is not just a simple redraw of the display, but a recalculation of all internal states used to render objects, styles and effects.
Zooming
The View menu contains multiple commands that can be used to set the document view zoom level and rotation amount to a specific value. The Actual Size will zoom the document to its actual size, using the current screen resolution.
The following commands will zoom the document to a specific level:
- Zoom to Canvas - Set the zoom level so that the whole canvas is visible. This command is not available for large canvases (see document setup).
- Zoom to Artboard - Set the zoom level to fit the current artboard into the document view area.
- Zoom to All Artboards - Set the zoom level to fit all artboards on the current canvas into the document view area.
- Zoom to All Objects - Set the zoom level to fit all objects on the current canvas into the document view area.
- Zoom to Selection - Set the zoom level to fit the selected objects on the current canvas into the document view area.
- Rotate View - Set the document view rotation to the selected angle.
- Zoom In - Increase the zoom level of the document.
- Zoom Out - Decrease the zoom level of the document.
- Rotate View by 5 - Rotate the document view by 5 degree in counter clockwise direction.
- Rotate View by -5 - Rotate the document view by 5 degree in clockwise direction.
Indicators
The document view may contain horizontal and vertical rulers (visible by default). The ruler can be shown or hidden using the Show Ruler (when not visible) or Hide Ruler (when visible) command.
When displaying a document, VectorStyler may present various indicators of the document content. The Show/Hide Text Baseline command is used to show or hide the baseline indicators of text frames. The Show/Hide Missing Fonts command is used to show or hide a highlight displayed to indicate missing fonts in text flows.
The Margins menu contains visibility options for various canvas and artboard indicators and margins.
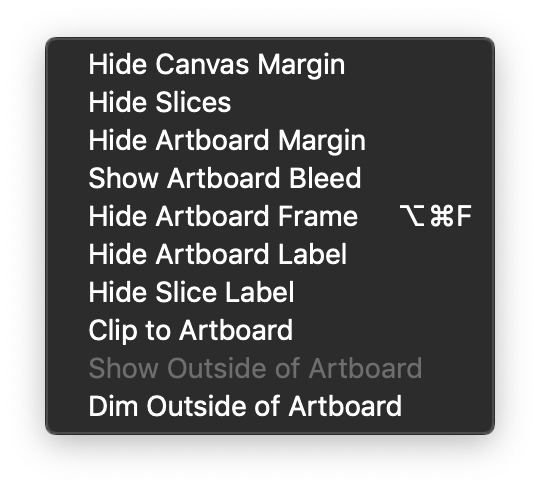
Margin options.
- Show Canvas Margin - Show or hide the margin of the canvas. This command is useful for limited size canvases.
- Show Artboard Margin - Show or hide the artboard margin indicator. The artboard margin is set to be at some distance (in artboard options) from the actual artboard frame. The margin can be used as a guideline to align objects inside the artboard.
- Show Artboard Frame - Show or hide the artboard frame. The artboard frame is the (shadowed) rectangular area indicating an artboard.
- Curent Artboard Frame - Show or hide the current artboard indicator frame. The current artboard is indicated by a dark frame highlight.
- Show Artboard Label - Show or hide the artboard name label. The name label is usually displayed at the top center of an artboard.
- Show Slice Label - Show or hide the slice name labels. The slice name labels are usually displayed at the top left corner of export slices.
- Clip to Artboard - Enable or disable the clipping of canvas content to artboards. When enabled, objects or part of objects located outside of an artboard will not be visible.
- Show Outside of Artboard - Available when the clip to artboard option is enabled. When selected, the Show Outside of Artboard option will show objects or part of objects located outside of artboards in outline mode.
- Dim Outside of Artboard - Enable or disable the dimmed mode rendering of areas outside of objects. When enabled, objects or part of objects located outside of any artboard are rendered in a dimmed mode.
Guides and Snapping
VectorStyler provides numerous snapping options to enable precise positioning of objects and shapes. These include the traditional grid, guideline and smart guide (Snap to Objects) options, but also new ones like collision and formation snapping.
The Enable Snapping command can be used to enable or disable any snapping modes in the current document view. Each document view maintains its own guide and snapping state, making it possible to have snapping enabled in one opened document, while disabled in an other.
Snapping options, and specific attributes of various snapping types, can also be controlled using the Snapping Options panel available from the Window - Editing menu.
The Guides menu contains various options to control guide visibility and enable or disable specific snapping types.
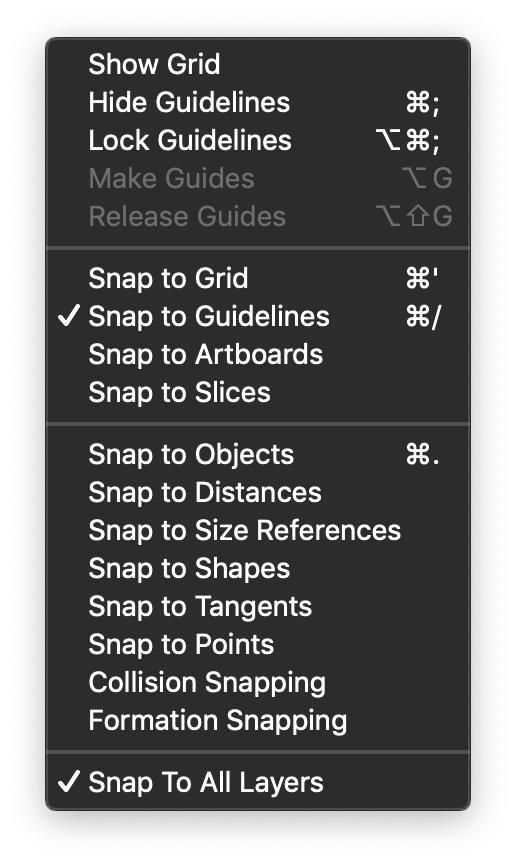
Guides
- Show/Hide Grid - Show or hide the grid of the current document, canvas or artboards. In VectorStyler it is possible to setup separate grid systems for the whole document, individual canvases and artboards. The grid system can be managed from the Grid panel available in the Window - Editing menu.
- Show/Hide Guidelines - Show or hide the guidelines in the current document. Separate guideline sets can be created on each canvas, and each artboard of a canvas. Guidelines can also be grouped and each guideline group can be assigned with an individual guideline color. The details of guideline settings can be managed using the Guidelines panel from the Window - Editing menu.
- Show/Hide Slices - Show or hide the margin indicators of export slices. Export slices can be created on canvases to mark an area of a canvas for exporting into one or more files and file formats. The slices and the associated export options can be managed using the Slices panel. Slices can be created, moved, scaled and rotated using the slice tool from the application toolbox.
- Make Guides - Create guidelines from the selected objects. The objects must be from a layer on the current canvas, objects inside groups cannot be converted to guidelines. Objects that are guidelines will use the collision snapping mode when guideline snapping is enabled.
- Release Guides - Releases the selected guideline object back to their original styled state. Released guide objects will not behave like guidelines anymore, unless collision snapping is enabled.
- Snap to Grid - Enable or disable snapping to the grid. The grid does not have to be visible for snapping to be enabled. Snapping to the grid may take into account multiple grid systems setup on a single artboard or canvas.
- Snap to Guide - Enable or disable snapping to guidelines (including guideline objects). Guidelines can be created on a canvas or an artboard.
- Snap to Artboard - Enable or disable snapping to the margin of artboards of the current canvas.
- Snap to Slices - Enable or disable snapping to the slices setup on the current canvas.
- Snap to Objects - Enable or disable snapping to object centers and margins (also known as smart guidelines).
- Snap to Distances - Enable or disable snapping to distances between object frames.
- Snap to Size References - Enable or disable snapping selected reference object sizes while resizing or drawing.
- Snap to Shapes - Enable or disable snapping to shapes when changing a point location.
- Snap to Tangents - Enable or disable snapping to tangents and normals of curves.
- Snap to Points - Enable or disable snapping to intersection points of shapes.
- Collision Snapping - Enable or disable snapping to collision snapping when moving objects. In collision snapping the objects are positioned so that their shape is colliding with nearby object shapes. Collision snapping (as any other snapping mode) is also integrated with guidelines, allowing precise positioning of objects.
- Formation Snapping - Enable or disable snapping to the formation snapping mode. In formation snapping, objects are positioned so that they form a special geometric formation with two or more other (not selected) objects.
- Snap to All Layers - Enable or disable snapping to objects (also shapes, collision and formation) to objects on all layers. If disabled, the snapping only considers objects of the current layer.
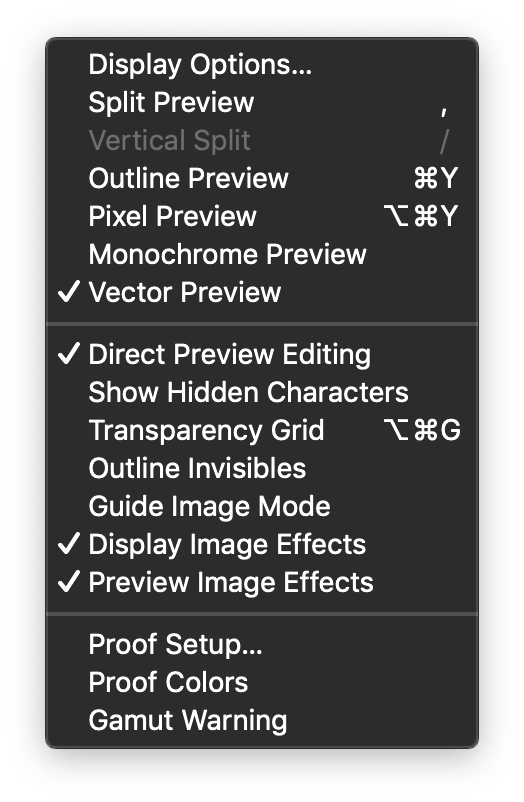
Display options
Guides
- Display Presets - Opens a list of previously saved display options presets. Selecting a preset will apply the display options stored in the preset.
- Display Options - Open a modal view used to configure detailed display settings of a VectorStyler document. The display settings will be stored with the document.
- Split Preview - Enable or disable the split preview mode of the current document. In the split preview mode, the document is shown using two viewing modes at the same time, by splitting the document view with a horizontal or vertical separator. Split preview mode can be used to combine outline, vector or pixel preview modes.
- Vertical Split - Set the split preview separator direction to vertical (checked) or horizontal (unchecked). This command is available when the split preview mode is enabled.
- Outline Preview - Select the outline preview mode. In outline preview, only the shape outline of objects is shown using the layer color and thin lines.
- Pixel Preview - Select the pixel preview mode. In pixel preview, the document is shown using a limited resolution rendering. When sufficiently zoomed in, the pixel preview mode will show pixels (and the pixel grid), instead of scaling vectors. The resolution of pixel preview mode can be adjusted in the display options view.
- Monochrome Preview - Select the vector preview mode using monochrome tones.
- Vector Preview - Select the vector preview mode. In vector preview, the view can be zoomed in to show the detail of shapes and objects at arbitrary resolution.
- Direct Preview Editing - Enable or disable direct preview of changes while editing the document. This option is enabled by default, allowing changes to be shown immediately when moving, scaling, transforming objects, editing nodes of path, or adjusting object styles with one of the tools from the toolbox. If disabled, only the outline of objects is shown when interacting with the document, and changes are applied only when the mouse is released. This option may be disabled for very complex documents, where immediate preview can slow down interaction. VectorStyler will automatically skip direct preview, when editing complex documents with long rendering duration. The direct preview mode can also be adjusted for individual tools and editors in the application settings view Direct Preview section.
- Show Hidden Characters - Check to show the hidden characters in text shapes or frames.
- Transparency Grid - Enable or disable the display of the transparency grid. The size and colors of the transparency grid can be adjusted in the display options view. The transparency grid can be used to indicate areas of the canvas without any drawings, and to show opacity amounts against the backdrop.
- Outline Invisibles - Check to show invisible objects in wire frame mode.
- Guide Image Mode - Switch the guide image modes between regular display, showing edges or hidden. See the Trace Guide panel for more info.
- Display Image Effects - Check to display image effects on the canvas.
- Image Effects in Previews - Check to preview image effects in the Layers panel preview icons.
Color proofing
- Proof Setup - Open a view to edit color proof preview settings. The color proof preview is used to display colors as if they were printed on a device with a specific color profile. The simulated color profile can be selected using the Proof Setup command.
- Proof Colors - Enable or disable the color proof preview mode. The color proof preview mode requires that a valid color profile is selected using the Proof Setup command.
- Gamut Warning - Enable or disable the gamut warning preview mode. When enabled, the gamut warning will render colors outside of the selected color profile gamut using a special indicator color. This allows the quick identification of RGB colors used in the document that are not reproduced exactly on a printer simulated by the selected color proofing profile.
The Navigator Panel
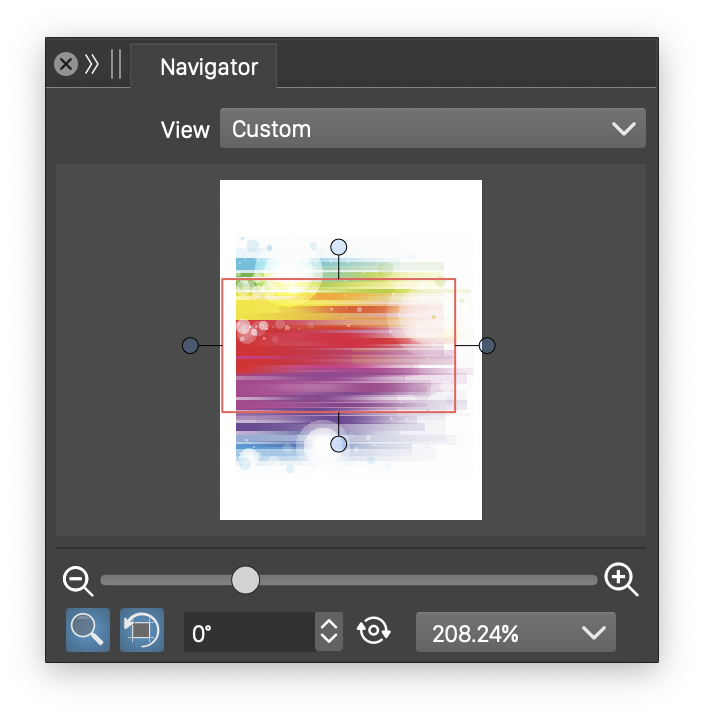
The Navigator panel.
The Navigator panel can be used to navigate the panning, zooming and rotation of the current canvas. The panel contains a preview of the current canvas content. The preview area can be used to adjust the panning, zooming and rotation of the canvas by usign the knobs displayed over the preview.
- To pan the canvas, drag the rectangular marker from the inside.
- To zoom the canvas, drag the from the corners of the rectangular marker.
- To rotate the canvas, drag the from four knobs on the side of the rectangular marker.
The View drop down in the top of the panel can be used to create and recall viewing snapshots of the canvas. The options of a viewing snapshot can be edited with the Edit Preset item of the drop down.


