Stylistic Effects
The Stylize section contains various image effects that can be used to add some form of stylistic adjustment to the images resulting from rendering an object or group of objects.
Add Brush
The Add Brush stylistic effect, adds a surface brushing or scratching effect to the image of an object. The brush is similar to the effect created by the Brushed Metal image generator.
The surface brushing can be set in a user selected direction, and may use a synthetic noise to adjust the strength locally.
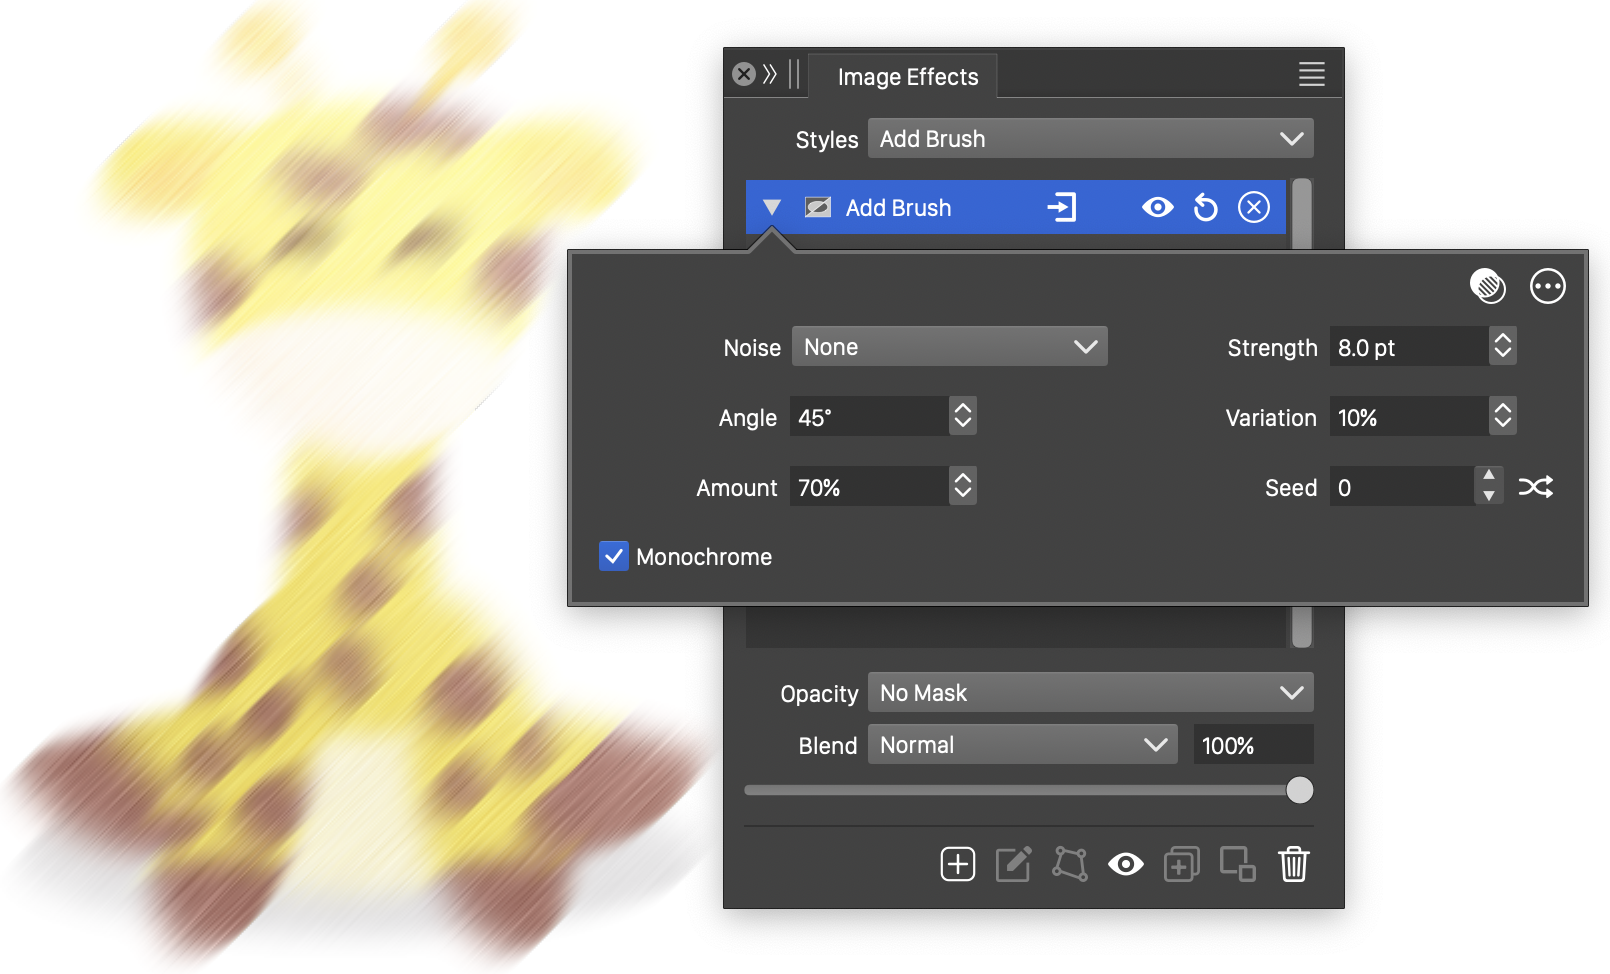
The Add Brush effect and its basic options.
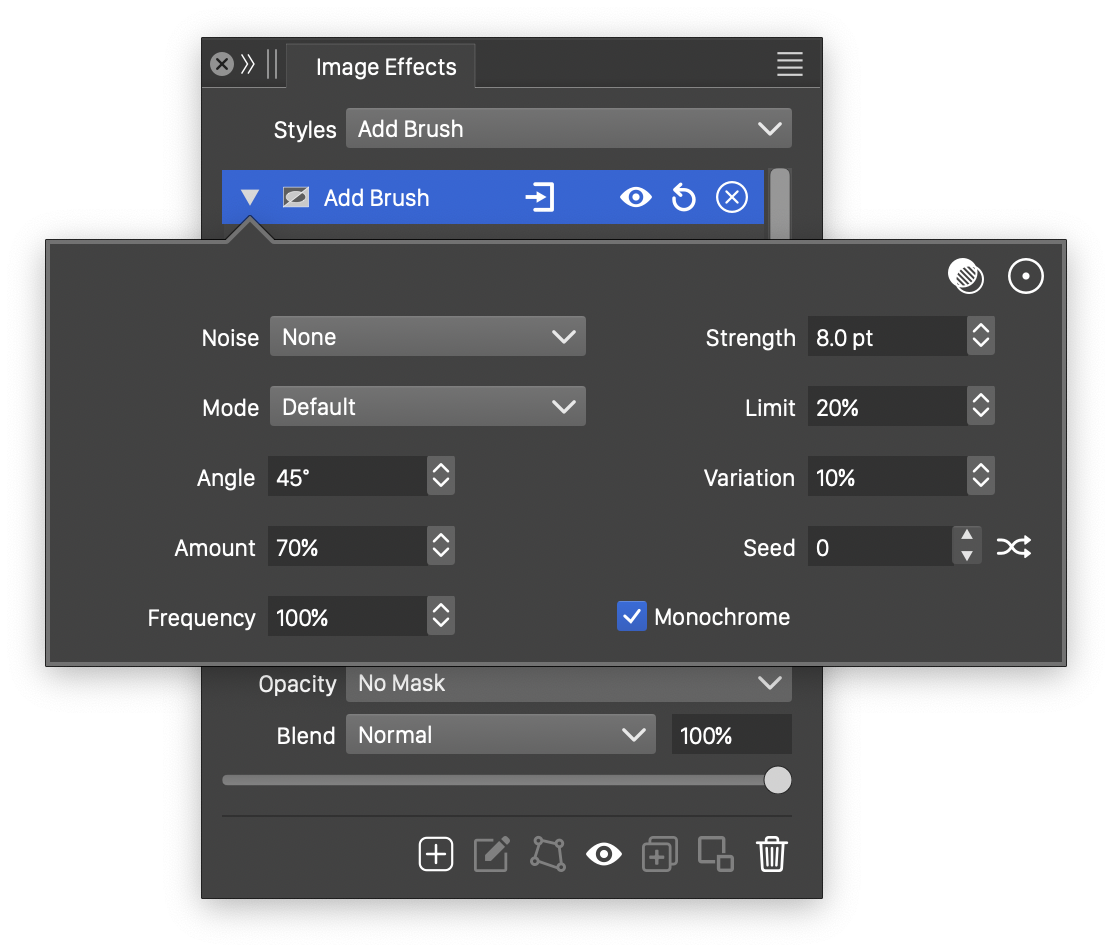
Advanced options of the Add Brush effect.
The Add Brush image effect uses the following basic options:
- Strength - Set the strength of the surface brushing effect. The strength adjusts the intensity of brush tracks along the selected direction.
- Angle - Set the angle of the direction of the brush tracks.
- Amount - Set the range of color intensity changes caused by brush tracks.
- Variation - Set the amount of variation in the strength of the brush tracks.
- Seed - Set the randomization seed used to generate the brush tracks. The
 button can be used to pick random seed values.
 - Monochrome - Enable or disable monochrome adjustments to the brushing effect color. When enabled, the add brush effect results in tonal adjustments of the original colors. When disabled, each color channel will be adjusted by separate brush tracks.
The advanced options of the Add Brush effect can be accessed, by clicking on the  button.
- Noise - Select the noise style from the list of predefined noise types, or user defined noise presets and styles. The noise is used to locally adjust the strength of the add brush effect. To browse randomly generated synthetic noise styles, select the Browse Styles command. To edit the noise attributes, select the Edit Noise command. Selecting noise is described with more detail in the Noise chapter.
- Limit - Set the smallest amount of color intensity change caused by brush tracks.
- Frequency - Adjust the frequency of the light variation in the add brush effect.
Add Noise
The Add Noise stylistic effect, adjust the image colors using a synthetic noise. The noise is synthesized from a user selected noise type, style or presets. Selecting and editing noise styles is described with more detail in the Noise chapter.
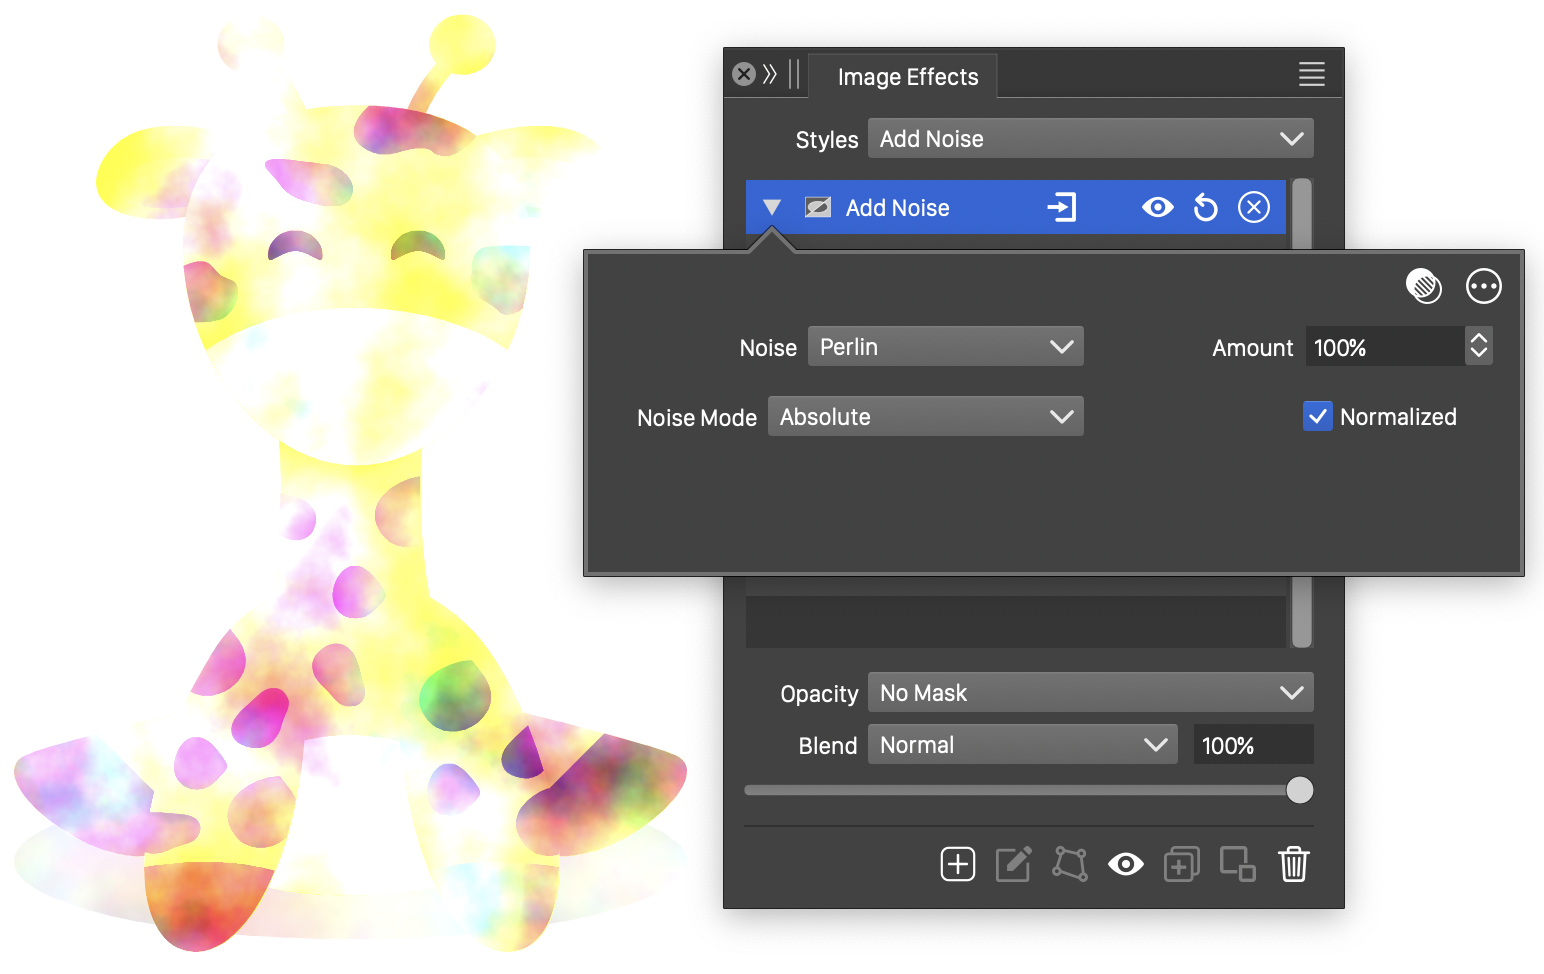
The Add Noise effect and its basic options.
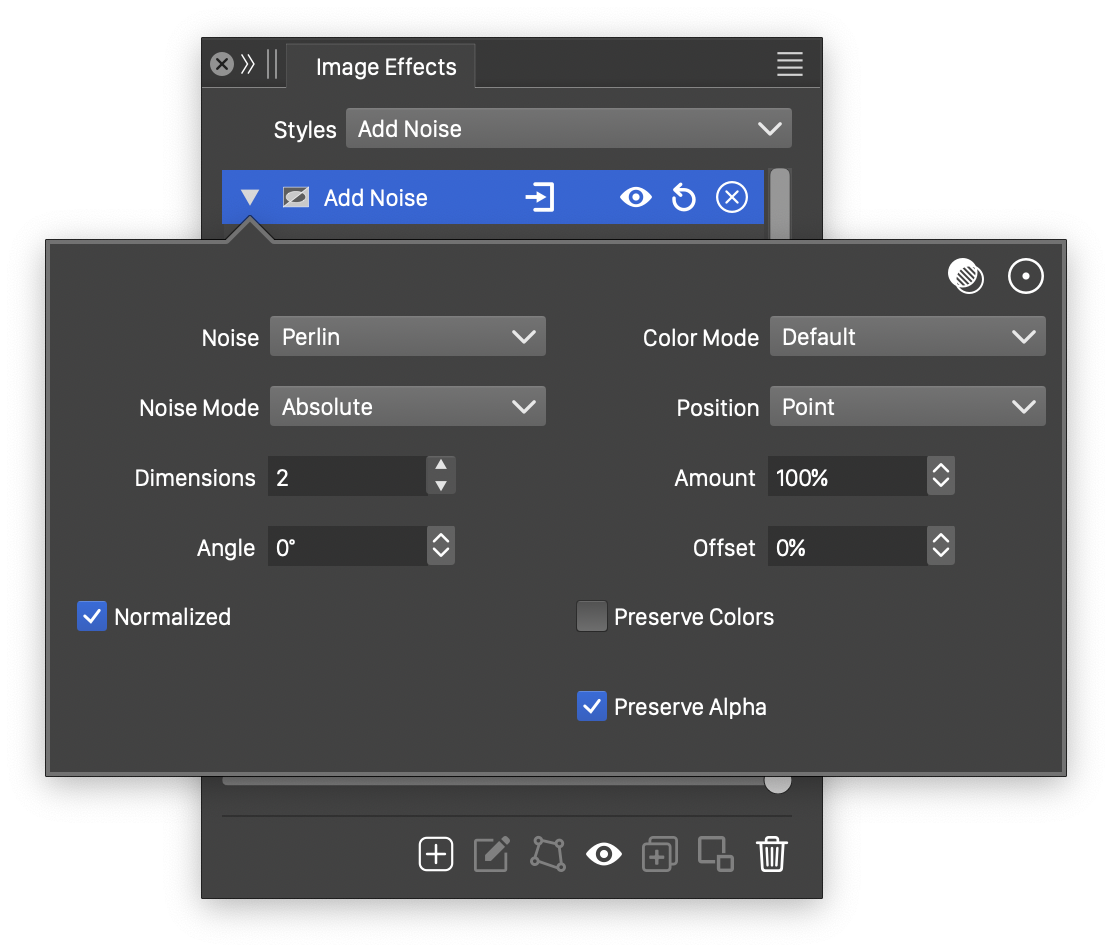
Advanced options of the Add Noise effect.
The Add Noise generator effect uses the following basic options:
- Noise - Select the noise style from the list of predefined noise types, or user defined noise presets and styles. The noise is used to adjust the colors of the selected object image. To browse randomly generated synthetic noise styles, select the Browse Styles command. To edit the noise attributes, select the Edit Noise command. Selecting noise is described with more detail in the Noise chapter.
- Noise Mode - Select the mode of adjusting the image colors by the noise. This can be:
- Color - Adjust the image colors towards a single user selected color, using the synthetic noise to control the amount of adjustment.
- Relative - Adjust the color components by amounts relative to the original color components.
- Absolute - Adjust the color components by absolute amounts generated by the noise.
- Noise Color - Select the color added to the image when using the Color noise mode.
- Amount - Set the intensity of the noise.
- Normalized - Enable or disable the use of normalized noise. When normalized, noise intensities are adjusted based on the selected noise type, to limit the resulting color adjustment intensities.
The advanced options of the Add Noise effect can be accessed, by clicking on the button.
- Color Mode - Select the color mode used to make the color adjustments. The image colors are converted to the selected color mode and adjustments are made to the color channels using the noise, in this color mode. Selecting different color modes will result in different noise adjustment effects.
- Position - Edit the noise positioning mode. This can be:
- Fixed - The noise is positioned relative to absolute coordinates. With fixed positioning, the noise content will depend on the object position. Noise in multiple different objects with the same noise style will have a matching position. The noise content is changed when the object is moved.
- Relative - The noise position and frequency is relative to the object size.
- Point - The noise is positioned relative to the object position, but the frequency in absolute values.
- Dimensions - Edit the dimensions used to create the base gradient noise. Different values of the gradient dimension result in different noise styles.
- Offset - Set the relative offset of the noise positions.
- Angle - Set the rotation angle of the synthesized noise.
- Preserve Colors - Enable or disable the preserving of original color values. When enabled, the original colors of the image are not adjusted. This option can be enabled, when the Preserve Alpha is disabled, to limit the adjustment to the alpha channel only. By default, this option is disabled.
- Preserve Alpha - Enable or disable the adjustment of the alpha channel by the noise.
Bevel
The Bevel stylistic effect, adds a surface bevel around the margins of the object image, defined by the alpha channel. The bevel effect can be used to add a three dimensional surface to an object.
The surface elevation and the light direction of the bevel can be adjusted to create various effects.

The Bevel effect and its basic options.

Advanced options of the Bevel effect.
The Bevel image effect uses the following basic options:
- Width - Set the width of the bevel.
- Angle - Set the angle of the light direction, creating the bevel effect.
The advanced options of the Bevel effect can be accessed, by clicking on the button.
- Elevation - Set the elevation of the bevel.
- Scale - Adjust the surface scaling of the bevel light.
- Shadow - Set the amount of shadow used in the bevel.
The  button from the Image Effects panel, activates the image effect tool used to interactively edit the bevel effect attributes.

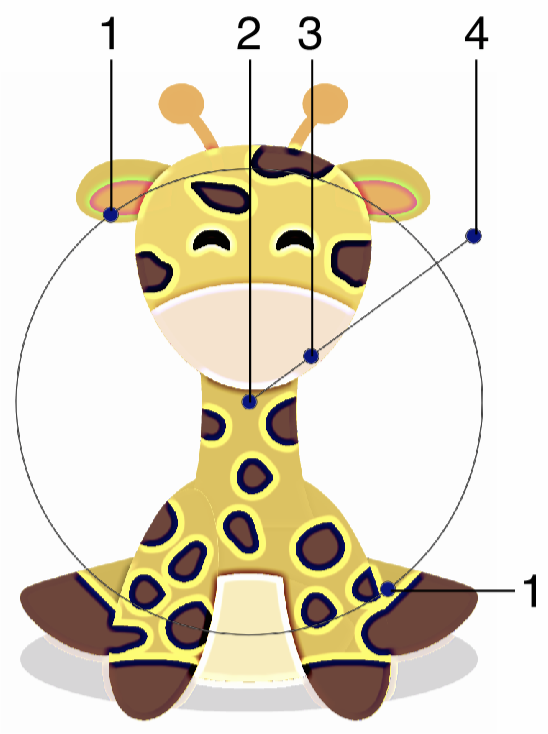
Interactive editing of the Bevel image effect.
Interactive editing of the bevel effect is done by dragging the handles to change an attribute value:
- (1) - Adjust the direction of the bevel effect.
- (2) - Adjust the center of the bevel effect. The center is used only to position the adjustment handles.
- (3) - Adjust the strength of the bevel effect.
- (4) - Adjust the elevation of the bevel effect.
Bloom
The Bloom stylistic effect, adds a bloom light of the colors and around the object image. The bloom effect can be used to add a haze and halo effect to the image of an object.
The Bloom effect can use different blending modes, resulting in variations of the haze and halo.
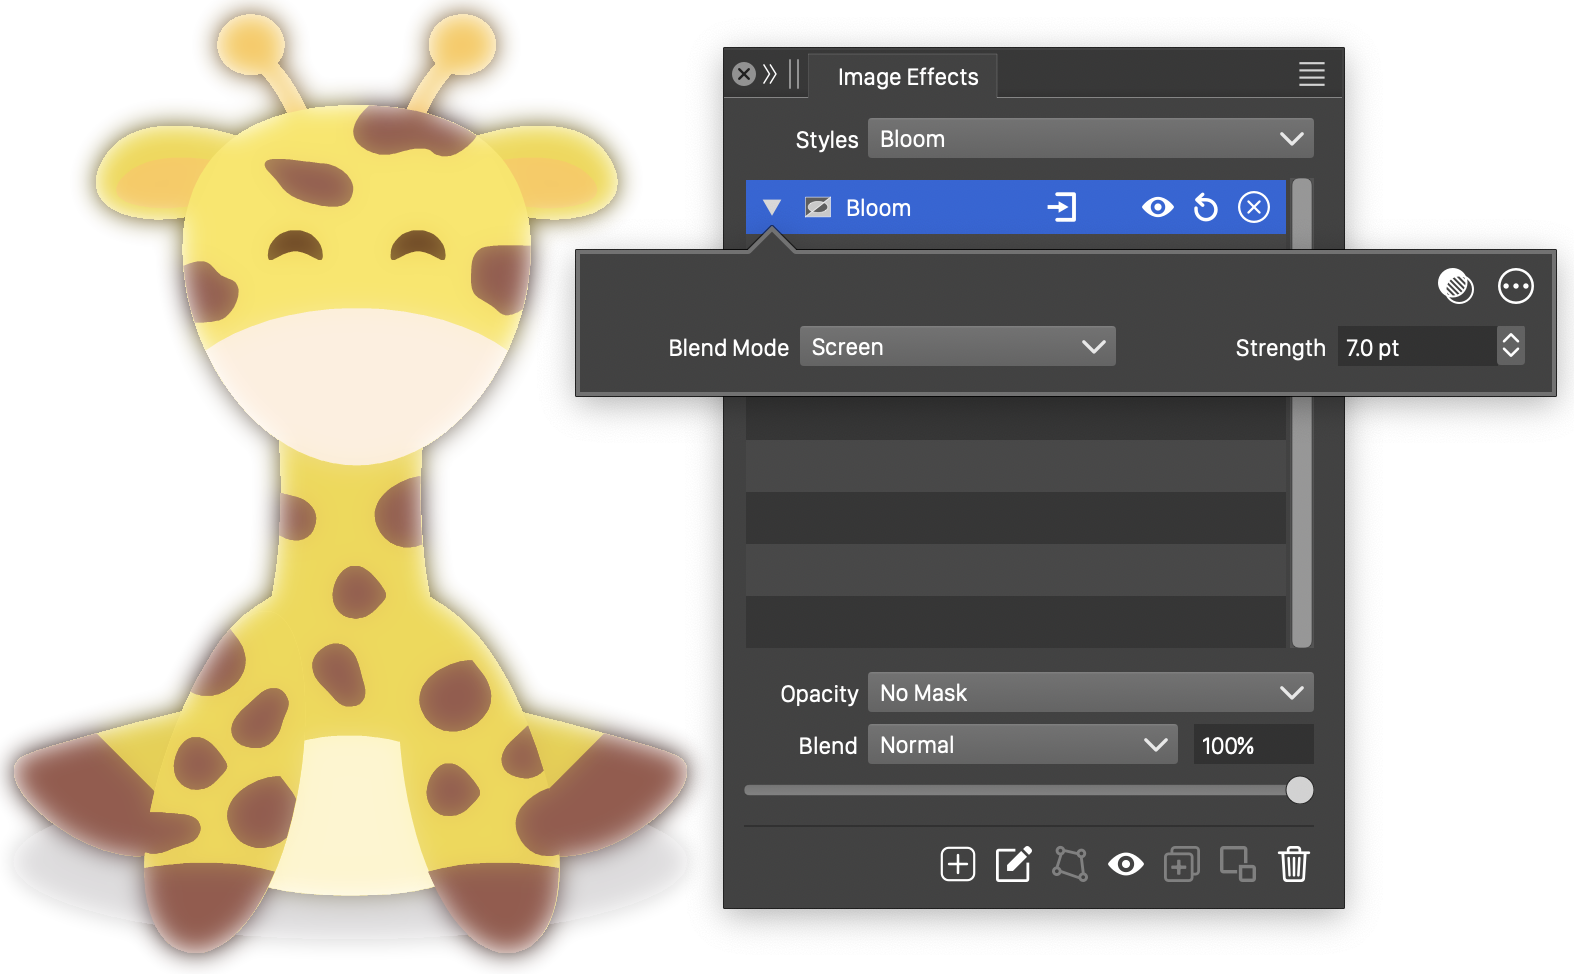
The Bloom effect and its basic options.
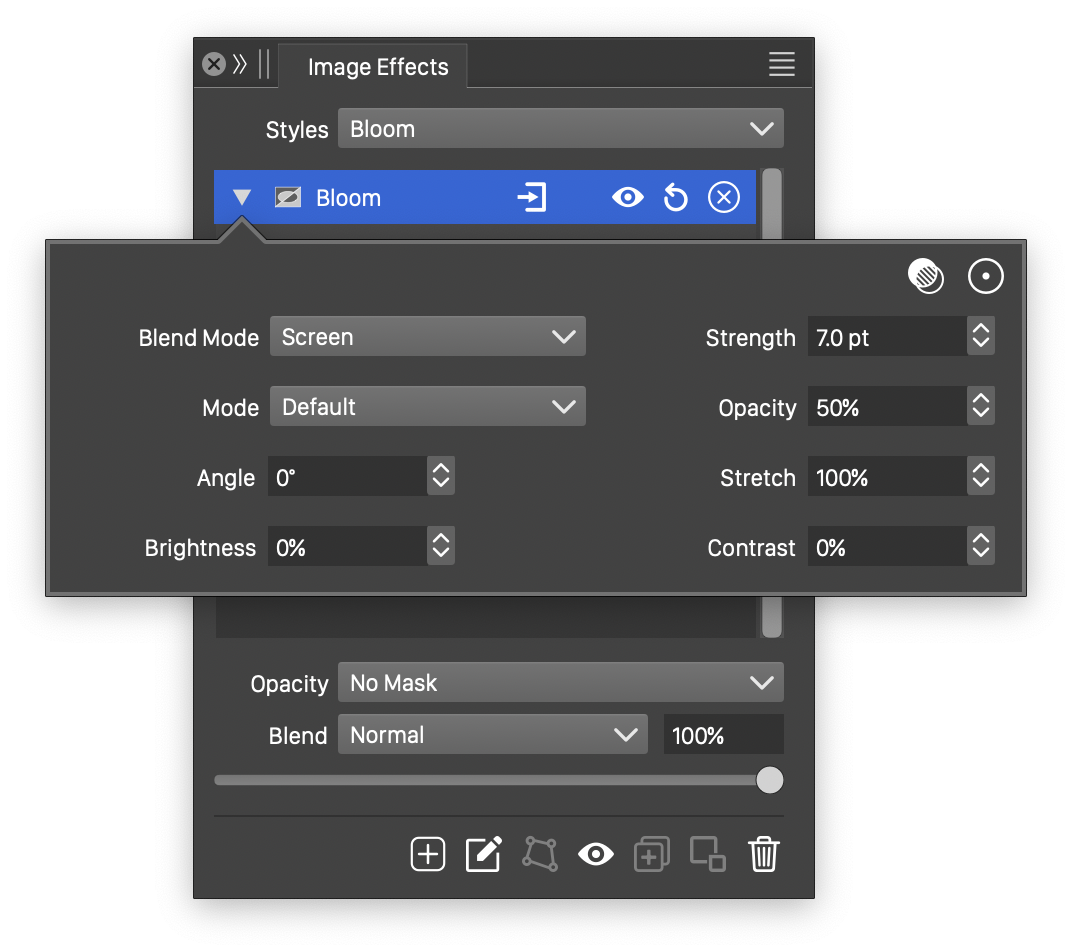
Advanced options of the Bloom effect.
The Bloom image effect uses the following basic options:
- Blend Mode - Select the blending mode used in the bloom effect. Different blending modes result in different bloom effects.
- Strength - Set the strength of the haze around the bloom effect.
The advanced options of the Bloom effect can be accessed, by clicking on the button.
- Mode - Select the color mode used to make the color adjustments in the bloom effect.
- Stretch - Set the vertical stretching of haze around the bloom effect.
- Angle - Adjust the direction of the stretched haze.
- Brightness - Adjust the brightness of the bloom tones.
- Contrast - Adjust the contrast of the bloom tones.
- Opacity - Adjust the opacity of the tones used in the bloom effect.
The button from the Image Effects panel, activates the image effect tool used to interactively edit the bloom effect attributes.
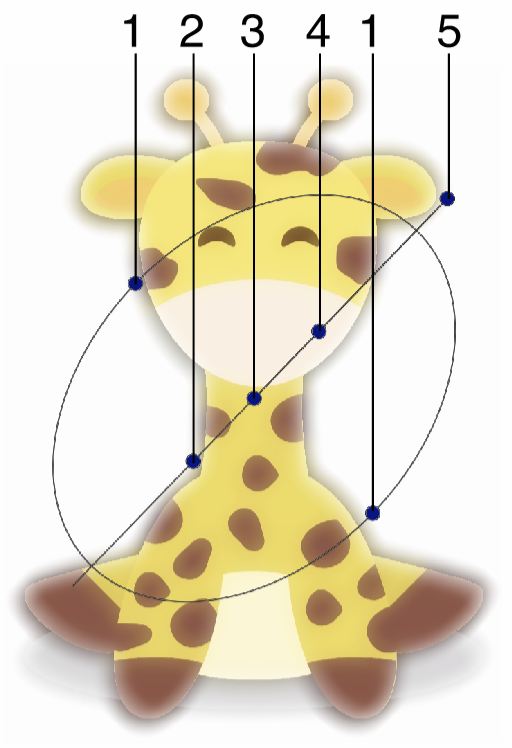
Interactive editing of the Bloom image effect.
Interactive editing of the bloom effect is done by dragging the handles to change an attribute value:
- (1) - Adjust the vertical stretching of the haze around the bloom effect.
- (2) - Adjust the contrast of the bloom effect.
- (3) - Adjust the center of the bloom effect handles.
- (4) - Adjust the strength of the bloom effect.
- (5) - Adjust the direction of the bloom effect.
Bump Shade
The Bump Shade stylistic effect, adds a color shade using a surface diffusion of the image.
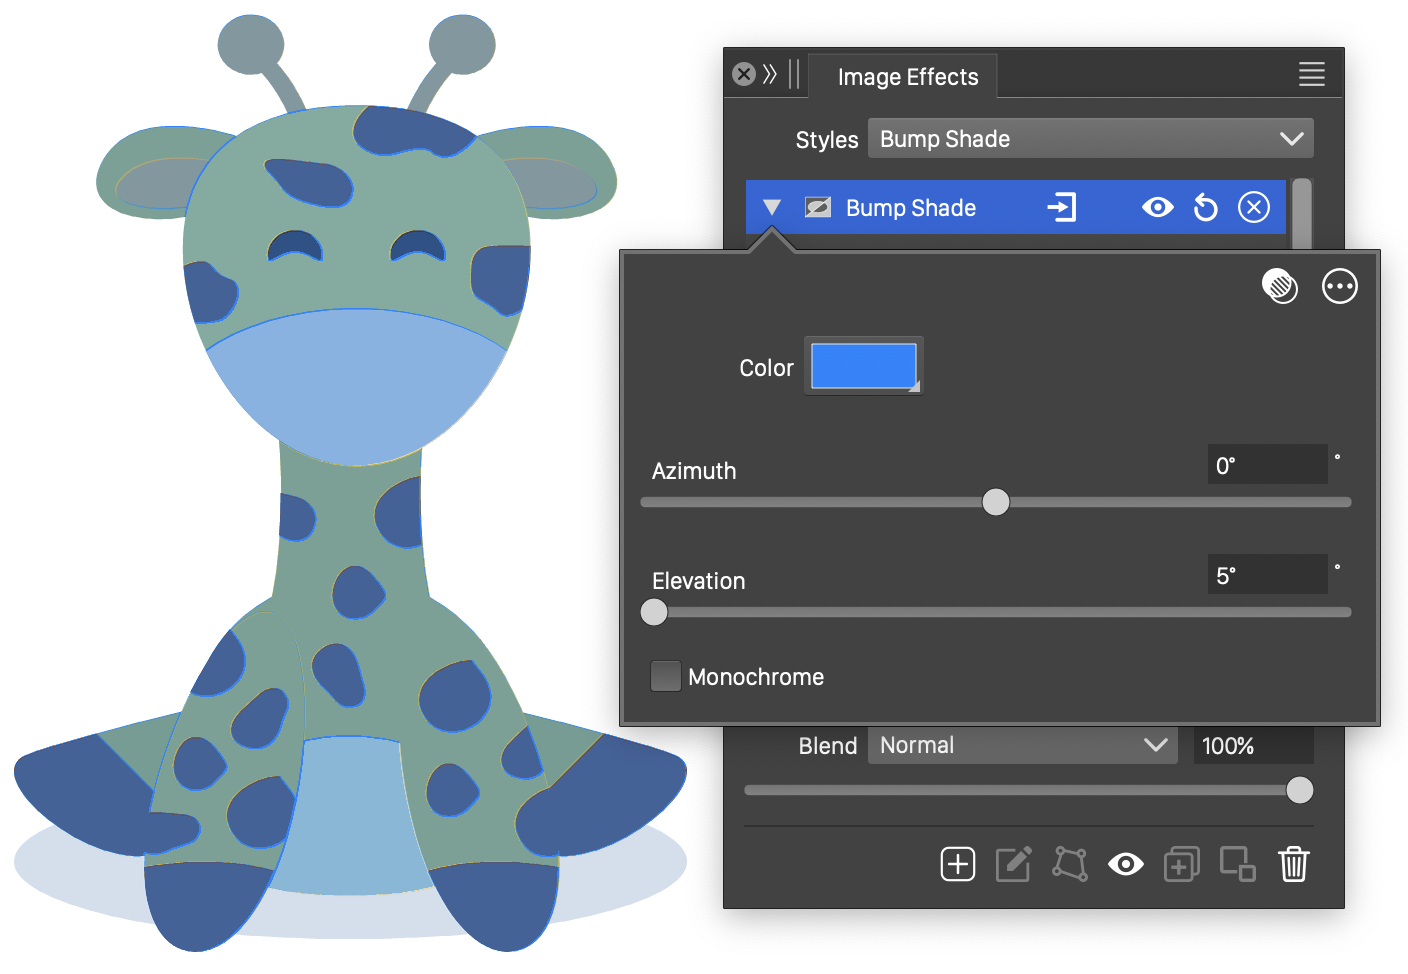
The Bump Shade effect and its basic options.

Advanced options of the Bump Shade effect.
The Bump Shade image effect uses the following basic options:
- Color - Select the color of the added shade.
- Azimuth - Adjust the direction of the light source.
- Elevation - Set the elevation of the light source.
- Amount - Set the range of color intensity changes caused by brush tracks.
- Monochrome - Enable or disable the monochrome shading mode. When enabled, the image will be filled with the select color, using the diffuse surface of the original image. When disabled, the original image colors are kept, using the diffuse surface to add the selected color to the image.
The advanced options of the Bump Shade effect can be accessed, by clicking on the button.
- Color Mode - Select the color mode used to adjust the colors.
- Width - Set the width of the diffuse surface variation.
- Scale - Adjust the diffuse surface intensity.
Despeckle
The Despeckle image effect, removes small variations and noise in photographic images, while keeping sharp edges unchanged. The despeckle effect can be used to remove noise from photographs while preserving details and edges.
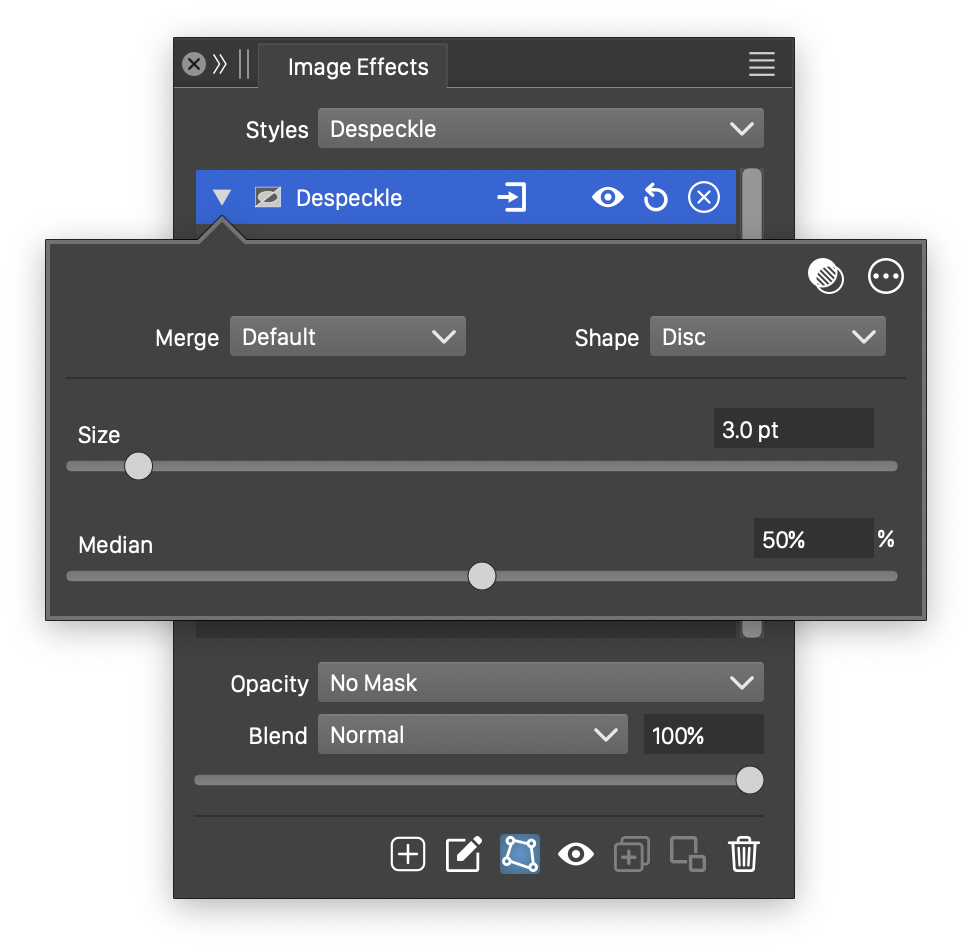
The basic options of the Despeckle effect.
The Despeckle image effect uses the following basic options:
- Merge - Select the color mode used to determine the despeckle intensity. The intensity of the blurring used by the despeckle filter is determined locally by the color intensity variations of the image.
- Shape - Select a shape for the despeckling region. The shape can be selected from a list of shape styles, presets and object references with the Shape role.
- Size - The size of the despeckle filtering region. Spots and noise smaller than this size are detected and removed from the image.
- Median - The position of the selected median intensity.
The advanced options of the Despeckle effect can be accessed, by clicking on the button.
- Color Mode - Select the color mode used to make the smoothing adjustments.
- Scale - Set the vertical scaling of the despeckle shape.
- Angle - Set the rotation angle of the despeckle region shape.
- Minimum - Set the minimum size of the adaptive smoothing extent, relative to the despeckle filter size.
- Limit - Set the smallest variation in the color intensities, adjusted by the despeckle filter.
- Full - Set the variation level in the color intensities, when maximum despeckling is applied.
- Search Depth - Set the precision of finding the median tone in a despeckle region.
- Median Search - Use median searching to find the tone of a despeckle region.
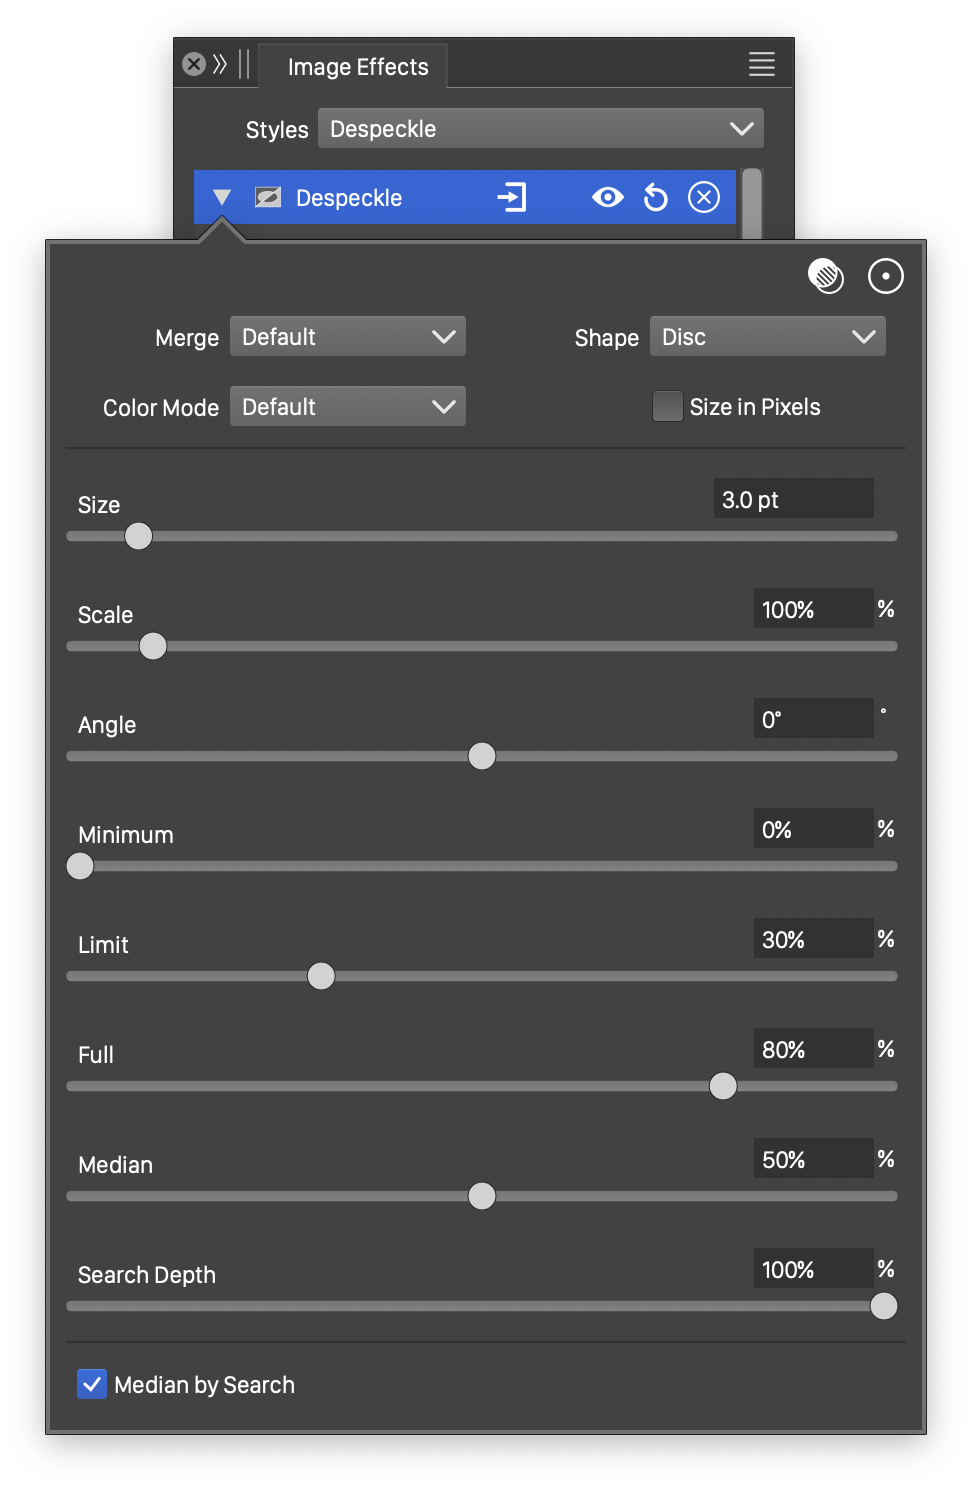
Advanced options of the Despeckle effect.
The button from the Image Effects panel, activates the image effect tool used to interactively edit the despeckle effect attributes. The secondary image effect  tool, is used to edit the despeckle region shape.
Dilute Tone
The Dilute Tone stylistic effect dilutes the colors of the image using an adaptive, tone dependent dilution strength.
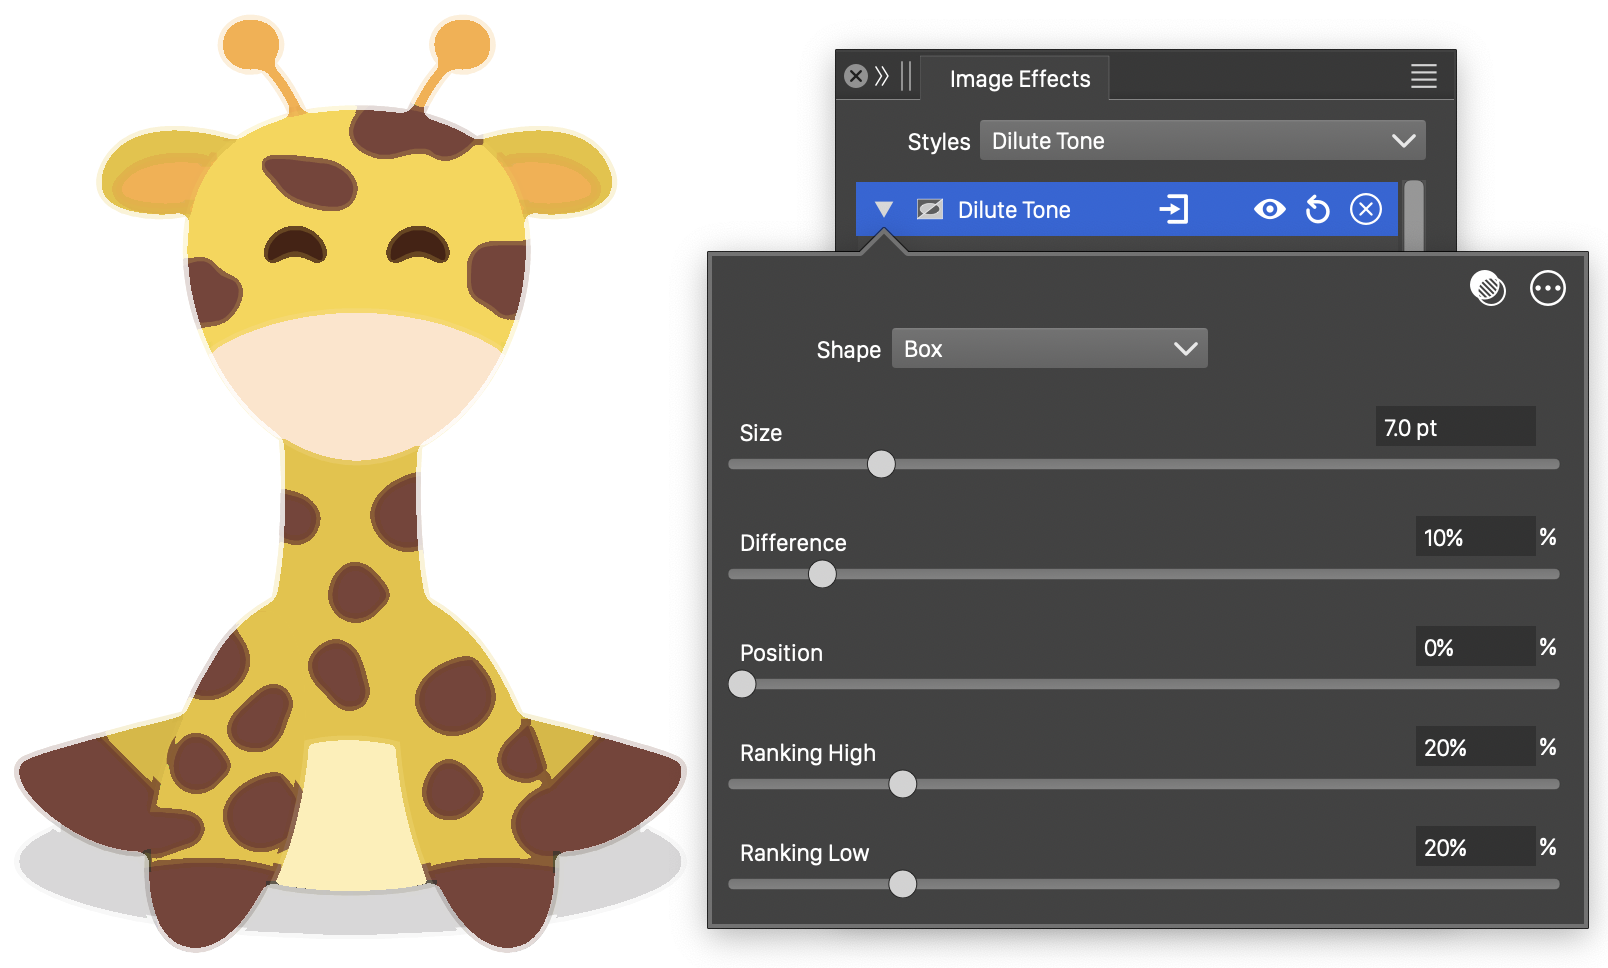
The Dilute Tone effect and its basic options.
Advanced options of the Dilute Tone effect.
The Dilute Tone image effect uses the following basic options:
- Shape - Select the dilution region shape around a pixel.
- Size - Set the size of the region around a pixel for the dilute operator.
- Difference - Set the minumum tone difference in the dilution region.
- Ranking High - Set the minimum amount of pixels in the dilution region with higher tones to allow dilution.
- Ranking Low - Set the minimum amount of pixels in the dilution region with higher tones to allow dilution.
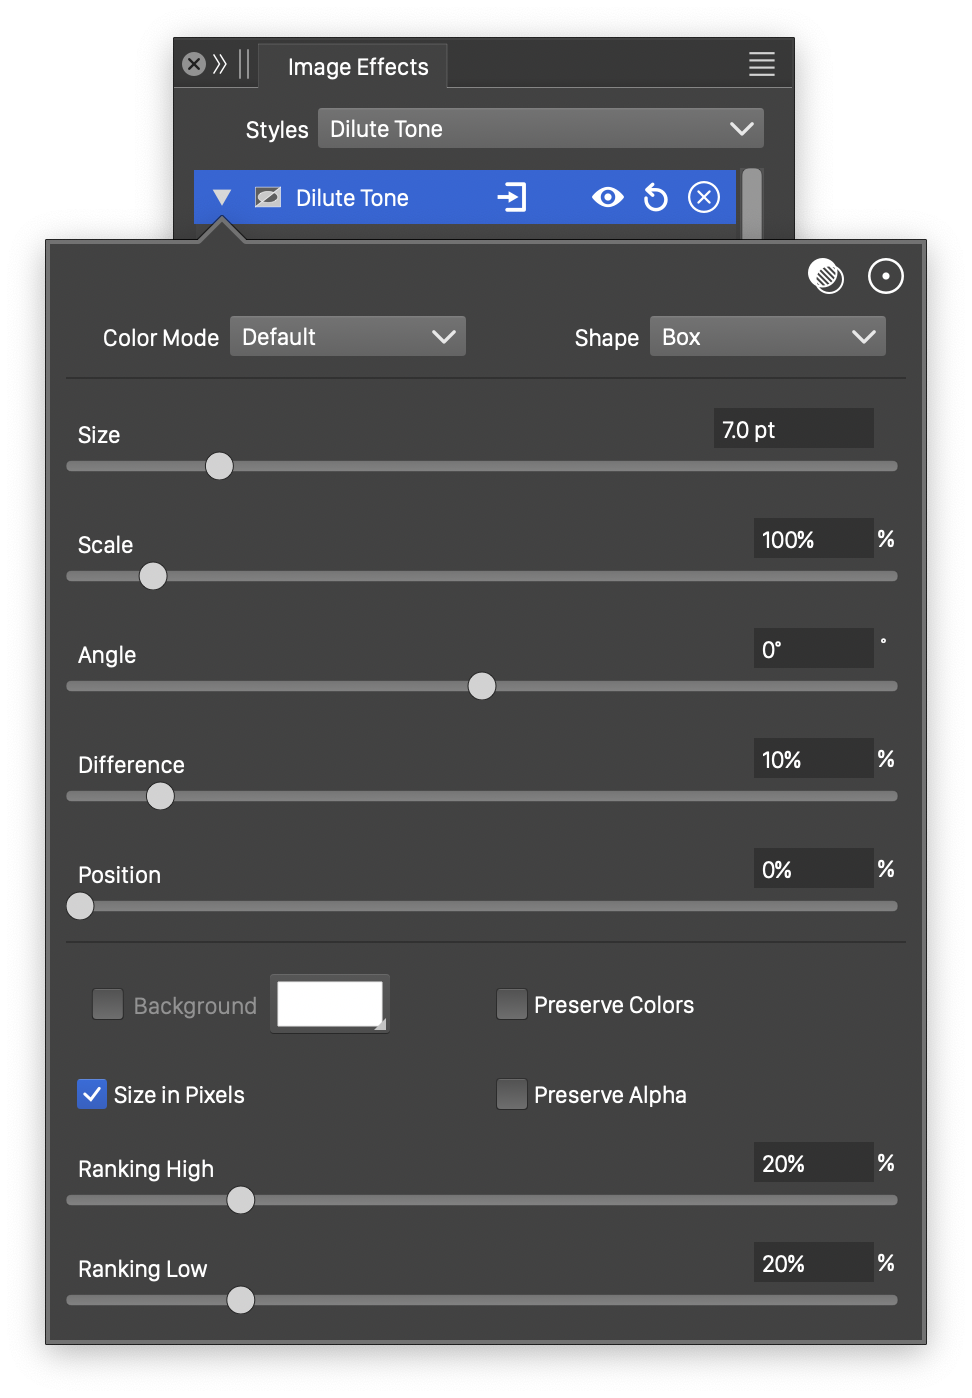
The advanced options of the Dilute Tone effect can be accessed, by clicking on the button.
- Scale - Set the vertical stretching of the region around a pixel for the dilute operator.
- Angle - Set the rotation angle of the stretched dilution region.
- Position - Select the diluted tone between low and high tone levels.
- Background - Select the background color of the dilute filter.
- Size in Pixels - Check to set the dilution size parameters in pixels.
Drop Shadow
The Drop Shadow stylistic effect, adds a shadow to the object image. The direction and extent of the shadow can be interactively adjusted, using the image effect tool. The color of the shadow can be set to any user selected color.
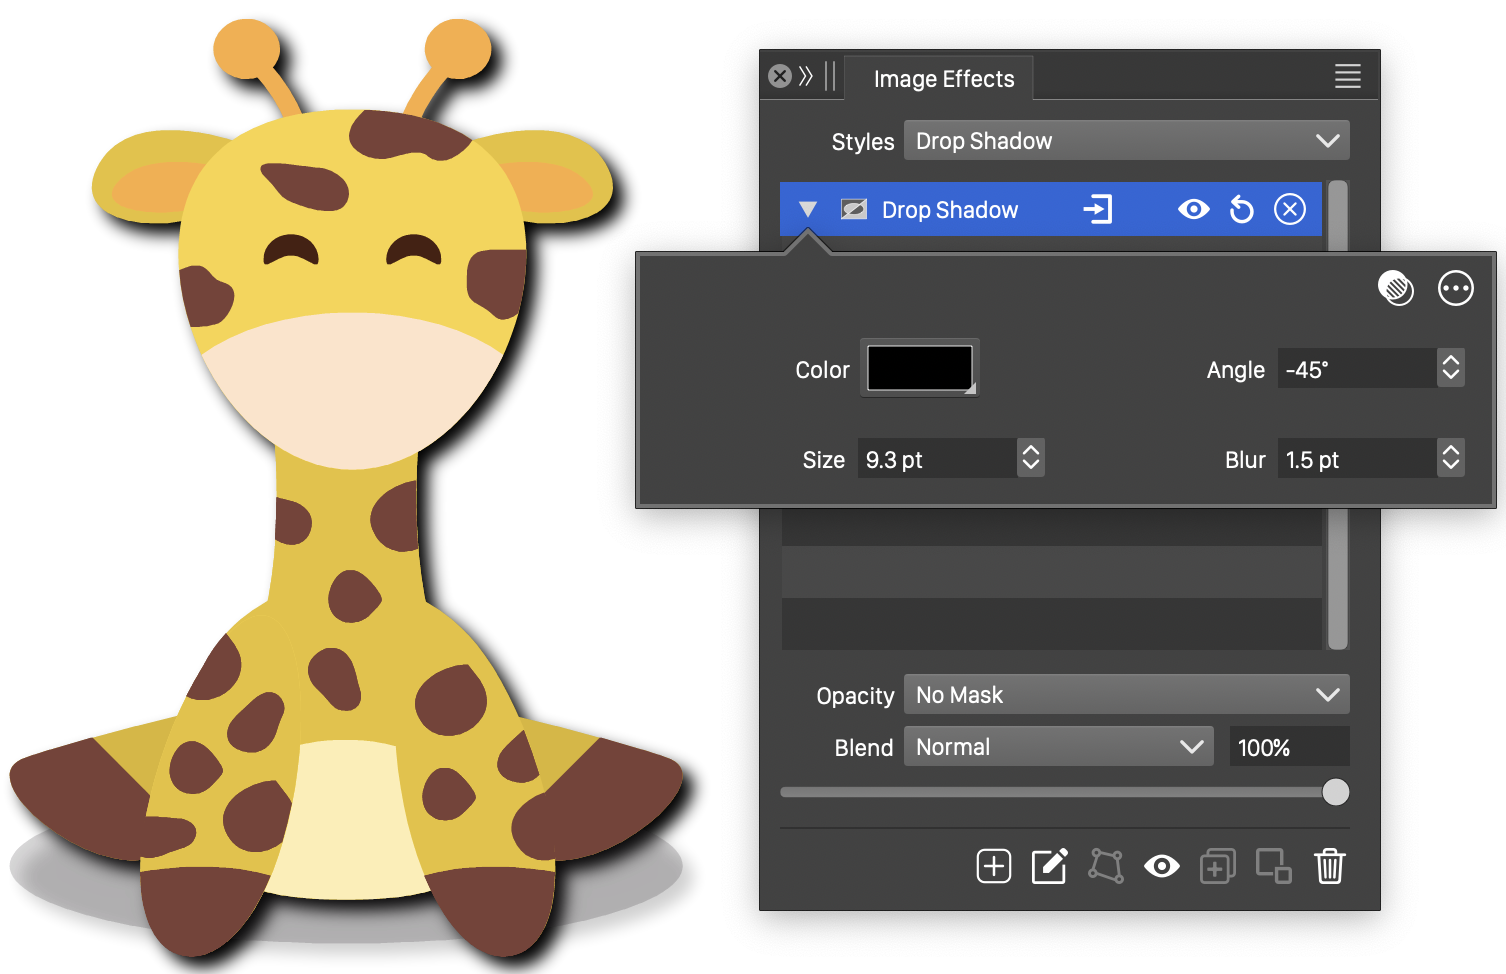
The Drop Shadow effect and its basic options.
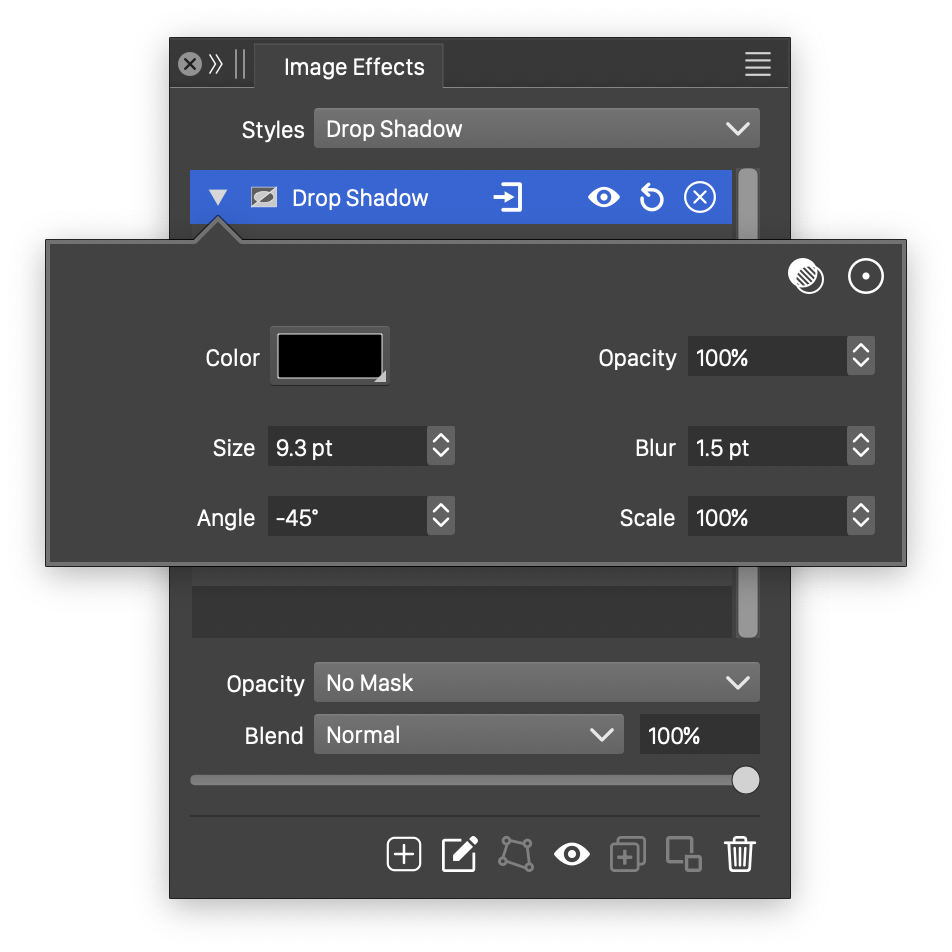
Advanced options of the Drop Shadow effect.
The Drop Shadow image effect uses the following basic options:
- Size - Set the extent of the drop shadow.
- Blur - Set the amount of blurring applied to the shadow.
- Angle - Set the direction of the drop shadow.
- Color - Select the color of the drop shadow. The default color is black.
The advanced options of the Drop Shadow effect can be accessed, by clicking on the button.
- Scale - Set the vertical stretching of the shadow extent.
- Opacity - Adjust the opacity of the drop shadow.
The button from the Image Effects panel, activates the image effect tool used to interactively edit the Drop Shadow effect attributes.
Interactive editing of the Drop Shadow effect is done by dragging the handles to change an attribute value:
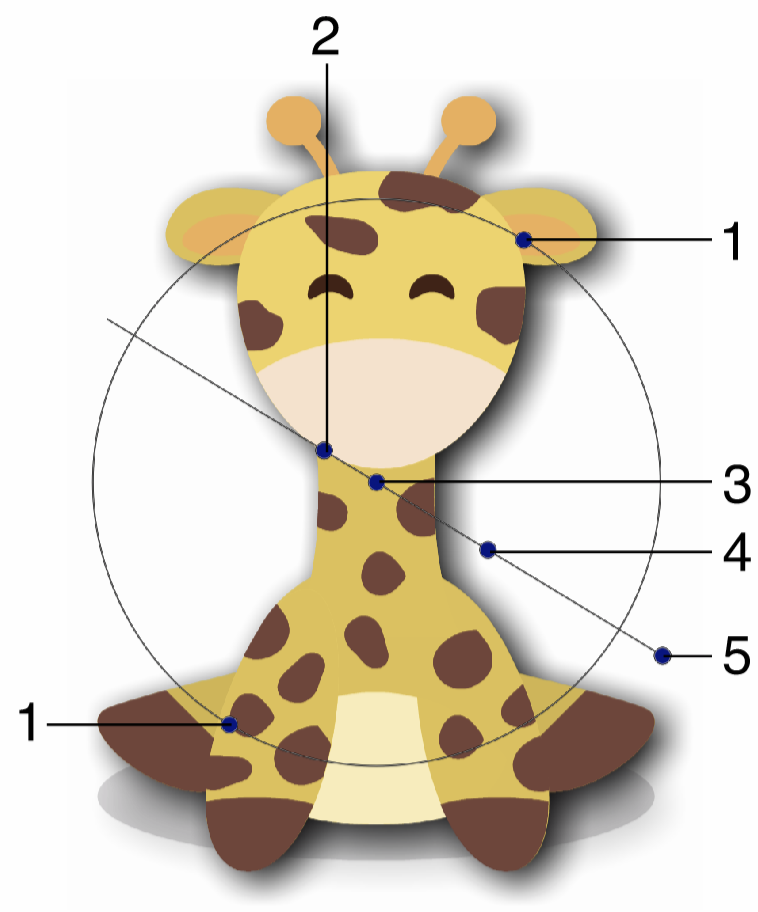
Interactive editing of the Drop Shadow image effect.
- (1) - Adjust the vertical stretching of the shadow region.
- (2) - Adjust the amount of blurring applied on the shadow.
- (3) - Adjust the center of the drop shadow effect. The center is only used to position the drop shadow handles.
- (4) - Adjust the extent of the drop shadow effect.
- (5) - Adjust the direction of the drop shadow effect.
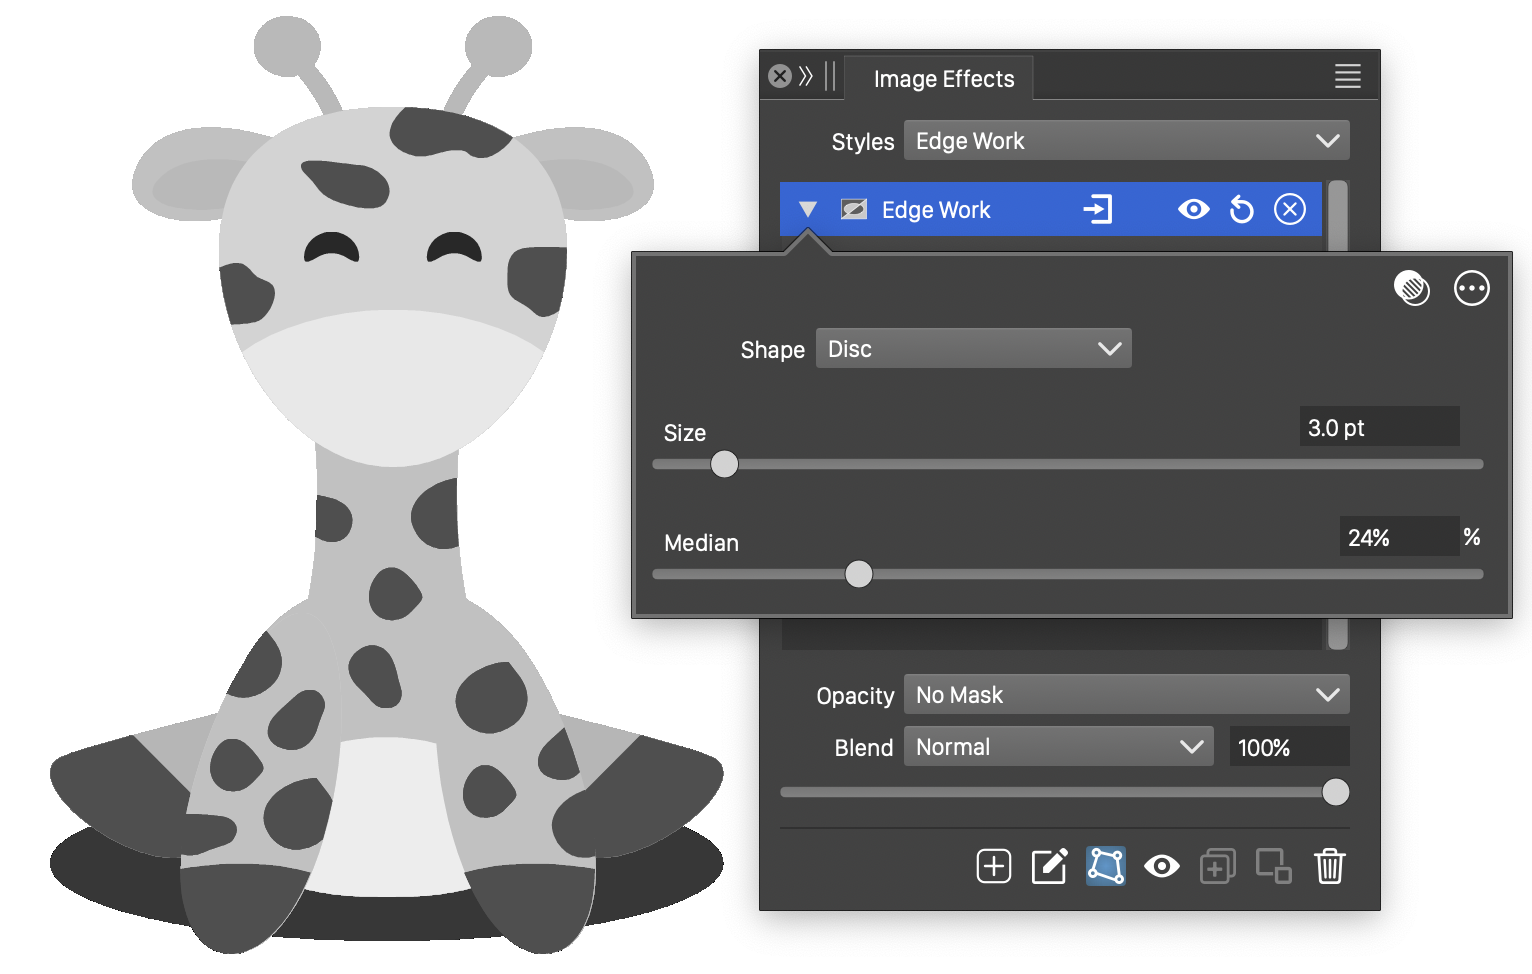
Edge Work
The Edge Work stylistic effect, converts the image into a black and white image, using edge detection to delineate uniform regions.
The Edge Work effect and its basic options.
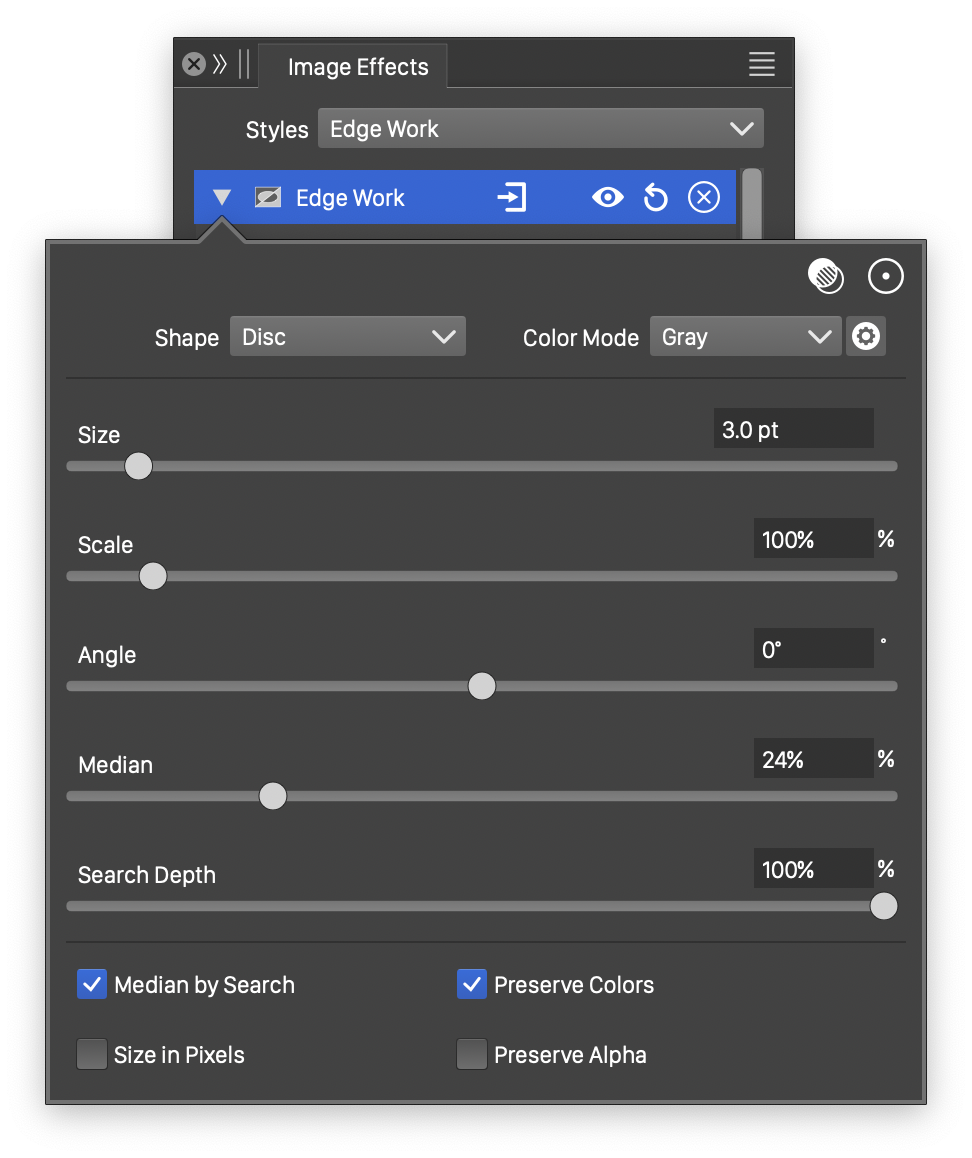
Advanced options of the Edge Work effect.
The Edge Work image effect uses the following basic options:
- Shape - Select a shape of the region used to detect edges. The shape can be selected from a list of shape styles, presets and object references with the Shape role.
- Size - The extent of the edge detection region.
- Median - The cutoff of the median tone between black and white regions.
The advanced options of the Edge Work effect can be accessed, by clicking on the button.
- Color Mode - Select the color mode used to detect edges. The default color mode is Gray, resulting in a black and white image. Using other color modes will result in a color image containing edge detected image color channels.
- Scale - Set the vertical stretching of the edge detection region.
- Angle - Set the rotation of the edge detection region.
- Search Depth - Set the precision of finding the median tone in an edge detection region.
- Median Search - Use median searching to find the tone of the edge detection region.
- Size in Pixels - Set the edge detection region size in pixels.
- Preserve Color - Preserve the colors in the edge work filter, adjusting only the alpha channel.
- Preserve Alpha - Preserve the alpha channel in the edge work filter, adjusting only the color values.
The button from the Image Effects panel, activates the image effect tool used to interactively edit the Edge Work effect attributes. The secondary image effect tool, is used to edit the edge detection shape.
Emboss
The Emboss stylistic effect, creates a relief image from the smooth regions and edges detected in the original image.
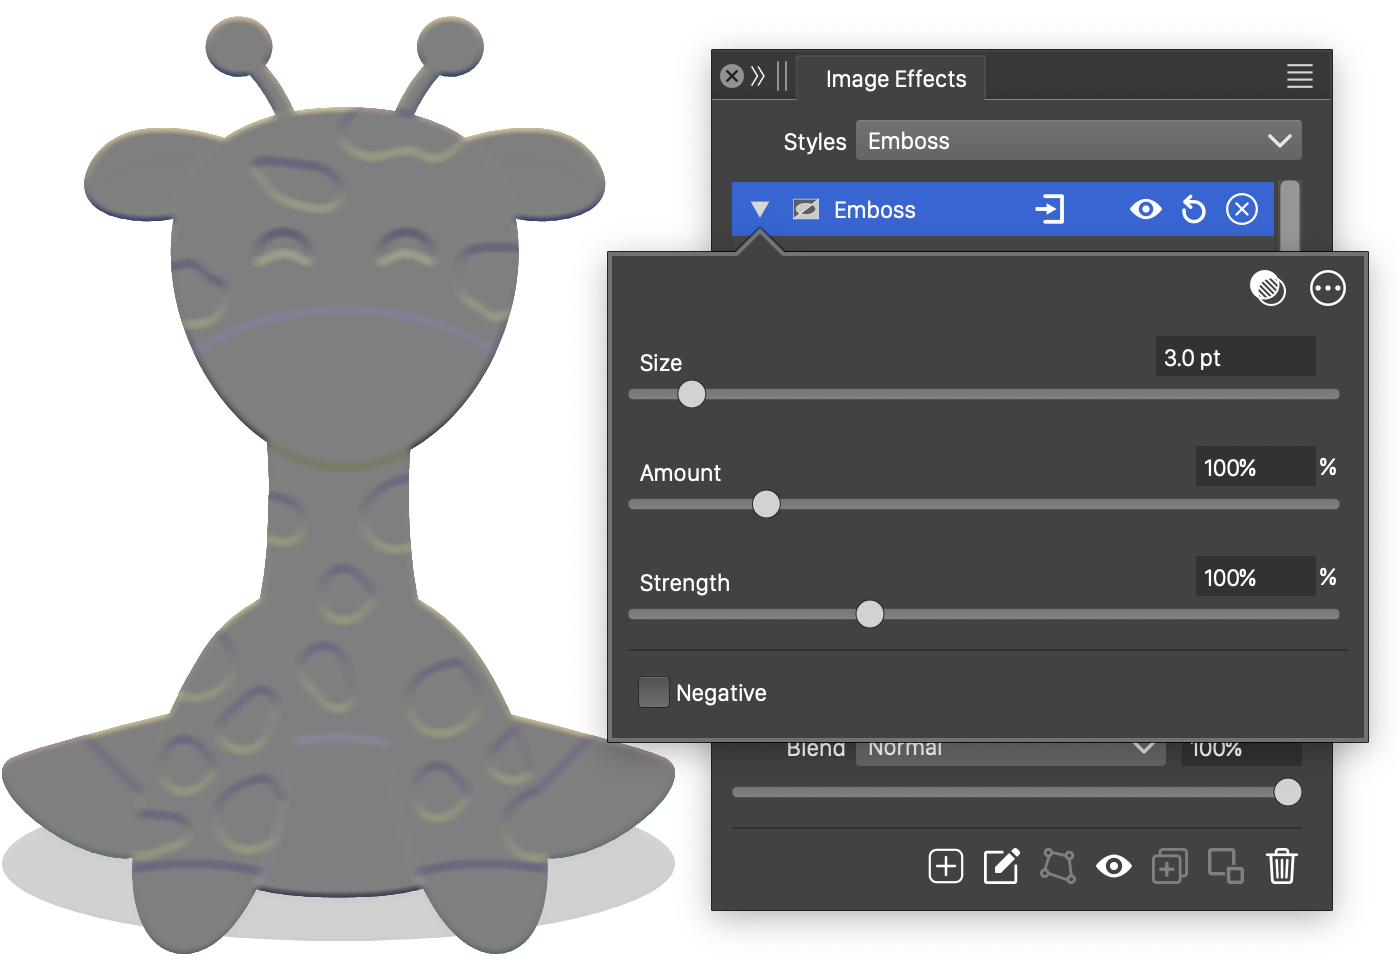
The Emboss effect and its basic options.
Advanced options of the Emboss effect.
The Emboss image effect uses the following basic options:
- Size - Set the extent of the emboss effect.
- Amount - Set the depth of the emboss effect.
- Strength - Set the steepness of the emboss relief.
- Negative - Enable or disable the flipping of the emboss relief.
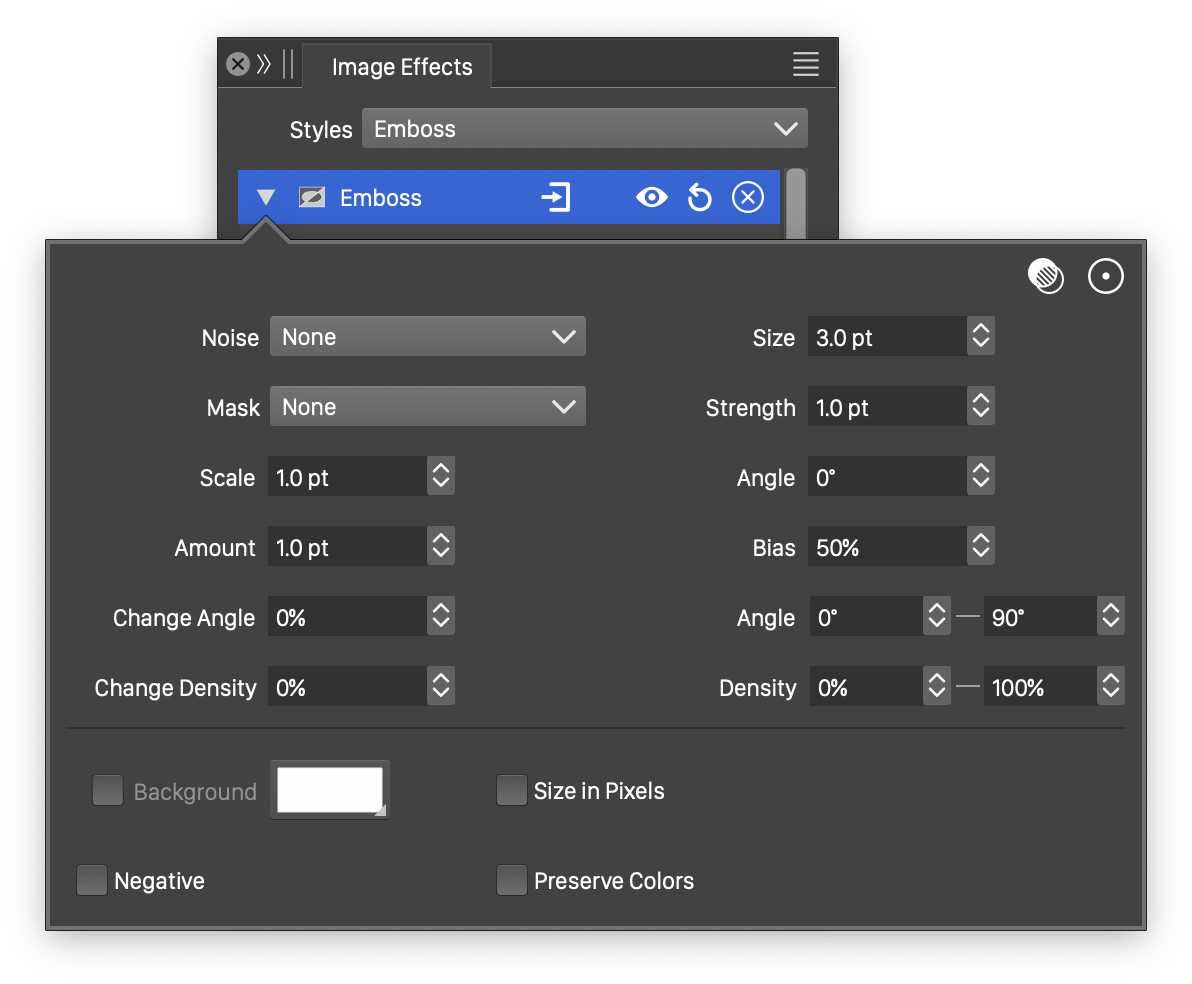
The advanced options of the Emboss effect can be accessed, by clicking on the button.
- Noise - Select the noise style from the list of predefined noise types, or user defined noise presets and styles. The noise is used to locally adjust the strength of the emboss effect. To browse randomly generated synthetic noise styles, select the Browse Styles command. To edit the noise attributes, select the Edit Noise command. Selecting noise is described with more detail in the Noise chapter.
- Mask - Select a transparency mask controlling the emboss strength locally. The transparency mask is aligned with the filtered object, and the mask intensities are used to adjust the emboss strength. The masking options are the same as described in the Transparency chapter.
- Scale - Adjust the vertical stretching of the emboss relief.
- Angle - Adjust the direction of the emboss relief.
- Bias - Set the amount of tone shift in the emboss effect.
- Start Angle - Adjust the initial angle of the emboss relief detection kernel.
- End Angle - Adjust the final angle of the emboss relief detection kernel.
- Start Density - Adjust the initial density of the emboss relief detection kernel.
- End Density - Adjust the final density of the emboss relief detection kernel.
- Change Angle - Adjust the angle variation of the emboss relief detection kernel.
- Change Density - Adjust the density variation of the emboss relief detection kernel.
- Background - Select a background color, when preserving colors in the emboss effect.
- Size in Pixels - Set the emboss effect size in pixels.
- Preserve Colors - Enable or disable the preserving of colors from the original image.
The button from the Image Effects panel, activates the image effect tool used to interactively edit the emboss effect attributes.
Interactive editing of the Emboss effect is done by dragging the handles to change an attribute value:
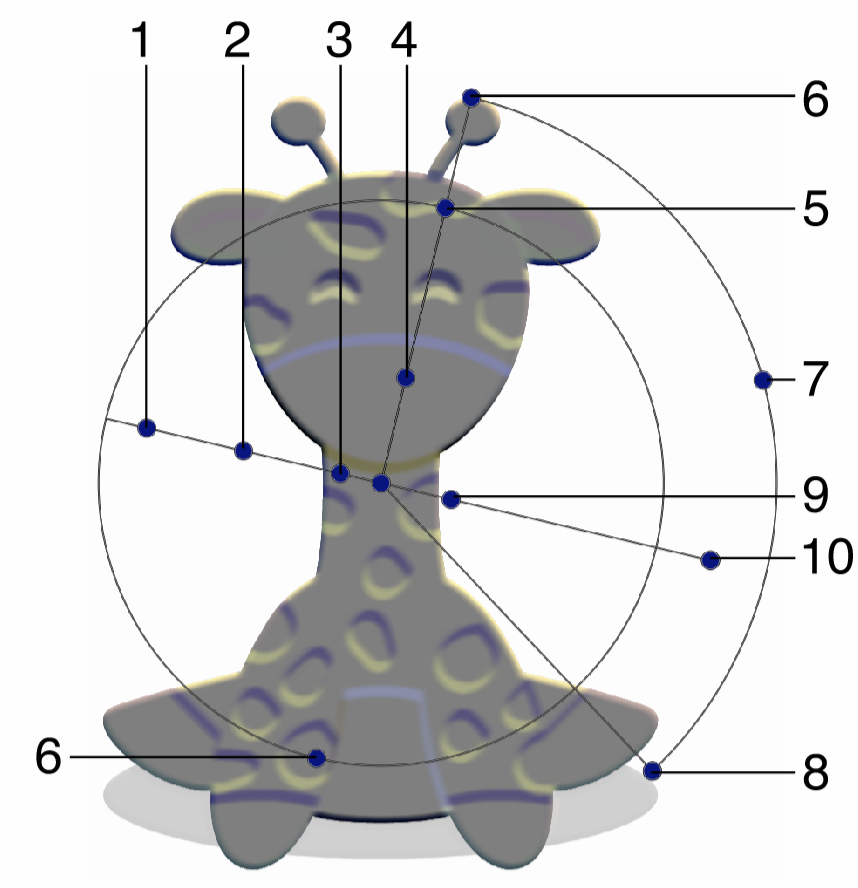
Interactive editing of the Emboss image effect.
- (1) - Adjust the final density of the emboss relief detection kernel.
- (2) - Adjust the density variation of the emboss relief detection kernel.
- (3) - Adjust the initial density of the emboss relief detection kernel.
- (4) - Adjust the strength of the emboss effect.
- (5) - Adjust the vertical stretching of the emboss relief.
- (6) - Adjust the initial angle of the emboss relief detection kernel.
- (7) - Adjust the angle variation of the emboss relief detection kernel.
- (8) - Adjust the final angle of the emboss relief detection kernel.
- (9) - Adjust the size of the emboss effect.
- (10) - Adjust the direction of the emboss effect.
Find Edge
The Find Edge stylistic effect, detects the edges in the image. The detected edges are assigned highlighted colors, which the smooth regions will be set to black.

The Find Edge effect and its basic options.
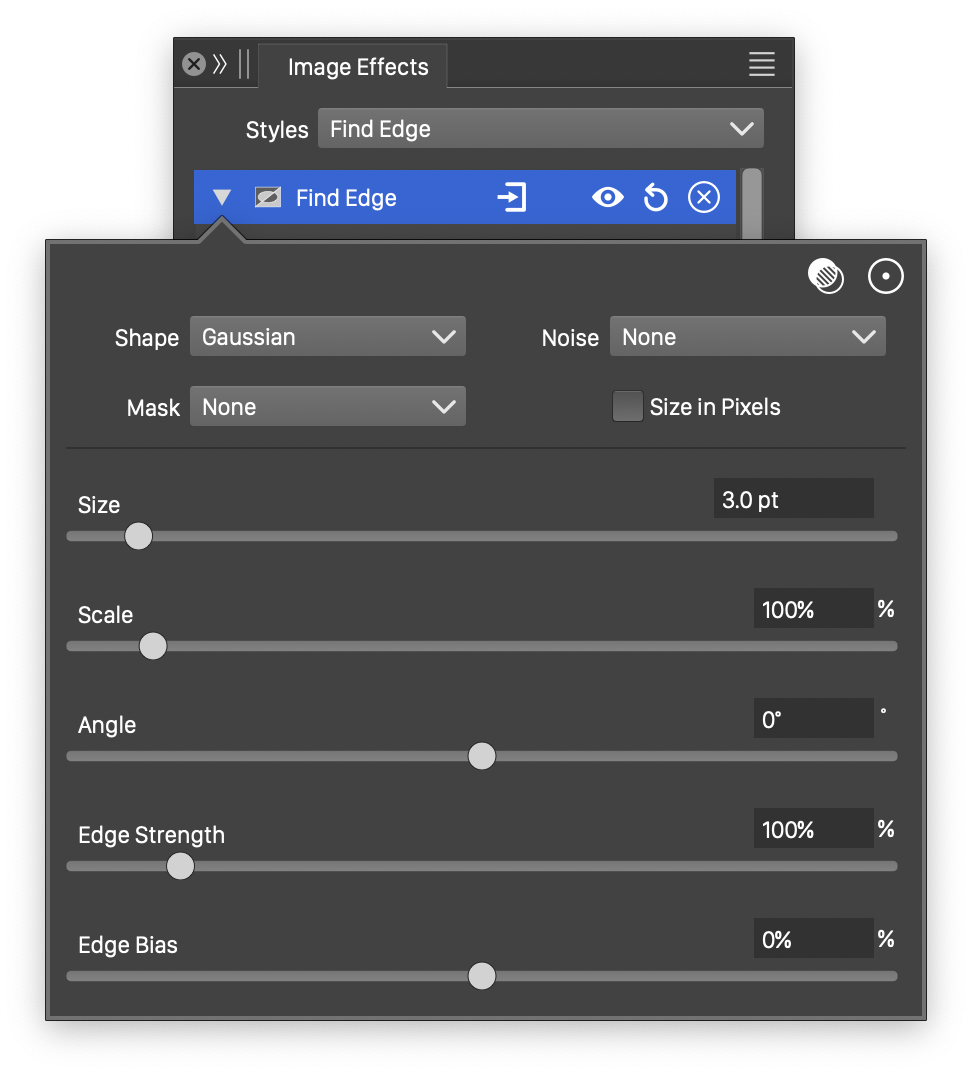
Advanced options of the Find Edge effect.
The Find Edge image effect uses the following basic options:
- Shape - Select a shape of the region used to detect edges. The shape can be selected from a list of shape styles, presets and object references with the Shape role. The predefined Gaussian and Disc shapes can be used to set default edge shapes.
- Size - Set the extent of the edge detection region.
- Edge Strength - Set the strength of the edge detection.
The advanced options of the Find Edge effect can be accessed, by clicking on the button.
- Noise - Select the noise style from the list of predefined noise types, or user defined noise presets and styles. The noise is used to locally adjust the strength of the edge finding effect. To browse randomly generated synthetic noise styles, select the Browse Styles command. To edit the noise attributes, select the Edit Noise command. Selecting noise is described with more detail in the Noise chapter.
- Mask - Select a transparency mask controlling the edge strength locally. The transparency mask is aligned with the filtered object, and the mask intensities are used to adjust the edge detection strength. The masking options are the same as described in the Transparency chapter.
- Scale - Adjust the vertical stretching of the edge detection region.
- Angle - Adjust the direction of the edge detection region.
- Edge Bias - Set the amount of tone shift in the resulting edge tones.
- Size in Pixels - Set the edge detection effect size in pixels.
The button from the Image Effects panel, activates the image effect tool used to interactively edit the find edge effect attributes.
Interactive editing of the Find Edge effect is done by dragging the handles to change an attribute value:
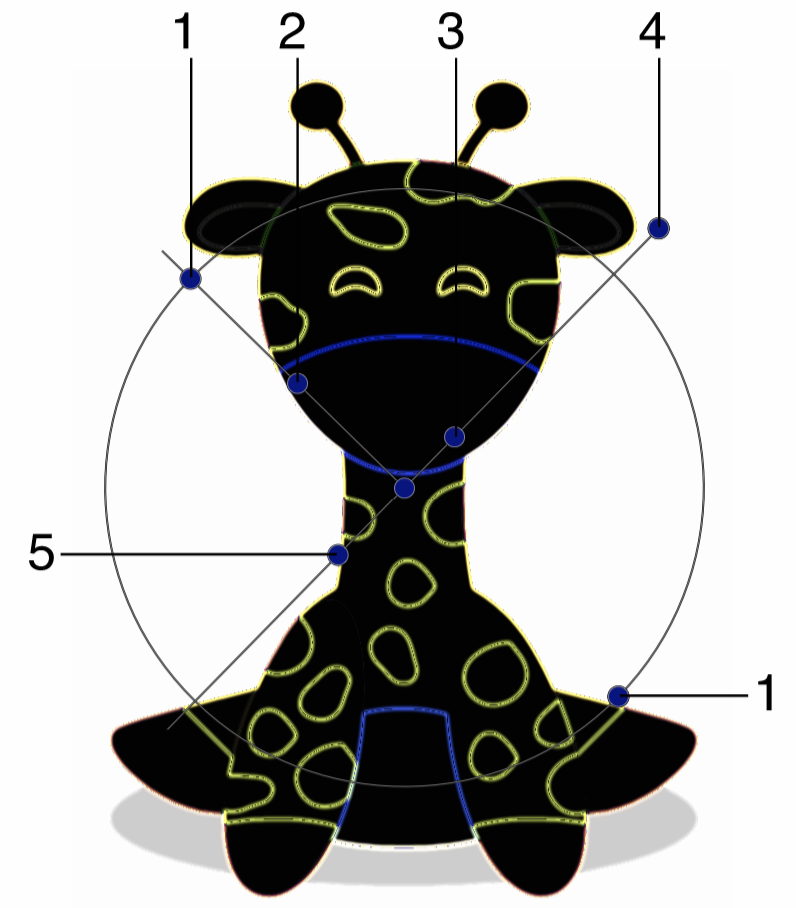
Interactive editing of the Find Edge image effect.
- (1) - Adjust the vertical stretching of the edge detection region.
- (2) - Adjust the amount of tone shift in the resulting edge tones.
- (3) - Adjust the extent of the edge detection region.
- (4) - Adjust the direction of the edge detection region.
- (5) - Adjust the strength of the edge detection.
Haze
The Haze stylistic effect, adds a glowing haze to the colors of the image.
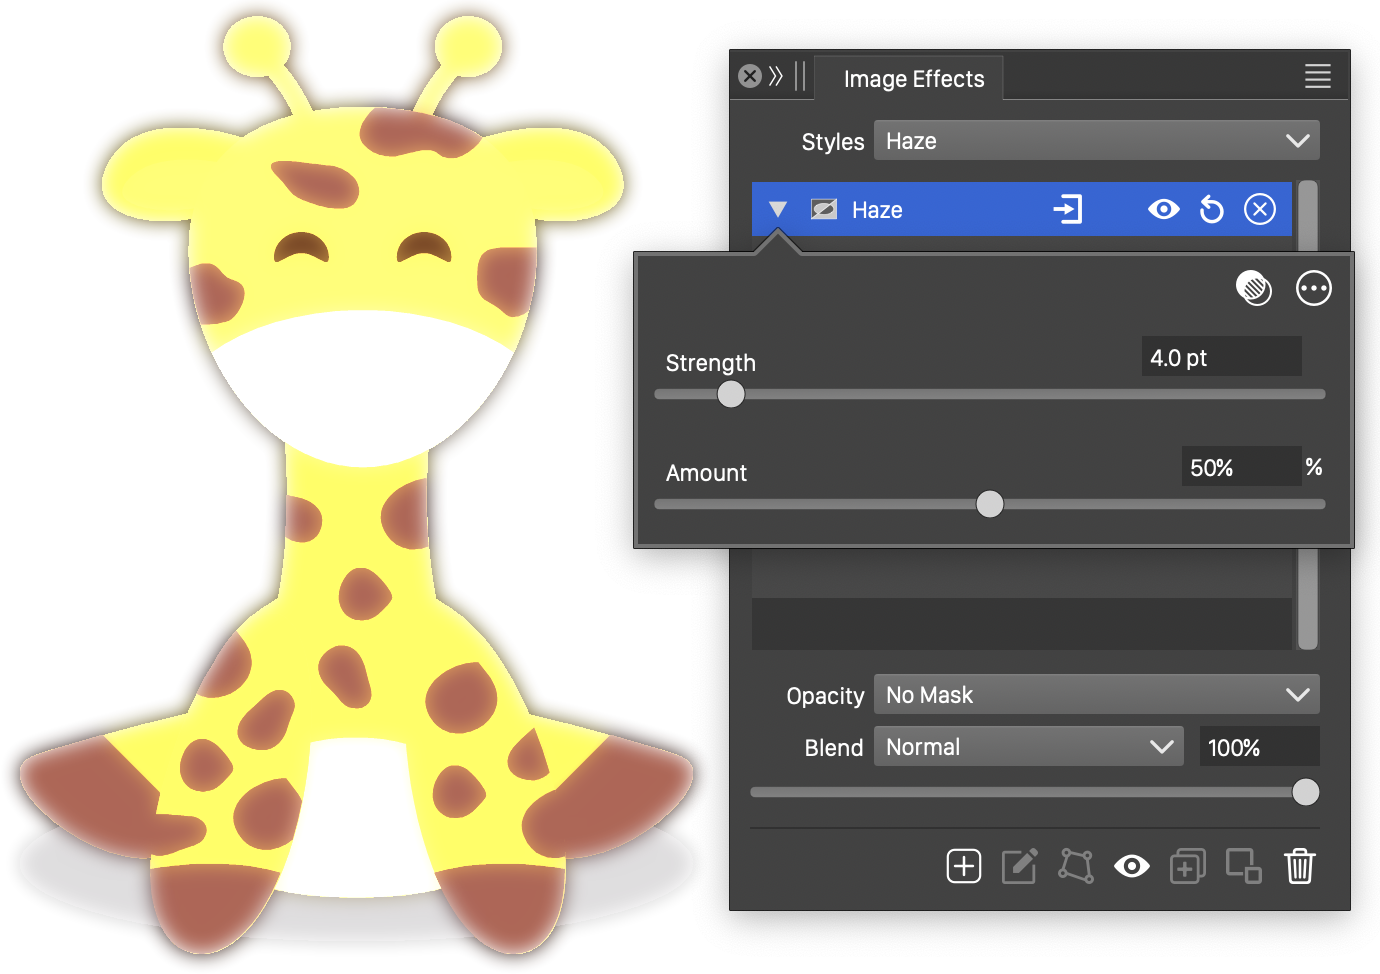
The Haze effect and its basic options.
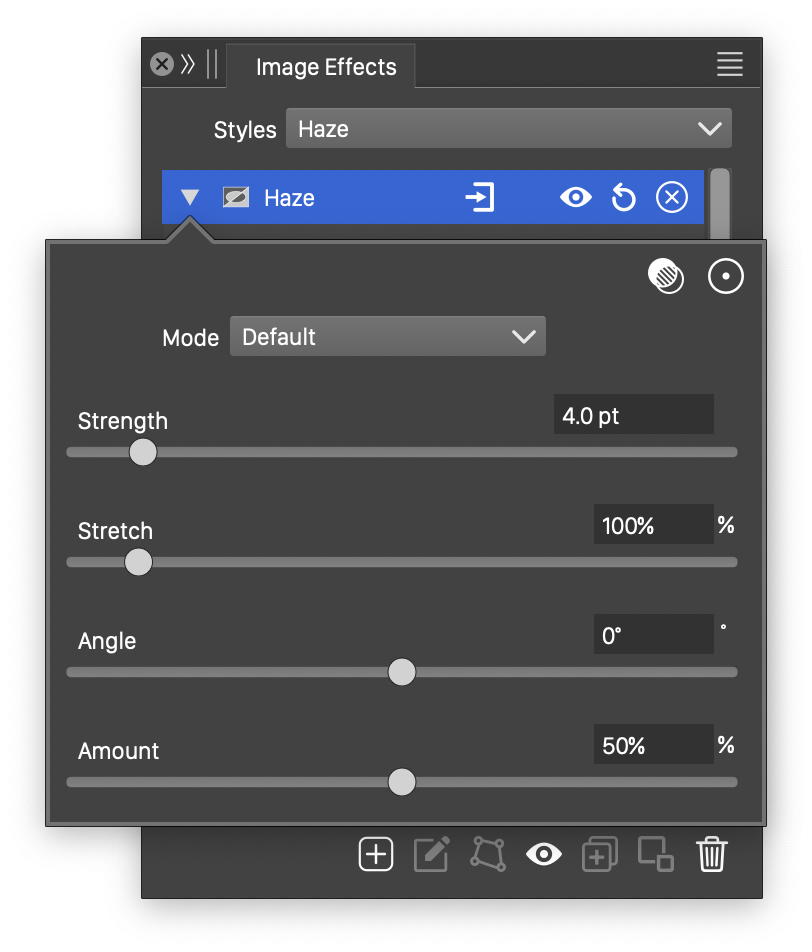
Advanced options of the Haze effect.
The Haze image effect uses the following basic options:
- Strength - Set the strength of the glow in the haze effect.
- Amount - Set the amount of glow in the haze effect.
The advanced options of the Haze effect can be accessed, by clicking on the button.
- Mode - Select the color mode used to make the color adjustments in the haze effect.
- Stretch - Set the vertical stretching of glow region.
- Angle - Adjust the direction of the glow region.
Height Field
The Height Field stylistic effect, adds a shadowy haze to the colors of the image.
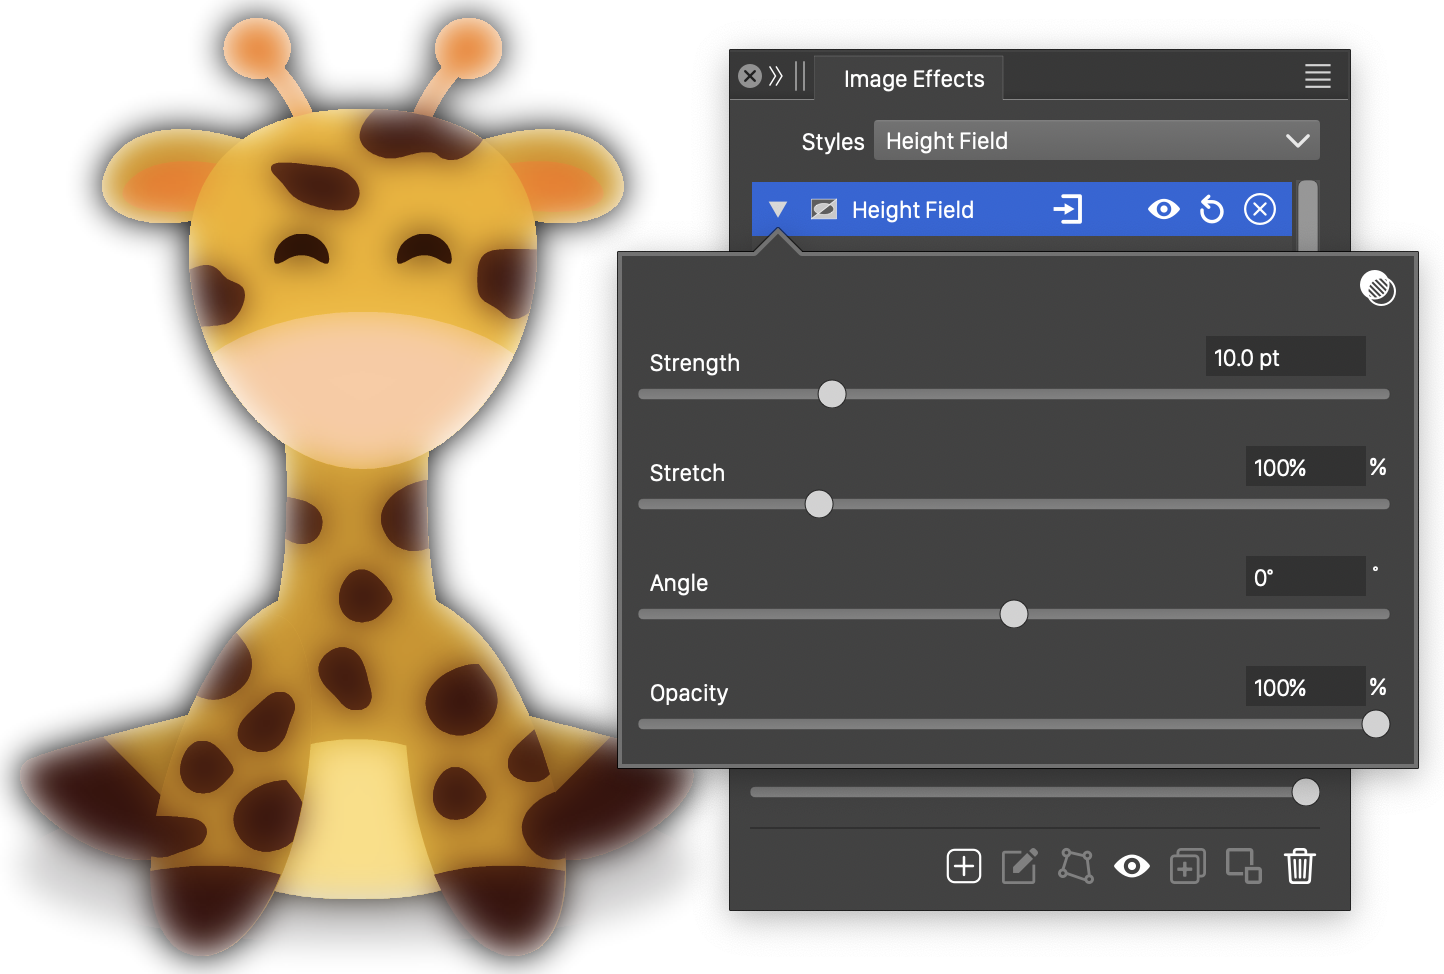
The Height Field effect and its basic options.
The Height Field image effect uses the following options:
- Strength - Set the strength of the haze in the height field effect.
- Stretch - Set the vertical stretching of the shadow region used to find color intensities.
- Angle - Set the direction of the stretched shadow region used to find color intensities.
- Opacity - Set the opacity of the haze effect.
Inner Shadow
The Inner Shadow stylistic effect, adds a directional inner shadow to the object image. The image shape is determined by the alpha channel.
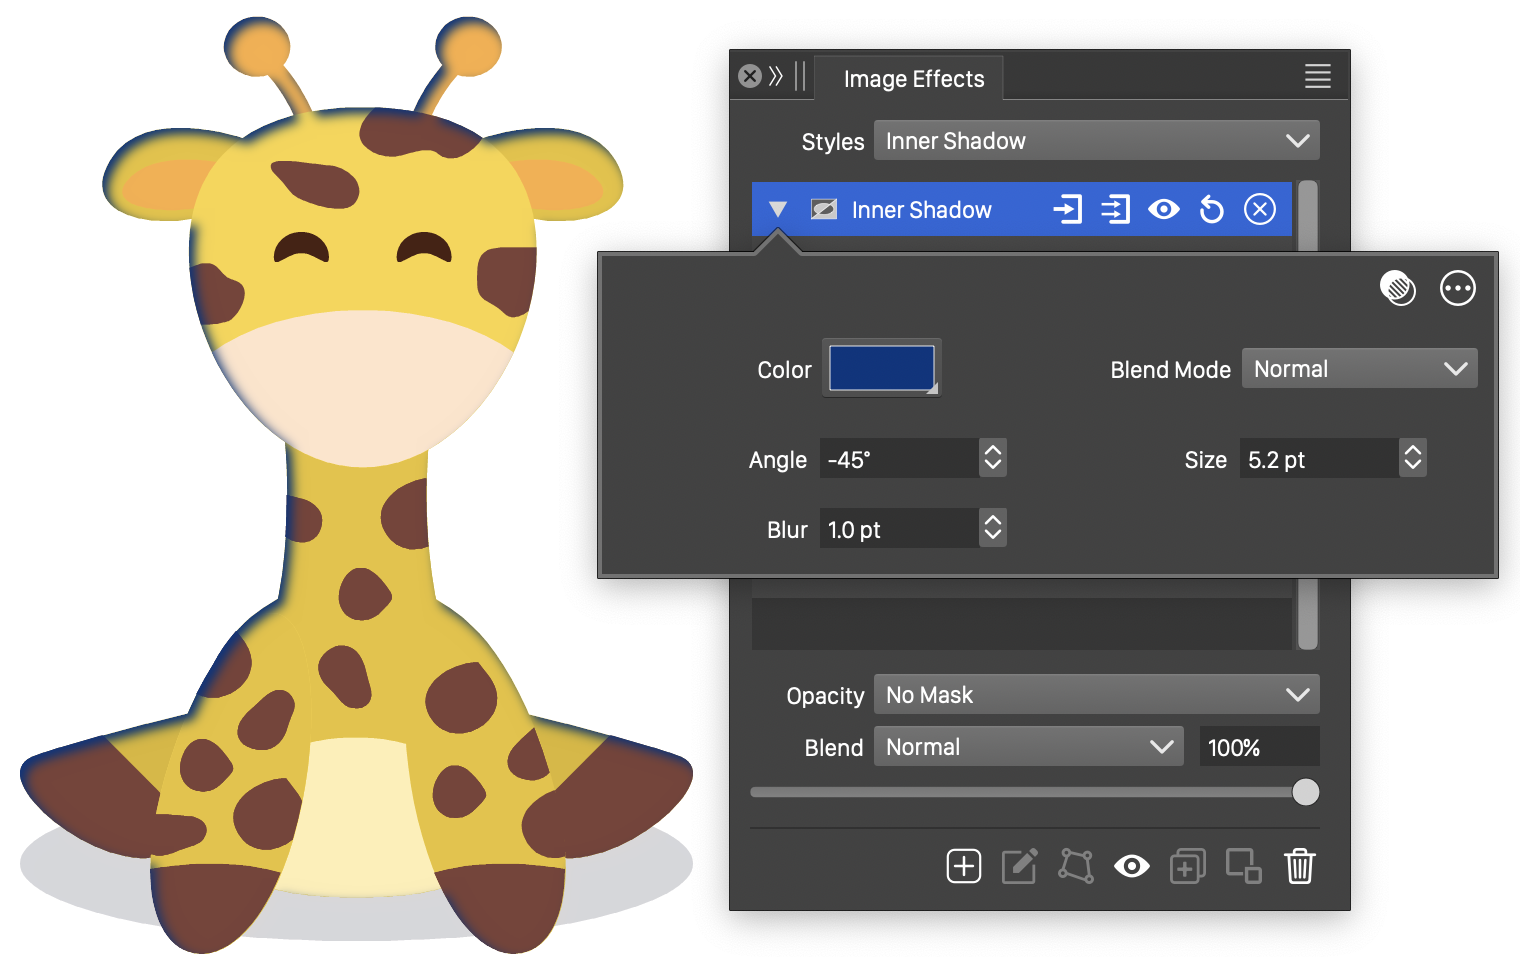
The Inner Shadow effect and its basic options.
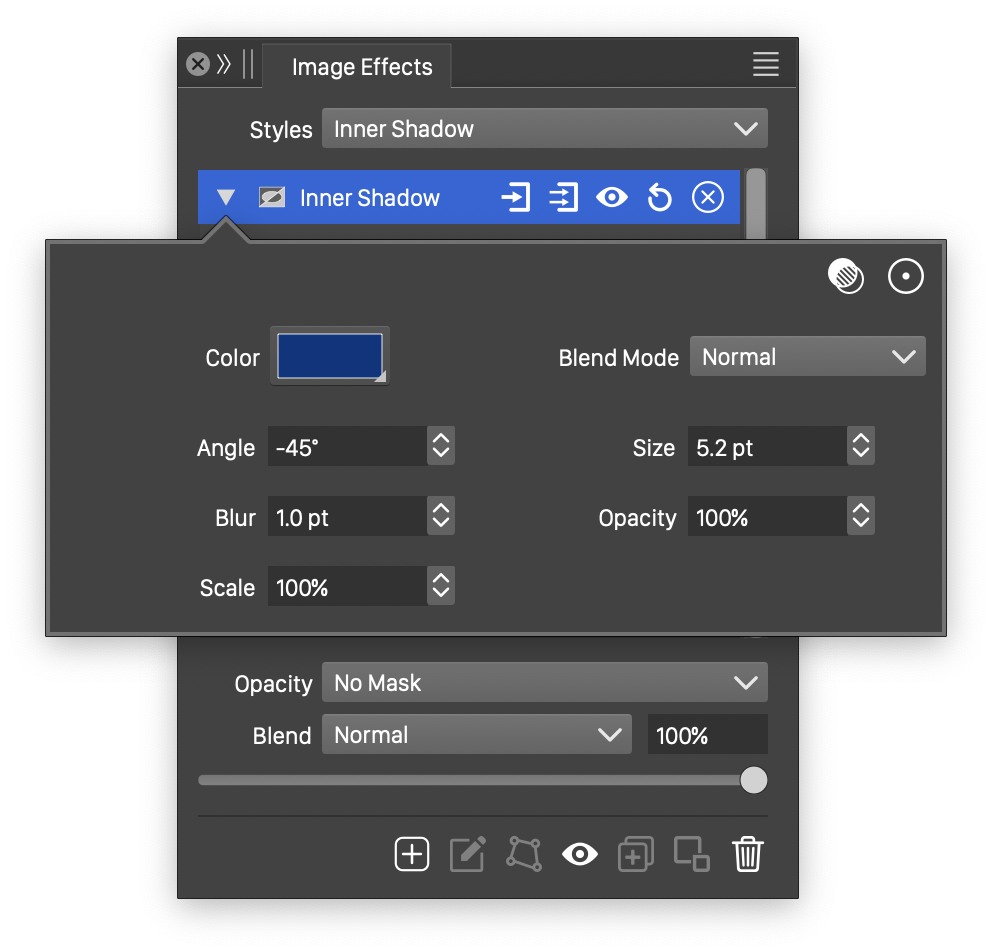
Advanced options of the Inner Shadow effect.
The Inner Shadow image effect uses the following basic options:
- Blend Mode - Select the blending mode used in the inner shadow effect. The blending mode is used to composite a inner margin blur with the original object image.
- Size - Set the extent of the inner shadow effect.
- Blur - Set the amount of blurring applied to the inner shadow.
- Angle - Set the direction of the inner shadow.
- Color - Set the color of the inner shadow.
The advanced options of the Inner Shadow effect can be accessed, by clicking on the button.
- Scale - Set the vertical stretching of blurring region.
- Opacity - Adjust the opacity of the inner shadow.
Inner/Outer Glow
The Inner/Outer Glow stylistic effect, adds an inner or outer glow to the object image. The image shape is determined by the alpha channel.
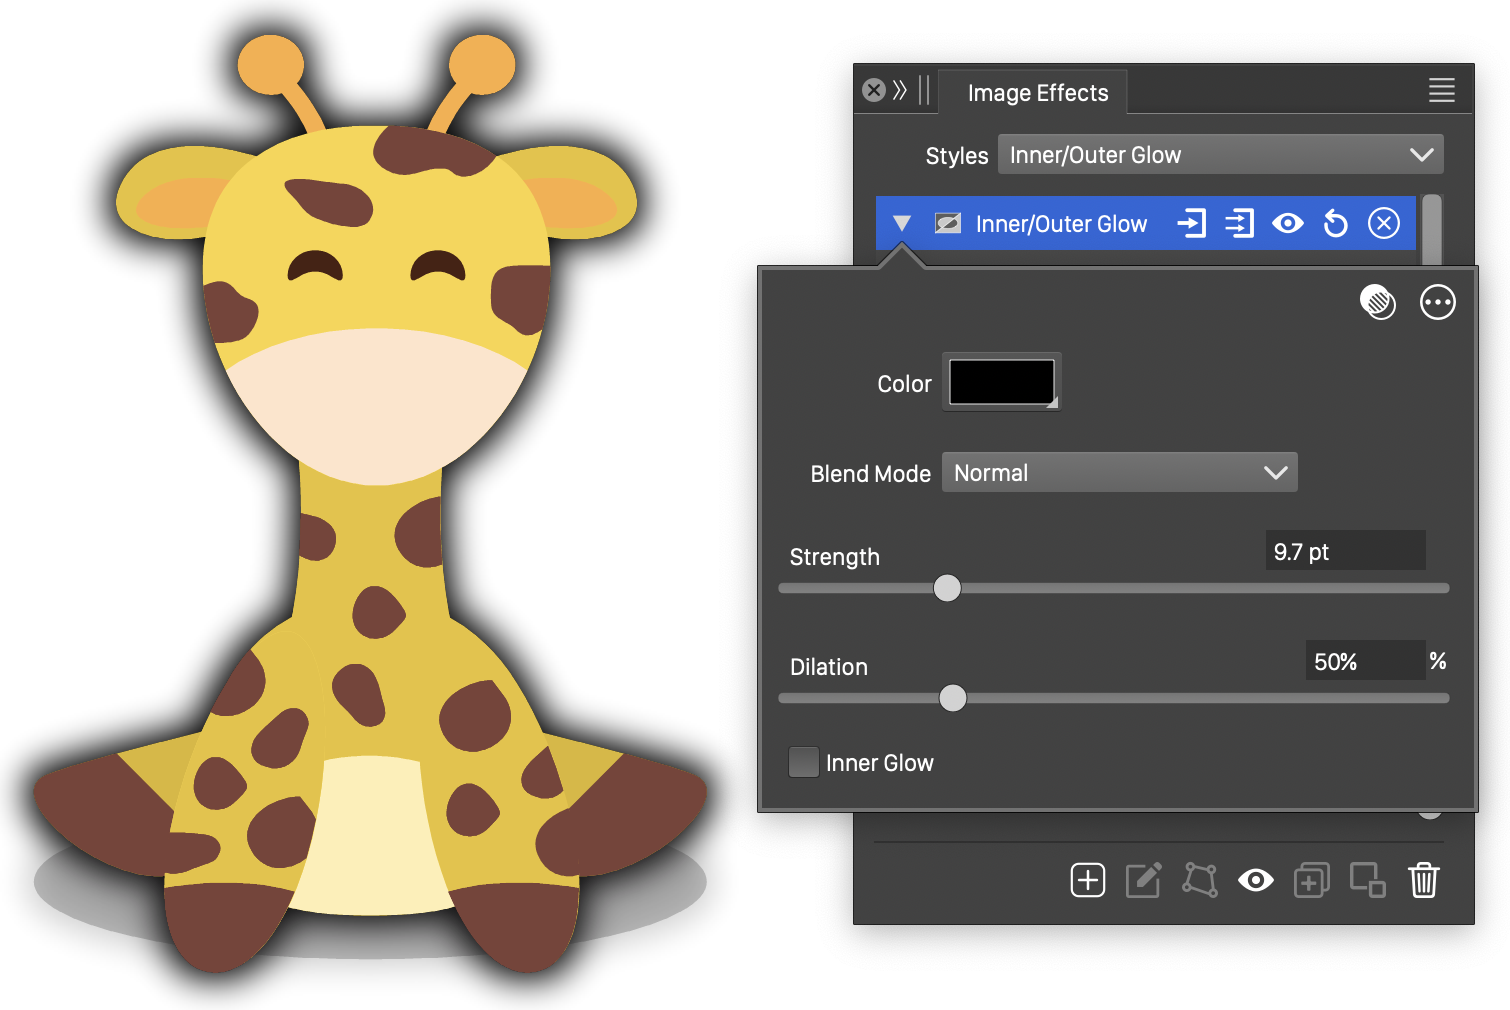
The Inner/Outer Glow effect and its basic options.

Advanced options of the Inner/Outer Glow effect.
The Inner/Outer Glow image effect uses the following basic options:
- Color - Set the color of the inner or outer glow effect.
- Strength - Set the strength of the blurring used to create the inner or outer glowing.
- Dilation - Set the amount of dilation applied to the alpha channel.
- Inner Glow - Select inner or outer glow mode.
The advanced options of the Inner/Outer Glow effect can be accessed, by clicking on the button.
- Intensity - Edit the function controlling the intensity variation of the inner or outer glow. The Cubic and Monotone Cubic functions are edited by selecting the Edit Curve command.
- Stretch - Set the vertical stretching of blurring region.
- Angle - Set the direction of the inner blurring region.
Median
The Median stylistic effect, applies a median color filter over the selected region size. The median filter selects the intensity of the color to the median, minimum or maximum intensities from the selected median region size.
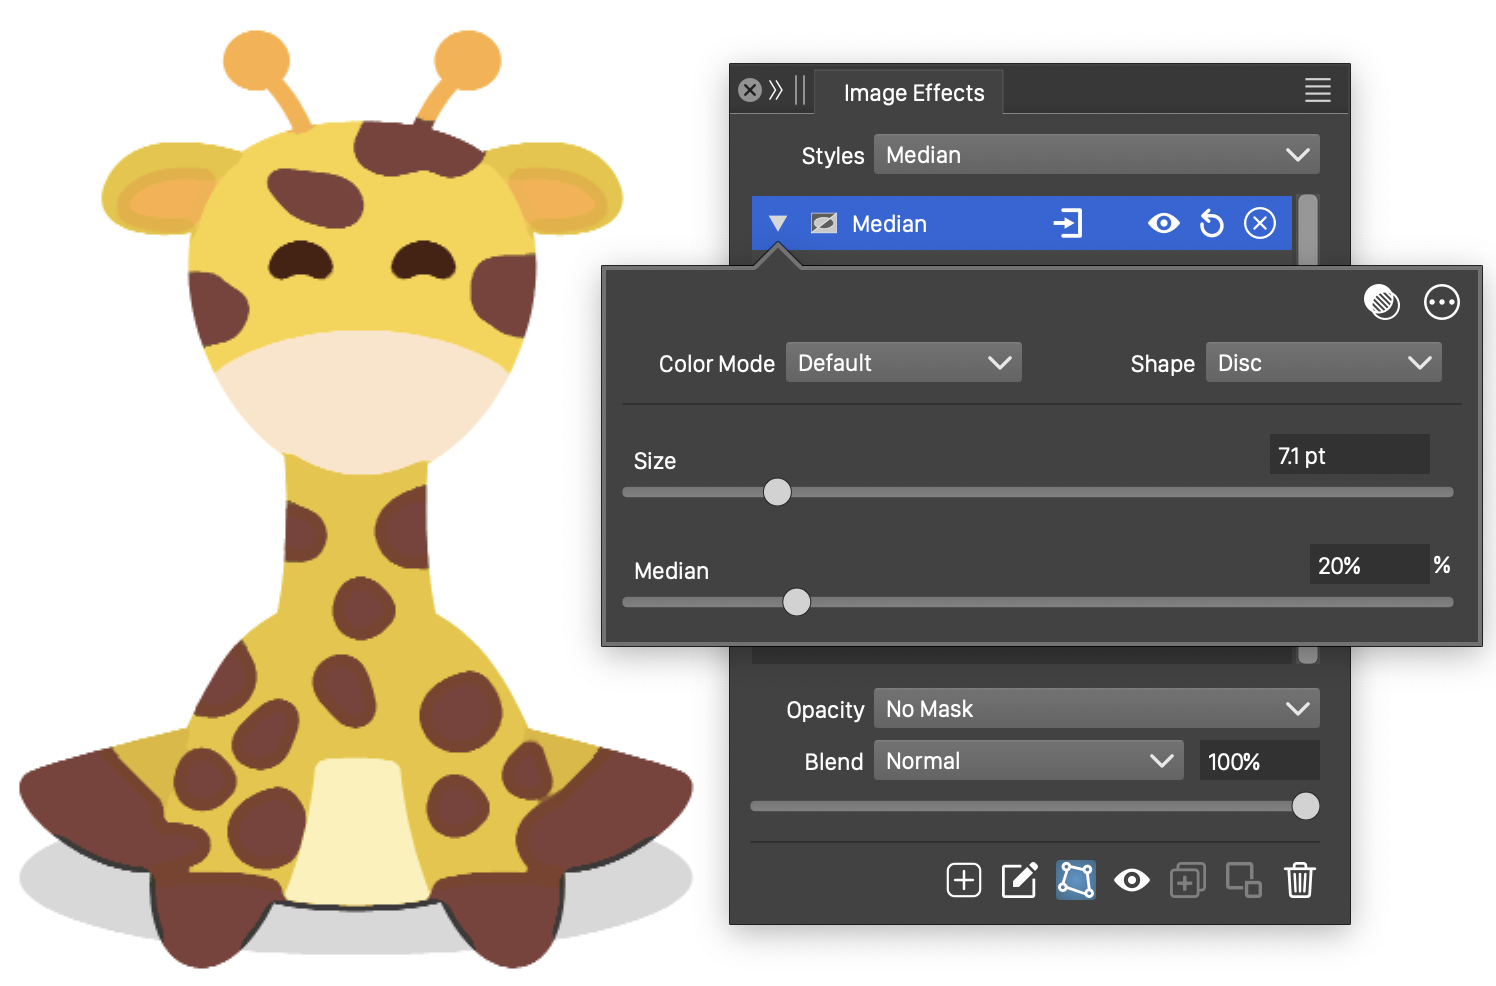
The Median effect and its basic options.
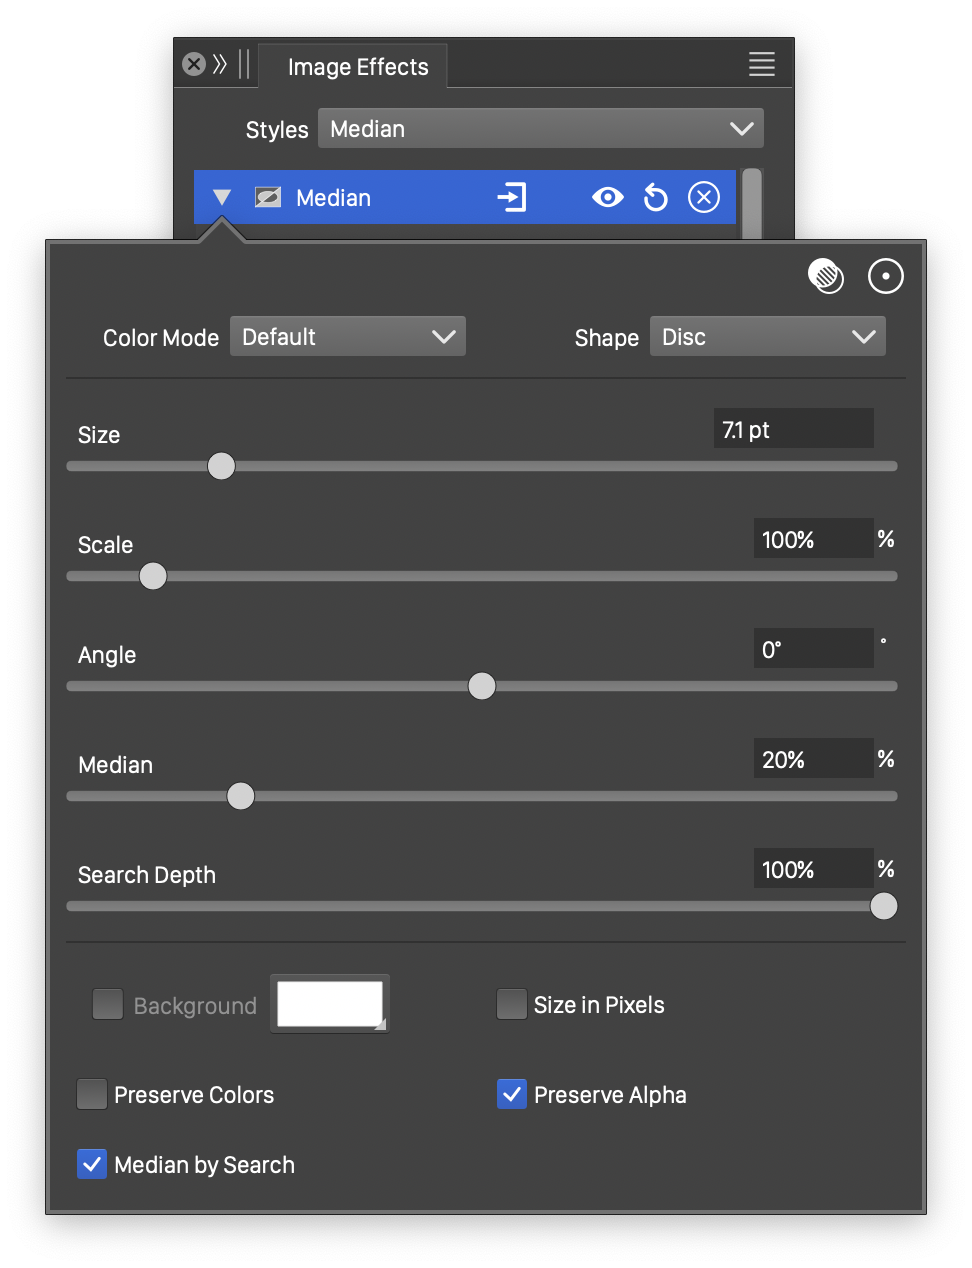
Advanced options of the Median effect.
The Median image effect uses the following basic options:
- Color Mode - Select the color mode used to find the color median.
- Shape - Select a shape of the region used to determine the color median. The shape can be selected from a list of shape styles, presets and object references with the Shape role. The predefined Gaussian and Disc shapes can be used to set default edge shapes.
- Size - Set the extent of the median search region.
- Median - Set the color ordering position in the median region. Low values select the low intensities from the region. High values will select the higher intensities. The median intensity is selected by setting the Median value to 50%.
The advanced options of the Median effect can be accessed, by clicking on the button.
- Scale - Adjust the vertical stretching of the median searching region.
- Angle - Adjust the rotation of the stretched median searching region.
- Search Depth - Set the precision of finding the median tone in an edge detection region.
- Median Search - Use median searching to find the tone of the edge detection region.
- Size in Pixels - Set the edge detection region size in pixels.
- Preserve Color - Preserve the colors in the edge work filter, adjusting only the alpha channel.
- Preserve Alpha - Preserve the alpha channel in the edge work filter, adjusting only the color values.
The button from the Image Effects panel, activates the image effect tool used to interactively edit the Median effect attributes.
Interactive editing of the Median effect is done by dragging the handles to change an attribute value:
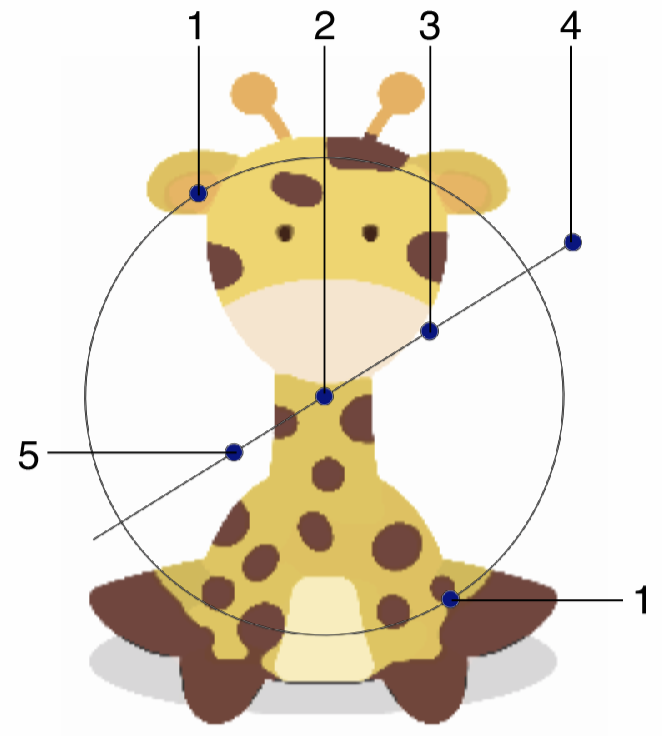
Interactive editing of the Median image effect.
- (1) - Adjust the vertical stretching of the median search region.
- (2) - Adjust the center of the median effect handles. The center has no impact on the resulting image.
- (3) - Adjust the extent of the median search region.
- (4) - Adjust the direction of the stretched median detection region.
- (5) - Adjust the color intensity selection level.
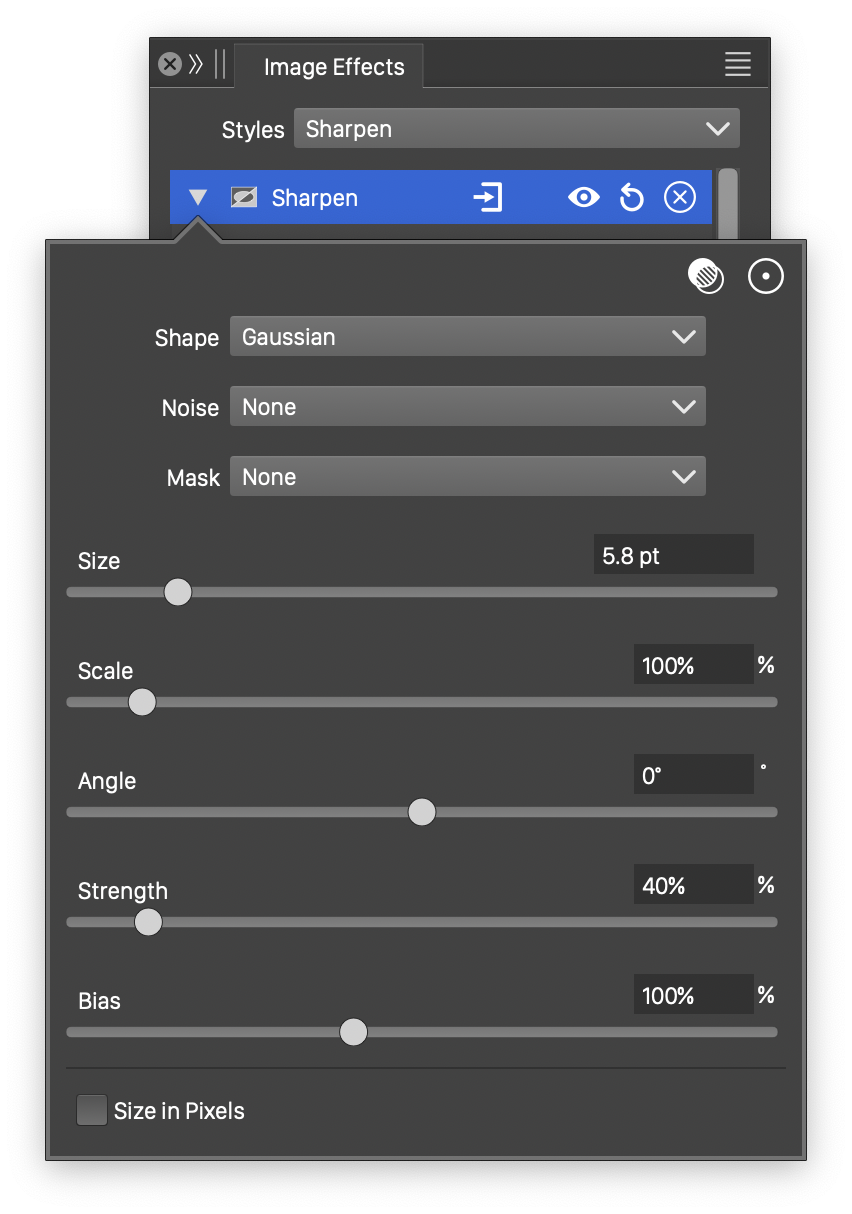
Sharpen
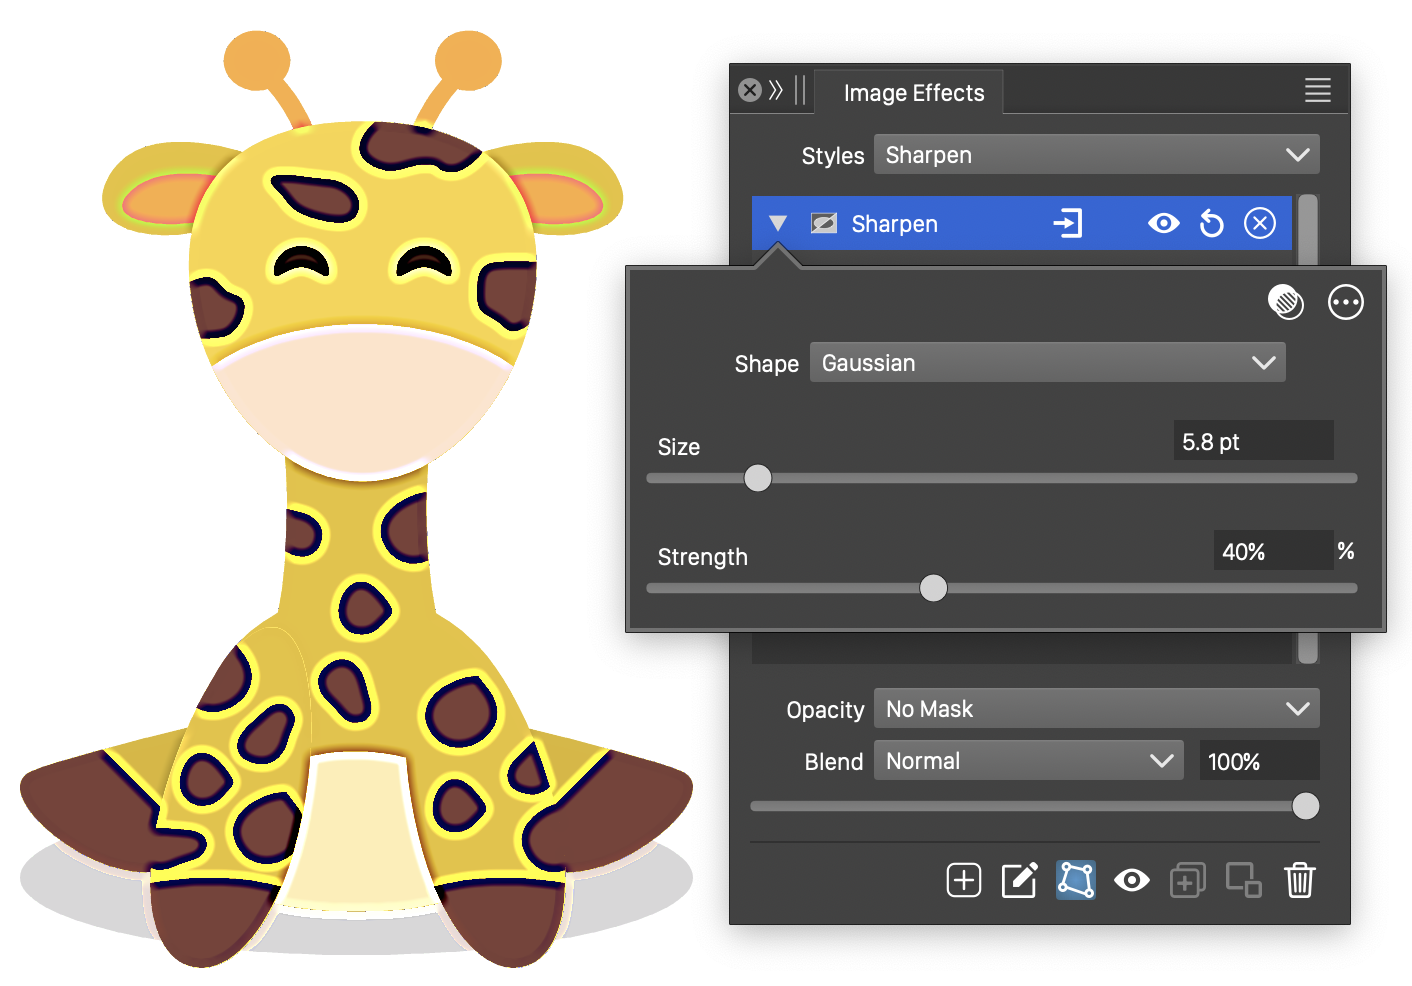
The Sharpen stylistic effect, increases the sharpens of the edges in the object image. The sharpen effect is typically used to adjust sharpness in a photographic image. It can also be used, to enhance the sharpness of edges in a vector rendering.
The Sharpen effect and its basic options.
Advanced options of the Sharpen effect.
The Sharpen image effect uses the following basic options:
- Shape - Select a shape of the region used to adjust the edge sharpness. The shape can be selected from a list of shape styles, presets and object references with the Shape role. The predefined Gaussian and Disc shapes can be used to set default edge shapes.
- Size - Set the extent of the sharpness.
- Strength - Set the strength of the sharpness.
The advanced options of the Sharpen effect can be accessed, by clicking on the button.
- Noise - Select the noise style from the list of predefined noise types, or user defined noise presets and styles. The noise is used to locally adjust the strength of the sharpness effect. To browse randomly generated synthetic noise styles, select the Browse Styles command. To edit the noise attributes, select the Edit Noise command. Selecting noise is described with more detail in the Noise chapter.
- Mask - Select a transparency mask controlling the sharpness strength locally. The transparency mask is aligned with the filtered object, and the mask intensities are used to adjust the sharpness strength. The masking options are the same as described in the Transparency chapter.
- Scale - Adjust the vertical stretching of the sharpness adjustment region.
- Angle - Adjust the rotation of the stretched sharpness adjustment region.
- Bias - Adjust the color tones resulting from the sharpness effect.
- Size in Pixels - Set the edge detection region size in pixels.
The button from the Image Effects panel, activates the image effect tool used to interactively edit the Sharpen effect attributes.
Interactive editing of the Sharpen effect is done by dragging the handles to change an attribute value:
Interactive editing of the Sharpen image effect.
- (1) - Adjust the vertical stretching of the sharpness selection region.
- (2) - Adjust the center of the sharpness effect handles. The center has no impact on the resulting image.
- (3) - Adjust the extent of the sharpness selection region.
- (4) - Adjust the direction of the stretched selection selection region.
Smoothing
The Smoothing stylistic effect smooths the image colors while sharpening the tones around the edges.
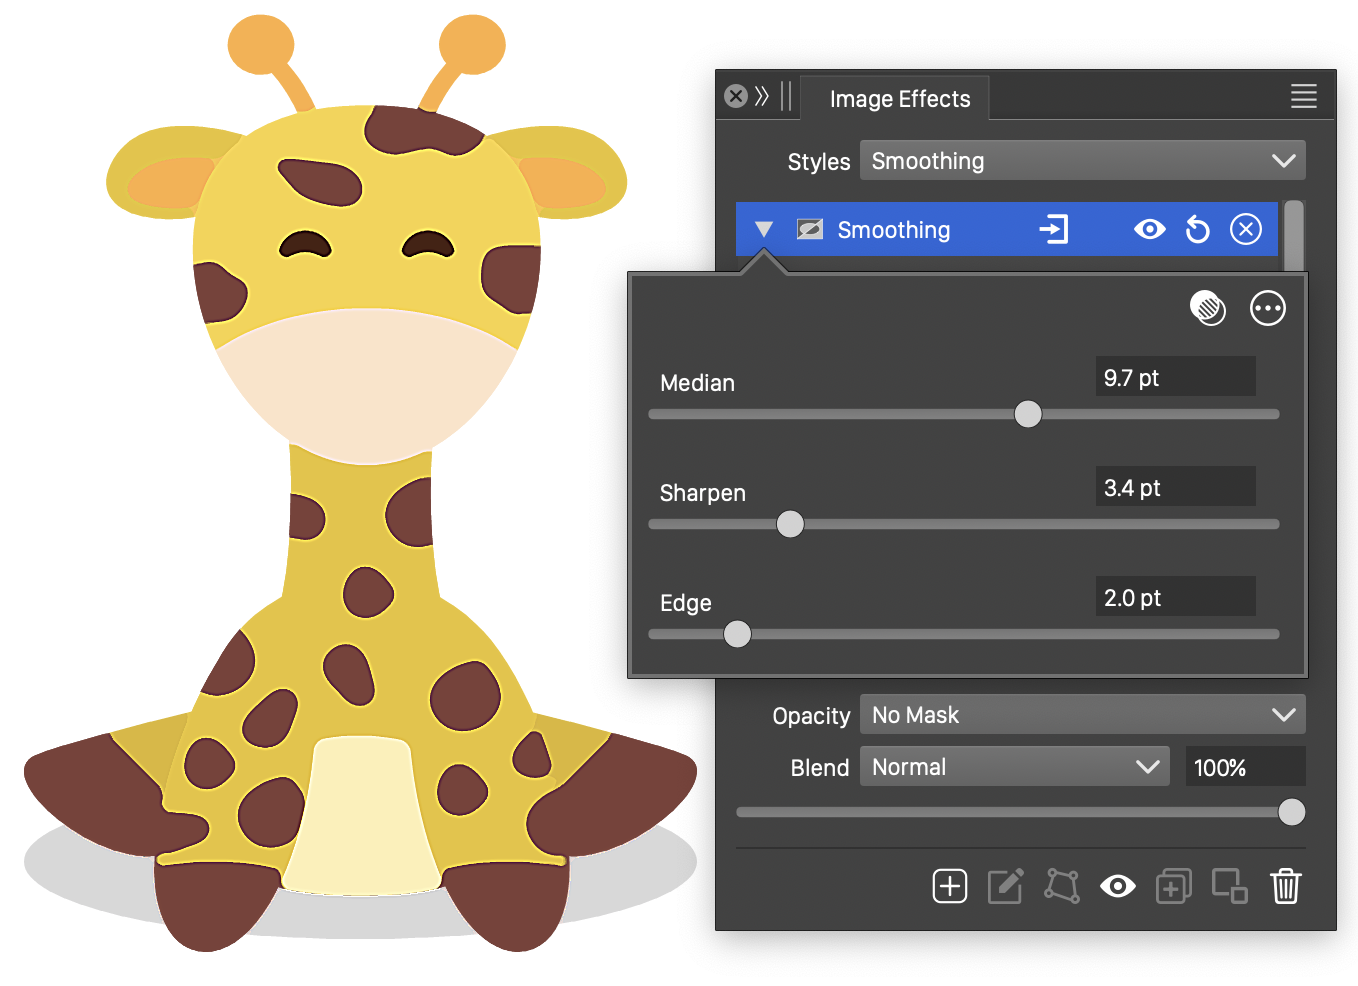
The Smoothing effect and its basic options.
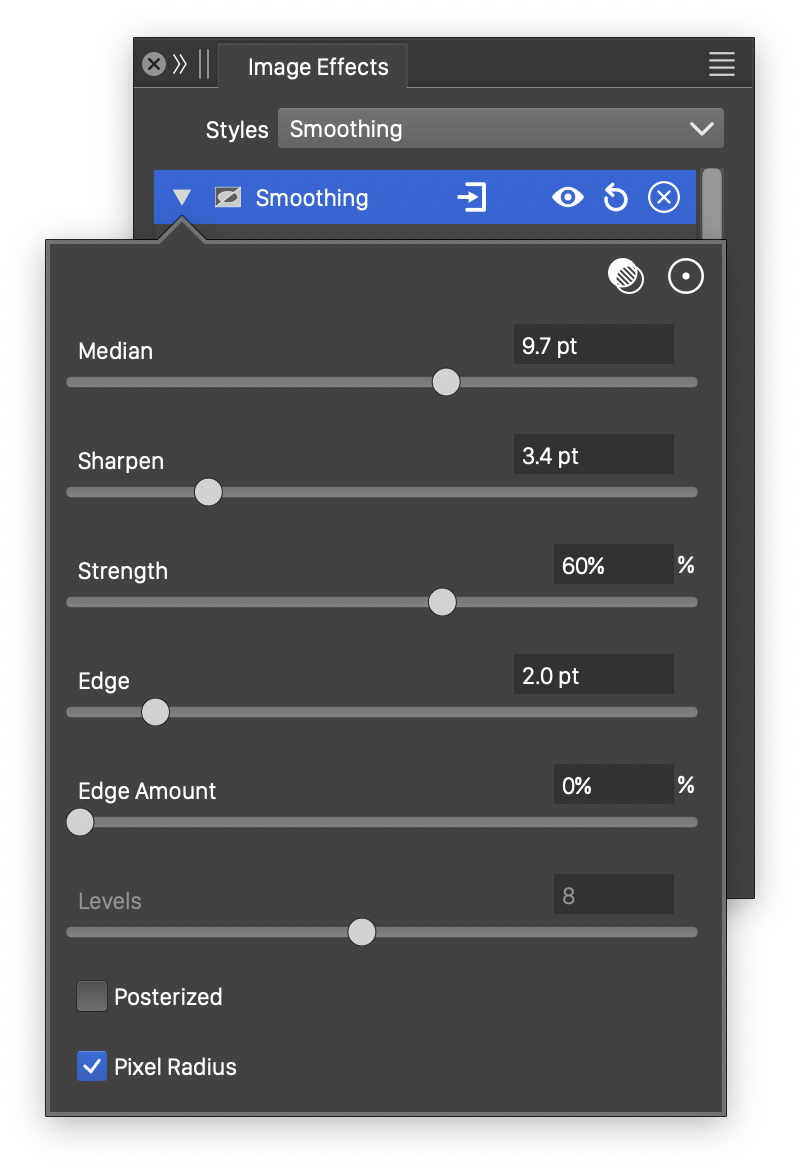
Advanced options of the Smoothing effect.
The Smoothing image effect uses the following basic options:
- Median - Select the median filter radius to smooth similar colors.
- Sharpen - Select the edge sharpening radius.
- Edge - Select the edge detection radius.
The advanced options of the Dilute Tone effect can be accessed, by clicking on the button.
- Strength - Select the image sharpening strength.
- Edge Amount - Select the edge sharpening strength.
- Posterize - Check to enable the posterization of the image tones.
- Levels - Set the number of tone levels used in posterization.
Stamp
The Stamp stylistic effect, converts the image colors into dark, light and medium intensities. By default, the result of the stamp effect will be a black and white image. Selecting a different color mode than Gray, will result in color images of restricted color variation.
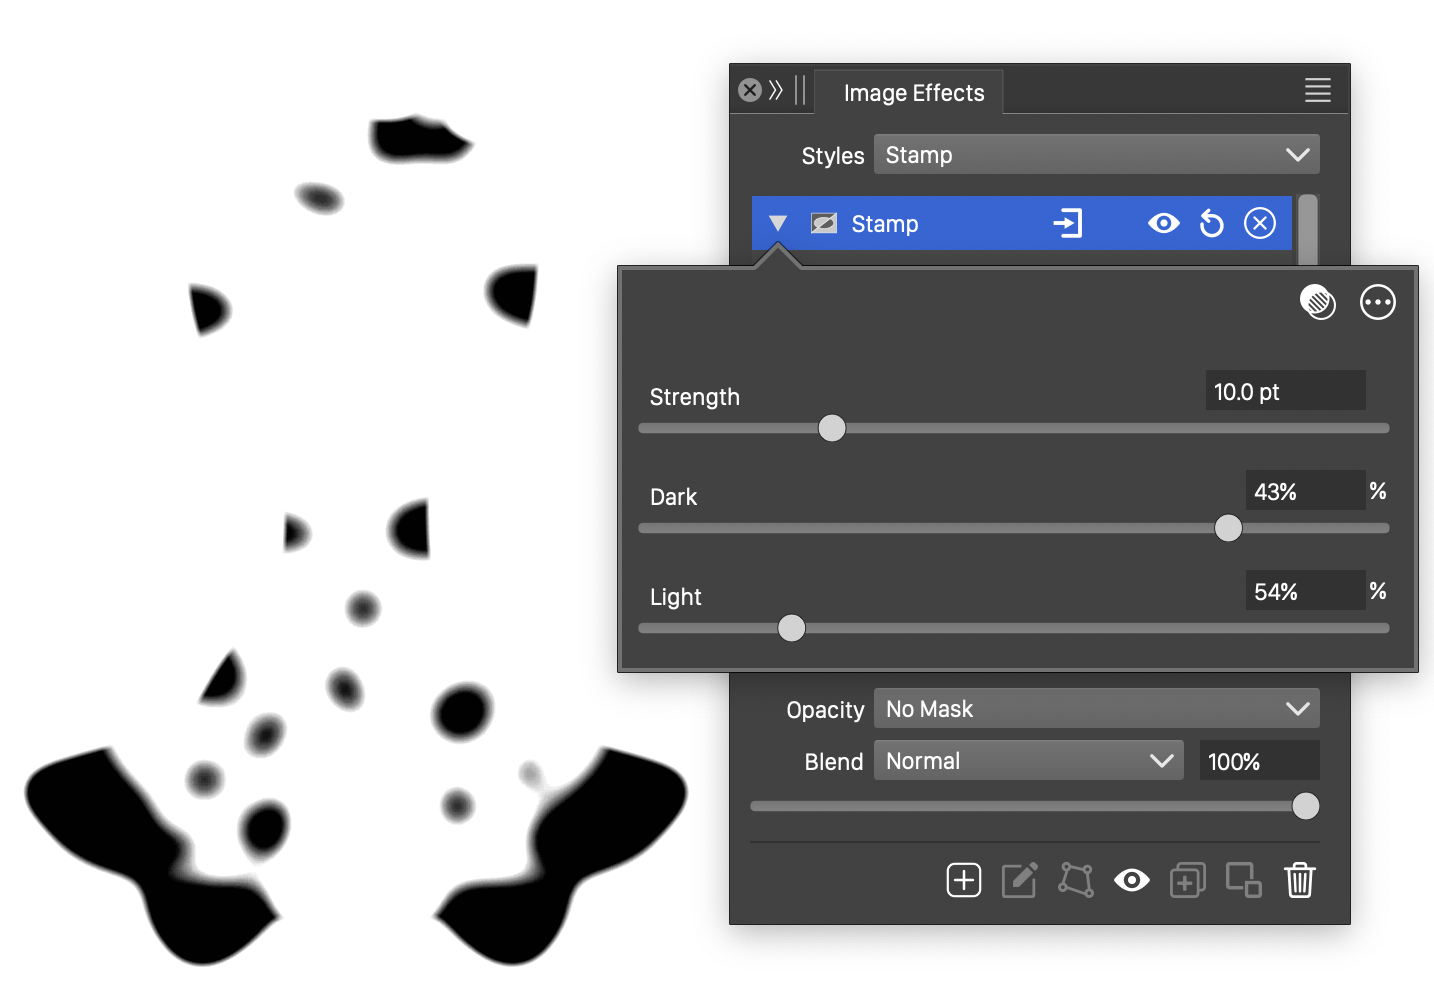
The Stamp effect and its basic options.
Advanced options of the Stamp effect.
The Stamp image effect uses the following basic options:
- Strength - Set the strength of stamp effect.
- Dark - Set cutoff limit for dark intensities.
- Light - Set cutoff limit for light intensities.
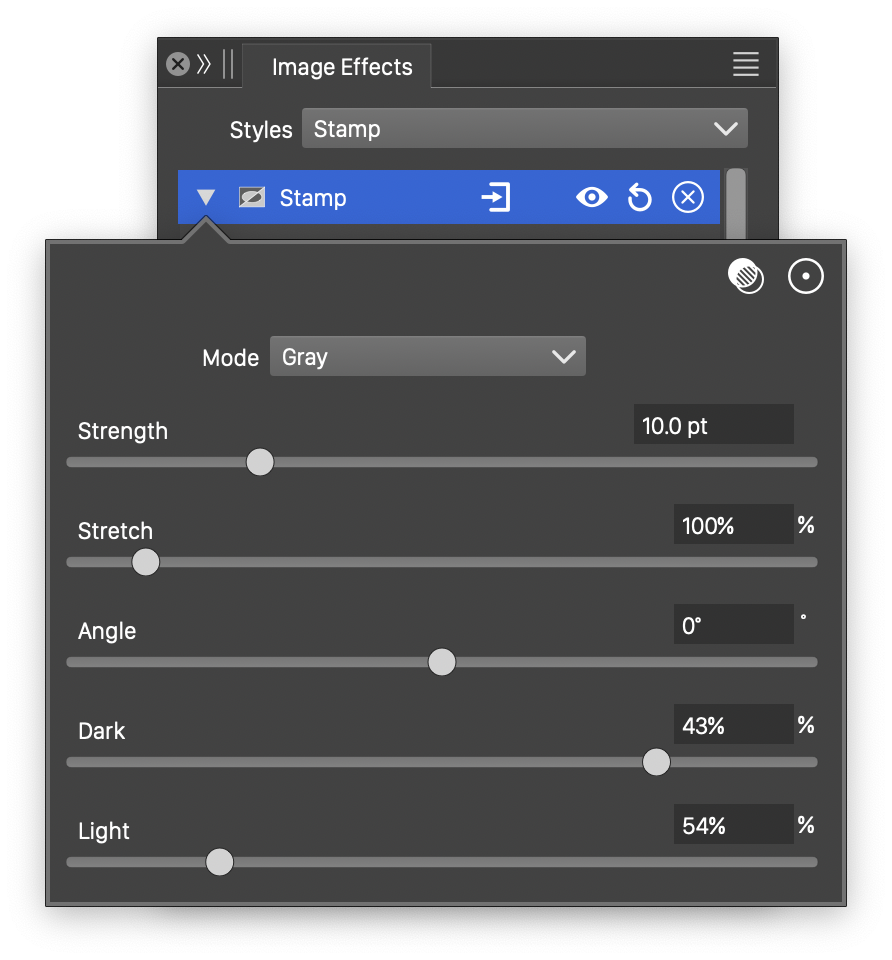
The advanced options of the Stamp effect can be accessed, by clicking on the button.
- Mode - Select the color mode used to make the color adjustments in the stamp effect.
- Stretch - Set the vertical stretching of intensity stamp region.
- Angle - Adjust the direction of the intensity stamp region.
Tracing Guide
The Tracing Guide stylistic effect highlights the strong edges of the image, to enable automatic curve extraction. The manual image trace tool uses this image effect to extract edges from the image and create smooth curves approximating these edges. For more details, see the Tracing Guide panel and the manual image trace tool.
This image effect is typically used on imported images, to extract edges for manual tracing.
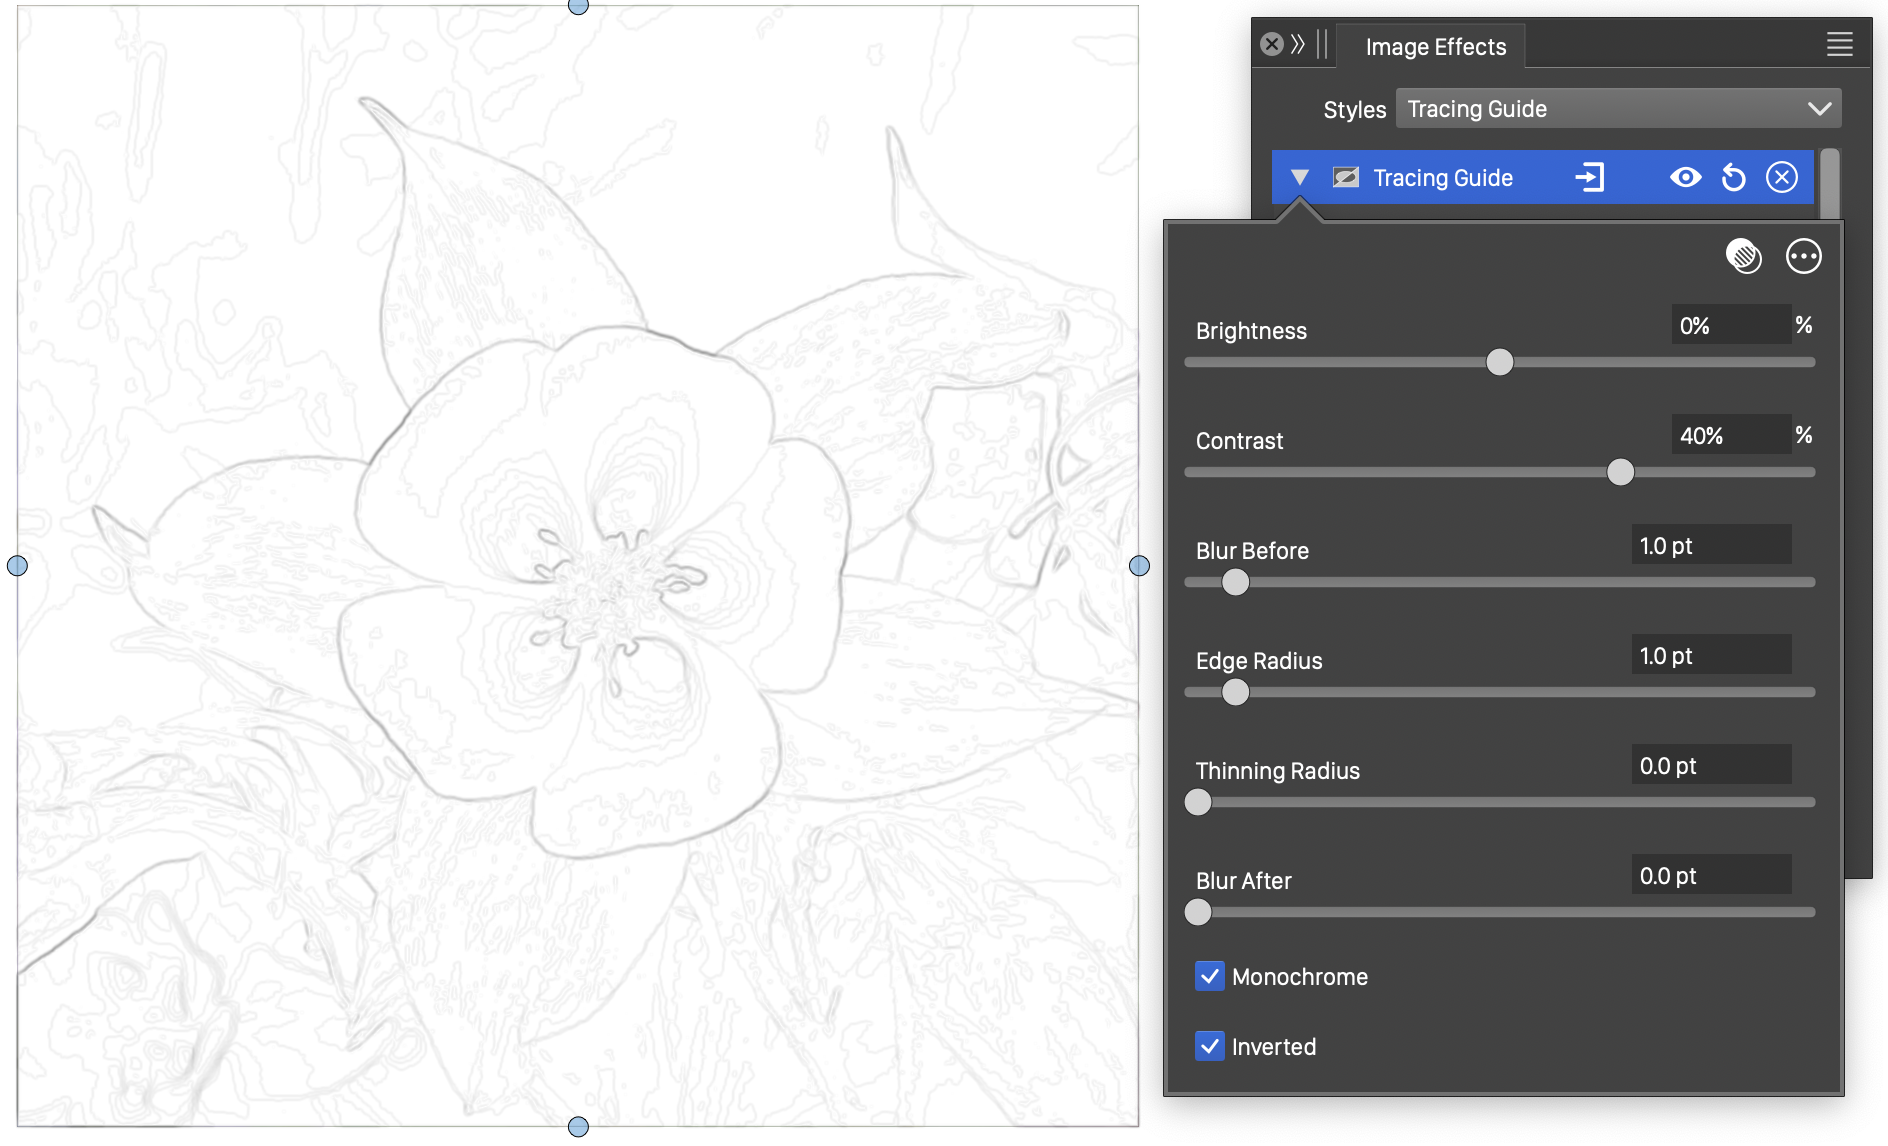
The Tracing Guide effect and its basic options.
Advanced options of the Tracing Guide effect.
The Tracing Guide image effect uses the following basic options:
- Brightness - Adjust the brightness of the image before extracting the edges.
- Contrast - Adjust the contrast of the image before extracting the edges.
- Blur Before - Set the amount of smoothing before edge extraction.
- Edge Radius - Set the extent of the edge extractor.
- Thinning Radius - Set the extent of the edge thinning operator.
- Blur After - Set the amount of smoothing applied to the extracted edges.
- Monochrome - Check to create a monochrome edge image.
- Inverted - Check to invert the resulting edge image.
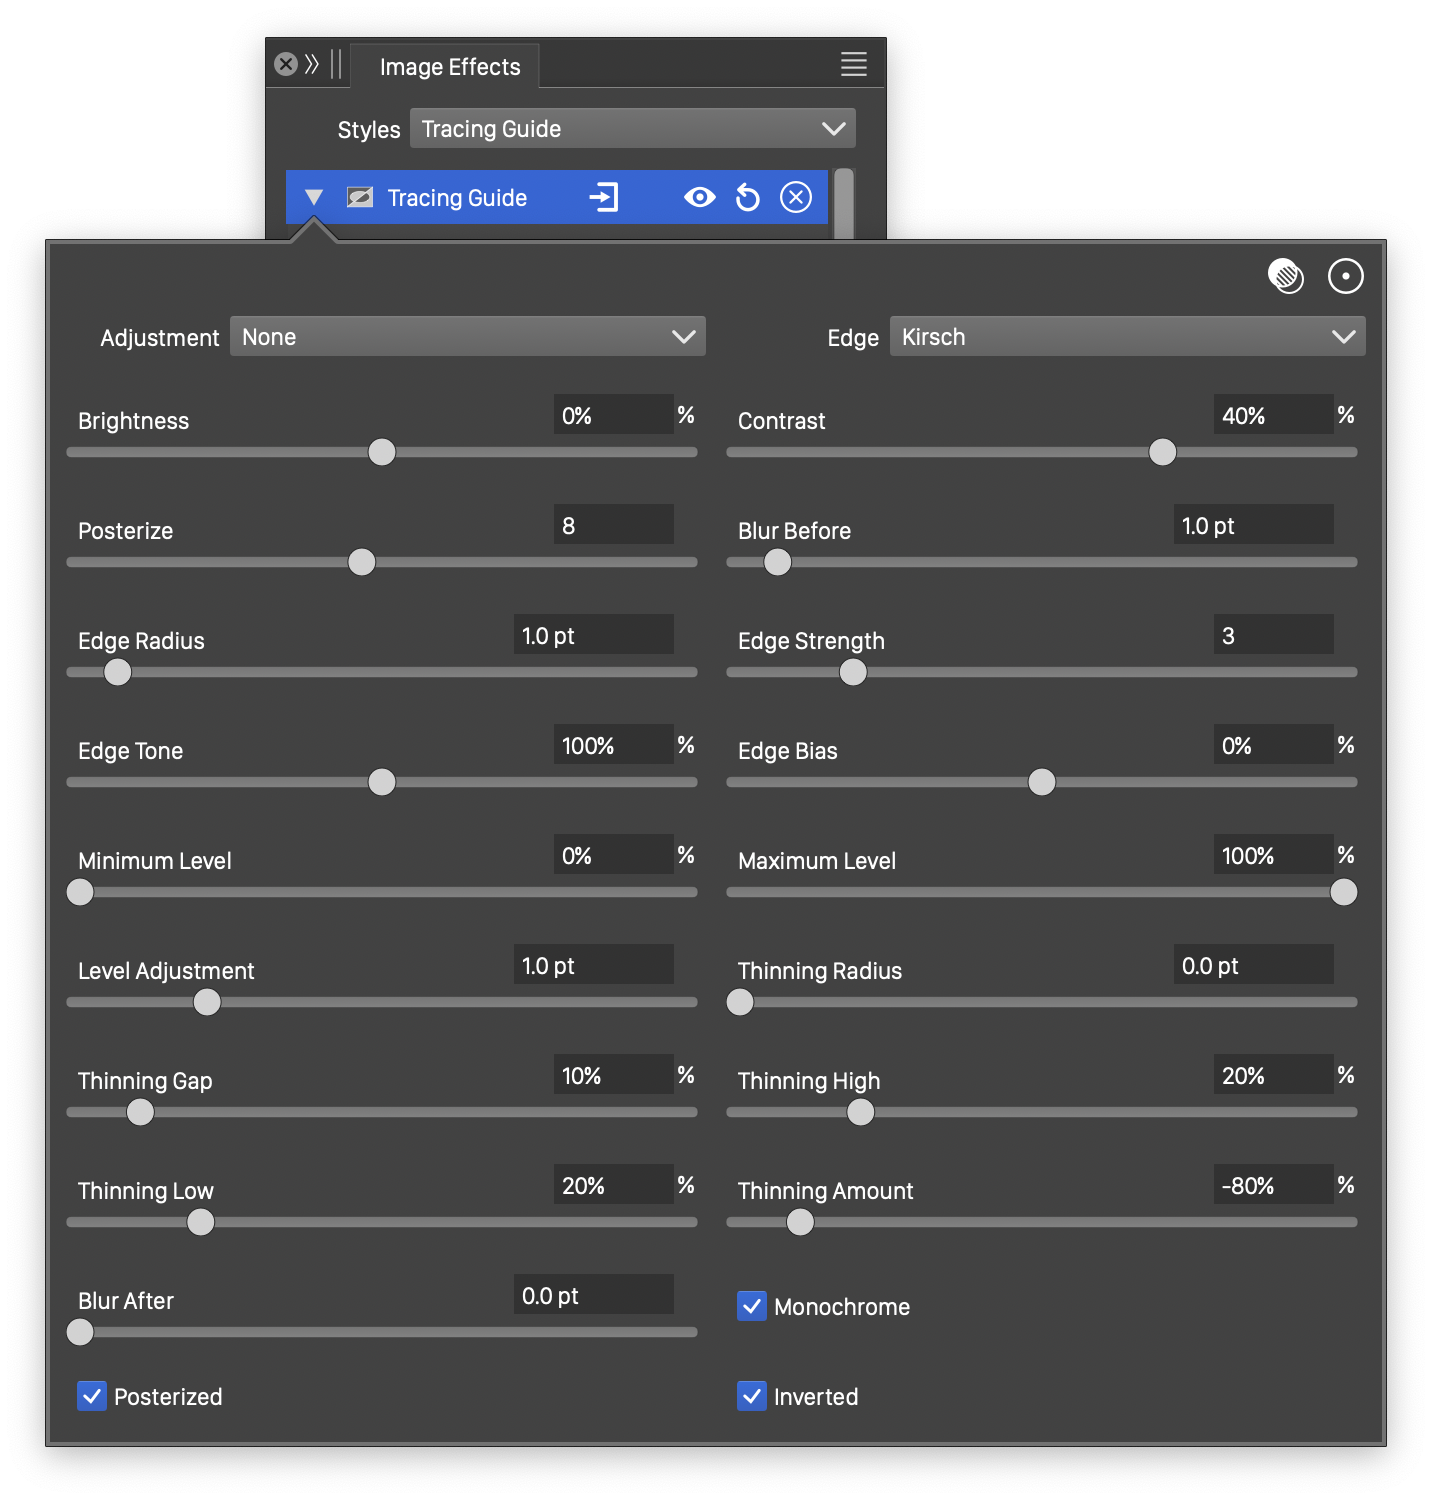
The advanced options of the Tracing Guide effect can be accessed, by clicking on the button.
- Adjustment - Select the final tone adjustment on the guide image.
- Edge - Select the edge extraction operator.
- Posterize - Set the number of color levels to reduce the amount of color tones before edge extraction.
- Edge Strength - Set the edge detection strength.
- Edge Tone - Set the intensity of the edge tones.
- Edge Bias - Set the amount of edge bias in the edge finding.
- Minimum Level - Set the minimum tone level of the edge image.
- Maximum Level - Set the maximum tone level of the edge image.
- Level Adjustment - Set the tone adjustment gamma of the edge image.
- Thinning Gap - Select the edge thinning radius.
- Thinning High - Set the minimum amount of pixels in the thinning region with higher tones to allow thinning.
- Thinning Low - Set the minimum amount of pixels in the thinning region with lower tones to allow thinning.
- Thinning Amount - Set the tone adjustment amount.
- Posterized - Check to enable the posterization before edge detection.


