Generator Effects
The Generate section of the image effects, contains a set of image generator effects, creating synthetic images from effect specific parameters. These effects can be used to create new synthetic images and textures.
Some of these effects, add the synthetic image to the existing image, creating various composition effects.
Brushed Metal
The Brushed Metal image generator effect, creates a brushed metal surface fill over the object image, using the object alpha mask. The brushed metal effect is generated in the selected direction, and optionally may use noise to adjust its strength.
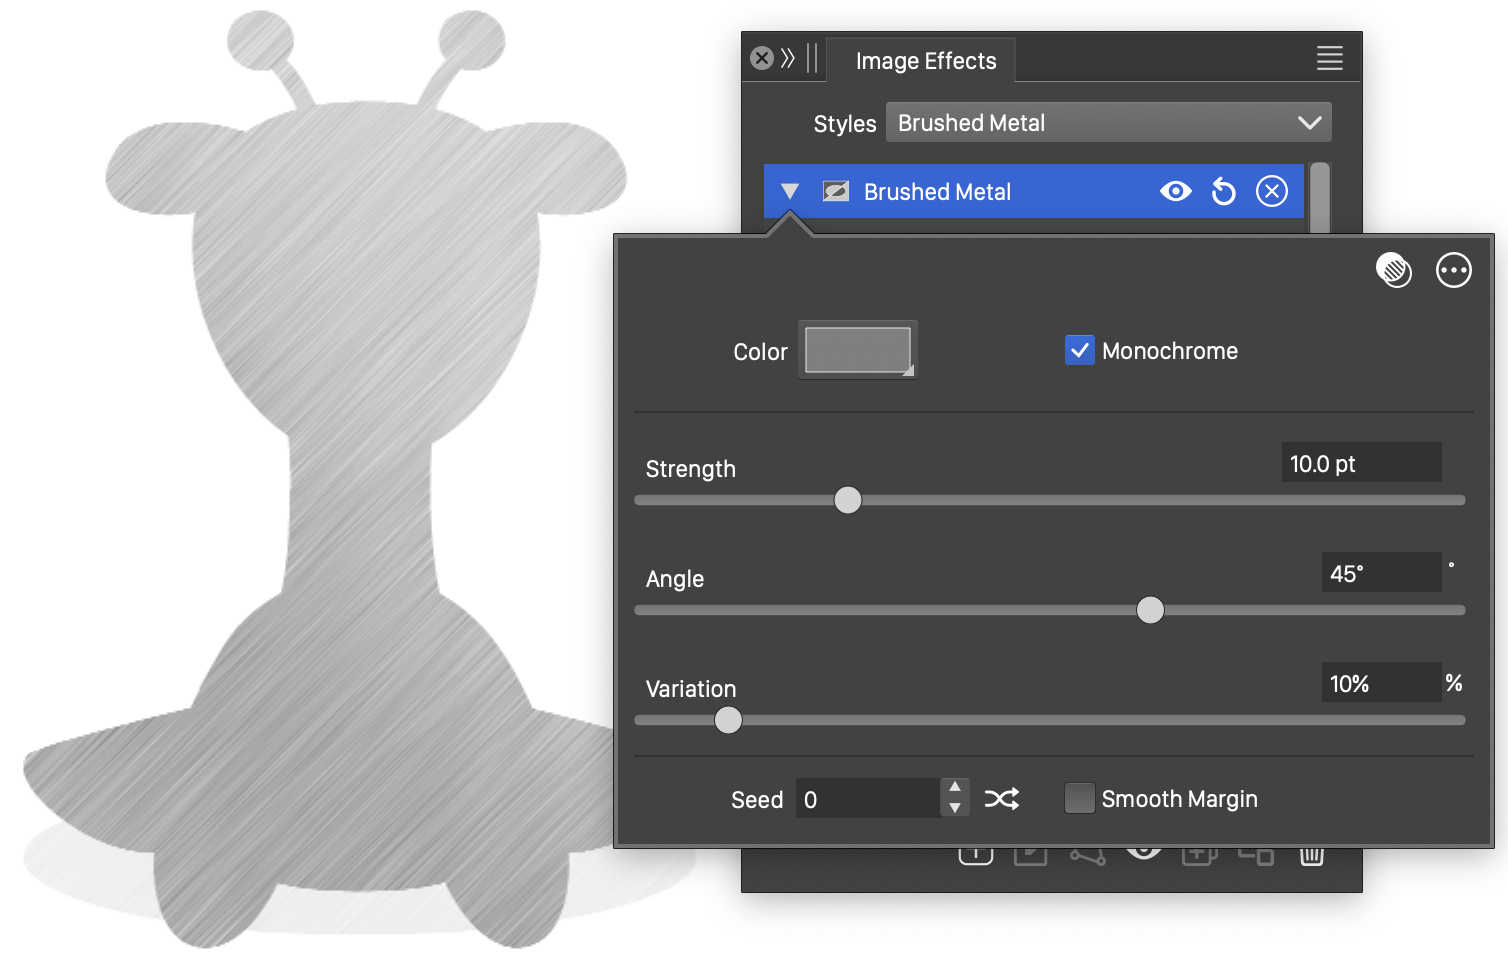
The Brushed Metal effect and its options.

Advanced options of the Brushed Metal effect.
The Brushed Metal generator effect uses the following basic options:
- Color - Select the color of the brushed metal effect. The brushed metal surface is generated using shades of a single color.
- Strength - Set the strength of the brushed metal effect. The strength adjusts the intensity of brush tracks along the selected direction.
- Angle - Set the angle of the direction of the brush tracks.
- Variation - Set the amount of variation in the strength of the brush tracks.
- Seed - Set the randomization seed used to generate the brush tracks. The
 button can be used to pick random seed values.
 - Smooth Margin - Enable or disable a smooth halo around the margin of the generated brush metal effect.
- Monochrome - Enable or disable monochrome adjustments to the brushed metal effect color. When enabled, the brushed metal effect contains tonal adjustments of the selected color. When disabled, each color channel will be adjusted by separate brush tracks.
The advanced options of the Brushed Metal effect can be accessed, by clicking on the  button.
- Noise - Select the noise style from the list of predefined noise types, or user defined noise presets and styles. The noise is used to locally adjust the strength of the brushed metal effect. To browse randomly generated synthetic noise styles, select the Browse Styles command. To edit the noise attributes, select the Edit Noise command. Selecting noise is described with more detail in the Noise chapter.
- Limit - Set the smallest amount of color intensity change caused by brush tracks.
- Amount - Set the range of color intensity changes caused by brush tracks.
- Frequency - Adjust the frequency of the light variation in the brushed metal effect.
Flare
The Flare image generator effect, creates a flare lighting effect over the existing image of an object. The flare light can be aligned to any direction, and the flare can be of any user selected color. The flare direction and length can be interactively edited using the image effect tool.
The flare effect is composed of three layers. Each layer contributes to the flare with a different color and extent.
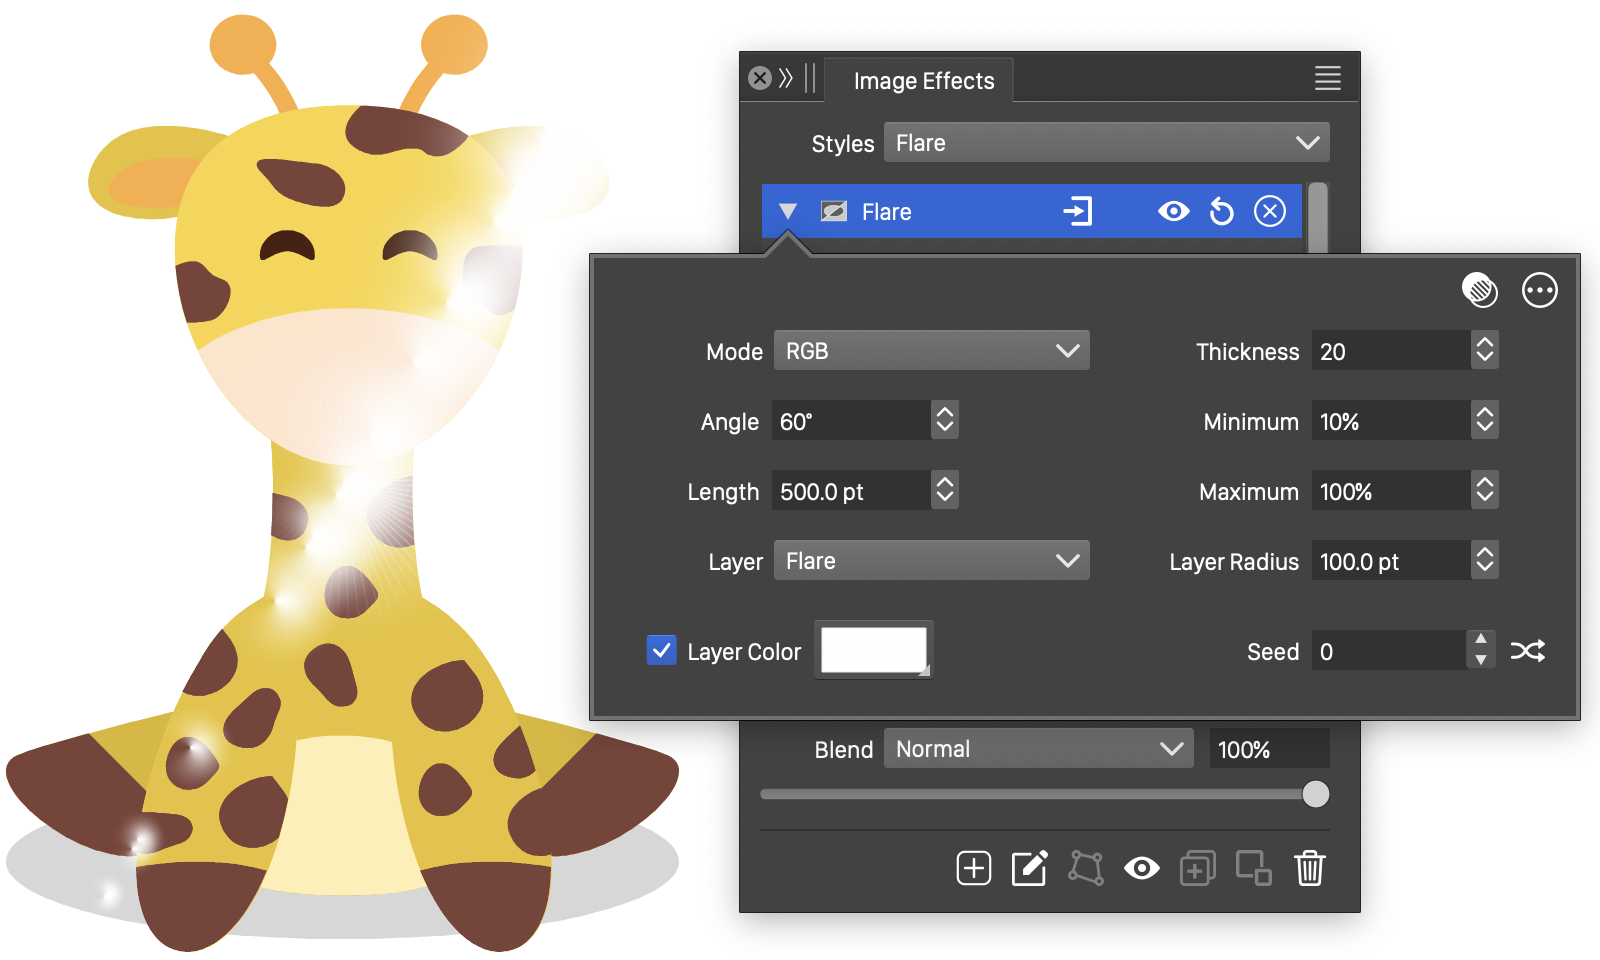
The Flare effect and its options.
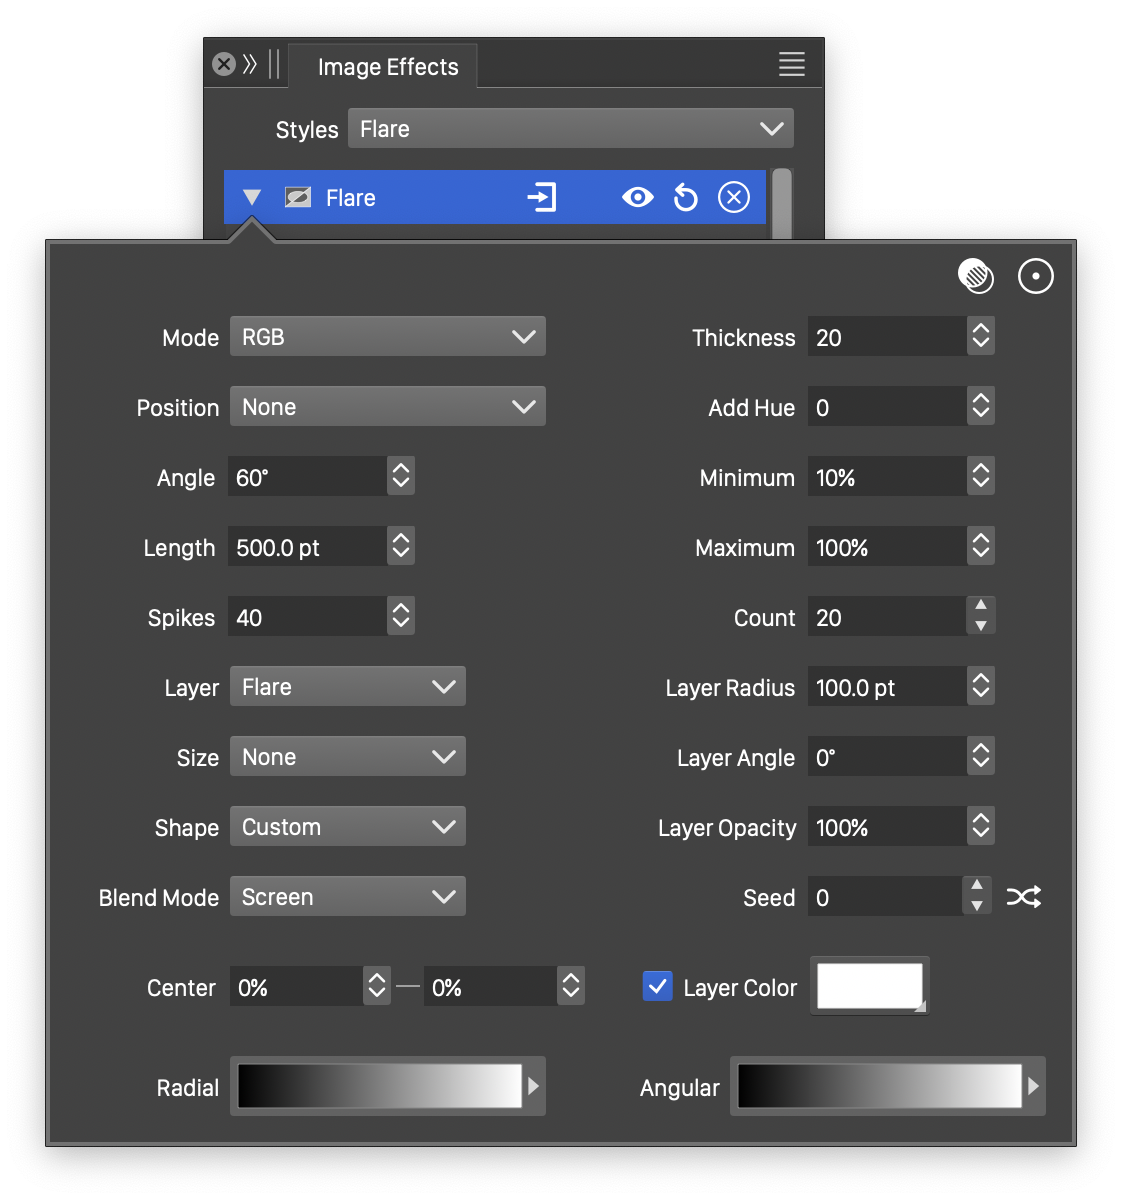
Advanced options of the Flare effect.
The Flare generator effect uses the following basic options:
- Mode - Select a color mode used to generate the flare effect. The color mode determines how the color intensities of the image are adjusted by the flare light.
- Thickness - Set the thickness of the flare ray. The thickness will affect only the ray layer strength. By default, the ray of the flare is visible only in the vicinity of the center.
- Angle - Set the angle of the flare direction.
- Length - Set the length of the flare effect.
- Minimum - Set the minimum extent of a single flare glow.
- Maximum - Set the maximum extent of a single flare glow.
- Layer - Select the flare layer to adjust its color and radius.
- Layer Color - Select the color of the current flare layer. The Layer Color check box must be checked to enable the use of a local color.
- Layer Radius - Set the radius of the current flare layer.
- Seed - Set the randomization seed used to generate the flare glow. The button can be used to pick random seed values.
The advanced options of the Flare effect can be accessed, by clicking on the button.
- Position - Edit the function controlling the flare position variations. The Cubic and Monotone Cubic functions are edited by selecting the Edit Curve command.
- Add Hue - The amount of hue adjustment of the original image color, caused by the flare.
- Spikes - Set the number of spikes in the flare ray.
- Count - Set the number of flare light contacts.
- Size - Edit the function controlling the flare extent around the center of a flare glow. The Cubic and Monotone Cubic functions are edited by selecting the Edit Curve command.
- Shape - Select a shape style or preset used as the shape of a flare glow.
- Radial - Select a gradient color style or preset, used to color a flare layer in the direction away from a glow center.
- Angular - Select a gradient color style or preset, used to color a flare layer in the direction around a glow center.
- Blend Mode - Select the flare layer composition mode.
- Layer Opacity - Set the opacity of the current flare layer.
- Layer Angle - Adjust the angle of the current flare layer, relative to the flare direction.
The  button from the Image Effects panel, activates the image effect tool used to interactively edit the flare effect attributes.
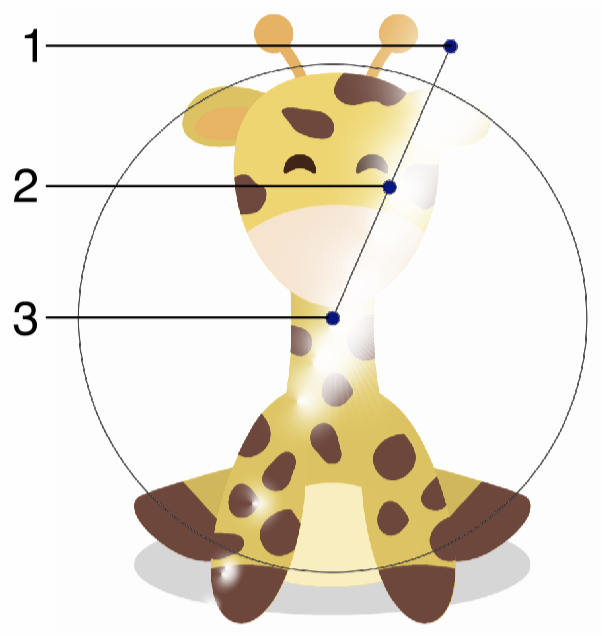
Interactive editing of the Flare image generator.
Interactive editing of the flare effect is done by dragging the handles to change an attribute value:
- (1) - Set the direction of the flare effect.
- (2) - Set the length of the flare.
- (3) - Set the center of the flare.
Lens Flare
The Lens Flare image generator effect, creates a lens flare light effect over the existing image of an object. The lens flare light simulates the flaring caused by lenses, by combining multiple layers of a user editable flare scheme.
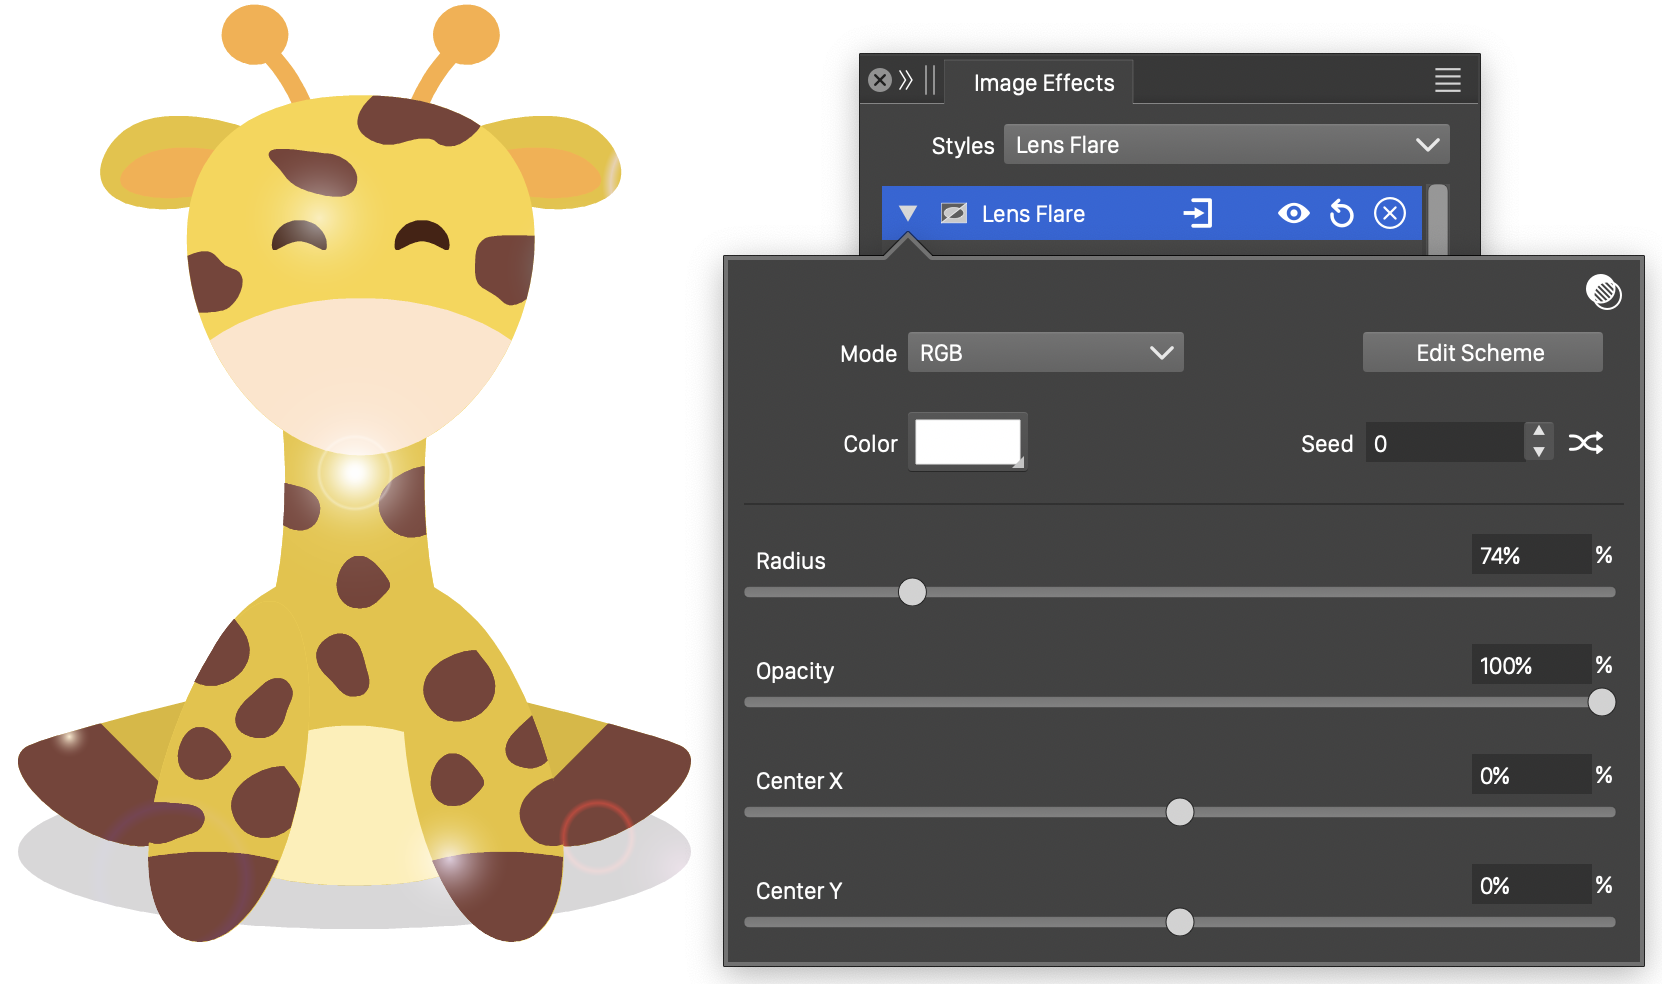
The Lens Flare effect and its options.
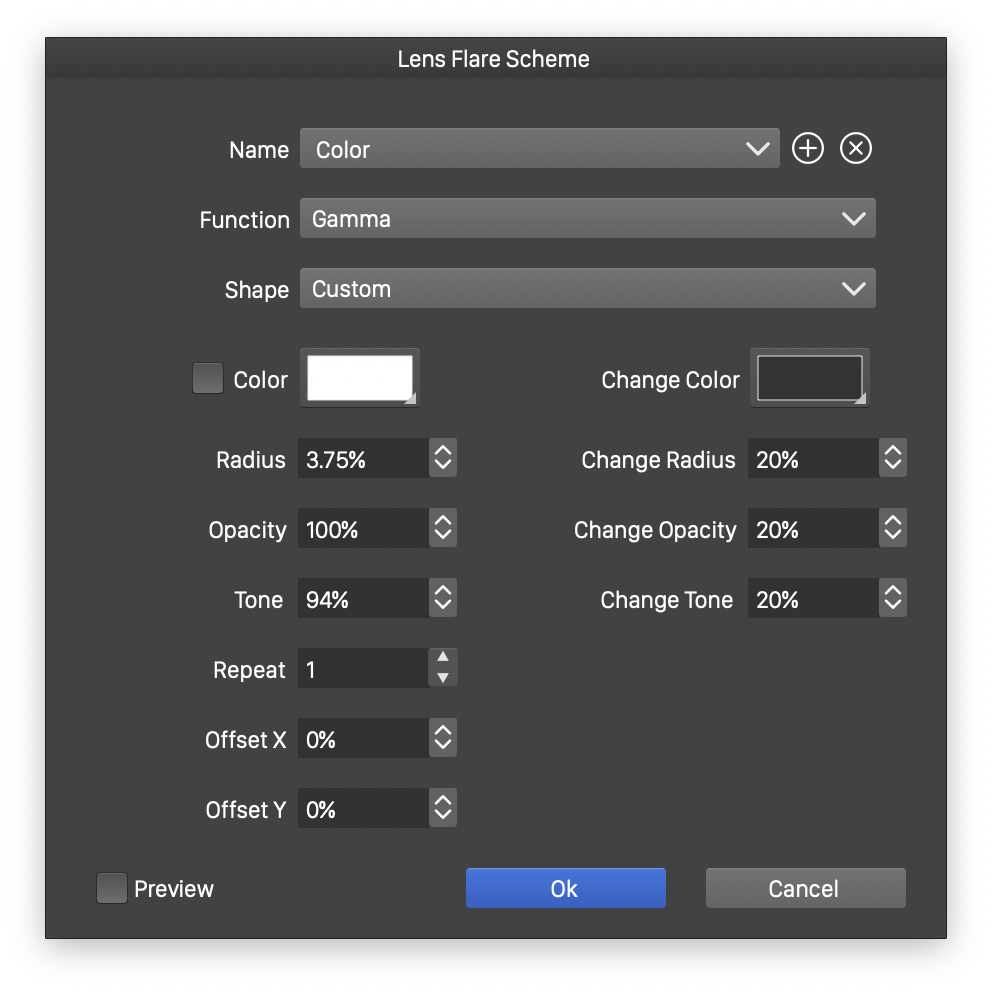
Editing a lens flare scheme.
The Lens Flare generator effect uses the following options:
- Mode - Select a color mode used to generate the lens flare effect. The color mode determines how the color intensities of the image are adjusted by the lens flare light.
- Color - Select the primary color of the lens flare effect. Individual lens flare layers may contribute with a different color to the flare, or may use the primary color.
- Radius - Set the maximum radius of individual flares in the lens flare effect.
- Opacity - Set the overlay opacity of the lens flare effect.
- Seed - Set the randomization seed used to generate the lens flare glow positions. The button can be used to pick random seed values.
- Edit Scheme - Opens the lens flare scheme editor view to create custom lens flare effects.
The Lens Flare effect is specified through a number of flare layers. The name, number and attributes of flare layers can be edited by the user in the Lens Flare scheme editor view, opened by the Edit Scheme button. Each flare layer contributes to the lens flare effect with a random number of glowing locations.
The Lens Flare scheme editing contains the following options.
- Name - Edit the name of the current flare layer
- Function - Edit the function controlling the flare radius variations. The Cubic and Monotone Cubic functions are edited by selecting the Edit Curve command.
- Shape - Select a shape style or preset used as the shape of a single flare glow.
- Color - Select a separate color for the lens flare layer. The Color check box must be checked to enable local color selection. If unchecked, the layer color will be the primary lens flare color.
- Color Change - Select the color used to generate flare color variations.
- Radius - Set the minimum radius of a flare glow, relative to the flare radius.
- Change Radius - Set the amount of variation in the radius of a flare glow.
- Opacity - Set the opacity of the flare layer glow, relative to the lens flare opacity.
- Change Opacity - Set the opacity variation of the flare layer glow.
- Tone - Set the minimum color tone of a flare layer glow.
- Change Tone - Set the amount of variation in the color tone of a flare layer glow.
- Repeat - Set the number of glow locations in the current flare layer.
- Offset X and Offset Y - Set the relative offset of the flare glow locations of the current flare layer.
- Preview - Enable or disable the previewing of the current lens flare scheme options.
Noise
The Noise image generator effect, creates a synthetic noise and replaces the object image (and optionally the alpha channel) with the generated noise. The noise is synthesized from a user selected noise type, style or presets. Selecting and editing noise styles is described with more detail in the Noise chapter.
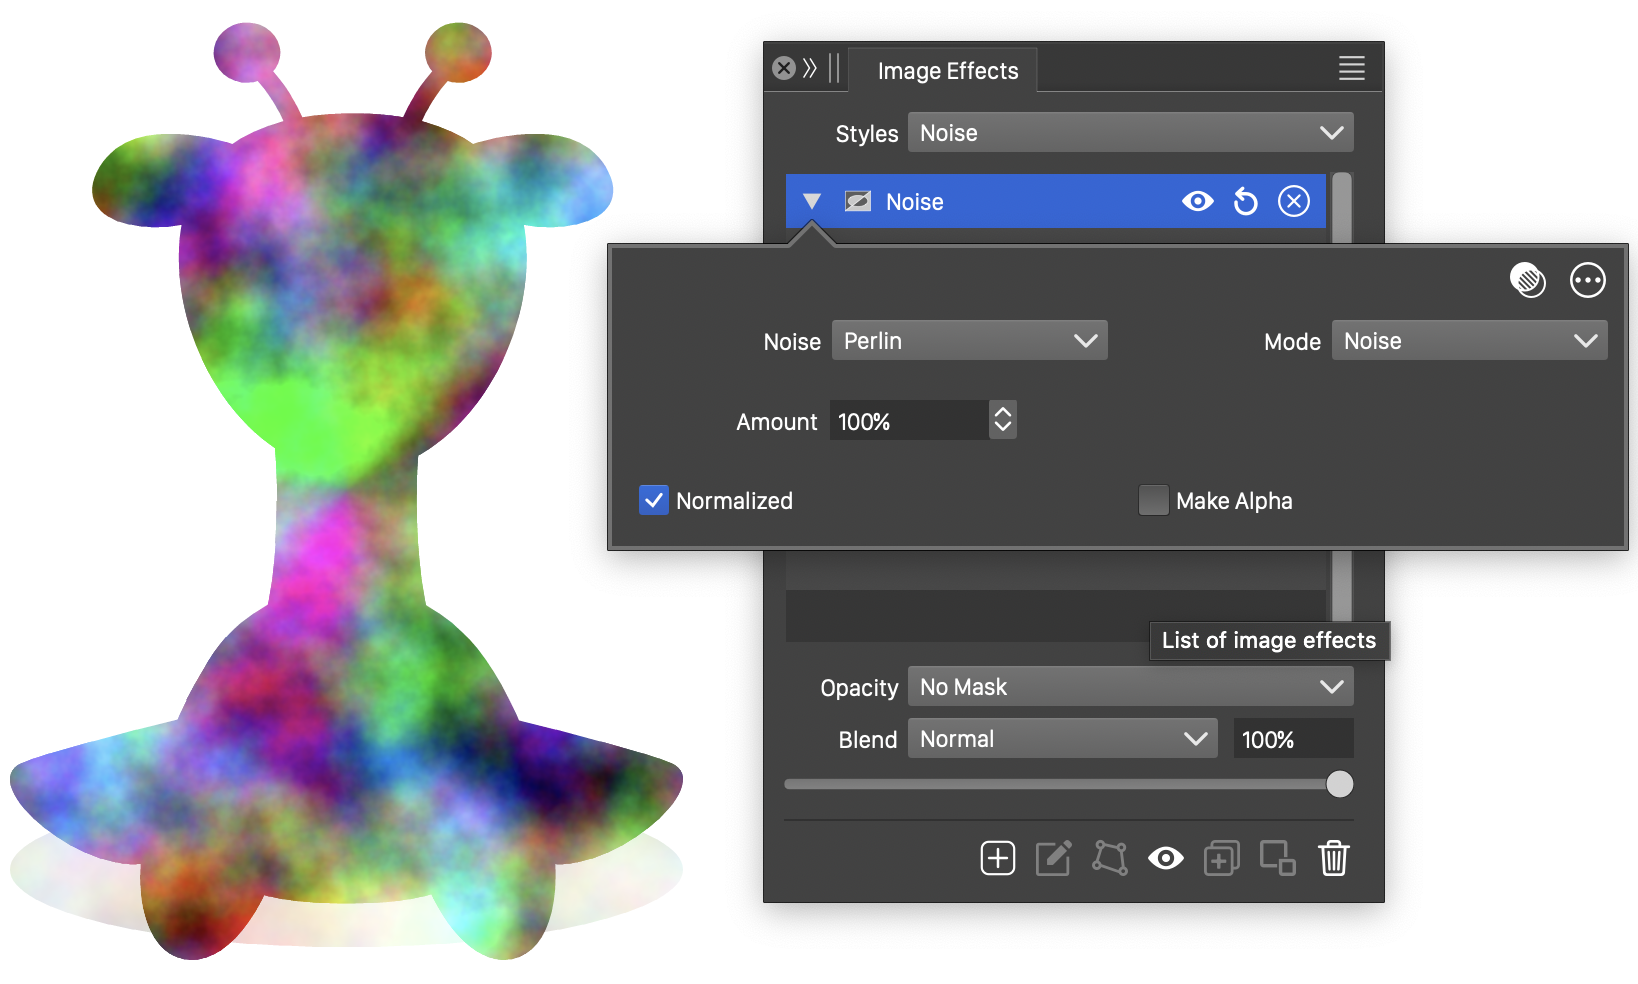
The Noise effect and its options.
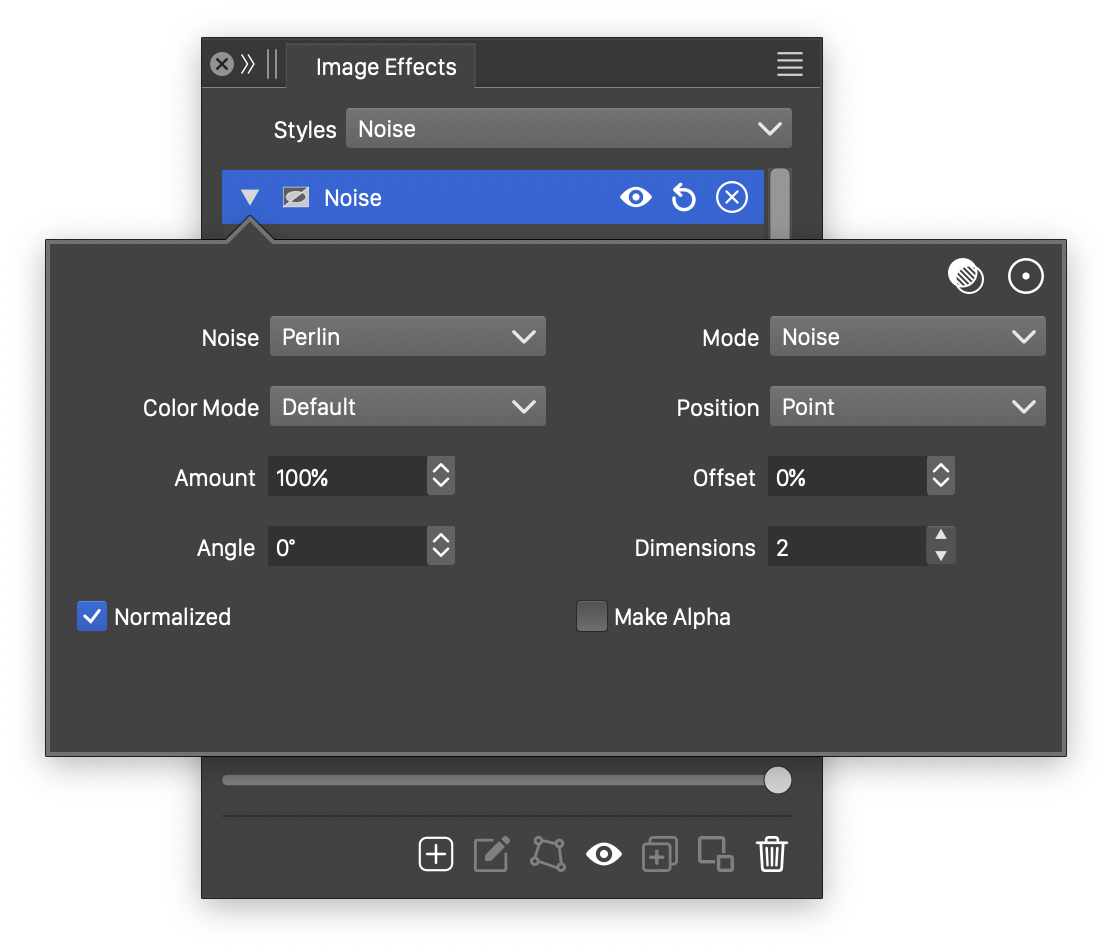
Advanced options of the Noise effect.
The Noise generator effect uses the following basic options:
- Noise - Select the noise style from the list of predefined noise types, or user defined noise presets and styles. The noise is used to synthesize a new image over the selected object image. To browse randomly generated synthetic noise styles, select the Browse Styles command. To edit the noise attributes, select the Edit Noise command. Selecting noise is described with more detail in the Noise chapter.
- Mode - Select the noise synthesizing mode. This can be:
- Noise - Generates a color noise, with each color channel independently set by the noise type.
- Gradient - Generates a gradient noise, where colors are selected from a gradient color transition, using intensities generated by a noise.
- Amount - Set the intensity of the noise.
- Normalized - Enable or disable the generation of normalized noise. When normalized, noise intensities are adjusted based on the selected noise type, to limit the resulting color tone intensities.
- Make Alpha - Enable or disable the adjustment of the alpha channel by the noise.
The advanced options of the Noise effect can be accessed, by clicking on the button.
- Position - Edit the noise positioning mode. This can be:
- Fixed - The noise is positioned relative to absolute coordinates. With fixed positioning, the noise content will depend on the object position. Noise in multiple different objects with the same noise style will have a matching position. The noise content is changed when the object is moved.
- Relative - The noise position and frequency is relative to the object size.
- Point - The noise is positioned relative to the object position, but the frequency in absolute values.
- Color Mode - Select the color mode used to generate the noise. The noise is synthesized, by generating individual color channel tones using the selected noise style.
- Offset - Set the relative offset of the noise positions.
- Angle - Set the rotation angle of the synthesized noise.
- Dimensions - Edit the dimensions used to generate the base gradient noise. Different values of the gradient dimension result in different noise styles.
Star Shine
The Star Shine image generator effect, creates a star shine effect over the existing image of an object. The position, extent and strength of the start shine can be interactively adjusted using the image effect tool.
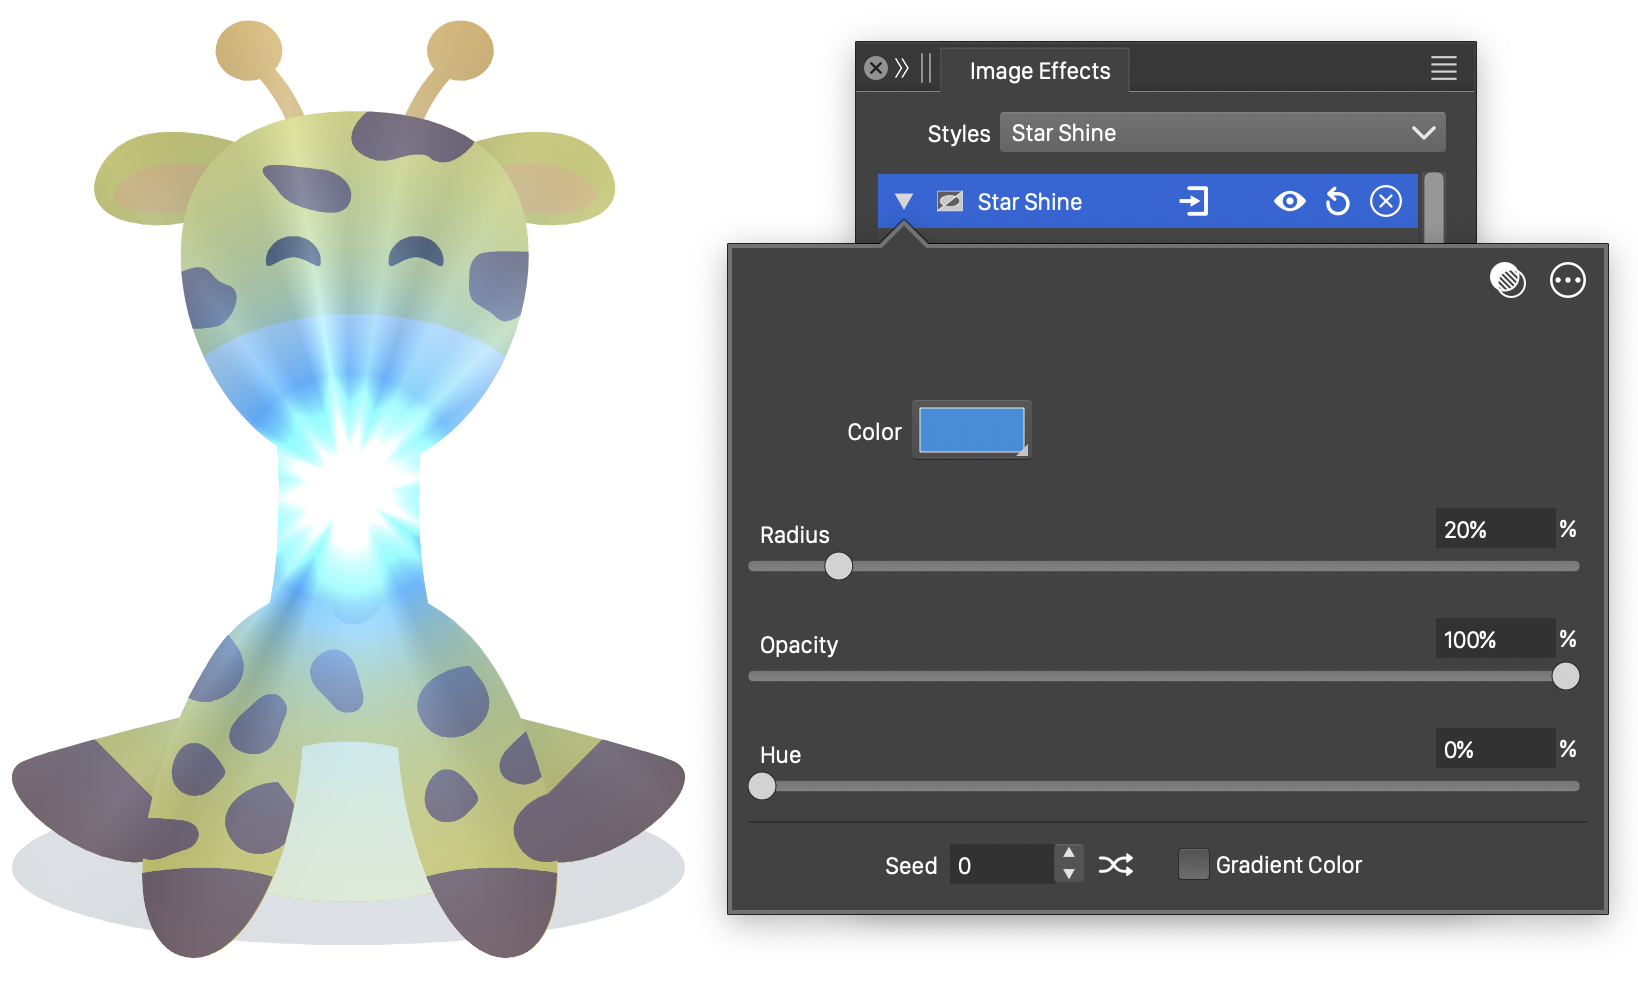
The Star Shine effect and its options.
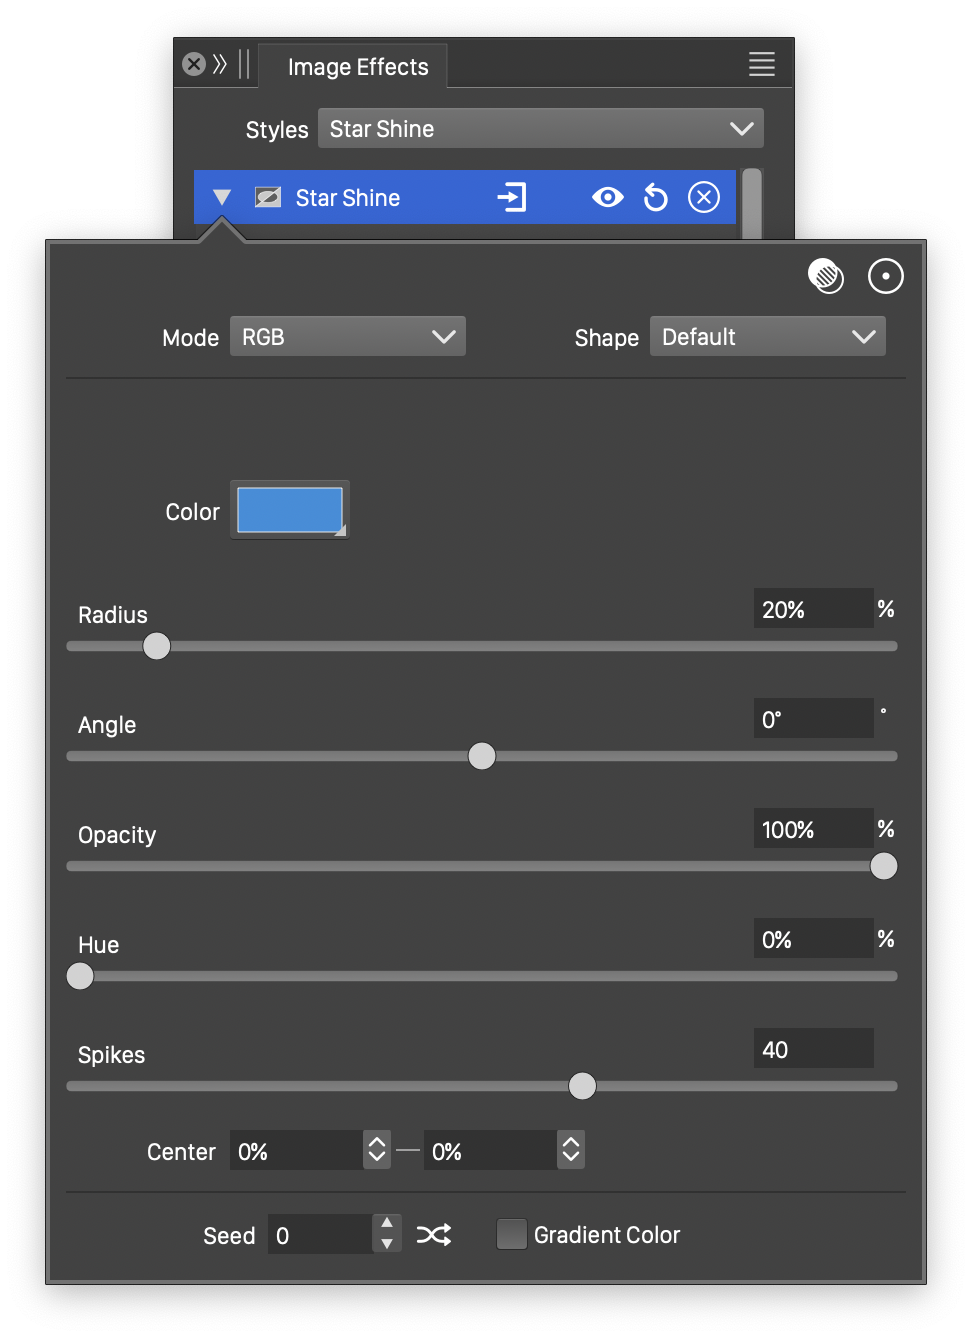
Advanced options of the Star Shine effect.
The Star Shine generator effect uses the following basic options:
- Color - Select the color used to add the start shine effect to the existing image.
- Radius - Set the radius of the star shine effect.
- Opacity - Set the opacity of the star shine effect.
- Hue - Set the hue adjustment of the original image colors, when combined with the star shine color.
- Seed - Set the randomization seed used to generate the star shine rays. The button can be used to pick random seed values.
- Gradient Color - Enable or disable the use of a gradient color, to generate the star shine color intensities. When enabled, a Gradient field is shown and can be used to select a gradient color style or preset. The gradient can also be adjusted using the gradient slider. When disabled, the star shine color is set as a single color in the Color field.
The advanced options of the Star Shine effect can be accessed, by clicking on the button.
- Mode - Select the color mode used to adjust the image colors. The star shine effect is composited with the original colors using the selected color mode.
- Shape - Select a shape style or preset used as the shape of the star shine glow.
- Angle - The amount of hue adjustment of the original image color, caused by the flare.
- Spikes - Set the number of spikes in the star shine.
The button from the Image Effects panel, activates the image effect tool used to interactively edit the Star Shine effect attributes.
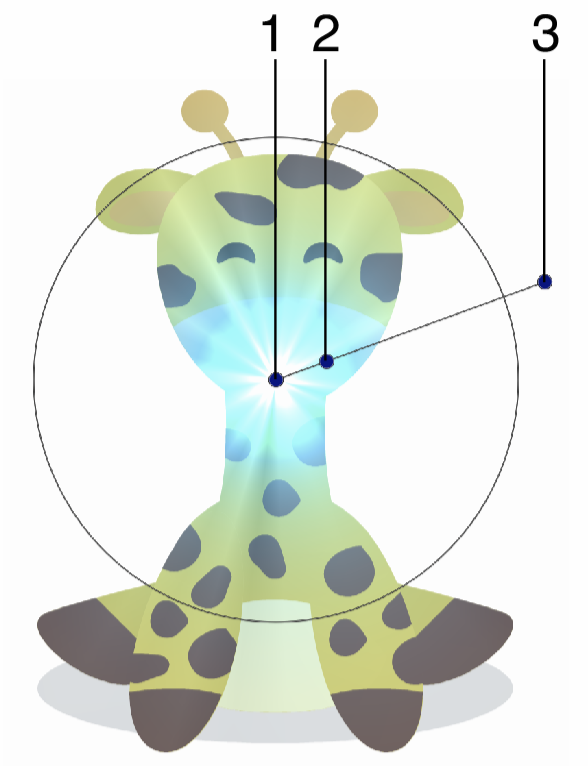
Interactive editing of the Star Shine image generator.
Interactive editing of the star shine effect is done by dragging the handles to change an attribute value:
- (1) - Adjust the center of the star shine effect.
- (2) - Adjust the extent of the star shine effect.
- (3) - Adjust the rotation angle of the flare star shine effect.
Turbulence
The Turbulence image generator effect, creates a synthetic noise using the SVG Turbulence effect. The SVG Turbulence effect is a special case of the Noise effect, and it can be created and adjusted separately, to allow exporting to SVG file format without generating an image.
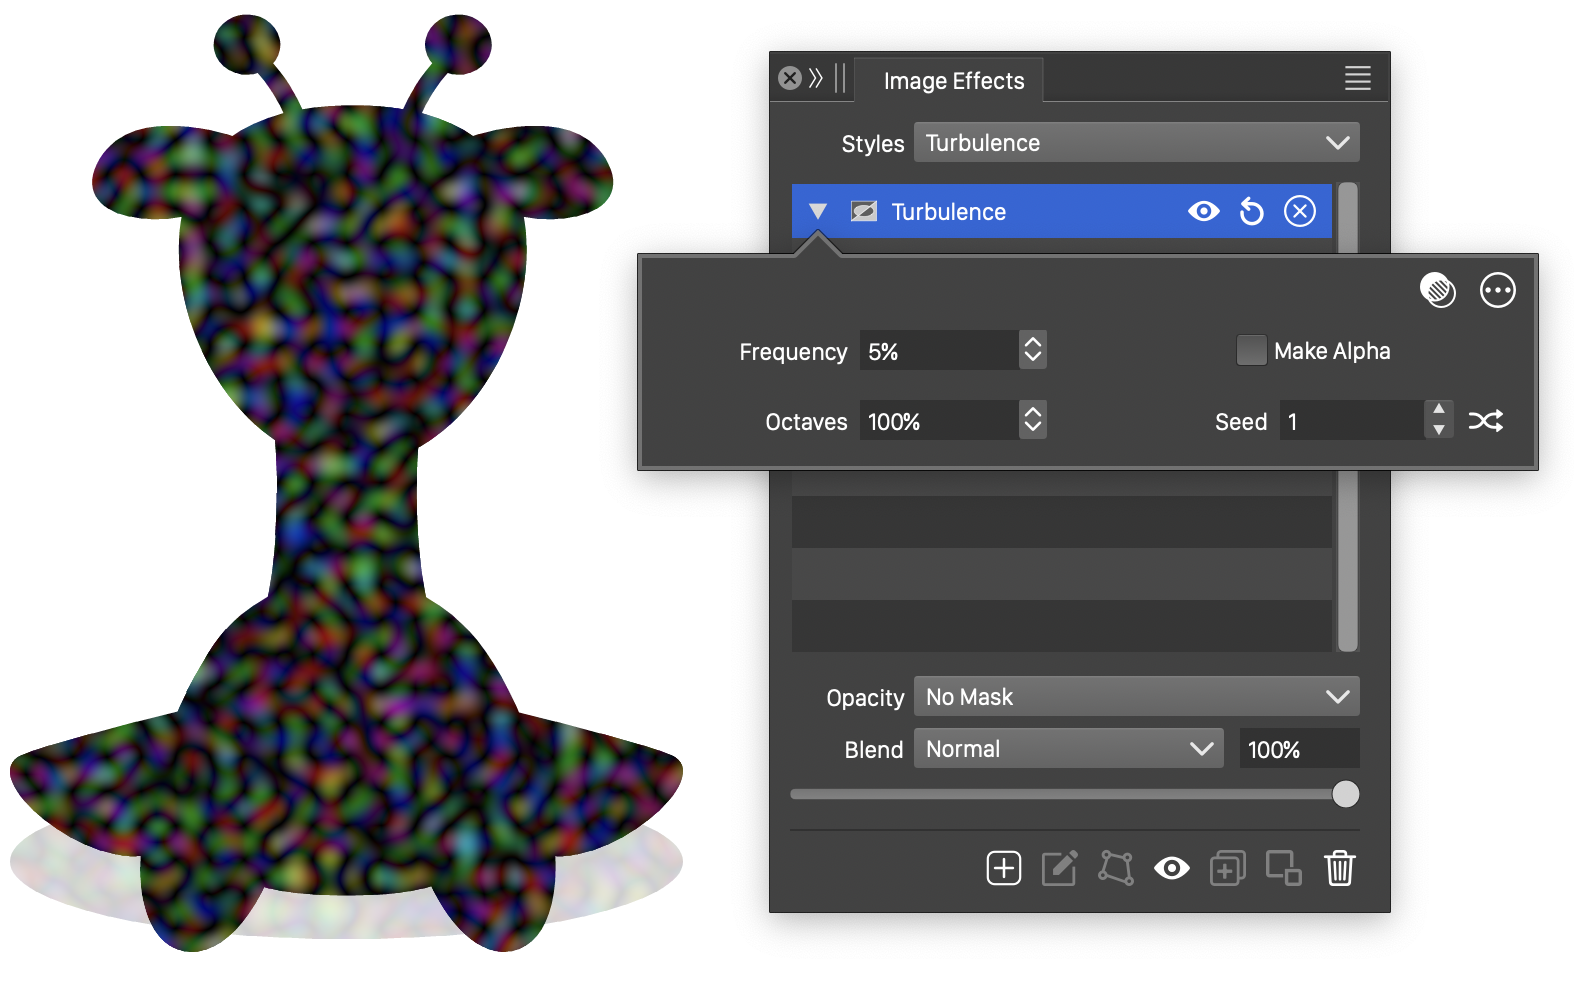
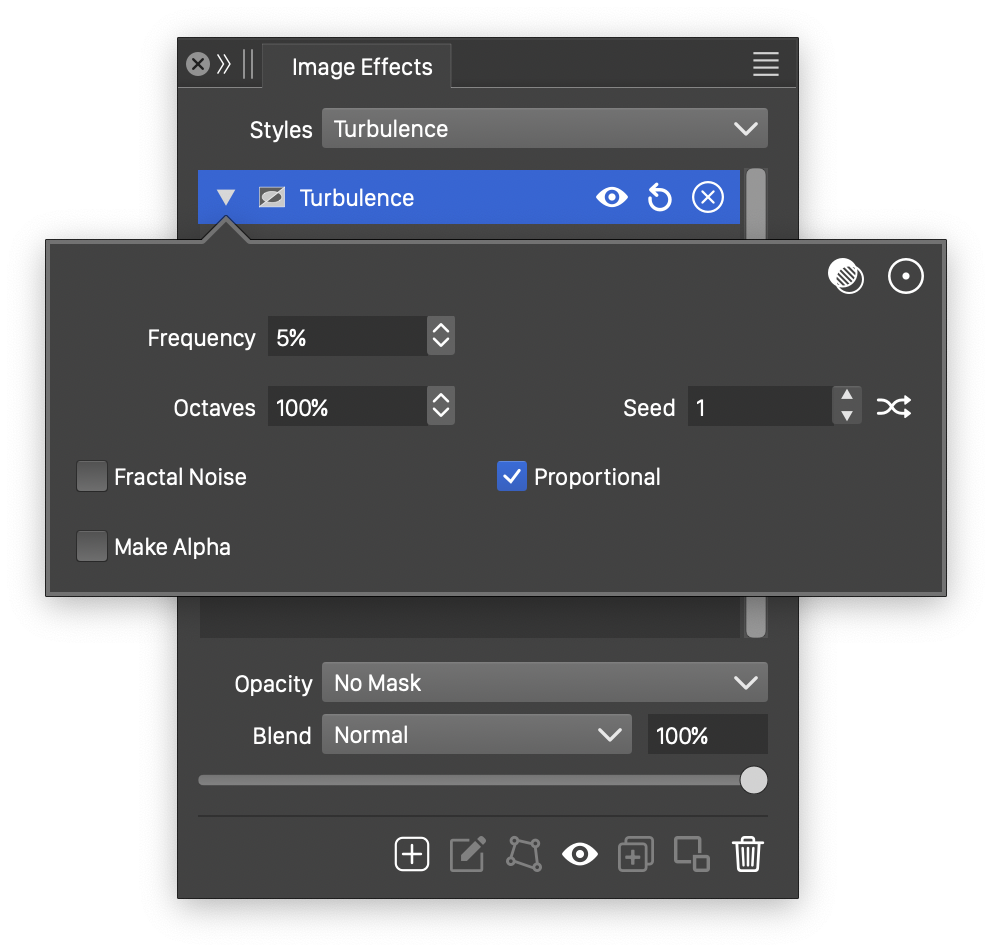
The Turbulence effect and its options.
Advanced options of the Turbulence effect.
The Noise generator effect uses the following basic options:
- Frequency - Set the frequency of the turbulence noise.
- Octaves - Set the number of octaves used to generate the turbulence. Higher octaves result in more detail.
- Seed - Set the randomization seed used to generate the turbulence noise. The button can be used to pick random seed values.
- Make Alpha - Enable or disable the adjustment of the alpha channel by the noise.
The advanced options of the Noise effect can be accessed, by clicking on the button.
- Frequency X - Set the frequency in the horizontal direction, when proportional mode is disabled.
- Frequency Y - Set the frequency in the vertical direction, when proportional mode is disabled.
- Fractal Noise - Enable or disable the generation of the fractal turbulence mode.
- Proportional - Enable or disable proportional frequency mode.


