Image Effects Panel

The Image Effects panel.
Image effects on the selected objects can be created, edited and managed using the Image Effects panel. The Image Effects panel can be opened using the Image Effects command from the Effects menu, or the Image Effects command from the Window - Effects menu.
The Image Effects panel shows the list of image effects stacked on the selected object. An object or group may contain multiple image effects, these will be listed in the panel.
The attributes of an image effect can be accessed by opening the effect in the list, using the arrow shown before the effect name. The image effect attribute editing can be closed or opened with the arrow icon.
When multiple image effects are stacked on the selected objects, opening all the effect attribute editors may create a long list in the Image Effects panel. The list of effect attribute editors can be scrolled using the scrollbar on the right side of the panel.
Multiple image effects can be grouped and organized into a hierarchy of effects. Effects can be saved as presets or styles and reused on other objects. When using image effect styles on objects, modifying the style (in the Styles panel), will update the image effects on all objects using that style.
Image Effects
The Image Effects panel lists the image effects stacked on an object, by showing the image effect title and its attributes. The image effect title section is used to show the effect name, open or close the attribute editing, set the individual effect mask, and select advanced or basic options mode.
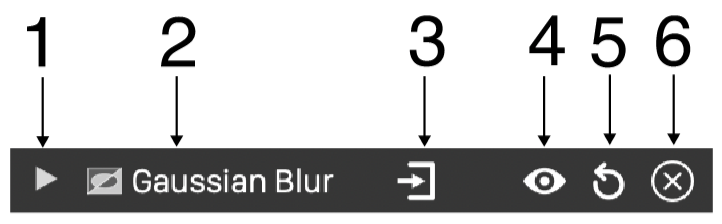
The title section of an image effect in the list.
- (1) - Open or close the image effect attribute editor in the list.
- (2) - Shows the image effect name.
- (3) - The
 button opens a menu with the available input images. If two input images are used, an additional
  button is shown in the title section.
 - (4) - Enables or disables the image effect. A disabled image effect is still part of the object, but it will augment the object image. This option can be used to disable the use of an effect without removing it from the object.
- (5) - Reset the shape effect to its default state.
- (6) - Selects the level of details for the image effect attributes. By default, each image effect type shows only the most important attributes in a compact form. By clicking this icon, the attribute editor can be expanded to show more attributes, or reduced to a more compact form.
When the Open in List mode is enabled, the image effect mask can be edited by clicking on the
button in the image effect row.
To add a new image effect to the selected object:
- Select one or more objects to adjust with an image effect.
- If multiple objects are selected, these will be grouped when an image effect is added.
- Click on the
 button in the panel icon section.
 - Select the image effect from the menu. Image effects are organized into sub-menus by type.
- The selected image effect is added to the object, and it is shown in the effects list.
- Open the image effect attributes, by clicking the arrow shown before the effect name.
Image effects of an object can be copied to another object:
- Select the object with the image effects.
- Select the image effects in the Image Effects panel.
- Drag and drop the selected image effects on an other object.
- The selected image effects are applied on the object pointed by the drag and drop operation.
Hierarchies of multiple image effects:
- Multiple image effects can be organized into a hierarchy of filters.
- Each filter takes its input image from one of the previous filters.
- The output image of a filter can be used by other filters.
- Use the and buttons in the effect title section to select from the available input images.
- Input images are listed using the names of the filters producing the image.
- When creating complex filter hierarchies, filters should be given custom names to allow for an easier identification of image sources.
- Example filter hierarchies can be explored, by importing composite SVG filter definitions.
Modifying Effects
Image effects are nondestructive, and the attributes of existing effects can be modified at any time. When an object is flattened into an image, using the Rasterize command, the image effects of the object are removed.
The image effects stacked on an object can be modified by editing their attributes in the Image Effects panel, or by visually editing an image effect attribute on the canvas.
To adjust the existing image effects of an object:
- Open the Image Effects panel, and select the object on the canvas.
- The Image Effects panel will show the image effects stacked on the object.
- Select an image effect by clicking on the image effect name in the effect title row.
- Open the image effect attributes (if not opened), using the arrow icon before the name.
- The attributes are specific to each image effect type, and are described with more detail in the sections of this chapter.
- If an attribute is adjusted, the image effect is automatically updated on the selected object, and the new distortion effects will be visible on the canvas.
- To remove an image effect, select the image effect and click on the
 button, in the icon section of the panel.
 - To remove all image effects from the selected object, deselect the effects in the panel and click on the button.
- To reset the image effect attributes to their default value, click on the
 icon in the image effect label row.
 - To enable or disable the selected image effects, click on the
 button.
Image effects can be adjusted visually on the canvas, by adjusting one or more parameters associated with the geometric distortion specific to the image effect.
An image effect may have a primary and a secondary effect editor.
- The primary editor, if available, adjusts the main attributes of the image effect. For example, in the case of the bend effect, the primary editor is used to interactively edit the bending image.
- The secondary editor, if available, adjusts a secondary attribute of the image effect. In the case of the bend effect, this will be the variable width profile used in the bending along the path.
- To activate an image effect editor, select the image effect in the list and click on the image effect editor icons in the icon section of the panel. The image effect must be highlighted (title row background is blue), to be able to interactively edit the effect on the canvas.
 - Activates the primary image effect editor. This button is disabled, if the selected image effect has no primary interactive editor.
 - Activates the secondary image effect editor. This button is disabled, if the selected image effect has no secondary interactive editor.
- The operation of an image effect editor is specific to the selected image effect type. The interactive editors of various image effect types are described with more detail in the sections of this chapter.
Multiple Effects
Multiple image effects can be stacked on a single object, group or layer, to create composite effects. The Image Effects panel will show a list of the effects, from the selected object.
When using multiple image effects on a single object, it is possible to organize these effects into groups, and create a hierarchy of image effects. Groups of image effects can also be saved as presets and styles, helping with the reuse of multiple effects on other objects.
- To create a group of image effects, select the image effects in the panel, and click on the
 button, or select the Group command from the panel menu.
 - To expand a group of image effects into separate effects, select the image effect group, and click on the
 button, or select the Ungroup command from the panel menu.
 - The image effect groups are shown as a hierarchy of image effects, that can be opened, closed and navigated in the panel.
- Image effects can be rearranged, to change the order of adjusting the object image with the effects.
- Use drag and drop of the selected image effects, to place them at a different location in the list of effects.
- Drag and drop one or more image effects on other objects, to apply the selected effects on those objects.
- The
 button in the image effect title row is used to enable or disable the image effect.
Image effects can also be copied to other objects, using the clipboard:
- Select the object containing image effects.
- Select the image effects in the panel.
- Press Command+C to copy the selected effects to the clipboard.
- Select an other object.
- Click in an empty area of the list in the image effect panel, to activate the panel.
- Press Command+V to paste the image effects from the clipboard.
- The Image Effects panel menu also contains a Copy and Paste command that can be used to copy image effects between objects.
Effect Masking

Masking options of an image effect.
The image effects stacked on an object may have opacity and masking attributes, selecting a fading level between the original image and the image effect result. Opacity and masking attributes can be set separately for each image effect, or for a whole group of image effects applied on an object.
To set the mask of a single image effect:
- Click on the button next to the image effect name in the panel.
- The image effect mask editor view is opened.
- Set the opacity value using the slider or the numeric editor.
- Select a non-uniform mask from the menu of masking options opened from the Opacity field.
- The masking options are the same as described in the Transparency chapter.
- The gradient mask of the selected image effect can be interactively edited on the canvas, by selecting the image effect in the panel and clicking on the
 button at the panel bottom.
To select the common masking options of the group of image effects stacked on the selected object, use the masking and opacity fields at the bottom of the image effect list.
Styles and Presets
Image effects can be saved and reused as styles or presets, using the Styles field on the Image Effects panel.
- To create a new preset from the current image effects, select the Create Preset command from the menu opened by the Styles field, or from the panel menu.
- To create a new style from the current image effects, select the Create Style command from the menu opened by the Styles field, or from the panel menu.
Creating and using image effect styles, allows the modification of the image effects of multiple objects, by editing a single style. The image effect styles are shown in the Style panel. The image effect style is edited using the Image Effects Editor. When the style editing is confirmed, all objects using the image effect style are updated.
Image effect styles can also be inserted into a group of image effects. In this case only a part of the object distortion is controlled by centralized styles, and other additional (or preceding) distortions can be added using other styles or local image effect types and attributes.
Individual image effect editors also contain a Style field, used to create and reuse single image effects. Selecting a style or preset will replace the edited image effect, and will leave the other image effects in the group unchanged. Saving the image effect as a preset or a style will save the edited effect only.
To summarize the style and preset management in the Image Effects panel:
- The common Styles field at the top of the panel (always visible), is used to save or replace the whole group of image effects, stacked on the selected object.
- The image effect specific Style field, shown in each image effect editor, under the effect title row, is used to save or replace a single image effect in the group.


