
Mesh Effects
The Mesh and Warp sections of the shape effects contains a set of mesh based distortion effects. In these effects, a mesh is created and edited by the user to distort the shapes of the selected object.
The Warp section contains mesh based effects, using specific mesh shapes. In the Warp effects, the mesh shape is synthesized based on the selected mesh profile.
The primary shape effect editor  tool can be used to edit the mesh used in the distortion.
The secondary shape effect editor  tool is available for some of the mesh based effects, to edit additional attributes of the mesh based distortion, like the variable width profile of the bending effect, or the corner mapping of the envelope effect.
4-Point
The 4-Point distortion effect stretches the object shapes inside a region defined by four points. The four points can be freely positioned, and the shapes are distorted according to the polygon defined by the four points. The sides of the bounding box are mapped to the sides of the four point distortion polygon.
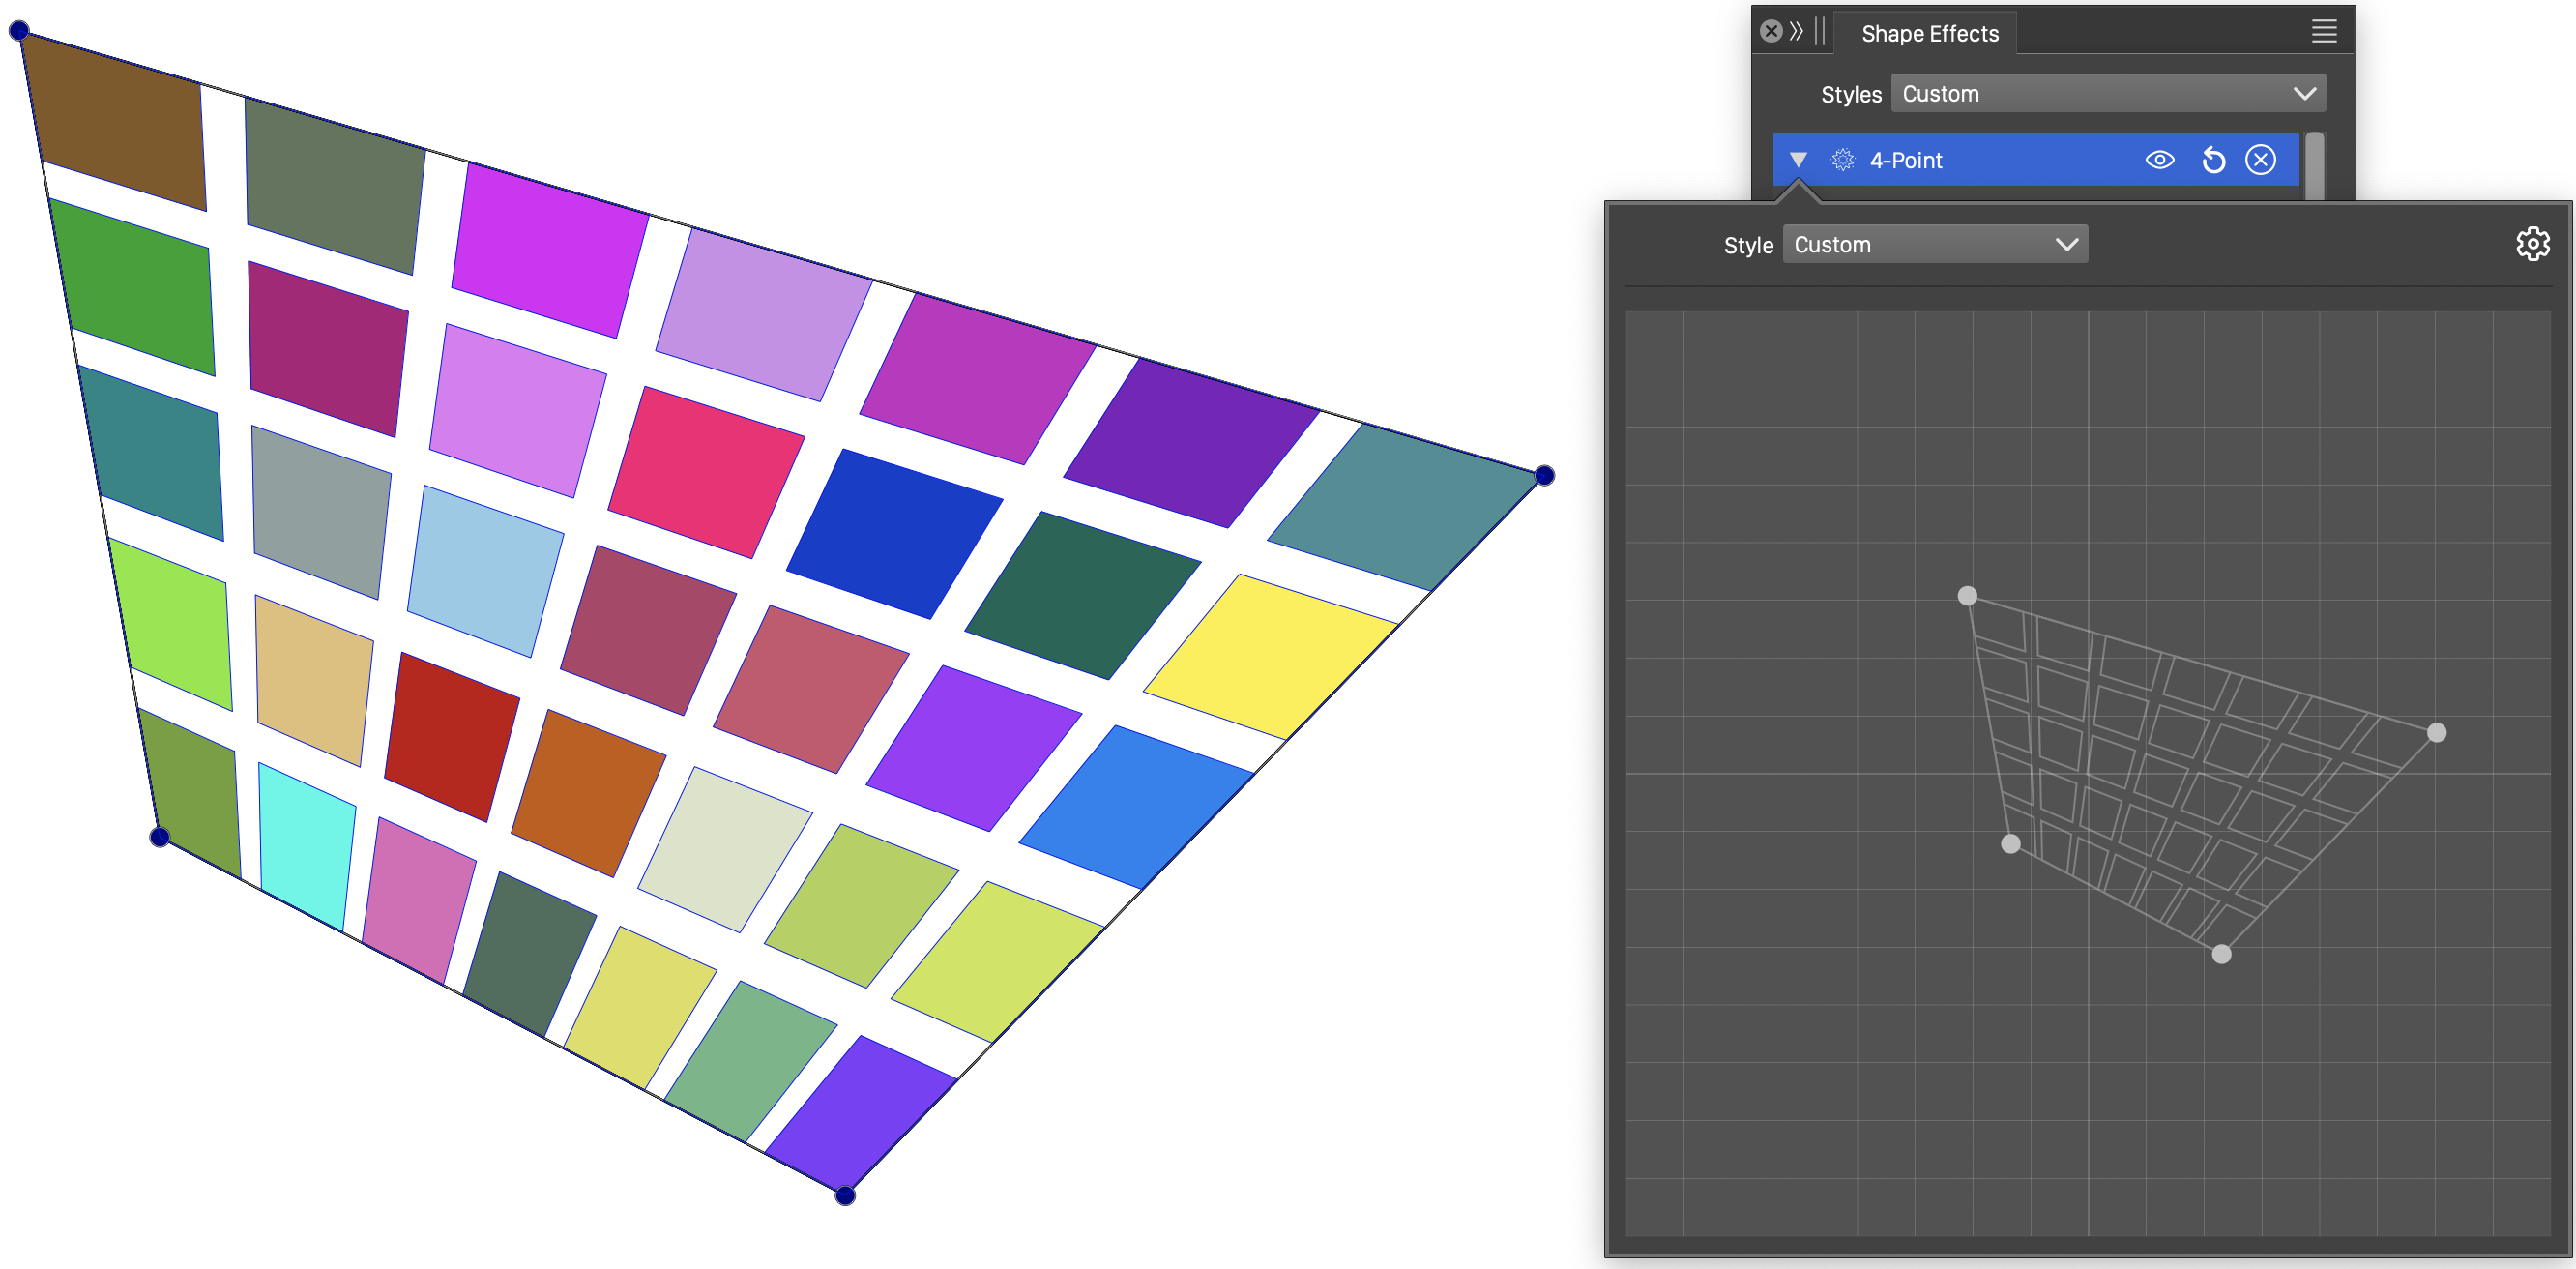
The 4-Point distortion.

Interactive editing of the 4-Point distortion.
The only options defining a 4-Point distortion effect are the fount points mapping the corner of the bounding box to new positions. The four points can be adjusted by dragging the corners of the polygon (initially a rectangle) in the shape effect panel.
The 4-Point distortion effect can be interactively edited, using the primary shape effect editor tool. The four points are shown at the corners of the distortion polygon. Drag the points to new positions to create a free distortion of the selected object group.
Bending
The Bending distortion stretches the shapes, in an object or group of objects, along a user edited path. The user selected path can be of arbitrary form, as long as it consists of a single continuous path. Both closed and open paths are allowed. The bending path can be edited using the primary shape effect editor tool.
The extent of the object stretching along the path is controlled by a variable width profile, selected from the bending options, or edited interactively using the secondary shape effect editor tool.
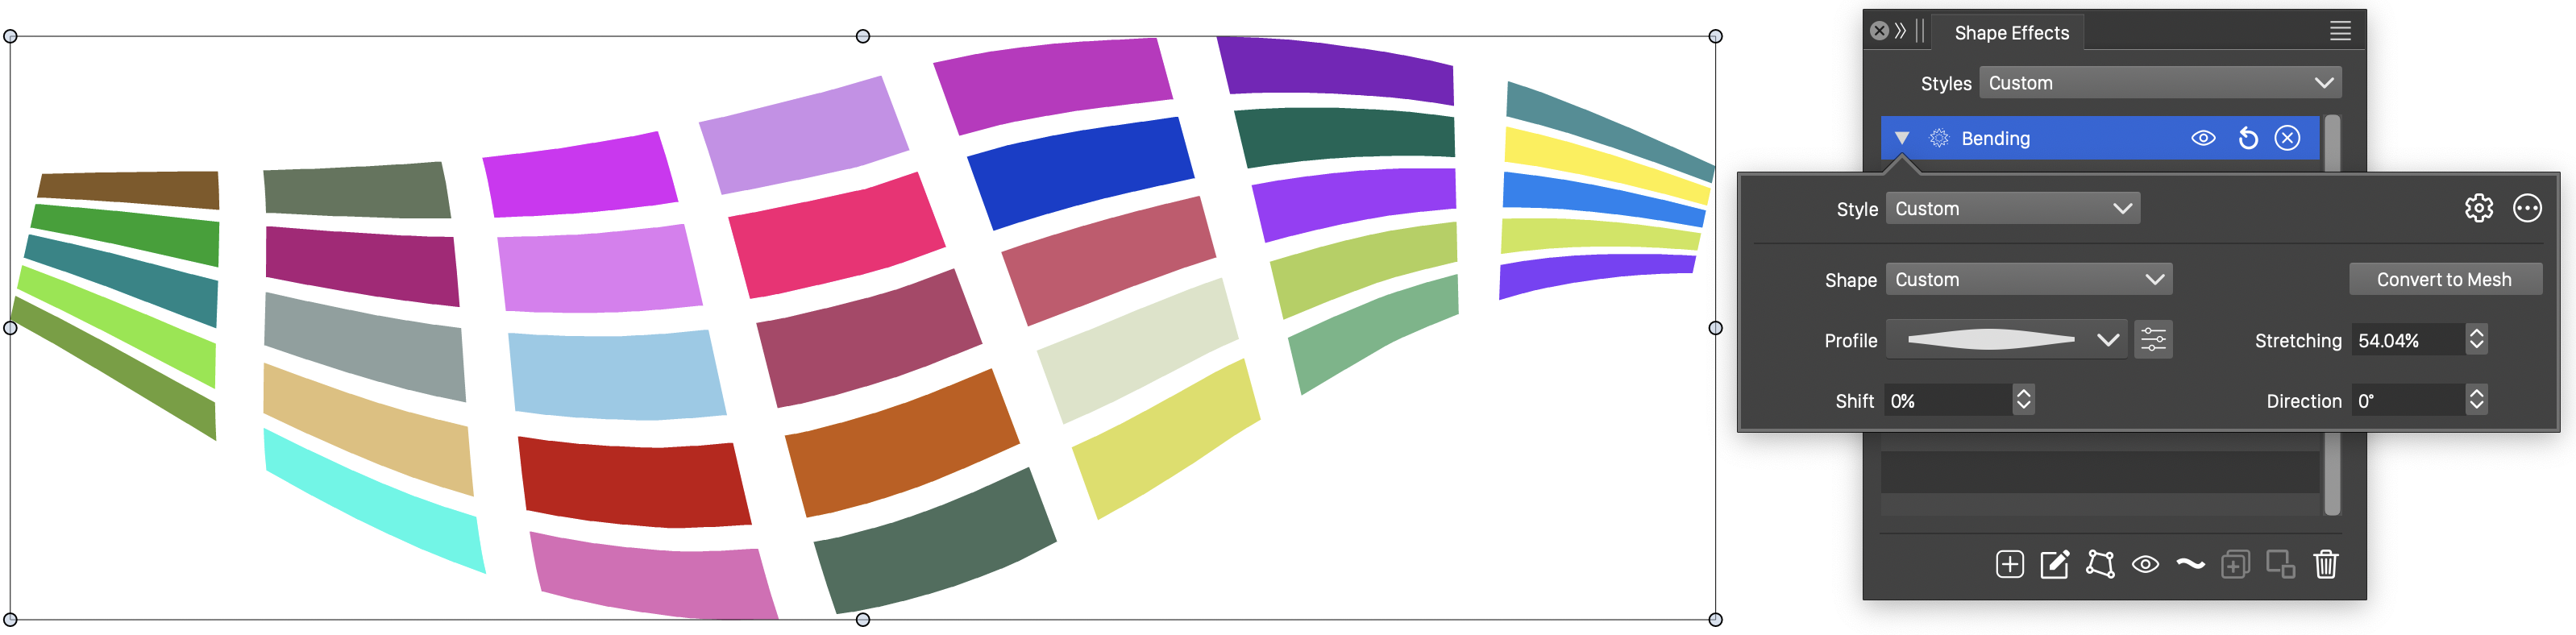
The Bending distortion, with basic options.
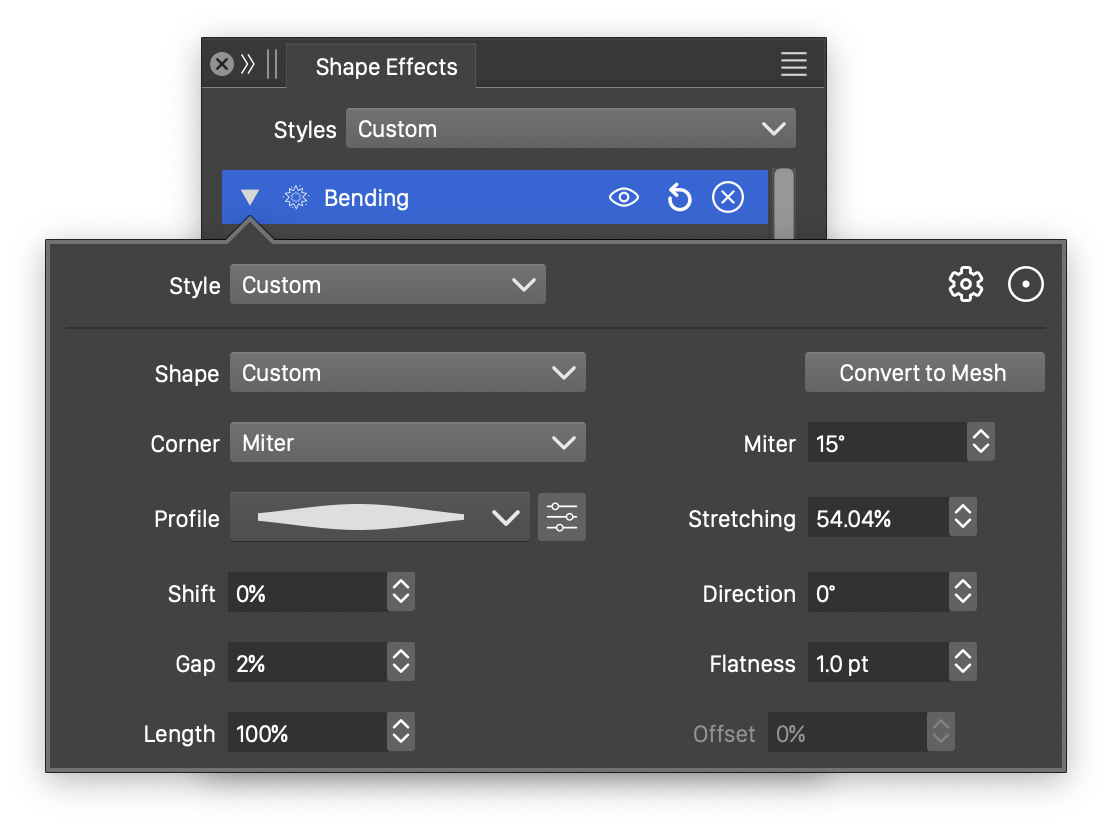
Detailed options of the Bending distortion.
The Bending distortion effect uses the following basic options:
- Shape - Select the bending path from the list of shape presets, styles and object references with the Shape role. The shape can be edited using the path editor, by clicking on the button in the icon section of the panel. Both closed and open shapes are allowed as bending paths.
- Profile - Select the variable width profile preset or style used in the bending distortion. The variable width profile controls the variation of the distance of the object margins from the bending path. To set custom variable width profiles, click on the
 button, or use the secondary shape effect editor tool.
 - Stretching - Edit the extent of the stretched objects along the bending path, relative to the original height of the object bounding box.
- Shift - Set the amount of shifting of the horizontal axis of the objects from the bending path, relative to the object height.
- Convert to Mesh - Convert the selected bending distortion into a mesh grid distortion effect.
More detailed options of the Bending distortion are available, by clicking on the  button.
- Corner - Select the corner mode used in sharp corners of the bending path.
- Direction - Edit the direction of the axis aligned to the bending path. By default, the direction is zero, aligning the horizontal axis of the object center. The direction can be set to other angles to change the aligned axis of the stretched objects.
- Offset - Offset the starting location of the bending distortion along a closed bending path. This option is enabled only with closed bending paths.
- Miter - Edit the miter limit at sharp corners of the bending path.
- Gap - Set the gap used around sharp corners, for corner generation.
- Flatness - Edit the precision of the blending effect.
The button from the Shape Effects panel, activates the shape effect tool used to interactively edit the bending distortion path.
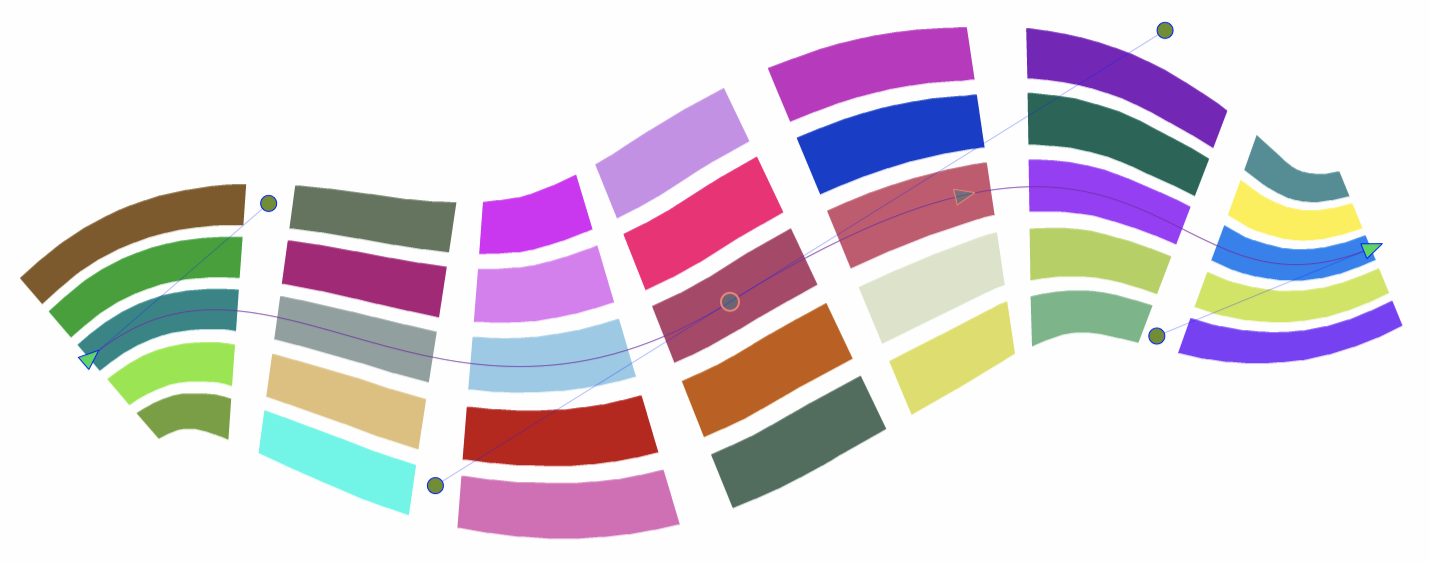
Interactive editing of the Bending distortion.
Interactive editing of the bending distortion path is the same as any path editing process, using the Node tool. There are a number of restrictions, when the bending path is edited. Most important of these is that the path cannot be broken at a node. Otherwise, all path editing tools are allowed, including using lines, quadratic or cubic segments, or smooth or cusp nodes.
The variable width profile used in the bending distortion can be edited using the secondary shape effect tool from the icon section of the panel. When the secondary shape effect tool is active, the variable width nodes are shown and can be adjusted in the same way as variable width strokes.
- The round (1) nodes along the bending path indicate the position of the current variable width nodes.
- New nodes can be added by clicking on the bending path with no existing node, and dragging away from the bending path.
- Drag the center node (1) along the path to change the position of a width node.
- Click and drag a width extent node (2) to change the extent of the bending at the selected location.
Editing the shape of the Bending distortion.
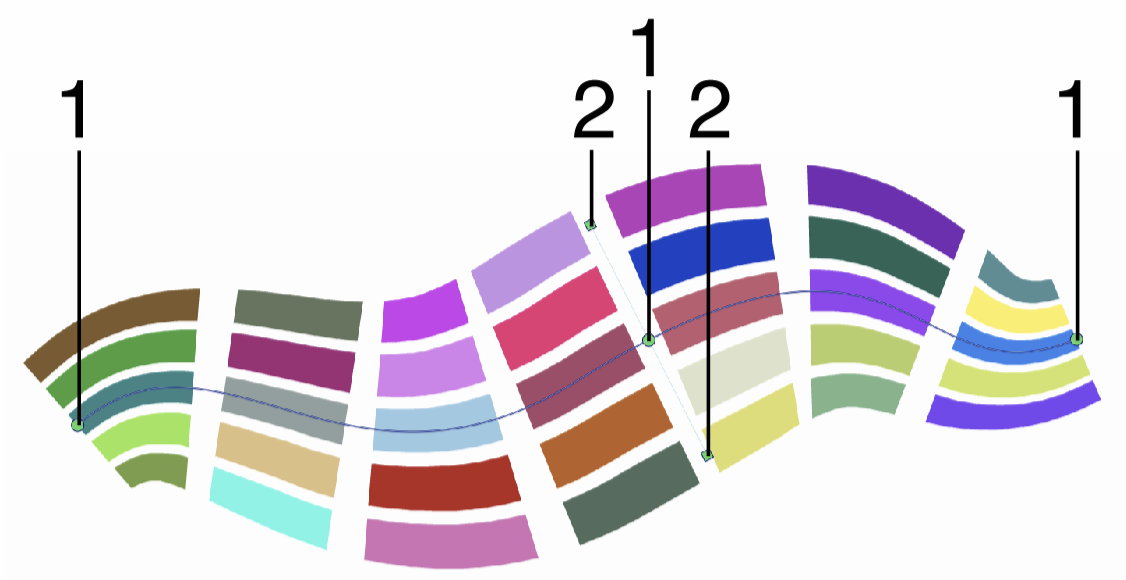
Elastic Warp
The Elastic Warp distortion stretches the shapes, in an object or group of objects, using an elastic mesh stretched at a number of user selected locations. The user selected anchor points of the mesh (also called pin-points) can be moved freely and the mesh stretches in an elastic way to move the underlying shape location to the new point, while keeping other locations anchored.
The anchor points can be interactively created, modified and removed using the primary shape effect editor tool.
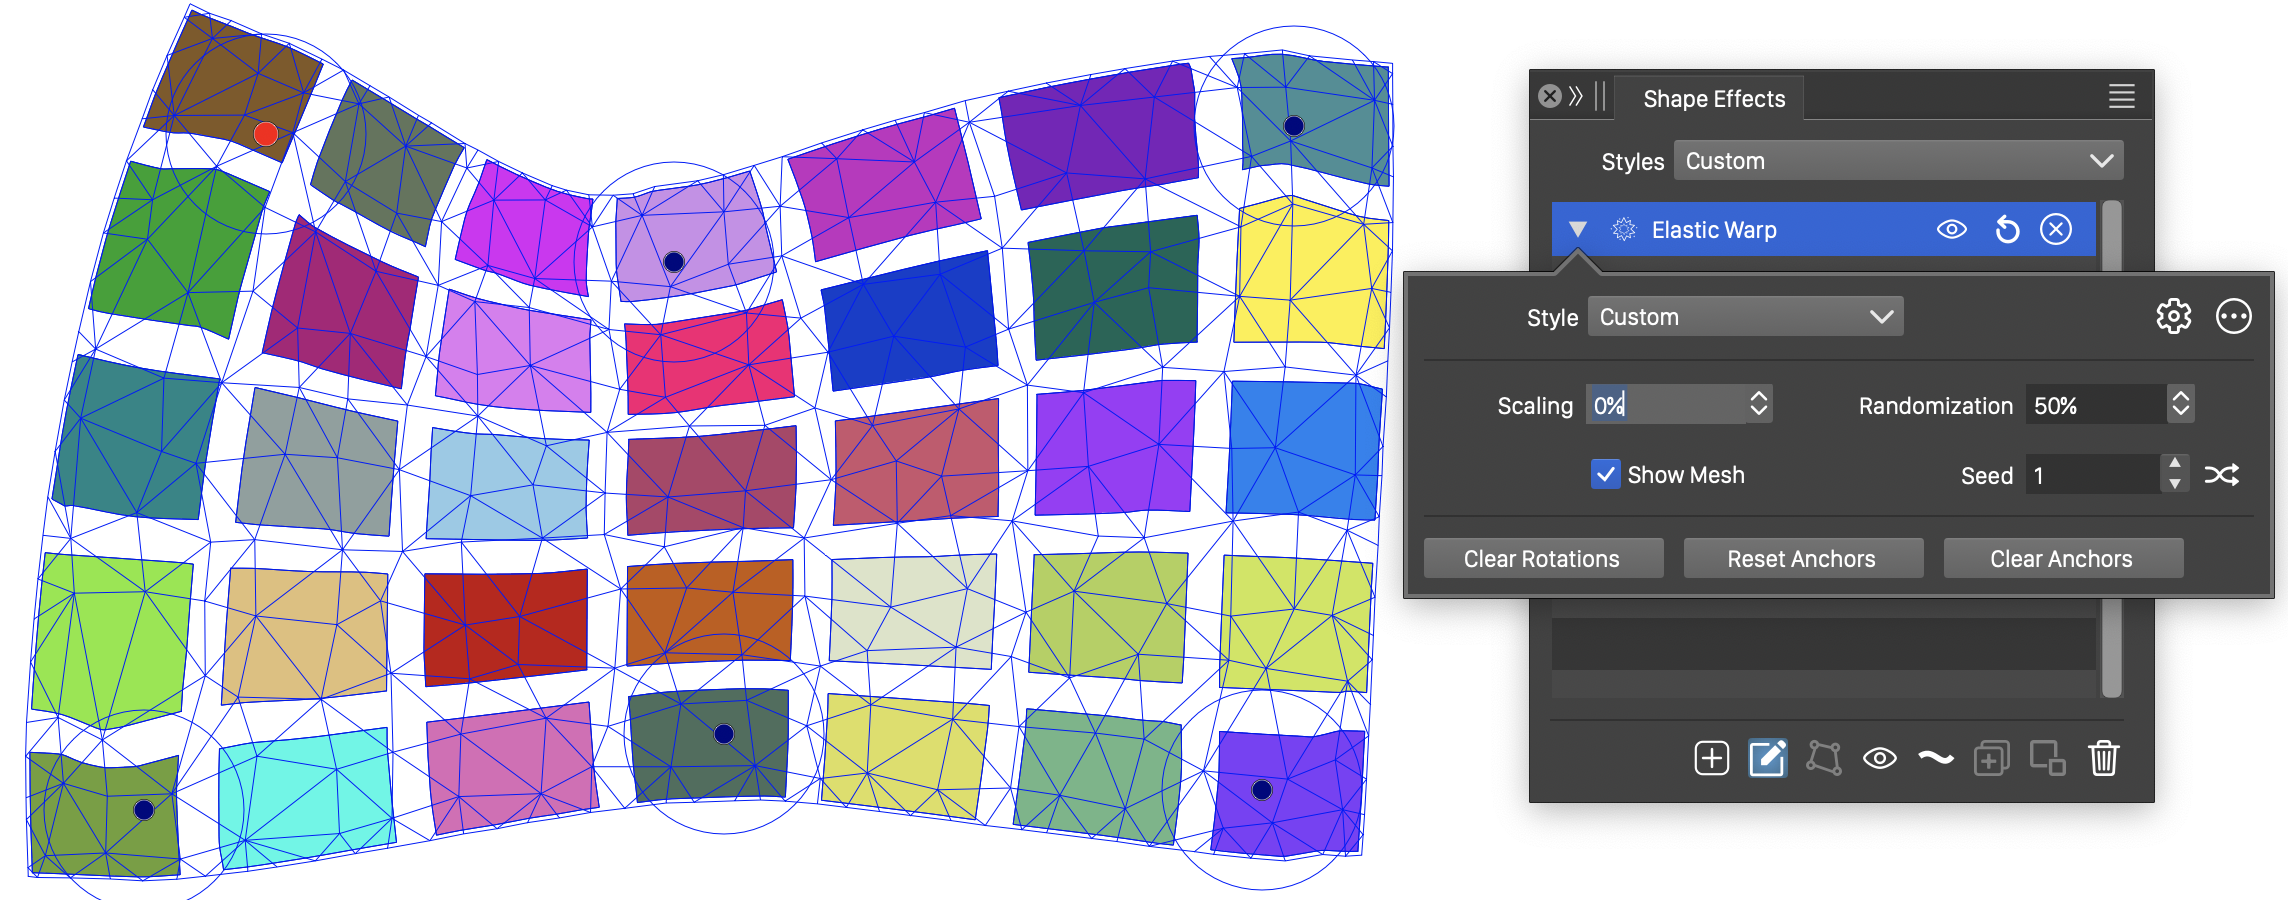
The Elastic Warp distortion, with basic options.
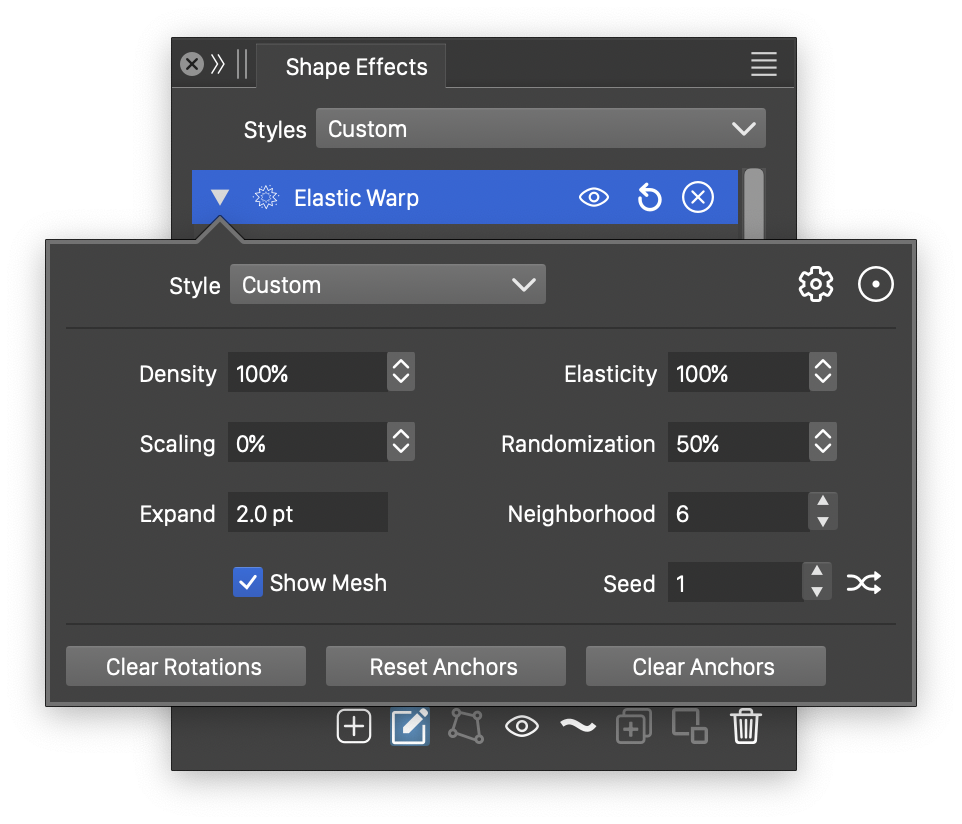
Detailed options of the Elastic Warp distortion.
The Elastic Warp distortion effect uses the following basic options:
- Scaling - Set the amount of scaling used to adjust stretched parts. For small values, the elastic stretching will avoid scaling the shape sizes, stretching them only to accommodate the new anchor points. For larger values, the objects are scaled to allow for a more uniform stretching scheme.
- Randomization - Amount of randomization used in generating the mesh grid.
- Seed - Set the randomization seed used to generate the mesh grid. The
 button can be used to pick random seed values.
 - Show Mesh - Enable or disable the showing of the mesh grid. The mesh grid covers the bounding box of the whole object group, to allow the creation and use of anchor points at arbitrary locations. By default, the mesh grid is not displayed, to avoid obstructing the details of the selected object group.
- Clear Rotations - Resets all rotated nodes to zero rotation.
- Reset Anchors - Reset all anchor points to their original positions.
- Clear Anchors - Remove all anchor points, restoring the shapes to a non-distorted state.
More detailed options of the Elastic Warp distortion are available, by clicking on the button.
- Density - Edits the density of the mesh grid. Increasing the density will make the elastic distortion smoother, at the cost of slower creation and removal of anchor points.
- Elasticity - Edit the elasticity at the anchor points.
- Expand - Expand the bounding box to create a larger mesh grid. Using an expanded mesh grid enables the creation of anchor points outside of the bounding box of the objects.
- Neighborhood - Edit the number of mesh nodes defining the neighborhood of a mesh node. Using larger number of mesh nodes results on a smoother elastic distortion, as the elasticity is linked to more neighboring locations.
The button from the Shape Effects panel, activates the shape effect tool used to interactively edit the elastic warp distortion anchor points.
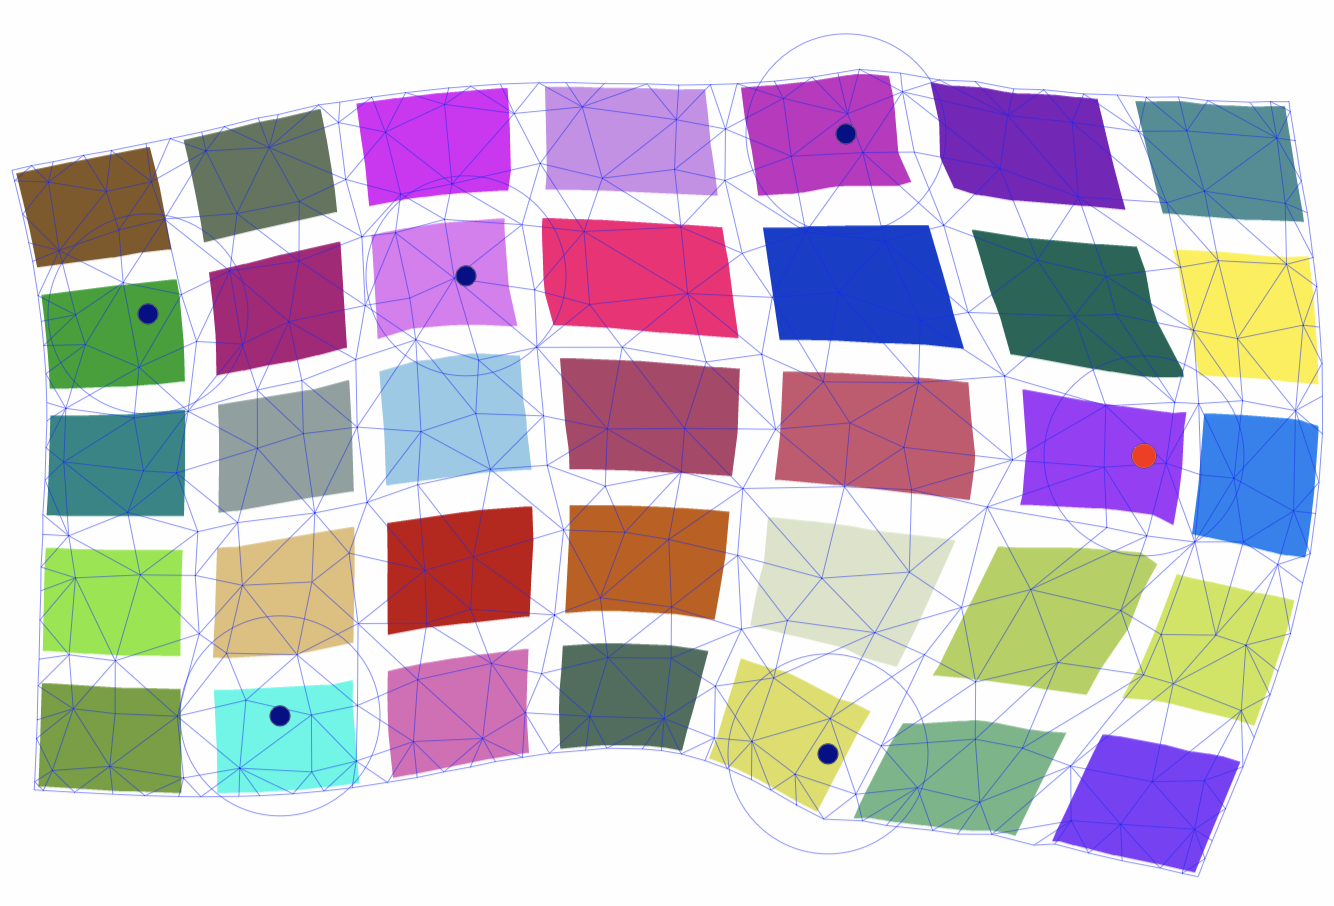
Interactive editing of the Elastic Warp distortion.
Interactive editing of the Elastic Warp distortion anchor points is done as follows:
- Click on any location inside the mesh grid, to create a new anchor point. New anchors can be created also at locations not covered by the selected object group.
- Click on an anchor point (dark circle) to select the anchor. The selected anchor point is indicated with a red circle.
- Drag an anchor point to stretch the mesh grid and the shapes in an elastic way.
- Press the Option (Mac) or Alt (Windows) key to show the rotation handles around the anchor points as blue circles. Hovering the mouse over the blue circles will indicate anchor node rotation.
- While holding the Option (Mac) or Alt (Windows) key, click on a blue circle around the node, and drag the mouse around the node to change the rotation of the mesh grid at that node.
Envelope and Mesh Warp
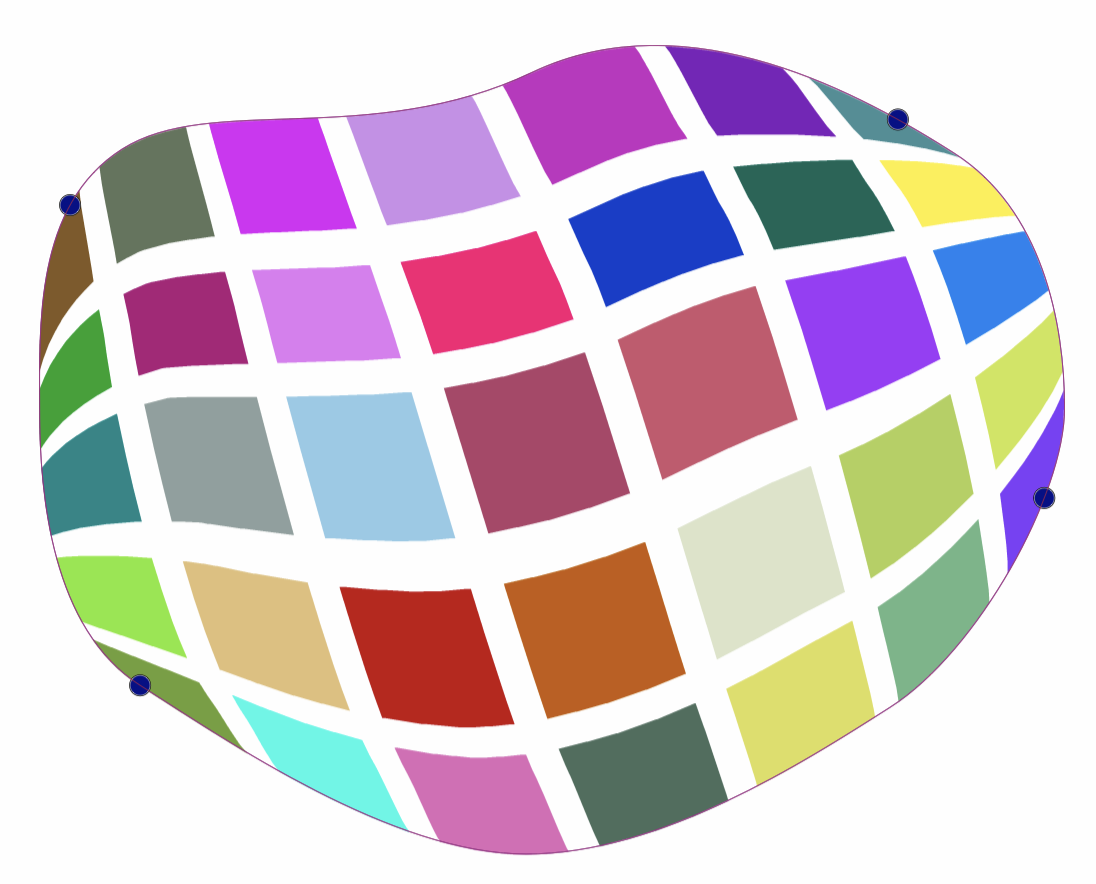
The Envelope distortion stretches the shapes by deforming the bounding box margin according to a user defined envelope shape. The envelope shape can be any single closed path, shape style or preset. The envelope shape defines how the object margins are stretched, distorting the interior of the shapes by the stretching of the margins.
The Mesh Warp distortion stretches the shapes using a mesh grid with user edited grid shapes. The Envelope and Mesh Warp distortions are interchangeable, by converting the mesh bounder to an envelope shape, or converting the envelope shape to a single cell mesh grid.
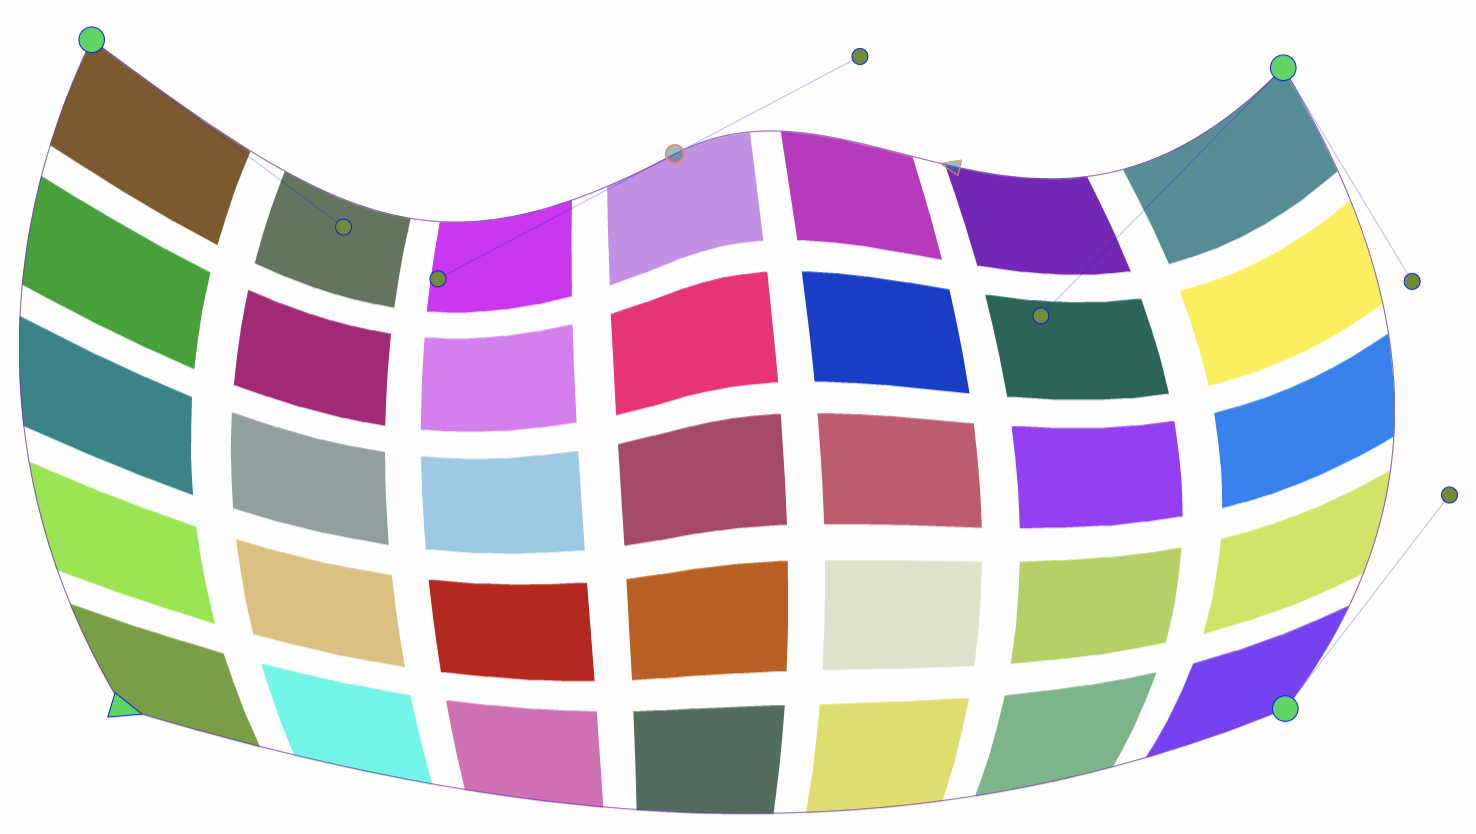
The envelope and mesh grid shapes can be interactively edited as a regular closed shape or path, using the primary shape effect editor tool from the Shape Effects panel.
The four corners of the bounding box of the envelope distortion are mapped to locations on the envelope shape. By default, these locations are set on the shape, in the direction of the original four corners. The envelope corner locations can be interactively shifted along the envelope shape using the secondary shape effect editor tool from the Shape Effects panel.
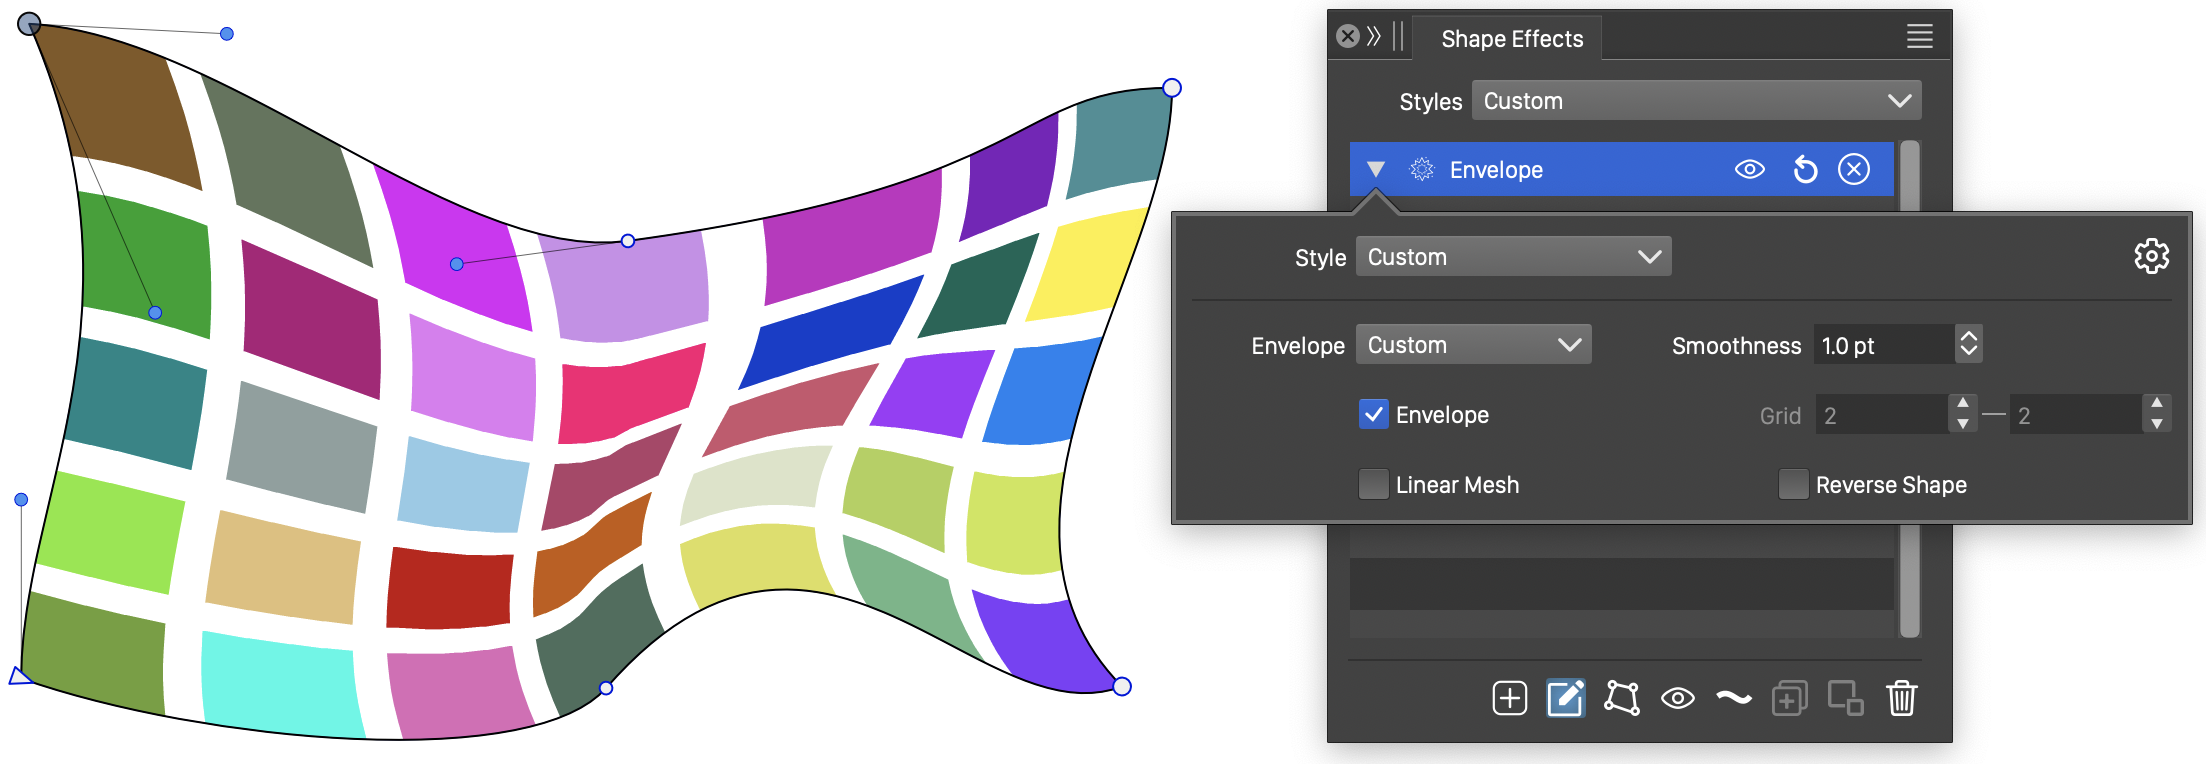
The Envelope distortion and its options.
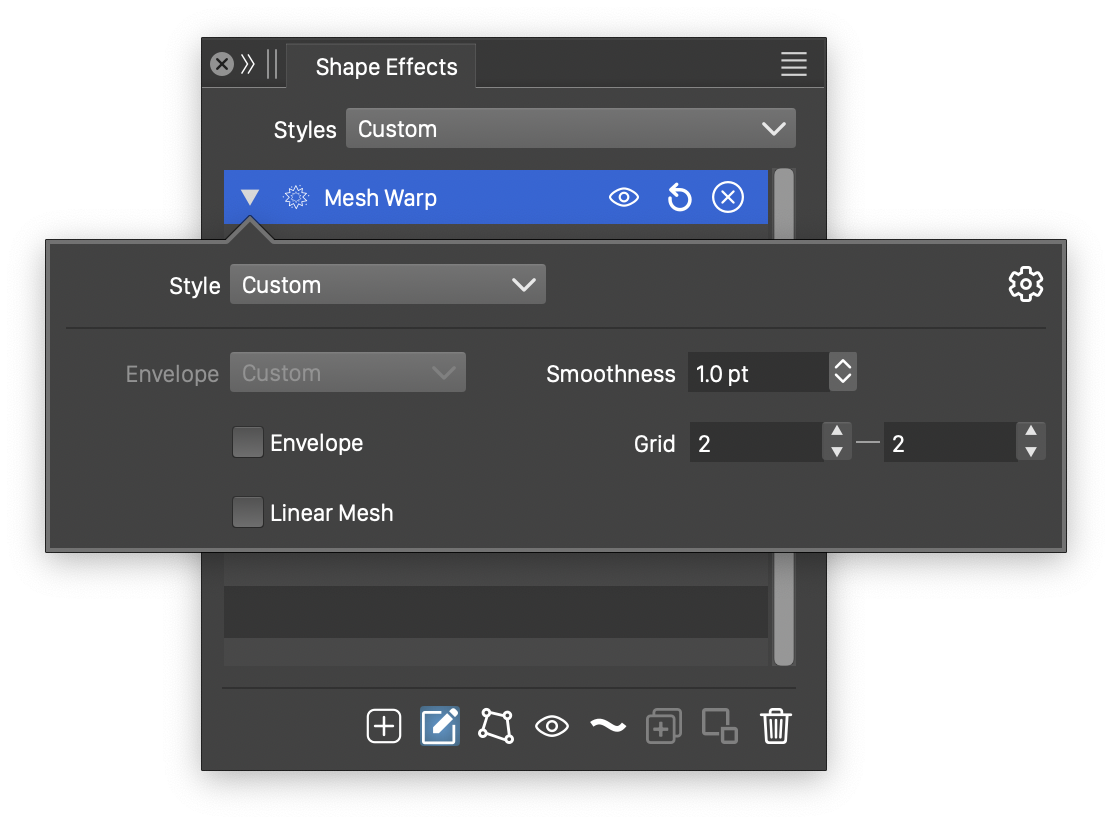
The Mesh Warp distortion options.
The Envelope and Mesh Warp distortion effects use the following options:
- Shape - Select the envelope shape from the list of shape presets, styles and object references with the Shape role. This option is enabled only for envelope distortions. The shape can be edited interactively using the path editor, by clicking on the button in the icon section of the panel. Only single closed shapes are permitted as envelope shapes. The envelope shape can be selected from the shape of another object, using the Shape role on that object. In this case, the envelope shape will be linked to the object shape.
- Smoothness - Edit the smoothness of the mesh grid distortion.
- Count X - Set the number of horizontal grid edges for the mesh warp distortion.
- Count Y - Set the number of vertical grid edges for the mesh warp distortion.
- Linear Mesh - Enable or disable using lines as mesh edges. The linear mesh can be seen as an extension of the 4-Point distortion effect.
- Envelope - Enables or disables the envelope distortion mode.
The button from the Shape Effects panel, activates the shape effect tool used to interactively edit the Envelope or Mesh Warp shapes.
Interactive editing of the envelope shape is the same as any path editing process, using the Node tool. There are a number of restrictions, when an envelope path is edited. The path must remain a single closed path, and cannot be broken at any node. Otherwise, all path editing tools are allowed, including using lines, quadratic or cubic segments, or smooth or cusp nodes.
When editing an Envelope distortion, the context panel will contain a Shape drop down of shape presets and styles that can be selected to replace the envelope shape.
Interactive editing of the Envelope distortion.
When using the Envelope distortion, the four corners of the bounding box are mapped to locations along the envelope shape. These locations can be adjusted using the secondary shape effect editor tool of the Shape Effects panel.
The corner locations are indicated using dark circular nodes. Drag a corner location along the envelope shape (keeping the mouse close to the shape), to adjust the bounding box corner mapping.
Interactive editing of the Envelope corner mapping.
The mesh warp editing is done by adjusting the nodes and curves defining the mesh grid and edges. The mesh edges may contain any number of additional control points. The mesh nodes are indicated using larger node handles.
The size of the mesh grid can be set in the Count X and Count Y fields of the shape effects panel.

Interactive editing of the Mesh Warp distortion.
Warp
The Warp section of the shape effects, menu, contains a set of mesh based distortion effects, using parametric mesh shapes.
The mesh shapes are generated by a user selected mesh scheme. All wrap mesh shapes use the same attributes, to create mesh distortions.
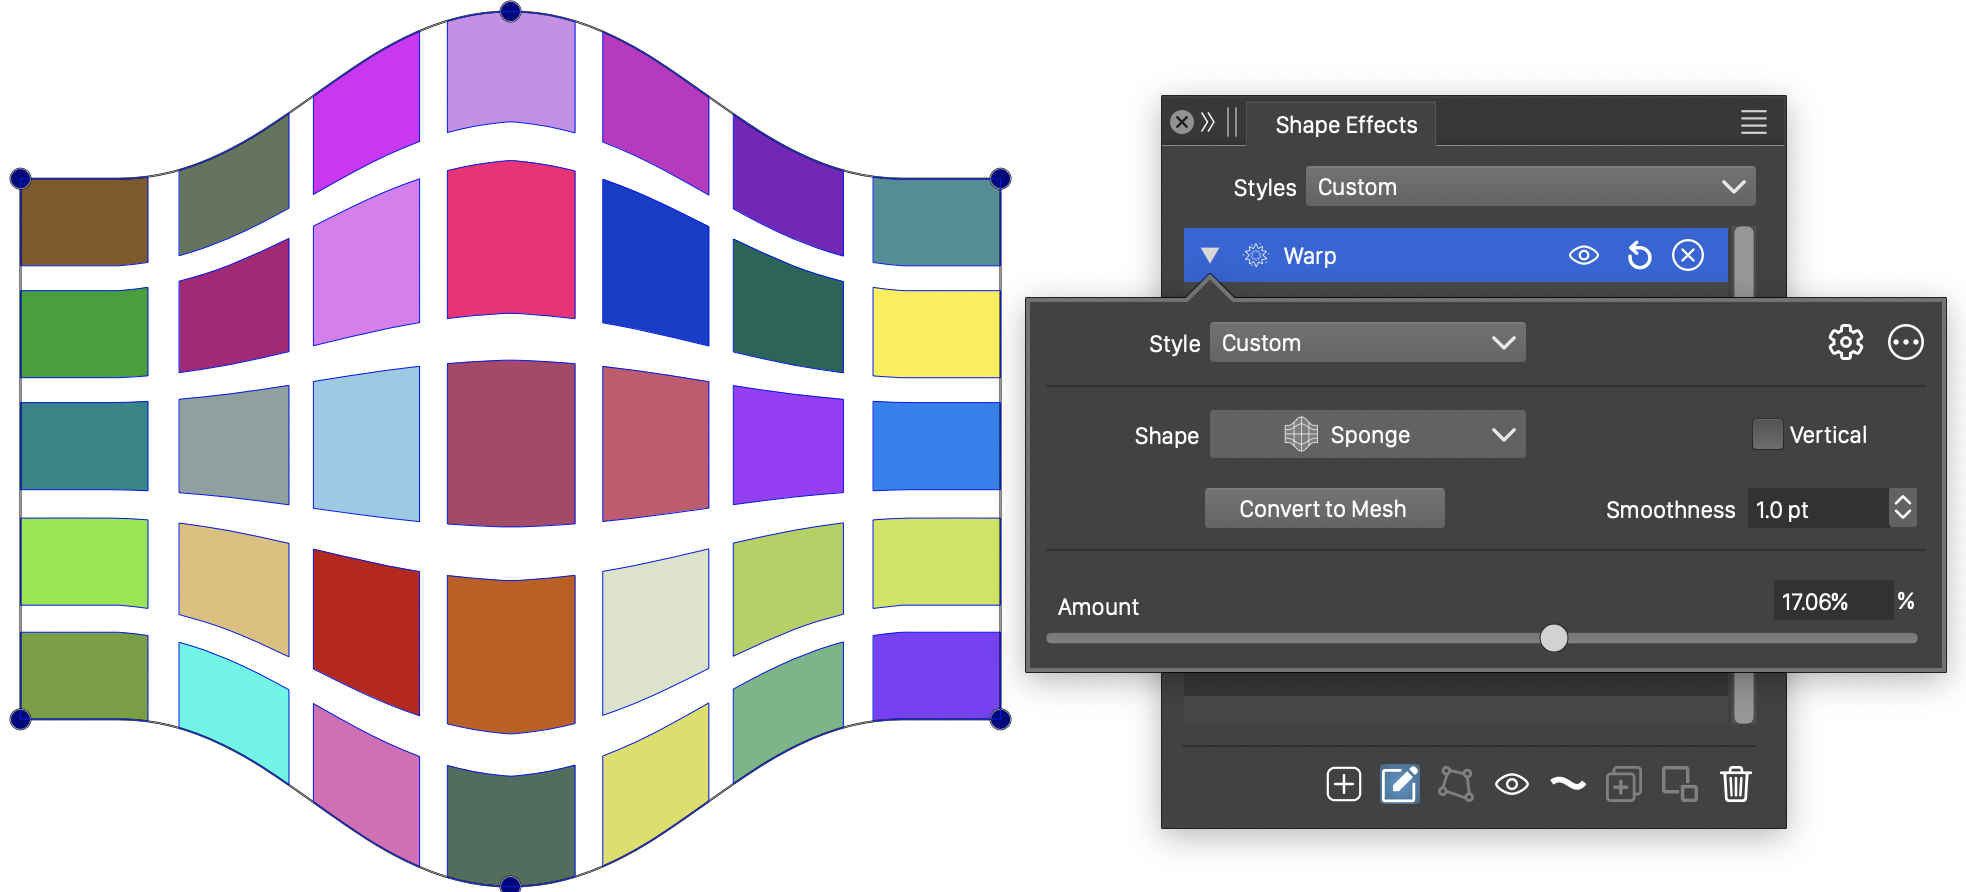
The Warp distortion using the *Sponge* mesh shape.
Advanced options of the Warp distortion effect.
The Warp distortion effects use the following basic options:
- Shape - Select the mesh shape used in the warp distortion. The default mesh shape is selected when the warp distortion type is selected from the menu. The Shape menu contains a small preview of the warp shapes.
- Convert to Mesh - Converts the warp distortion into an editable mesh distortion.
- Vertical - Set the direction of the warp distortion to vertical (checked) or horizontal (not checked).
- Amount - Set the amount of warping using the selected warp shape.
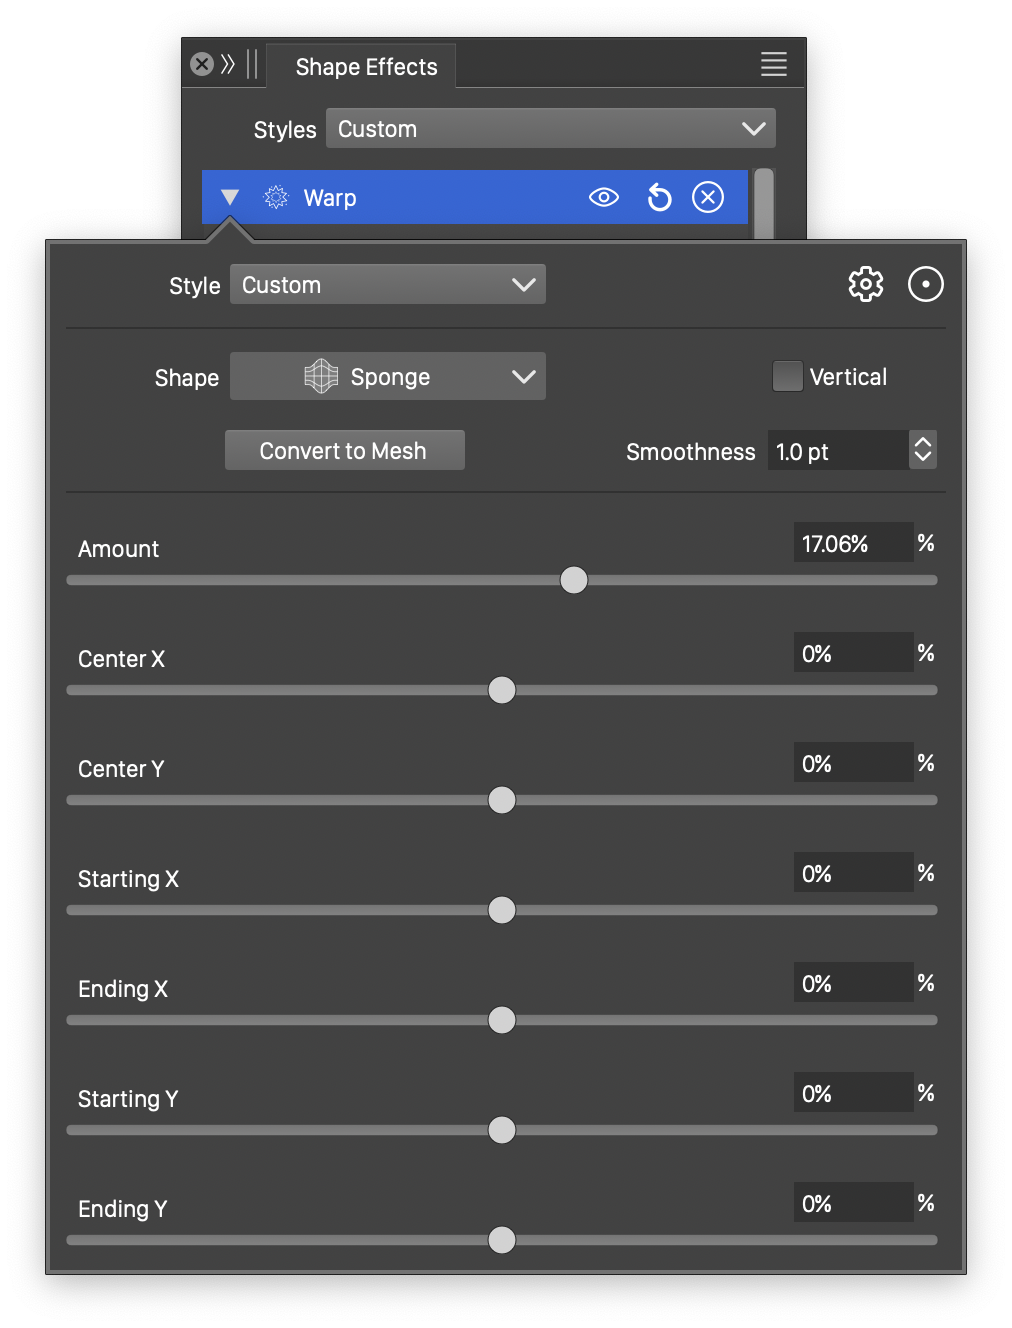
The following advanced options are available for the Warp distortion effect, by clicking on the button:
- Center X and Center Y - Set the horizontal and vertical center of the warp distortion.
- Starting X - Set the horizontal stretching of the bottom margin of the warped bounding box.
- Ending X - Set the horizontal stretching of the top margin of the warped bounding box.
- Starting Y - Set the vertical stretching of the bottom margin of the warped bounding box.
- Ending Y - Set the vertical stretching of the top margin of the warped bounding box.
- Smoothness - Set the smoothness of the resulting mesh grid.