Shape Effects Panel

The Shape Effects panel.
Shape effects on the selected objects can be created, edited and managed using the Shape Effects panel. The Shape Effects panel can be opened using the Shape Effects command from the Effects menu, or the Shape Effects command from the Window - Effects menu.
The Shape Effects panel shows the list of shape effects stacked on the selected object. An object or group may contain multiple shape effects, these will be listed in the panel.
The attributes of a shape effect can be accessed by opening the effect in the list, using the arrow shown before the effect name. The shape effect attribute editing can be closed or opened with the arrow icon.
When multiple shape effects are stacked on the selected objects, opening all the effect attribute editors may create a long list in the Shape Effects panel. The list of effect attribute editors can be scrolled using the scrollbar on the right side of the panel.
Multiple shape effects can be grouped and organized into a hierarchy of effects. Effects can be saved as presets or styles and reused on other objects. When using shape effect styles on objects, modifying the style (in the Styles panel), will update the shape effects on all objects using that style.
Shape Effects
The Shape Effects panel lists the shape effects stacked on an object, by showing the shape effect title and its attributes. The shape effect title section is used to show the effect name, open or close the attribute editing and to set common shape effect options.

The title section of a shape effect in the list.
- (1) - Open or close the shape effect attribute editor in the list.
- (2) - Shows the shape effect name.
- (3) - Enables or disables the shape effect. A disabled shape effect is still part of the object, but it will not adjust the object shape. This option can be used to disable the use of an effect without removing it from the object.
- (4) - Reset the shape effect to its default state.
- (5) - Selects the level of details for the shape effect attributes. By default, each shape effect type shows only the most important attributes in a compact form. By clicking this icon, the attribute editor can be expanded to show more attributes, or reduced to a more compact form.
When the Open in List mode is enabled, the shape effect options can be edited by clicking on the
button in the shape effect row.
Creating Effects
To add a new shape effect to the selected object:
- Select one or more objects to adjust with a shape effect.
- If multiple objects are selected, these will be grouped when a shape effect is added.
- Click on the
 button in the panel icon section.
 - Select the shape effect from the menu. Shape effects are organized into sub-menus by type.
- The selected shape effect is added to the object, and it is shown in the effects list.
- Open the shape effect attributes, by clicking the arrow shown before the effect name.
Shape effects of an object can be copied to another object:
- Select the object with the shape effects.
- Select the shape effects in the Shape Effects panel.
- Drag and drop the selected shape effects on an other object.
- The selected shape effects are applied on the object pointed by the drag and drop operation.
Modifying Effects
Shape effects are nondestructive, and the attributes of an existing effect can be modified at any time. When an object is converted to curves, the shape effects of the object are removed.
The shape effects stacked on an object can be modified by editing their attributes in the Shape Effects panel, or by visually editing a shape effect attribute on the canvas.
To adjust the existing shape effects of an object:
- Open the Shape Effects panel, and select the object on the canvas.
- The Shape Effects panel will show the shape effects stacked on the object.
- Select a shape effect by clicking on the shape effect name in the effect title row.
- Open the shape effect attributes (if not opened), using the arrow icon before the name.
- The attributes are specific to each shape effect type, and are described with more detail in the sections of this chapter.
- If an attribute is adjusted, the shape effect is automatically updated on the selected object, and the new distortion effects will be visible on the canvas.
- To remove a shape effect, select the shape effect and click on the
 button, in the icon section of the panel.
 - To remove all shape effects from the selected object, deselect the shape effect in the panel by clicking in an empty part of the list and then click on the button.
- To reset a shape effect attributes to their default value, click on the
 button at the end of the shape effect label.
 - To enable or disable a shape effect, click on the
 button.
Shape effects can be adjusted visually on the canvas, by adjusting one or more parameters associated with the geometric distortion specific to the shape effect.
A shape effect may have a primary and a secondary effect editor.
- The primary editor, if available, adjusts the main attributes of the shape effect. For example, in the case of the bend effect, the primary editor is used to interactively edit the bending shape.
- The secondary editor, if available, adjusts a secondary attribute of the shape effect. In the case of the bend effect, this will be the variable width profile used in the bending along the path.
- To activate a shape effect editor, select the shape effect in the list and click on the shape effect editor icons in the icon section of the panel. The shape effect must be highlighted (title row background is blue), to be able to interactively edit the effect on the canvas.
 - Activates the primary shape effect editor. This button is disabled, if the selected shape effect has no primary interactive editor.
 - Activates the secondary shape effect editor. This button is disabled, if the selected shape effect has no secondary interactive editor.
- The operation of a shape effect editor is specific to the selected shape effect type. The interactive editors of various shape effect types are described with more detail in the sections of this chapter.
Multiple Effects
Multiple shape effects can be stacked on a single object, group or layer, to create complex distortions of the shapes. The Shape Effects panel will show a list of the effects, from the selected object.
When using multiple shape effects on a single object, it is possible to organize these effects into groups, and create a hierarchy of shape effects. Groups of shape effects can also be saved as presets and styles, helping with the reuse of multiple effects on other objects.
- To create a group of shape effects, select the shape effects in the panel, and click on the
 button, or select the Group command from the panel menu.
 - To expand a group of shape effects into separate effects, select the shape effect group, and click on the
 button, or select the Ungroup command from the panel menu.
 - The shape effect groups are shown as a hierarchy of shape effects, that can be opened, closed and navigated in the panel.
- Shape effects can be rearranged, to change the order of adjusting the object shape with the effects.
- Use drag and drop of the selected shape effects, to place them at a different location in the list of effects.
- Drag and drop one or more shape effects on other objects, to distort the shape of those objects with the selected effects.
- The
 button in the shape effect title row is used to enable or disable the shape effect.
Shape effects can also be copied to other objects, using the clipboard:
- Select the object containing shape effects.
- Select the shape effects in the panel.
- Press Command+C to copy the selected effects to the clipboard.
- Select an other object.
- Click in an empty area of the list in the shape effect panel, to activate the panel.
- Press Command+V to paste the shape effects from the clipboard.
- The Shape Effects panel menu also contains a Copy and Paste command that can be used to copy shape effects between objects.
Shape Effect Options
The shape effect options control how a shape effect or distortion is adjusting a path. When distortion effects are applied to multiple paths of an object group, the precision of transforming curves will determine the geometry of the resulting paths.
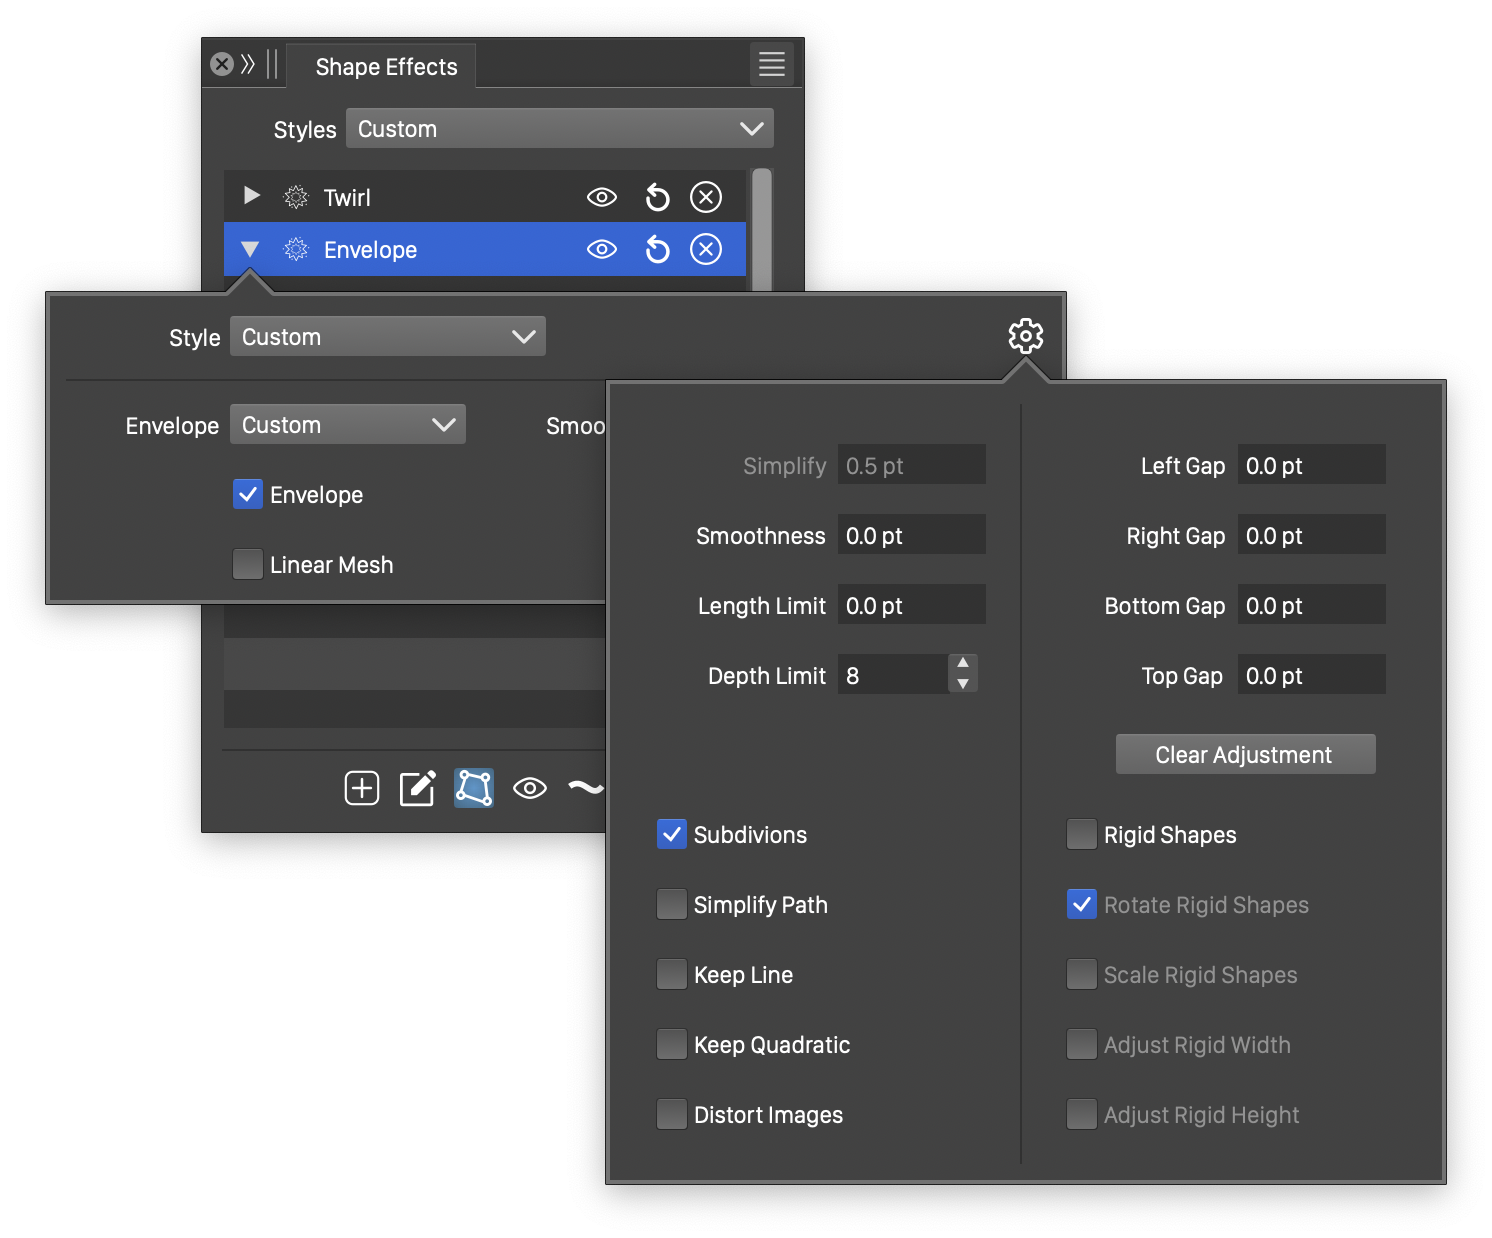
Common shape effect options.
To edit the shape effect options, click on the
The following shape effect options are available:
- Simplify - Precision of simplifying the path after the distortion is applied. This option is available, when the Simplify Path option is checked. Some shape effects may add multiple new nodes to the path, to achieve effect prevision. The number of nodes can be reduced, by enabling the Simplify Path option and setting a larger Simplify value.
- Smoothness - Edit the precision of shape distortion effects. The smoothness value controls the number of added nodes and the precision of the distortion. Small smoothness values result in more precise distortions, but more added nodes as well. Larger smoothness values will result in small number of new nodes, but some curves may not approximate the distortion with precision.
- Length Limit - Set a limit for the smallest curve length created when splitting curves to approximate distortion effects.
- Depth Limit - Set a limit for the curve subdivision.
- Subdivisions - Enable or disable curve subdivisions to better approximate distortion effects. This option is enabled by default, resulting in additional curve nodes to create smooth distortion approximations. When disabled, the number of nodes remains the same after the distortion, but curves may not be approximating the distortion geometry. This option can be used to achieve different geometric distortion results.
- Rigid Shapes - Enable or disable the distortion of shapes. This option is disabled by default, resulting in distorted shapes. When enabled, only the shape positions and rotations are changed, shapes remain rigid to deformation and distortions. This option can be used to achieve effect variations in a group of objects.
- Rotate Rigid Shapes - Enable or disable the rotation of shapes when the Rigid Shapes option is enabled. When enabled, the distortion of rigid shapes will rotate shapes based on the distortion geometry. When disabled the shapes are only and moved (and maybe scaled) in the rigid shape distortion mode.
- Scale Rigid Shapes - Enable or disable the scaling of shapes when the Rigid Shapes option is enabled. When enabled, the distortion of rigid shapes will also adjust the shape sizes. When disabled the shapes are only rotated (and moved) in the rigid shape distortion mode.
- Adjust Rigid Width - Enable or disable the horizontal scaling of shapes when the Rigid Shapes option is enabled.
- Adjust Rigid Height - Enable or disable the vertical scaling of shapes when the Rigid Shapes option is enabled.
- Distort Images - Enable or disable the distortion of images in the distorted objects. This option is disabled by default, resulting in shape distortions only, and leaving images in their original form. When enabled, image content of distorted objects will be also distorted using the same geometric distortions as the shapes.
- Keep Line - Enable or disable rigid lines in distortions. This option is disabled by default, converting all lines to cubic curve segments, for better effect precision. When enabled, the line segments are not converted to curves, and only endpoint of lines are changed.
- Keep Quadratic - Enable or disable rigid quadratic segments in distortions. This option is disabled by default, converting all quadratic segments to cubic segments, for better effect precision. When enabled, the quadratic segments are distorted by changing the control points.
- Simplify Path - Enable or disable the additional simplification of paths after the distortion effect is applied. When enabled, the value set in the Simplify field is used to approximate the resulting paths with fewer number of nodes.
Geometric distortions use the object bounding box, expanded by a gap, to determine the region of distortion of object groups. The gap can be set for all four margins of the bounding box.
- Left Gap - Amount of extra gap added on the left side of the object bounding box, to obtain the geometric distortion region.
- Right Gap - Amount of extra gap added on the right side of the object bounding box, to obtain the geometric distortion region.
- Bottom Gap - Amount of extra gap added on the bottom of the object bounding box, to obtain the geometric distortion region.
- Top Gap - Amount of extra gap added on the top of the object bounding box, to obtain the geometric distortion region.
- Clear Adjustment - Sets the bounding box adjustment back to zero.
Styles and Presets
Shape effects can be saved and reused as styles or presets, using the Styles field on the Shape Effects panel.
- To create a new preset from the current shape effects, select the Create Preset command from the menu opened by the Styles field, or from the panel menu.
- To create a new style from the current shape effects, select the Create Style command from the menu opened by the Styles field, or from the panel menu.
Creating and using shape effect styles, allows the adjustment of the shape effects of multiple objects, by editing a single style. The shape effect styles are shown in the Style panel. The shape effect style is edited using the Shape Effects Editor. When the style editing is confirmed, all objects using the shape effect style are updated.
Shape effect styles can also be inserted into a group of shape effects. In this case only a part of the object distortion is controlled by centralized styles, and other additional (or preceding) distortions can be added using other styles or local shape effect types and attributes.
Individual shape effect editors also contain a Style field, used to create and reuse single shape effects. Selecting a style or preset will replace the edited shape effect, and will leave the other shape effects in the group unchanged. Saving the shape effect as a preset or a style will save the edited effect only.
To summarize the style and preset management in the Shape Effects panel:
- The common Styles field at the top of the panel (always visible), is used to save or replace the whole group of shape effects, stacked on the selected object.
- The shape effect specific Style field, shown in each shape effect editor, under the effect title row, is used to save or replace a single shape effect in the group.


