Stroke Profile
The width of the stroke can vary along the shape, to achieve various calligraphic effects. An easy way to create a calligraphic stroke is to use the Scale and Angle values in the stroke selector view. These options set the stroke nib to a rotated elliptic shape, and the stroke width will vary based on the trajectory of this shape along the curve.
The stroke width can also be adjusted along the stroke by setting different width values at different locations along the outline path. The width of the stroke between these locations will smoothly transition from one width to the next. Setting varying stroke widths and different outline locations is done by defining a stroke width profile.
The variable width profile, is controlled by a set of stroke widths along the outline path. These widths can be set in the width profile editor view, or interactively adjusted using the Width  tool. The transition between consecutive width values can be set to monotone for a smooth transition that is between two width values, or cubic for a smooth transition that may go outside of the neighboring width values to better approximate a smooth curvature.
The variable width profile can be symmetric, having the same width amounts on both sides of the outline stroke axis, or asymmetric, when the two sides along the axis are controlled by different width points and amounts. The variable width profile can be combined with stripes and dashes, resulting in complex outline stroke effects.
The Width Editor
A common way of setting up variable width profiles is to use the profile editor view, accessed from the stroke panel. The Profile drop box in the stroke panel contains a list of existing width profile presets and styles. Select a width profile from this list to quickly apply a variable width profile to the outline stroke of the selected objects.
To edit a custom width profile, click the
button next to the profile drop box, or select the Edit Profile command from the panel menu. The width profile editor view is shown, where the width locations and amounts can be created and adjusted.
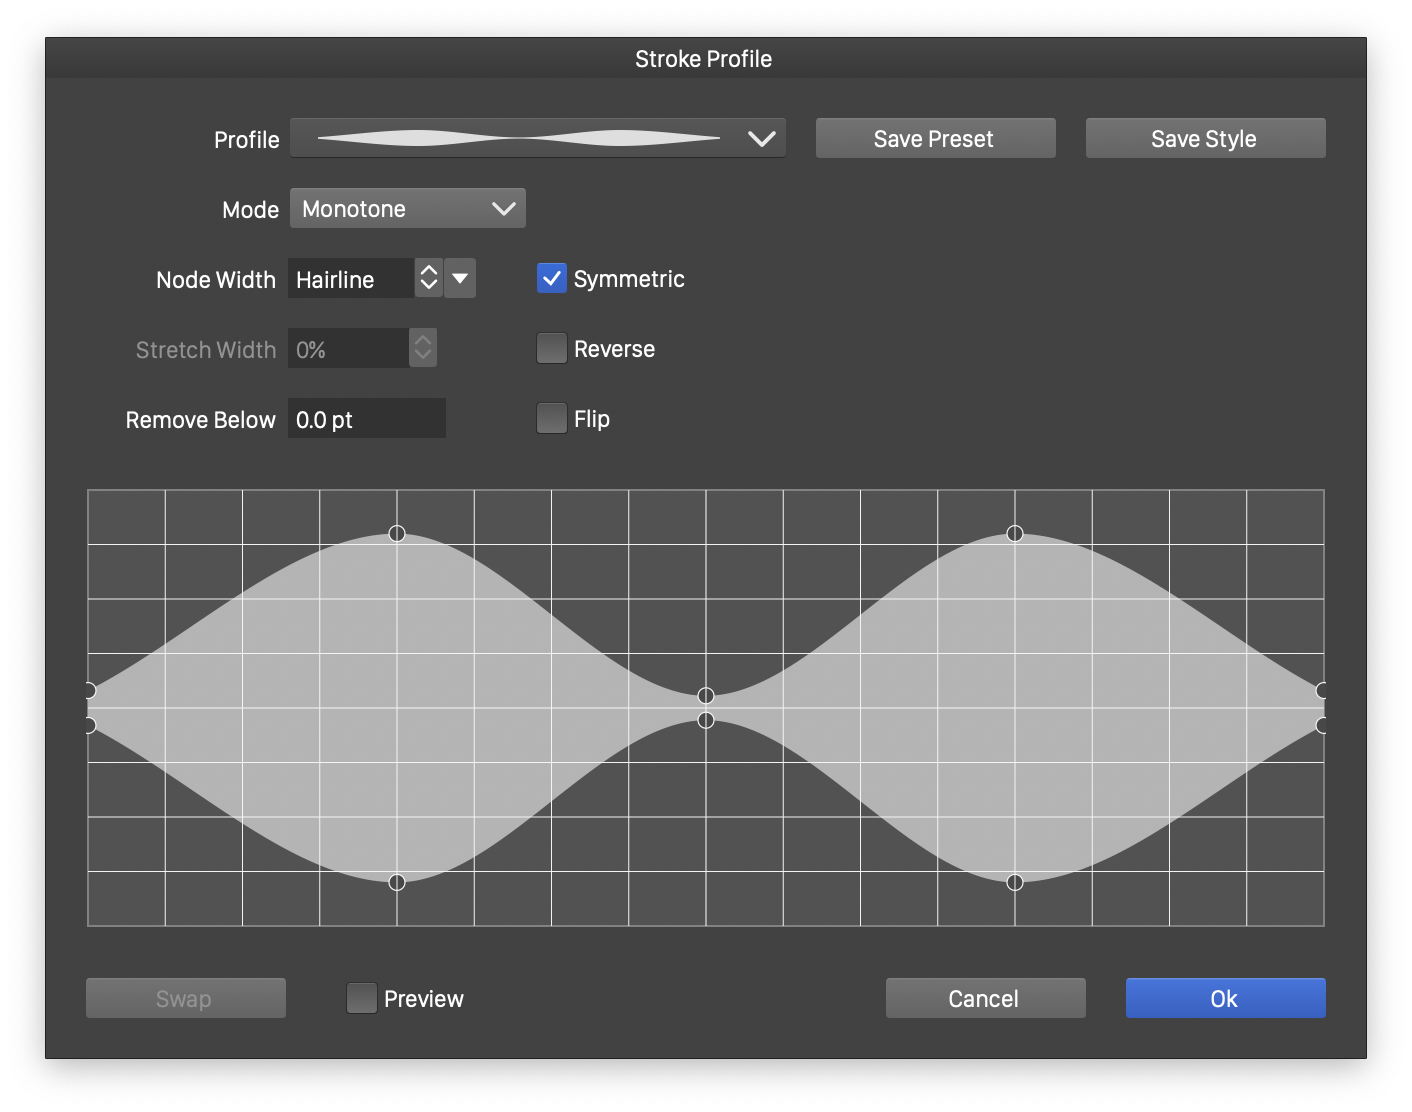
The variable width profile editor view.
The width profile editor contains the following options:
- Profile - Opens the list of existing profile presets and styles. Select a profile from this list, for reuse or changing.
- Save Preset - Create a new width profile preset with the current profile settings.
- Save Style - Create a new width profile style with the current profile settings. It is recommended that commonly used width profiles are stored as styles or presets, for easy selection and reuse. When using styles, modifying the style will update all instances of the width profile used in object stroke styles.
- Mode - Select the width variation mode. This can be Monotone, for smooth but restricted variation (restricted between two consecutive width amounts). Or can be Cubic, for smooth and unrestricted variation. In Cubic mode, the stroke width may be outside of two consecutive width nodes, to better approximate a smooth curvature.
- Node Width - Edit the width of the stroke at the selected node. This width is calculated using the relative width stretching at the selected node and the current stroke width. If a stroke width is not available, the absolute width is shown based on a stroke width of 1.0.
- Stretch Width - Edit the width stretching at the selected width node. The width stretching is shown as a percentage of how much the stroke width is reduced at the selected width node.
- Remove Below - Set the minimum possible stroke width at any location.
- Symmetric - Enable or disable the use of symmetric width profiles along the two sides of the outline stroke axis. When enabled, the two sides (shown as upper and lower in the preview area) will contain the same width nodes with the same amounts. When disabled, the two sides of the stroke axis may have different width nodes using different amounts.
- Reverse - Enable or disable the reversing of the variable width profile. Normally (when disabled), the width profile is used along the outline path in forward direction (from the start to the end of the outline). When enabled, this direction is reversed.
- Flip - Enable or disable the flipping of asymmetric variable width profiles across the outline stroke axis, while rendering.
- Swap - Exchange the two sides of an asymmetric width profile. This is similar to the Flip option, but it is done by exchanging the width nodes and therefore modifying the profile, instead of temporarily flipping while rendering.
The width profile nodes can be created, removed or edited interactively using the mouse in the width profile preview area:
- To select a width profile node, click on the node indicated with a small circle. The width and stretching at the selected node are shown in the Node Width and Stretch Width fields.
- To modify the location and the width at a node, select the node and drag with the mouse to a new location. To modify the width only (not the location) at a node, hold the Command (Mac) or Control (Windows) key while dragging the node.
- To remove a width node, select the node and press the Delete key.
- To create a new width node, click with the mouse at a location without a width node and start dragging the newly created width node.
The Width Tool
The Width tool, selected from the application tool box, can be used to interactively edit the variable width profile on the selected object outline. Editing the width profile on the outline allows for a more precise variable width profile control.
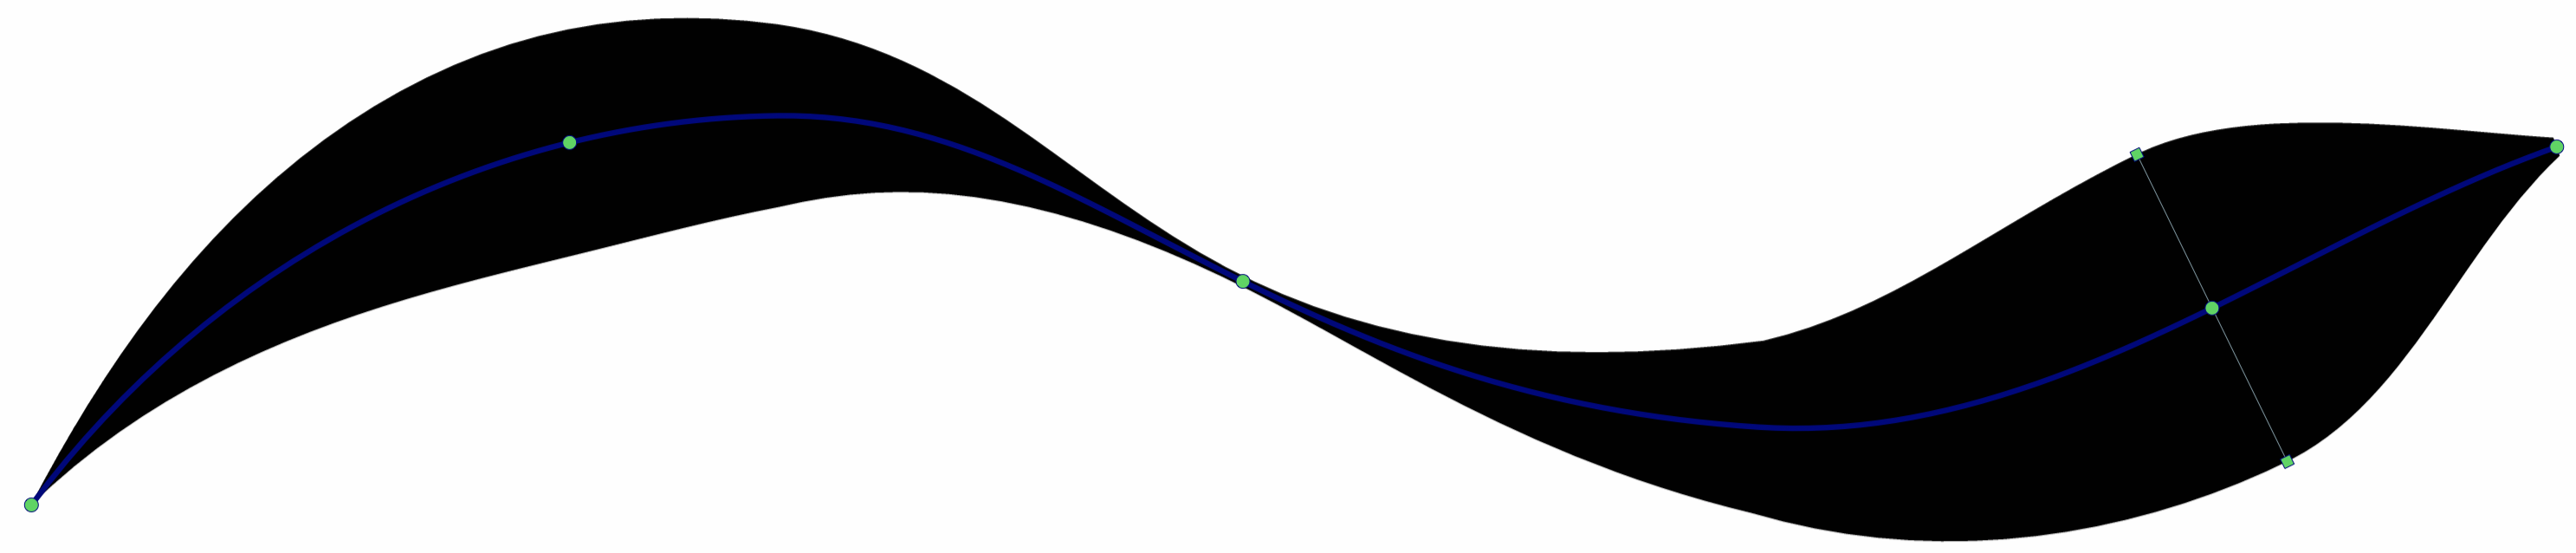
The width tool editing a variable width profile on the object outline.
When an object outline is selected using the width tool, the location of the width nodes are shown (small green circles) along the outline path. To edit the width profile node positions and width amounts, use the following steps:
- To select an object with the width tool, click on the outline of the object. The width tool will keep the previous selection, so that the same width profile can be applied on multiple objects.
- To deselect a selected object, click outside of the object area.
- To select a width node, click on the node shown on the outline axis. When a width node is selected, the stroke extent at that position is indicated by a line and two nodes.
- To change the width at a selected node, drag the handles shown at the end of the lines.
- To move the width node location along the outline, drag the handle at the center indicating the width node.
- To remove a width node, select the node and press Delete.
- To create a new width node, click at a location along the outline without a width node and start dragging.
The Stroke Width Panel
The Stroke Width panel can be used to select variable width profiles, and to set width profile options. The width panel is also used with the Width tool, to set the width at selected nodes. The panel can be opened using the Stroke Width command of the Window menu.

The variable width profile panel.
The width panel contains the following options:
- The top of the width panel previews the current stroke width profile in a drop box. Clicking the drop box opens a list of width profile presets and styles. Select a new width profile from the list to change the stroke width profile of the selected objects.
- Stretch Width - Edit the stroke width stretching at the selected width node.
- Node Width - Edit the stroke width value at the selected node. The width at the selected node depends on the overall stroke width (stroke panel) and the stretching at that node.
- Change Width - Edit the amount used to change stroke widths.
 - Increment the stroke width at the selected nodes by the change width amount.
 - Decrement the stroke width at the selected nodes by the change width amount.
- Tapering - Edit the tapering width used at the end of the stroke. If set to zero, no tapering is applied.
- Change Taper - Edit the amount of change applied to tapering, when increasing or decreasing the tapering width.
 - Increment the tapering width of the variable width profile.
 - Decrement the tapering width of the variable width profile.
 - Select all width nodes on the selected objects.
 - Swap the two sides of an asymmetric width profile. If the width profile is symmetric, this button is disabled.
 - Change between symmetric and asymmetric width profiles. In asymmetric width profiles, the two sides of the outline can have a different set of width nodes with different width amounts.
 - Reverse the direction of the width profile against the direction of the outline path.
 - Enable or disable the flipping of the asymmetric width profile sides.
 - Smooth the selected width profile nodes.
 - Move the selected width profile amounts towards average amounts.
 - Remove the width profile and select a solid stroke style.
 - Remove the selected width nodes from the variable width profile.
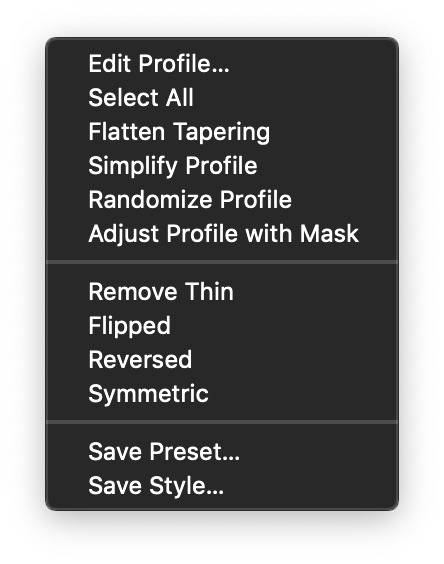
The width panel menu.
The width panel menu provides the following commands and options:
- Edit Profile - Open the width profile editor view to edit the options and nodes of the current variable width profile.
- Select All - Select all width nodes in the selected objects.
- Flatten Tapering - Convert the tapering amount applied at the end of the stroke into width nodes.
- Simplify Profile - Simplify the width profiles by removing some of the nodes.
- Randomize Profile - Add new profile nodes at random locations width random width, creating a rugged stroke effect.
- Adjust Profile by Mask - Uses an existing mask preset, style or object to adjust the variable width profiles on the selected objects. The mask must be a previously defined preset or mask style. It can also be a named object using the mask role.
- Remove Thin - Remove the width nodes at locations when the stroke becomes too thin.
- Flipped - Enable or disable the flipping of the asymmetric width profile sides.
- Reversed - Enable or disable the reversing of the width profile direction against the direction of the outline path.
- Symmetric - Enable or disable the symmetric profile mode. In symmetric profiles, the two sides of the stroke follow the same width variation. In asymmetric width profiles, the two sides of the outline can have a different set of width nodes with different width amounts.
- Save Preset - Create a new variable width profile preset from the current profile settings.
- Save Style - Create a new variable width profile style from the current profile settings.
Adjust Width by Mask
The stroke widths of selected objects can be modified into variable widths, by adjusting the local width amounts using gray level intensities of a mask object. This can be done by selecting the Adjust Profile by Mask command from the stroke width panel menu.
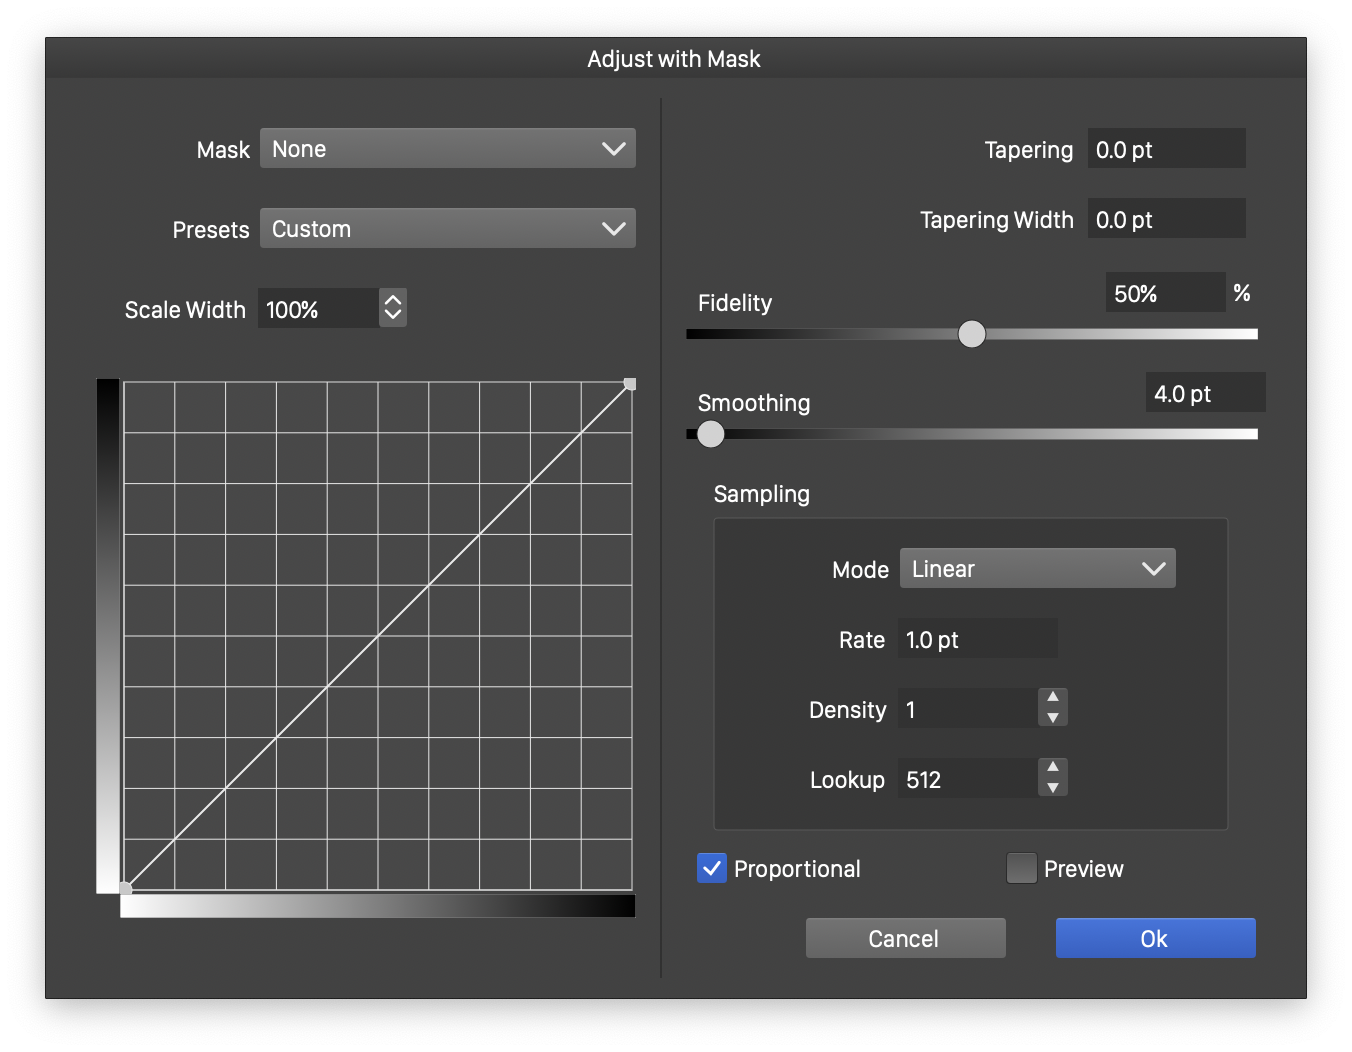
Adjusting the stroke widths using mask intensities.
The stroke widths are reduced at locations of low tone intensities in the selected mask. The mask can be any mask preset or style, previously saved in the Transparency panel. It can also be a named object having the Transparency Content role. The following options are used to control the width adjustments with a mask:
- Mask - Opens a list of transparency mask presets and styles, including object references using the Transparency Content role. A mask must be selected from this list to be able to adjust the stroke widths.
- Presets - Opens a list of stroke width adjustment presets. Presets can be created and reused to quickly apply width adjustments on multiple different object selections.
- Scale Width - Edit the strength of the changes applied to the stroke widths.
- The function editor area edits the transition between minimum and maximum stroke widths.
- Tapering - Edit the amount of tapering applied at the end of open paths.
- Tapering Width - Edit the width of the tapering applied at the end of open paths.
- Fidelity - Edit the fidelity of reproducing the desired stroke width variations using the minimum number of width nodes.
- Smoothing - Edit the amount of additional smoothing applied to stroke width nodes, to simplify the result.
- Sampling - Control the details of sampling the mask image to obtain stroke width variation intensities.
- Mode - Select the sampling mode.
- Rate - Edit the sampling rate along an outline path.
- Density - Edit the sampling density used to sample the intensity of a single width node.
- Lookup - Edit the size of the mask image used to render intensities of the selected mask style.
- Proportional - Enable or disable the proportional scaling of stroke shapes to the mask area.
The Width Brush
The Width Brush  tool is used to increment and decrement stroke widths interactively, by painting over the widths. The amount of width changes depends on the brush shape, proximity to the painting center, and the pressure applied by the tool.
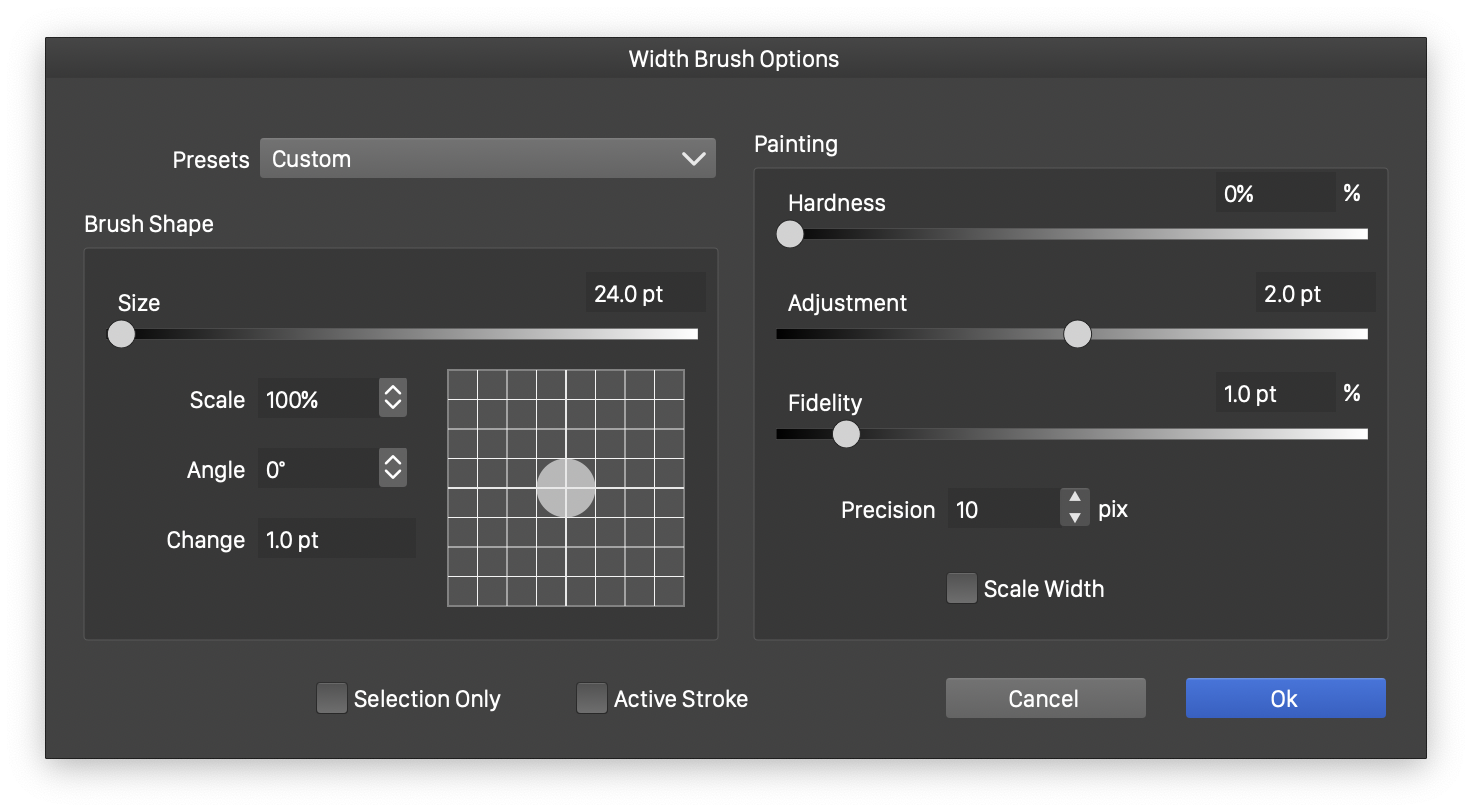
The width brush options.
To change the stroke widths using the width brush tool, paint over the stroke outlines at the locations where the change should be applied. The region of width changes is indicated by a red highlight. The widths are changed only when the mouse is released. Painting over a region multiple times will increase the amount of change applied to the stroke widths. If a pressure sensitive tablet is used, the pressure applied by the pen is considered in determining the size of the region where width changes are applied.
The amount of change applied to the stroke width, and whether these are decreasing or increasing the stroke width, can be set in the brush options view. The width brush options view can be opened by double clicking on the Width Brush tool.
The following width brush options are available:
- Presets - Open a list of width brush option presets. These can be created using the Save Preset command, to quickly reuse various width brush settings.
- Size - Edit the size of the width brush. The brush size determines the region where changes to stroke widths are applied.
- Scale - Edit the calligraphic brush shape scaling.
- Angle - Edit the calligraphic brush shape rotation.
- Change - Edit the amount of increment or decrement applied by the brush size, when pressing the { and } keys while using the width brush tool.
- The area previewing the brush shape can be used to interactively adjust the scale and angle values, by dragging the brush shape margin with the mouse.

The preview area can be used to interactively adjust the angle and scale.
- Hardness - Edit the width brush hardness, the variation of width changes from the center towards the margin of the brush.
- Adjustment - Edit maximum amount of adjustment applied to stroke widths. This can be a positive value to increase widths, and a negative value to decrease widths.
- Fidelity - Edit fidelity of reproducing width changes using the minimum number of new width nodes.
- Precision - Edit precision of approximating the brush trajectory with a free form path.
- Scale Width - Enable or disable the use of scaling in the width values. When enabled, width values are changed by scaling them using the adjustment amount. When disabled, the adjustment amount is added to the width values.
- Selection Only - Choose between modifying the stroke widths of the selected objects, or all objects.
- Active Stroke - Choose between modifying the stroke widths of the active stroke, or all strokes of an object with multiple stroke styles. The active stroke can be selected in the Appearance panel, by highlighting the stroke style that should be changed.
The Width Smooth Tool

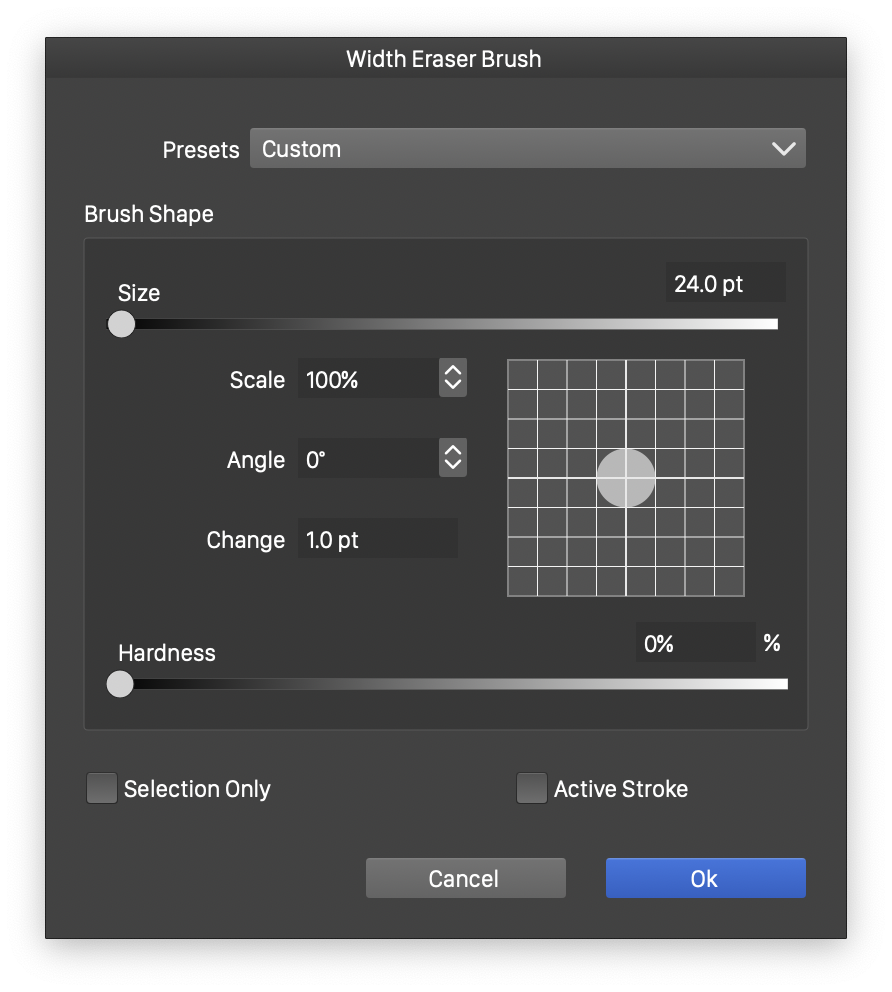
The width smooth tool options.
The Width Smooth  tool is used to smooth out variations of stroke widths, by painting over the stroke regions. The amount and strength of smoothing depend on the brush shape, proximity to the painting center, and the pressure applied by the tool. The width smooth tool will remove some of the width nodes, as a width variation is smoothed out.
To smooth out the variation on stroke widths using the width smooth tool, paint over the stroke outlines, at the locations where the change should be applied. The region of width smoothing is indicated by a red highlight. The widths are smoothed out only when the mouse is released. Painting over a region multiple times will increase the smoothing amount. If a pressure sensitive tablet is used, the pressure applied by the pen is considered in determining the strength of smoothing the stroke width nodes.
The width smooth tool options can be edited by double clicking on the tool icon. This opens the width smooth options view, containing similar settings as the width brush options view (see earlier), with the exception of the following:
- Window - Edit the size of the window (a neighborhood of width nodes), used to average and smooth out width nodes. The window extent is set in percentages relative to the outline path length.
- Factor - Edit the strength of the smoothing and removal of width nodes.
The Width Erase Tool
The width erase tool options.
The Width Erase  tool is used to erase variable width profile nodes, by painting over the regions of a stroke where the nodes should be erased. The width nodes are erased if they fall inside the region painted by the brush.
To erase stroke width nodes using the width erase tool, paint over the stroke outlines at the locations where the nodes should be erased. The region of width erasure is indicated by a red highlight. The widths are erased only when the mouse is released.
The width erase tool options can be edited by double clicking on the tool icon. This opens the width erase options view, containing similar settings as the width brush options view (see above).


