Object Styling
The appearance of objects and layers is controlled by various attributes, including style, transparency, and effects used on the object. An object with a shape may contain multiple fill or stroke styles, to create complex styling effects. The style and effect attributes of objects can be selected and edited using the various tools available in VectorStyler.
The object appearance attributes include:
- One or more fill or stroke styles, stacked in a specific order. Fill and stroke styles are used with the object shape, to draw an object.
- The shape effects applied on individual fill and stroke styles.
- The transparency mask settings of the object. The transparency mask can be edited using the tools described in the Transparency chapter.
- One or more image effects, adjusting the content of the object. For objects and layers with the Adjustment Layer option, the image effects will adjust the backdrop of the object or layer.
- Image effects can also be added as style adjustments.
- The opacity and blending mode of the object.
- The fill and transparency regions, used to select the reference area of an object.
The Appearance panel provides a common tool, to select and change the styling attributes of one or more selected objects in the current canvas. The multiple fill and stroke styles are listed for the selected objects. The object opacity, blending mode and transparency options are accessible from the Appearance panel, for each selected object. Each fill or stroke style can be assigned a separate transparency setting.
Image and shape effects can be applied on the whole object, or individual fill, stroke or brush contents of an object. Image effects applied to an object content will adjust the appearance of that content only, other fill, stroke or brush contents will be rendered with their effects and styles.
Using shape effects on an object content, alters the object shape for that content only. The object and its other content are rendered with the object shape.
The Appearance Panel
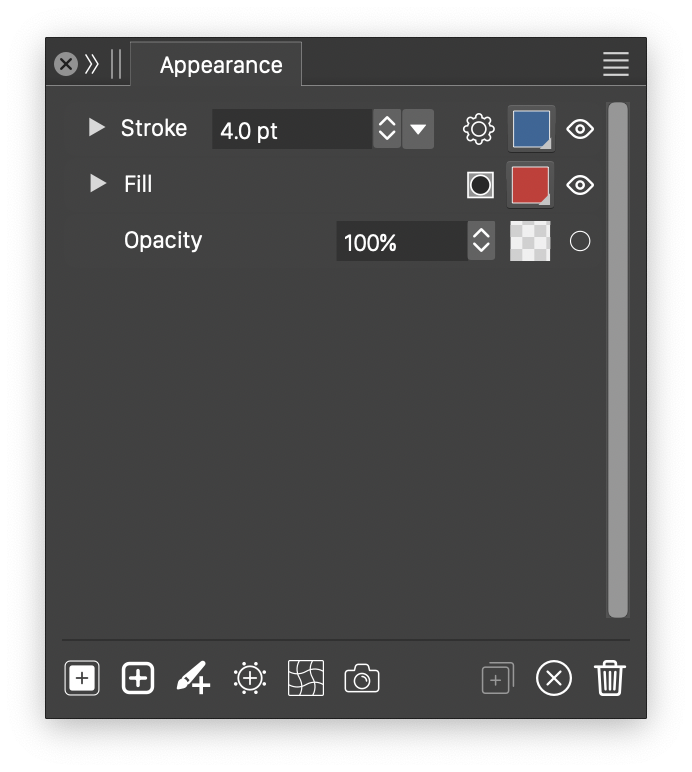
The Appearance panel.
The Appearance panel, accessed from the Window menu, is used to manage multiple fill, stroke and brush styles on a single object. The object content, including fill, stroke and brush styles, are listed under the object. The object transparency settings is shown in the last item under the object. Each object content item can be opened, to edit the transparency settings for that content only.
The objects, and their content is shown in a list, with the following options.
- For each fill content, or content that uses clipping, the
 button selects the fill rule between winding and even-odd modes.
 - If an object or content has image effects, the
 button is shown to edit the image effects.
 - If an object or content has shape effects, the
 button is shown to edit the shape effects.
 - Dragging and dropping a single style, or the whole object from the panel on an object on the canvas will copy the style or all styles to the targeted object.
When multiple objects are selected in the document, the Appearance panel will show a combination of the styles from the selected objects. When styles are different, the Appearance panel will show one of the styles, to enable easy selection and editing of the style.
Showing multiple objects separately can be enabled in the panel options Separate Object Styles option. Showing multiple objects, instead of merging the content styles into a single object, allows the dragging and dropping of content styles between objects. To copy or move fill, stroke or brush styles between two or more objects, select the objects, and open each object in the Appearance panel. Drag and drop a fill, stroke or brush style content from one object to an other. This allows an easy setup of complex object styling, by copying and reusing these styles from different objects. To setup the same complex styling on multiple objects, use the Copy / Paste Style commands, or use object styles or style presets.
Selecting Transparency

Each object, and every content of an object contains a row in the appearance panel, used to select transparency options. This row provides a preview and a quick access to various transparency settings of the object content. The details of the transparency options can also be set using the Transparency Panel.
- The content opacity can be set in the number editor, or adjusted using the slider button next to the editor.
 - Previews the current transparency mask, and if clicked, opens a popup menu with various transparency options. These options are the same as the ones described in the Transparency chapter.
 - Enable or disable the transparency mask.
Changing Fill Styles

When an object with one or more filled content is selected, the style list will contain a fill row, for each fill content under the object. The fill style, visibility and winding rule can be selected in the fill row.
- - Swap between even-odd or winding fill rule modes. The fill rule determines how a complex, self-intersecting shapes are filled.
 - Previews the current fill styles, and when clicked, opens a view to change the fill style. The fill style can be set to any available fill style.
 - Show or hide the fill content.
Changing Stroke Styles

When an object with one or more stroke content is selected, the style list will contain a stroke row, for each stroke content under the object. The stroke width, attributes, style and visibility can be selected in the stroke row.
 - Select the stroke width.
 - Opens the stroke attributes view. The stroke attributes view contains the same stroke properties as the Stroke Panel.
 - Previews the style used to fill the stroke shape. Clicking on the button opens the fill style view, to select a new style for the stroke.
- - Show or hide the stroke content.
Changing Brush Styles

When an object with one or more brush content is selected, the style list will contain a brush row, for each brush content under the object. The brush width, attributes, color and visibility can be selected in the brush row.
- The numeric field is used to edit or select the brush width.
 - Opens the brush style view. The brush attributes view contains the same brush properties as the Brush Style Panel.
- - Previews the current brush color. Clicking on the button opens the color view, to select a color for the brush.
- - Show or hide the brush content.
Symbols and References

When a symbol instance is selected, the appearance panel will contain a row showing the symbol reference as an object content. The symbol reference can be changed to an other existing symbol, or object reference with a symbol role.
- The drop box contains a list of available symbols in the current document. Open the list, and select an other symbol, to replace the content of the current symbol instance.
- - Swap between even-odd or winding fill rule modes. The fill rule determines how a complex, self-intersecting shape is clipped.
- - Show or hide the symbol reference content.
Image and Linked Content

When an image or linked content object is selected, the appearance panel will contain a row, showing the image or linked content choice. The image can be changed to an other image, available in the document. The Content Panel can be used to manage images and linked content of a document.
- The drop box contains a list of available images (or linked content) in the current document. Open the list, and select an other image, to replace the content of the current image object.
 - Select the rotation angle of the image or linked content inside the object.
- - Swap between even-odd or winding fill rule modes. The fill rule determines how a complex, self-intersecting shape is clipped.
- - Show or hide the image or linked content.
Expanded Stroke
In VectorStyler, the stroke of an object can be expanded into editable curves using the Expand Stroke command. This command is destructive and will remove the existing fill style, leaving the object with a shape resulting from the stroke expansion and a fill style form the stroke style.
A non-destructive Expand Stroke can also be added to an object. This will leave the object shape in its original form, while letting the stroke be styled and distorted as a regular object shape.
To add a non-destructive Expand Stroke to the selected object, select a position in the Appearance panel and select the Expanded Stroke option from the panel menu. This will dynamically augment the object shape to be the expansion of a stroke at the selected position.
The stroke expansion effect can be removed, by selecting it in the Appearance panel and deleting it.
Shape Adjustment Effects
The shape of individual styles can be distorted with any shape effect, using the Appearance panel shape effect feature. But such effects will apply to a single styling item only.
To distort multiple object style shapes with one effect, use the Shape Adjustment Effects  feature from the Appearance panel icon bar. This will add a new shape effect as an adjustment effect to the list of object styles. The shape adjustment effect will change the shapes of the styles placed below the effect in the Appearance panel list.
The shape adjustment effect can be edited by clicking on the effect icon in the adjustment effect row of the Appearance panel list. Multiple shape effects can be combined into a single adjustment effect group.
Appearance Panel Options

The Appearance panel appearance can be customized using the Panel Options command from the panel menu. The following panel options are available:
- Limit - Sets the maximum number of object styles shown in the appearance panel. This limit can be set to larger values, allowing for the editing of more object styles. Showing only a small number of objects (eight is the default), allows for a more focused view over object styling, when dragging and dropping styles from one object to another.
- Item Size - Edit the size of a row in the appearance panel. The size can also be set to a predefined value, from the drop box.
- Font Size - Edit the size of the font, used to show the object name and the content type.
- Indent - Edit the amount of indentations, used to show the member contents of an object.
- Show Preview - Enable or disable the display of object preview, in the object rows.
- Preview Image Effects - Check to preview image effects in the Appearance panel preview icons, available when Separate Object Styles is enabled.
- Open Large Preview - Check to open a large preview when clicking on the preview icon, available when Separate Object Styles is enabled.
- Separate Object Styles - Check to preview image effects in the Appearance panel preview icons.
Appearance Panel Commands
The Appearance panel provides a number of quick access commands, in the icon section at the bottom of the panel. The following style editing commands are available:
 - Create and insert a new fill content into the selected object. The style used in the fill content can be adjusted in the new fill row.
 - Create and insert a new stroke content into the selected object. The width, attributes and style used in the stroke content can be adjusted in the new stroke row.
 - Create and insert a new brush content into the selected object. The width, attributes and color used in the brush content can be adjusted in the new brush row.
 - Create and insert a new style adjustment image effect, into the list of object styles. Style adjustment effects are used to adjust styles below the effect in the style stacking order.
 - Create or edit shape effects associated with selected style item.
 - Create or edit image effects associated with selected style item.
 - Duplicate the selected content in the object. Duplicating a content can be used to create multiple content of a style in a single object.
 - Remove all extra content from the selected objects. Removing extra content will leave the object with at most one fill, stroke or brush content, and a container content if the object is a group or image container.
 - Remove the selected content from the object.
Appearance Panel Menu
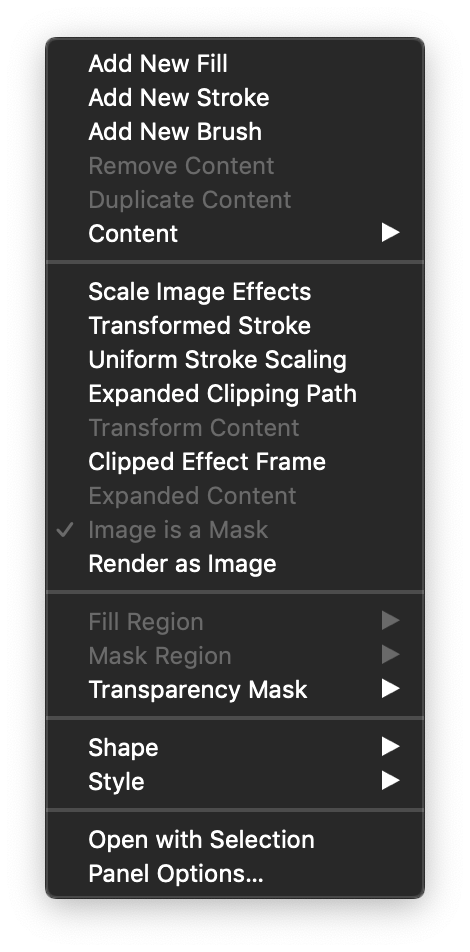
Managing the content
- Add New Fill - Create and insert a new fill content into the selected object.
- Add New Stroke - Create and insert a new stroke content into the selected object.
- Add New Brush - Create and insert a new brush content into the selected object.
- Remove Content - Remove the selected content from the object.
- Content - Select object content options.
- Clear Content - Remove all content from the selected objects. The object becomes an empty shape.
- Clear Extra Content - Remove all extra content from the selected objects. Removing extra content will leave the object with at most one fill, stroke or brush content, and a container content if the object is a group or image container.
- Clear Content Area - Remove content cropping adjustments.
- Clear Content Transform - Remove any additional transformation from an image or linked content.
- Expand Cloned Content - Copy and detach the cloned content of an object.
- Restore Cloned Content - Restore the content of cloned objects, to the same state as the source object.
Content options
- Transform Image Effects - Enable to disable the scaling of image effect parameters for the selected object or content.
- Transformed Stroke - Enable or disable the transformation of stroke attributes inside the object.
- Uniform Stroke Scaling - Enable or disable the uniform scaling of transformed stroke widths.
- Transform Content - Enable or disable the transformation of the object content with the object shape. When enabled, the scaling, skewing and rotation transformations made on the object shape, are also applied to the object content like gradient or pattern fill.
- Clipped Effect Frame - Check to apply shape effects to the boundary of clipping shape of clipped groups. If unckecked, shape effects are applied to the bounding box of all objects inside a group.
- Expanded Content - Keep a copy of the linked vector graphics content in memory, to be adjusted by shape effects when the Transform Content is enabled.
- Image is a Mask - Use image content as a mask.
- Render as Image - Enable or disable the image rendering of the selected object. When enabled, the object is composited into an image, and the image is cached for future displaying operations. The image is refreshed when the object is changed.
- Fill Region - Open a menu of fill region options, to set the filling area of the selected object. Fill regions are described below in more detail.
- Mask Region - Open a menu of transparency mask region options, to set the masking area of the selected object. Mask regions are described below in more detail.
- Transparency Mask - Select transparency mask options.
Changing shape
Select the shape adjustment options from the Shape menu.
- Shape Styles - Open a menu of available shape styles, that can be used to set the shape of an object. If a layer or a group is selected, selecting a shape style will set the clipping shape.
- Shape References - Open a menu of available objects with the Shape role. These shapes can be used to set the shape of objects, or the clipping shape of layers or groups.
- Clear Shape - Remove the shape from the clipping shape from selected layers or objects.
- Create Shape Style - Create a new shape style, from the shape of the selected object. Shape styles can be used to set the shape of objects, from the Layers or Shape panels.
- Create Shape Presets - Create a new shape preset, from the shape of the selected object. Shape presets can be used to set the shape of objects, from the Layers or Shape panels.
- Shape Presets - Open a menu of available shape presets. These shapes can be used to set the shape of objects, or the clipping shape of layers or groups.
Managing styles
Select the style adjustment options from the Style menu.
- Create Content Style - Save the selected object content (fill, stroke or brush) as a style. Object content styles can be reused in other objects. Changes made on an object content style are automatically mirrored on all objects using that style.
- Create Content Preset - Save the selected object content (fill, stroke or brush) as a preset. Object content presets can be reused in other objects, by copying the content.
- Create Style - Create a new object style from the selected object. Object styles contain the various fill and stroke styles, transparency masks and effects of an object. Object styles can be reused on multiple objects. Styles are linked to a common definition. When using styles, the changes to an object style will be mirrored on all objects using that style.
- Create Style Preset - Create a new object style preset from the selected object. This is similar to the linked object styles, except that when using presets, changes of the preset are not mirrored on all objects using that preset.
Panel options
- Open with Selection - Open a new Appearance panel, fixed to the selected objects. Multiple appearance panel instances can be opened, to drag and drop content from specific objects of a document, to the selected object shown in the main appearance panel. Working with multiple appearance panels is described below in more detail.
- Panel Options - Open the panel options view, used to edit the various options of the Appearance panel.
Fill and Mask Regions
When an object is filled with a gradient, tiling pattern or noise fill style, the position of the fill geometry (gradient center or tiling pattern margins) is determined by the object shape and bounding box. Similarly, when using complex transparency masks, the mask is aligned to the object bounding box.
When using the same fill or mask style in multiple objects, in some cases it is preferred that these fill or mask styles are aligned seamlessly, regardless of the object positions. For example, using a gradient on two different objects (that may partially overlap), the gradient can be set to be a continuation from one object to another.
Fill and mask regions are used to position the fill and transparency mask of an object to a fixed reference frame, independent of the object position. The fill region can be set from the Fill Region menu. The mask region can be set from the Mask Region menu. The options are similar for both fill and mask regions.
The following fill or mask region options are available:
- By default, the fill and mask region is inherited from the container object. This is a group or layer that defines a fill or mask region. If no group or layer defines a region, the region will be the object shape.
- If None mode is selected, the region will be the object shape, regardless of what region is set in the parent object. This option clears the fill region for objects inside a group or layer.
- If Current Region mode is selected, the fill or mask region is inherited from the container object. This is the same as the default behavior.
- If Object Shape mode is selected, the fill or mask region will be the object shape, regardless of the region defined by a container object. This option is used to override the common fill region, inside a group or layer content. If a group or layer object sets a fill region, other than the default mode, all of its member objects will use that region. If the selected member objects should use their own shape as the fill or mask region, use the Object Shape mode.
- If Member Shapes mode is selected, the fill or mask region will be set to the region defined by all the member objects inside a group or layer. Use this option on a group or layer, to make all fill or mask regions inside the group or layer, share the same area.
- If the document contains objects with the Fill or Mask Region role, or shape styles, these will be listed in the fill or mask region mode menu. Selecting a specific shape, will set the fill or mask region to the region covered by the shape. This option can be used to set the fill or mask region to an area defined by an other object or shape.
Region Example 1:
In this example, the fill region is shared by all objects inside a group, and the region is defined by the object group frame. When filling objects inside this group with the same gradient or tiling pattern fill styles, these will overlap seamlessly.
- Select the objects that will share a fill region.
- Group the objects into a single group.
- Select the group, and set the Fill Region mode to Member Shapes.
- Apply the same gradient style to two or more objects inside the group.
- The gradients will render seamlessly over multiple overlapping objects.
The same technique can be used to create seamless transparency masks over multiple objects inside a group. The content of a layer can also share a fill or mask region, by setting the region mode for the layer.
Region Example 2:
In this example, the fill region is set to the region defined by a single object shape. Multiple objects will share the same region. The objects remain independent, no grouping will be necessary.
- Create a new rectangle shape, with no fill and no outline. The object can also be filled or outlined, if it is not printed or exported, or the object is placed on a reference canvas.
- Use the Object Options command from the Object menu, to set the object name and role. Set the object role to Fill or Mask Region.
- Select the objects that should have a common fill region.
- Select the fill region from the Fill Region menu to be the name of the object drawn earlier.
- The above two steps can be made separately for objects that should use the same fill region.
- The region of objects can be changed later, and new objects may be set with the existing region defined by the rectangle.
- Use the same fill style in these objects, to enable a seamless overlapping of object fills.
The same region option can be applied to objects inside a layer, or to transparency masks, to enable seamless overlapping of similar fill styles.
Multiple Appearance Panels
Multiple instances of the Appearance panel can be opened and fixed on specific object selections. These extra appearance panels will show the content of the objects they were opened with, regardless of the current selection in the document.
Opening extra appearance panels can be used to easily copy and paste fill, stroke or brush content styles from a fixed object to the currently selected object.
- Select the object (or objects) with the fill, stroke or brush content that will be reused.
- Open a new appearance panel fixed on the selected objects, using the Open with Selection command from the appearance panel menu.
- A new appearance panel is opened, showing the same objects as the main appearance panel.
- Select the objects on the canvas, whose style or content should be changed.
- The main appearance panel shows the new object selection, while the extra appearance panel shows a fixed object.
- Drag and drop content items from one panel into the other one, to adjust the object styling.
- The fixed appearance panel may contain objects from an other opened but inactive document.


