Paragraph Options
The details of the paragraph formatting options, can be edited using the Paragraph Options command from the Text menu. This opens the Paragraph Style view, containing the paragraph formatting options organized in sections. The Paragraph Style view is used also when editing a paragraph style in the Paragraph Styles panel.
The following common options are available in the Paragraph Style view:
- Style - Open a list of paragraph formatting presets and styles. The Create Style command saves the current paragraph options as a new paragraph style. The Create Preset command saves the current paragraph options as a new paragraph preset. Typically, paragraph formatting options are saved and reused as styles.
- The left side of the view contains the list of sections with paragraph formatting options. Select a section to edit the respective formatting options.
- Changes - Open a menu of paragraph formatting option names, to enable or disable the selection of specific options. When applying paragraph options (or creating paragraph styles), it is possible to change only a subset of options, leaving the other formatting options as they were on the selected text. By default, the option changing is automatically enabled, when the corresponding value is changed in one of the sections of the view. Options can be individually enabled or disabled, by checking or unchecking in the menu opened with the Changes button.
- Preview - Enable or disable the previewing of selected paragraph formatting options.
General Options
The General section of the Paragraph Style view contains common paragraph formatting options.
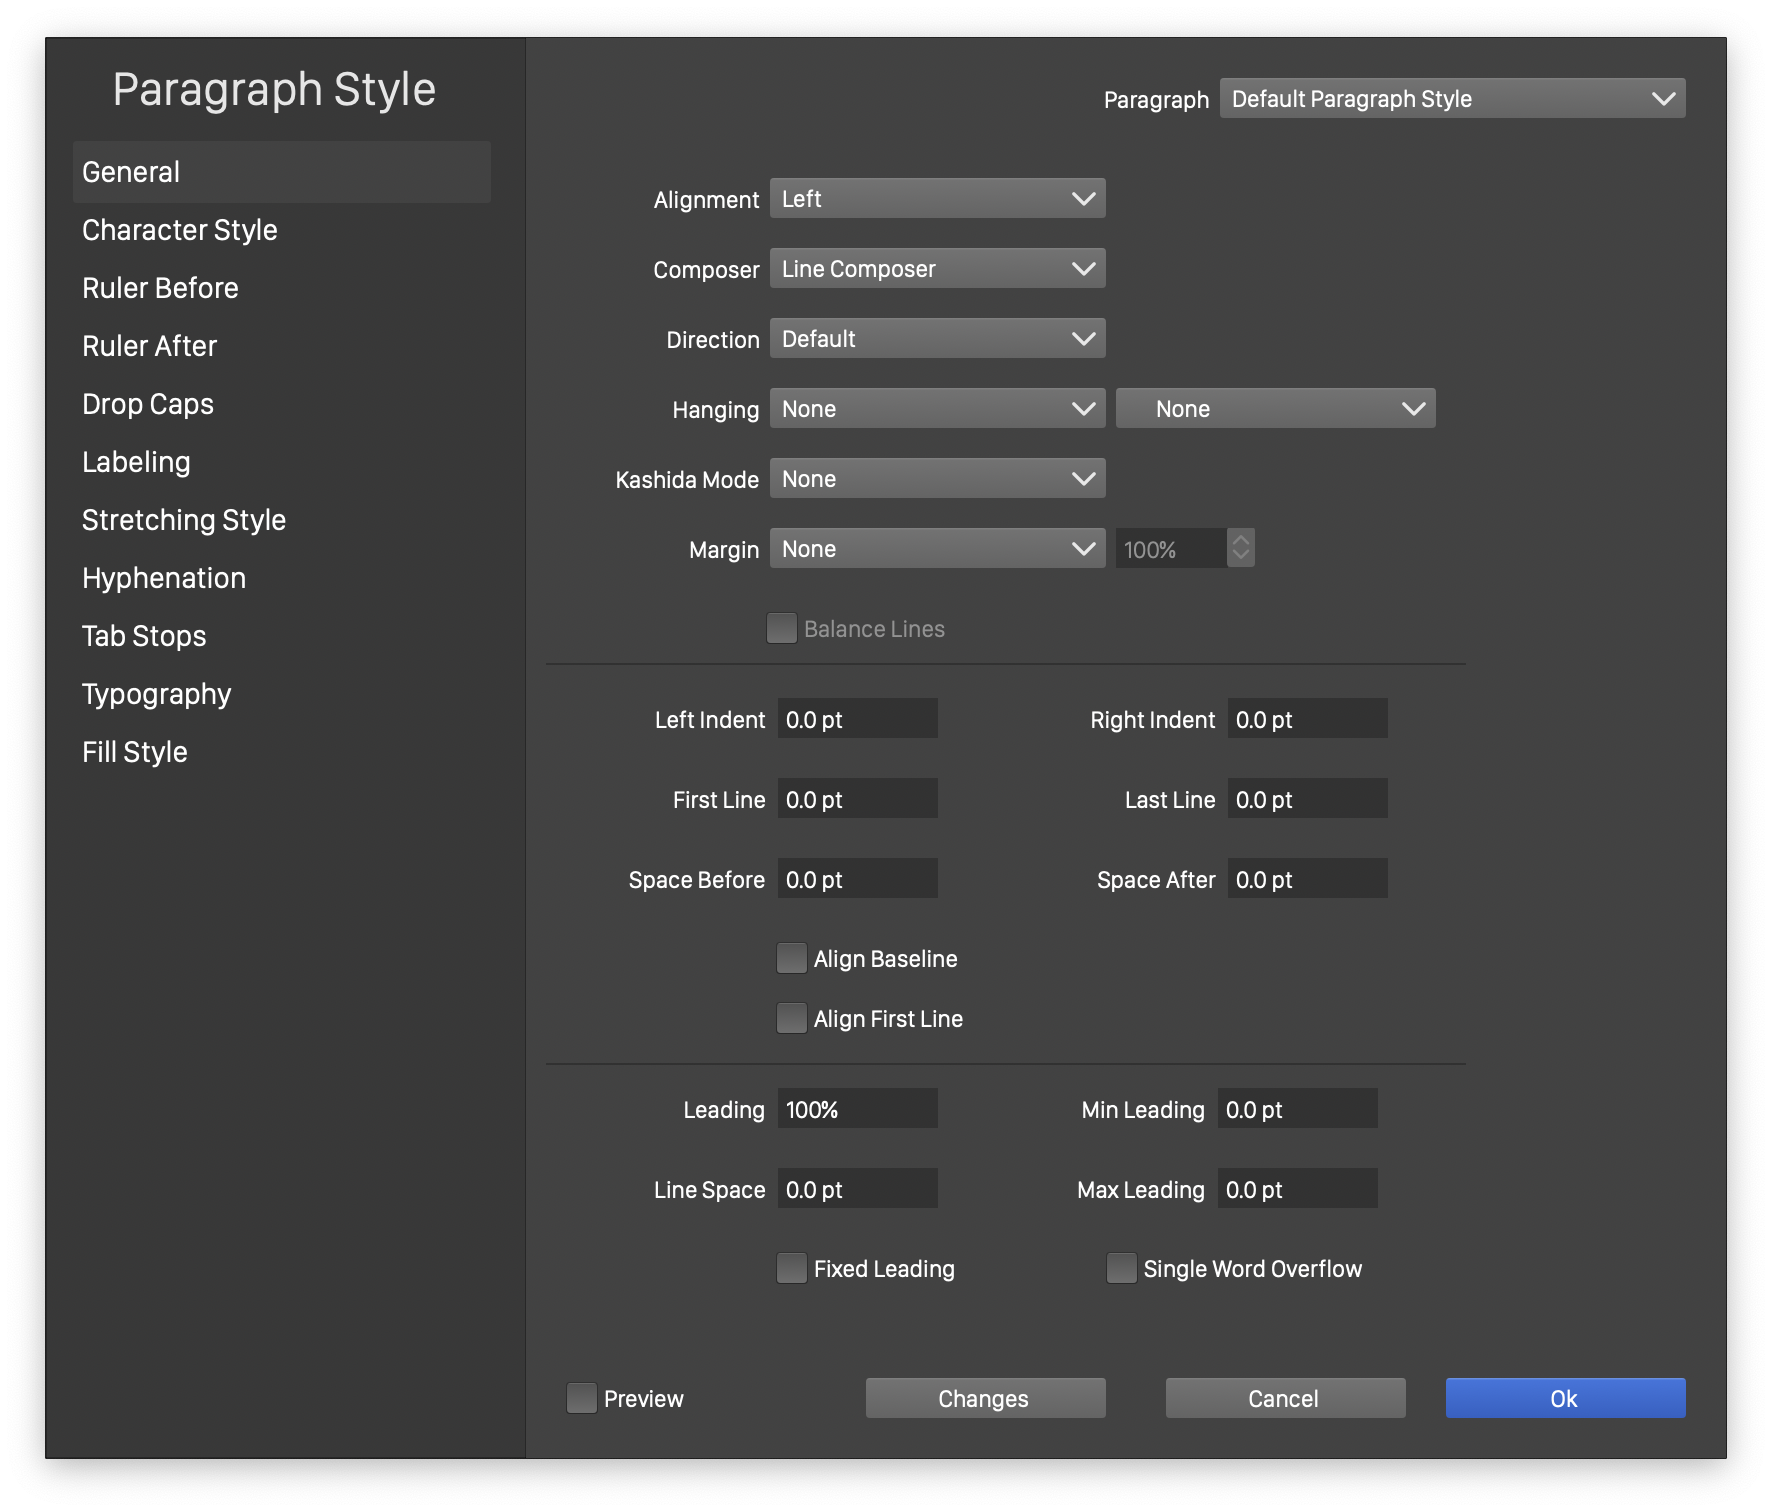
The General section of the Paragraph Style view.
- Alignment - Select the paragraph text alignment.
- Composer - Select the paragraph composition mode. This can be Line or Paragraph composer. The paragraph composer creates line breaks in a paragraph, by optimizing a penalty caused by the stretching of word and character spaces, scaling of glyphs or inline shapes, or hyphenation.
- Balance Lines - Enable or disable the balancing of lines when using paragraph composer.
- Margin - Select the glyph margin mode and amount. The margin is used to align the glyphs at the left and right edges of the paragraph. The following margin modes are available:
- None - Align the glyphs using glyph properties from the font.
- Glyph - Use the glyph shape to determine a margin.
- Optical - Use the optical properties of the glyph shape to determine the margin.
- Glyph Area - Use the width and height of the glyph shape, to determine the margin.
- Left Indent - Edit the amount of indentation on the left side.
- Right Indent - Edit the amount of indentation on the right side.
- First Line - Edit the amount of indentation used at the first line of text in the paragraph.
- Last Line - Edit the amount of indentation used at the last line of text in the paragraph.
- Space Before - Edit the amount space before the paragraph.
- Space After - Edit the amount space after the paragraph.
- Leading - Edit the amount of leading used by the paragraph lines. This is given in percentages, relative to the automatic leading obtained from font heights.
- Line Space - Edit a fixed amount of extra line space, added to the leading of the paragraph lines.
- Min Leading - Edit the minimum absolute leading in the paragraph.
- Max Leading - Edit the maximum absolute leading in the paragraph.
- Fixed Leading - Enable or disable the use of fixed leading. When enabled, the leading will be fixed over the whole paragraph and will not depend on character height overrides.
- Single Word Overflow - Check to allow a single word to overflow the text frame.
Character Style
The Character Style section edits the default character style used in the paragraph text. The options selected here are also described in the Character Options section.
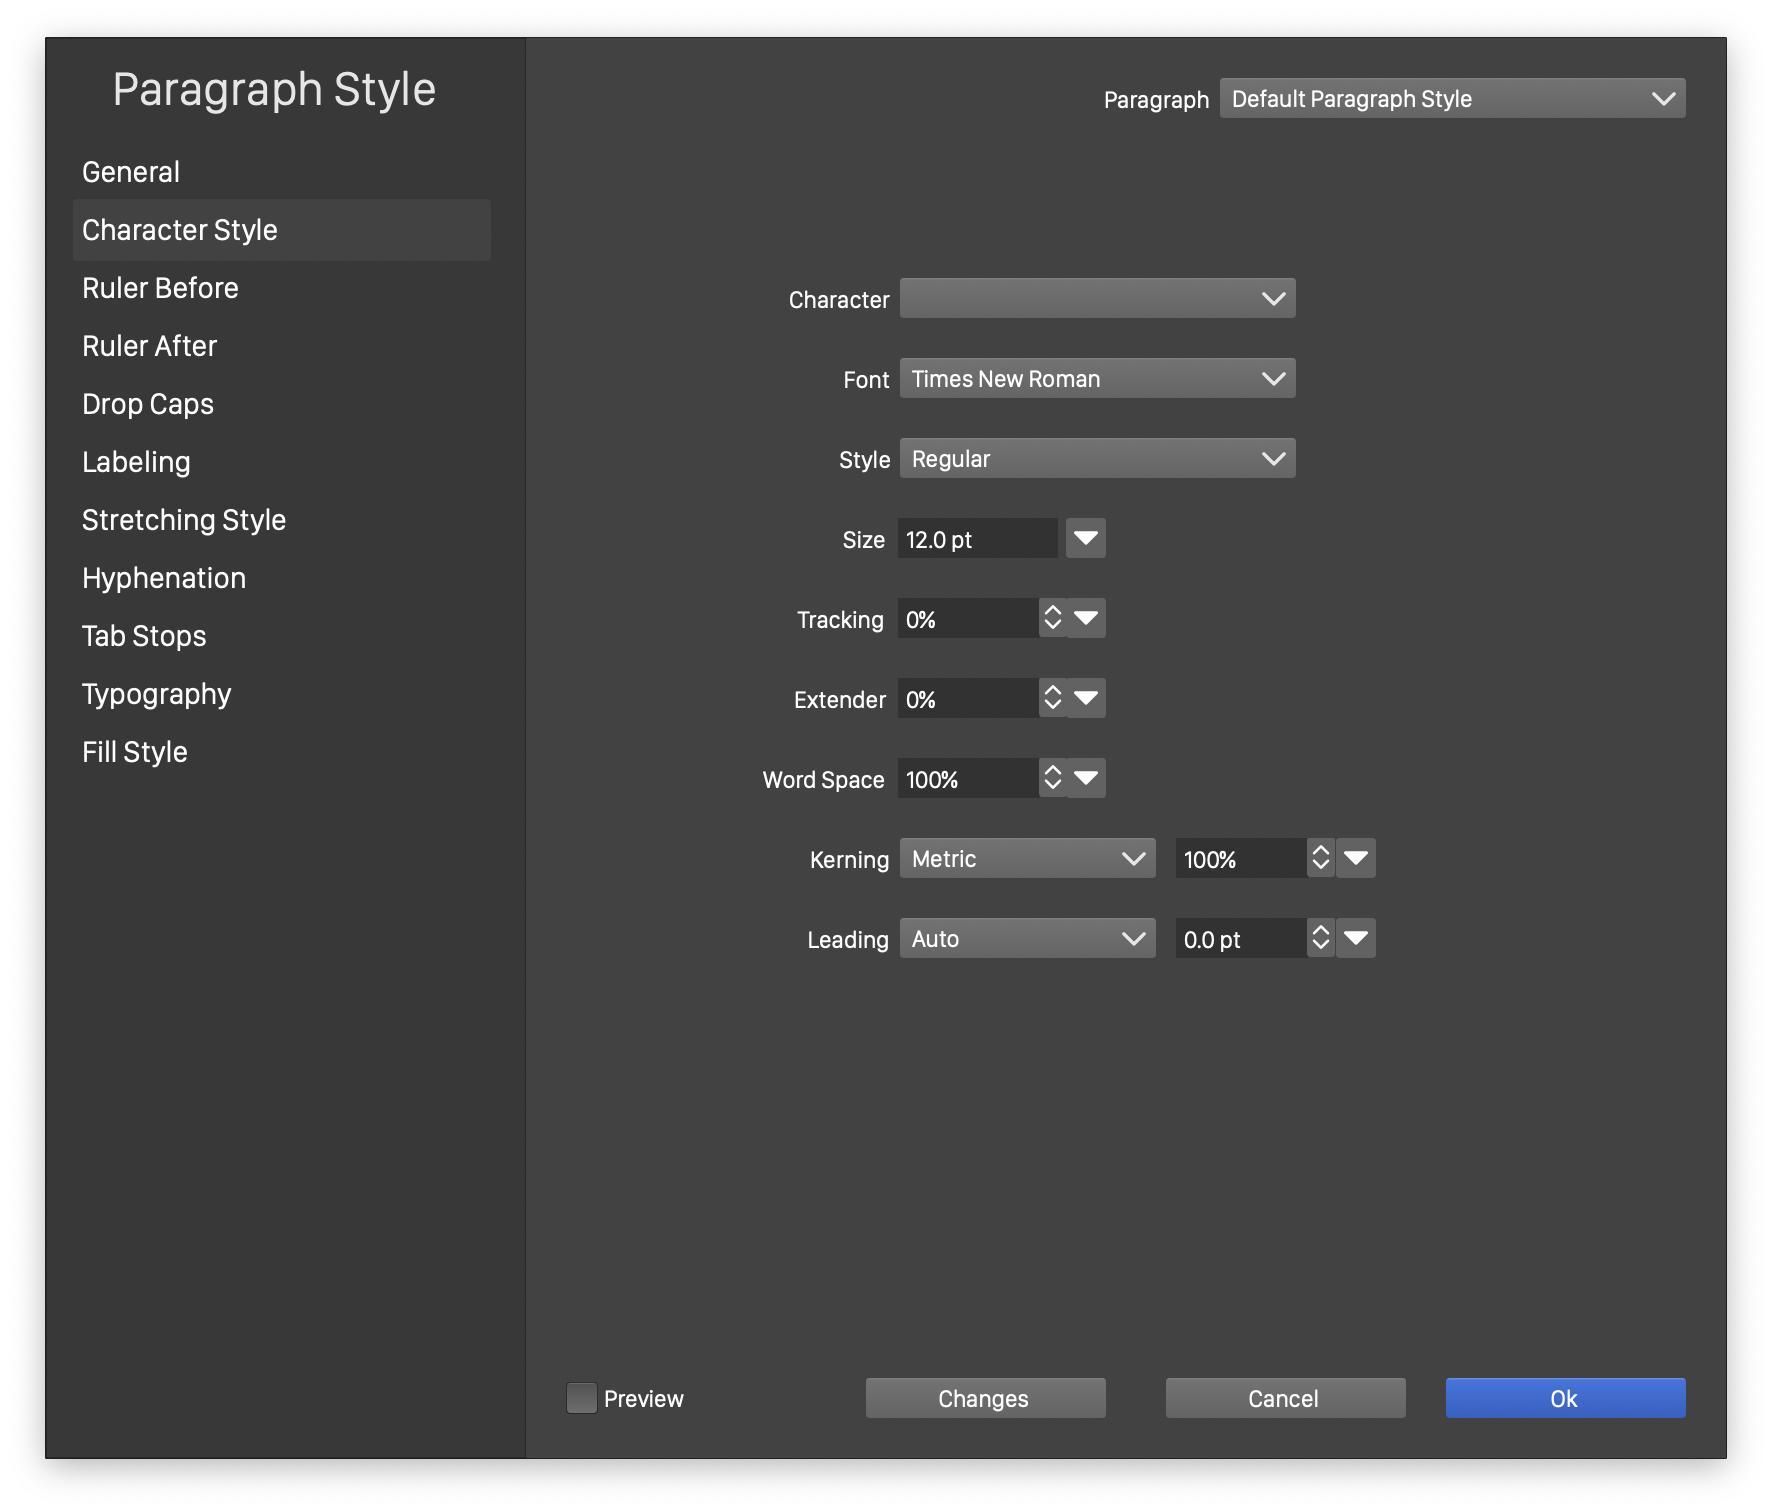
The Character Style section of the Paragraph Style view.
- Style - Open a list of character formatting styles and presets. Character styles can be created and managed using the Character Styles panel. It is recommended, that the default character formatting options of a paragraph style are set using a previously defined character style.
- Font - Open the font selector view, to select the font family and style. The font selector is described in more detail in the Fonts section.
- Style - Open the available font styles. The name and shape of font styles depend on the selected font family.
- Size - Select or edit the font size.
- Tracking - Edit the uniform character spacing.
- Word Space - Edit the spacing between words.
- Kerning - Select the kerning mode for the characters. The kerning is a glyph specific spacing, between pairs of glyphs. The following options are available:
- None - there is no kerning between glyphs.
- Font - the kerning pairs, defined in the font, are used to space pairs of characters. This can be increased or decreased, using the amount in the numeric field.
- Optical - the kerning pairs are calculated using an optical method over the shape of the two glyphs. The resulting kerning can be increased or decreased, using the amount in the numeric field.
- Leading row is used to set the character leading, the spacing between lines of text. The leading can be:
- Auto - for automatic leading, here the line spacing is calculated based on the leading amounts from the font, plus the user defined value.
- Fixed - the line spacing is set to a fixed amount.
- Height - the line spacing is set to the font XHeight plus a fixed amount.
Paragraph Rulers
The Ruler Before and Ruler After sections edit the paragraph rulers added before and after the paragraph. Paragraph rulers are lines, used to separate paragraphs.
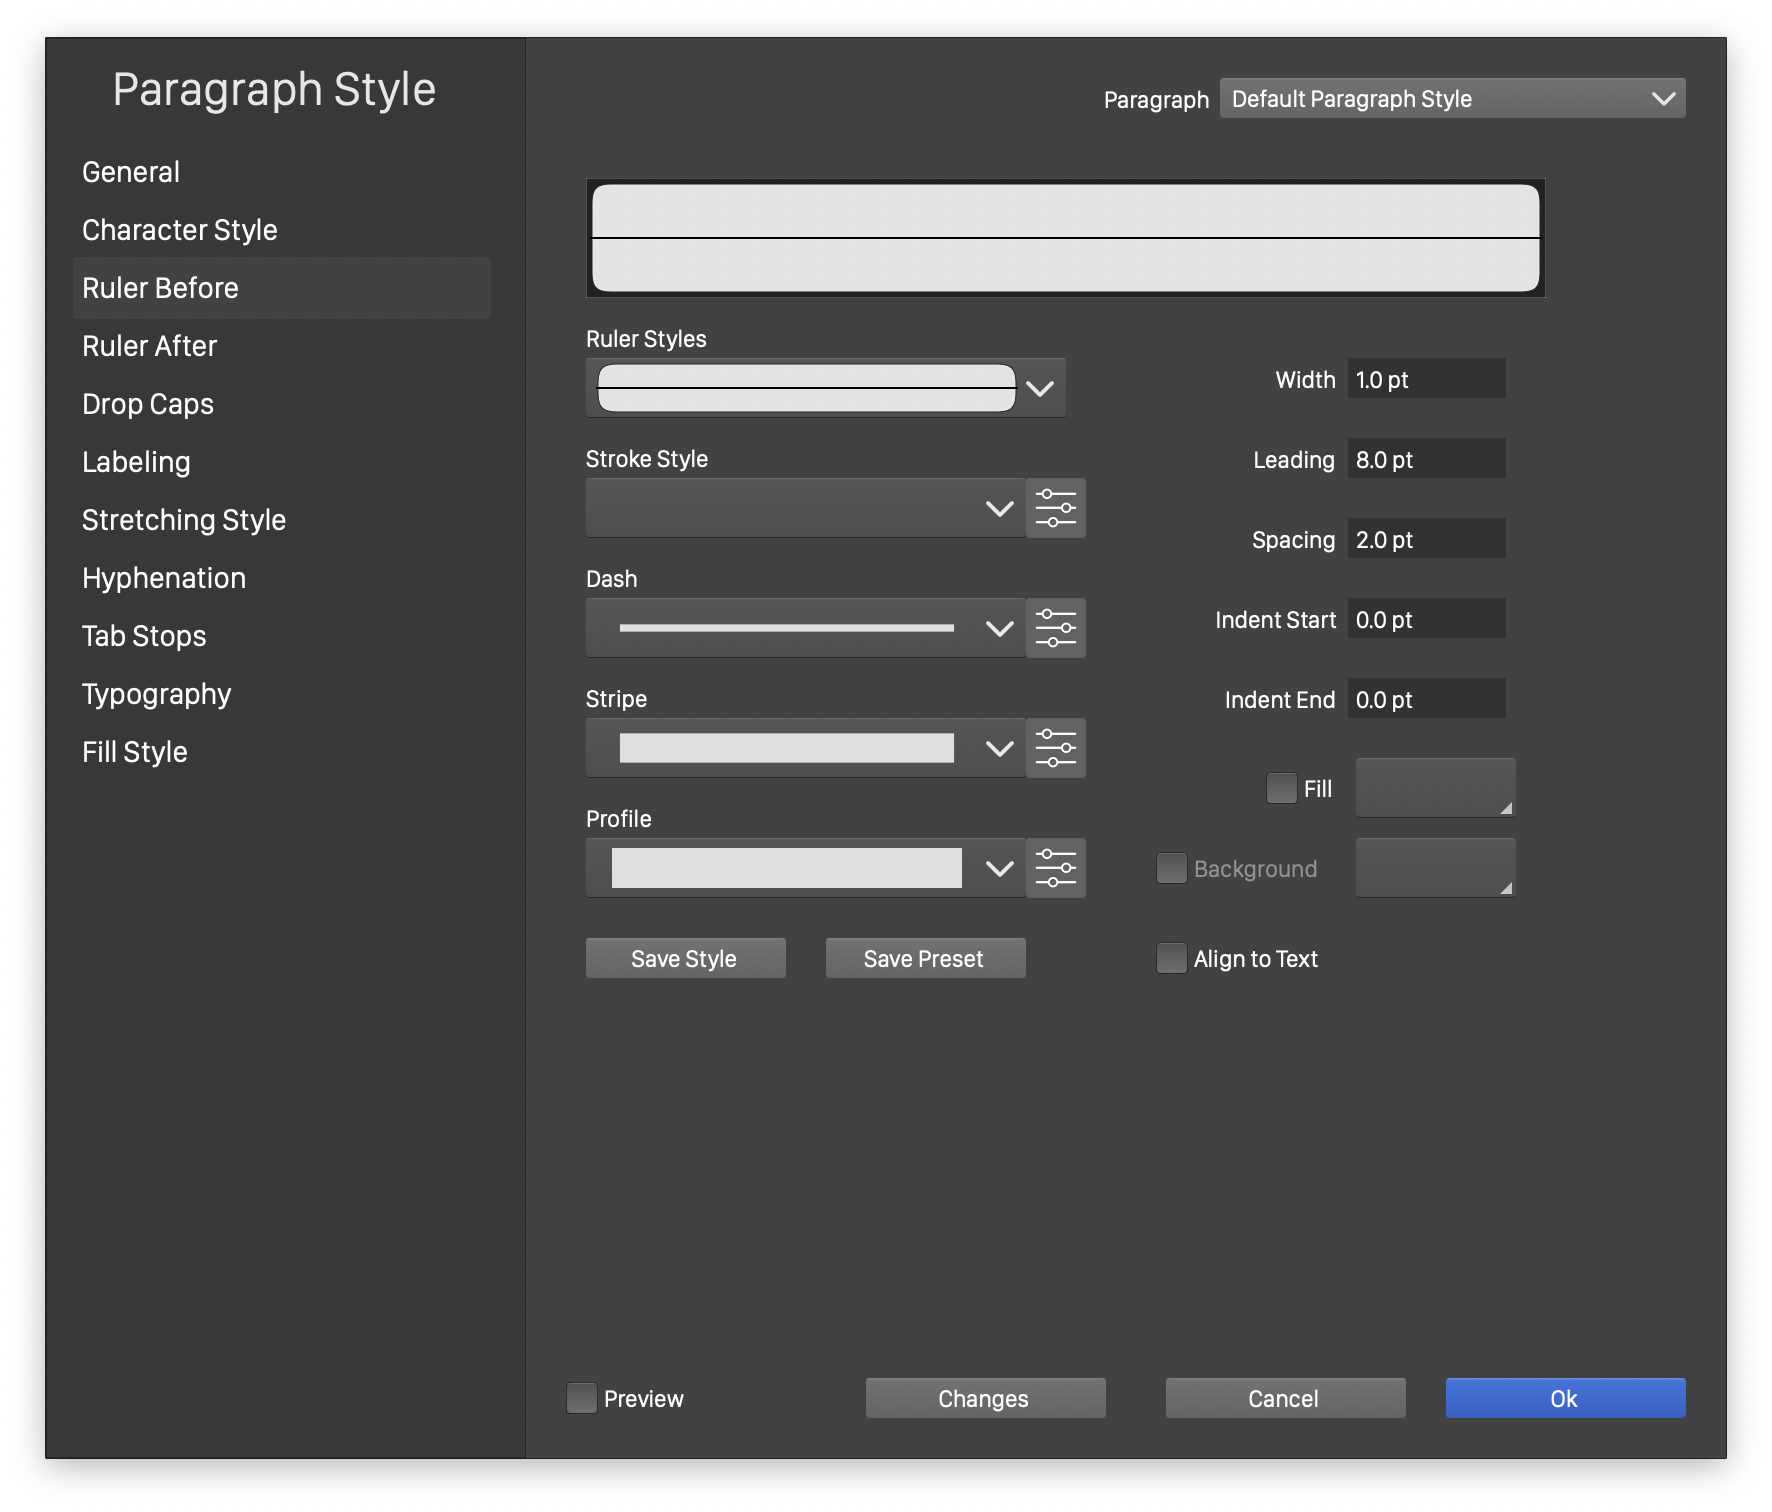
The Ruler section of the Paragraph Style view.
- Ruler Style - Open a list of ruler styles and presets.
- Stroke Style - Open a list of stroke styles and presets, that can be used to create paragraph rulers. The
 button next to the stroke style drop box is used to edit all the stroke options used in the paragraph ruler line.
 - Dash - Open a list of dash styles and presets, that can be used to create paragraph rulers. The
 button next to the dash field is used to edit the dash style.
 - Stripe - Open a list of stripe styles and presets, that can be used to create paragraph rulers. The button next to the stripe field is used to edit the stripe style.
- Profile - Open a list of variable width profile styles and presets, that can be used to create paragraph rulers. The button next to the profile field is used to edit the variable width profile.
- Save Style - Create a paragraph ruler style from the current ruler settings. Ruler styles can be selected from the Ruler Style field, and reused in multiple paragraphs.
- Save Preset - Create a paragraph ruler preset from the current ruler settings.
- Align to Text - Enable or disable the alignment of the ruler line length to the length of the first or last line of text in the paragraph.
- Fill - Enable or disable the use of a separate fill style for the paragraph ruler line. Select the fill style by clicking on the fill preview widget next to the Fill check box.
- Background - Enable or disable the use of a separate background fill style for the paragraph ruler line. The background fill style can be selected only if a dash or stripe is used to create gaps in the line.
- Width - Edit the width of the ruler line.
- Leading - Edit the amount of space taken by the ruler line. This space is added before (for rulers before) or after (for rulers after) the paragraph. The leading of a ruler sets the amount of space available for the ruler line, regardless of the line width.
- Spacing - Edit the amount of space between the paragraph text and the ruler line.
- Indent Start - Edit the amount of space between the text frame and the start of the ruler line (on the left side).
- Indent End - Edit the amount of space between the text frame and the end of the ruler line (on the right side).
Drop Capitals
The Drop Capitals section contains options to setup drop capitals for the paragraph. Drop capitals are one or more characters, at the start of a paragraph, shown with a larger side and over multiple lines.
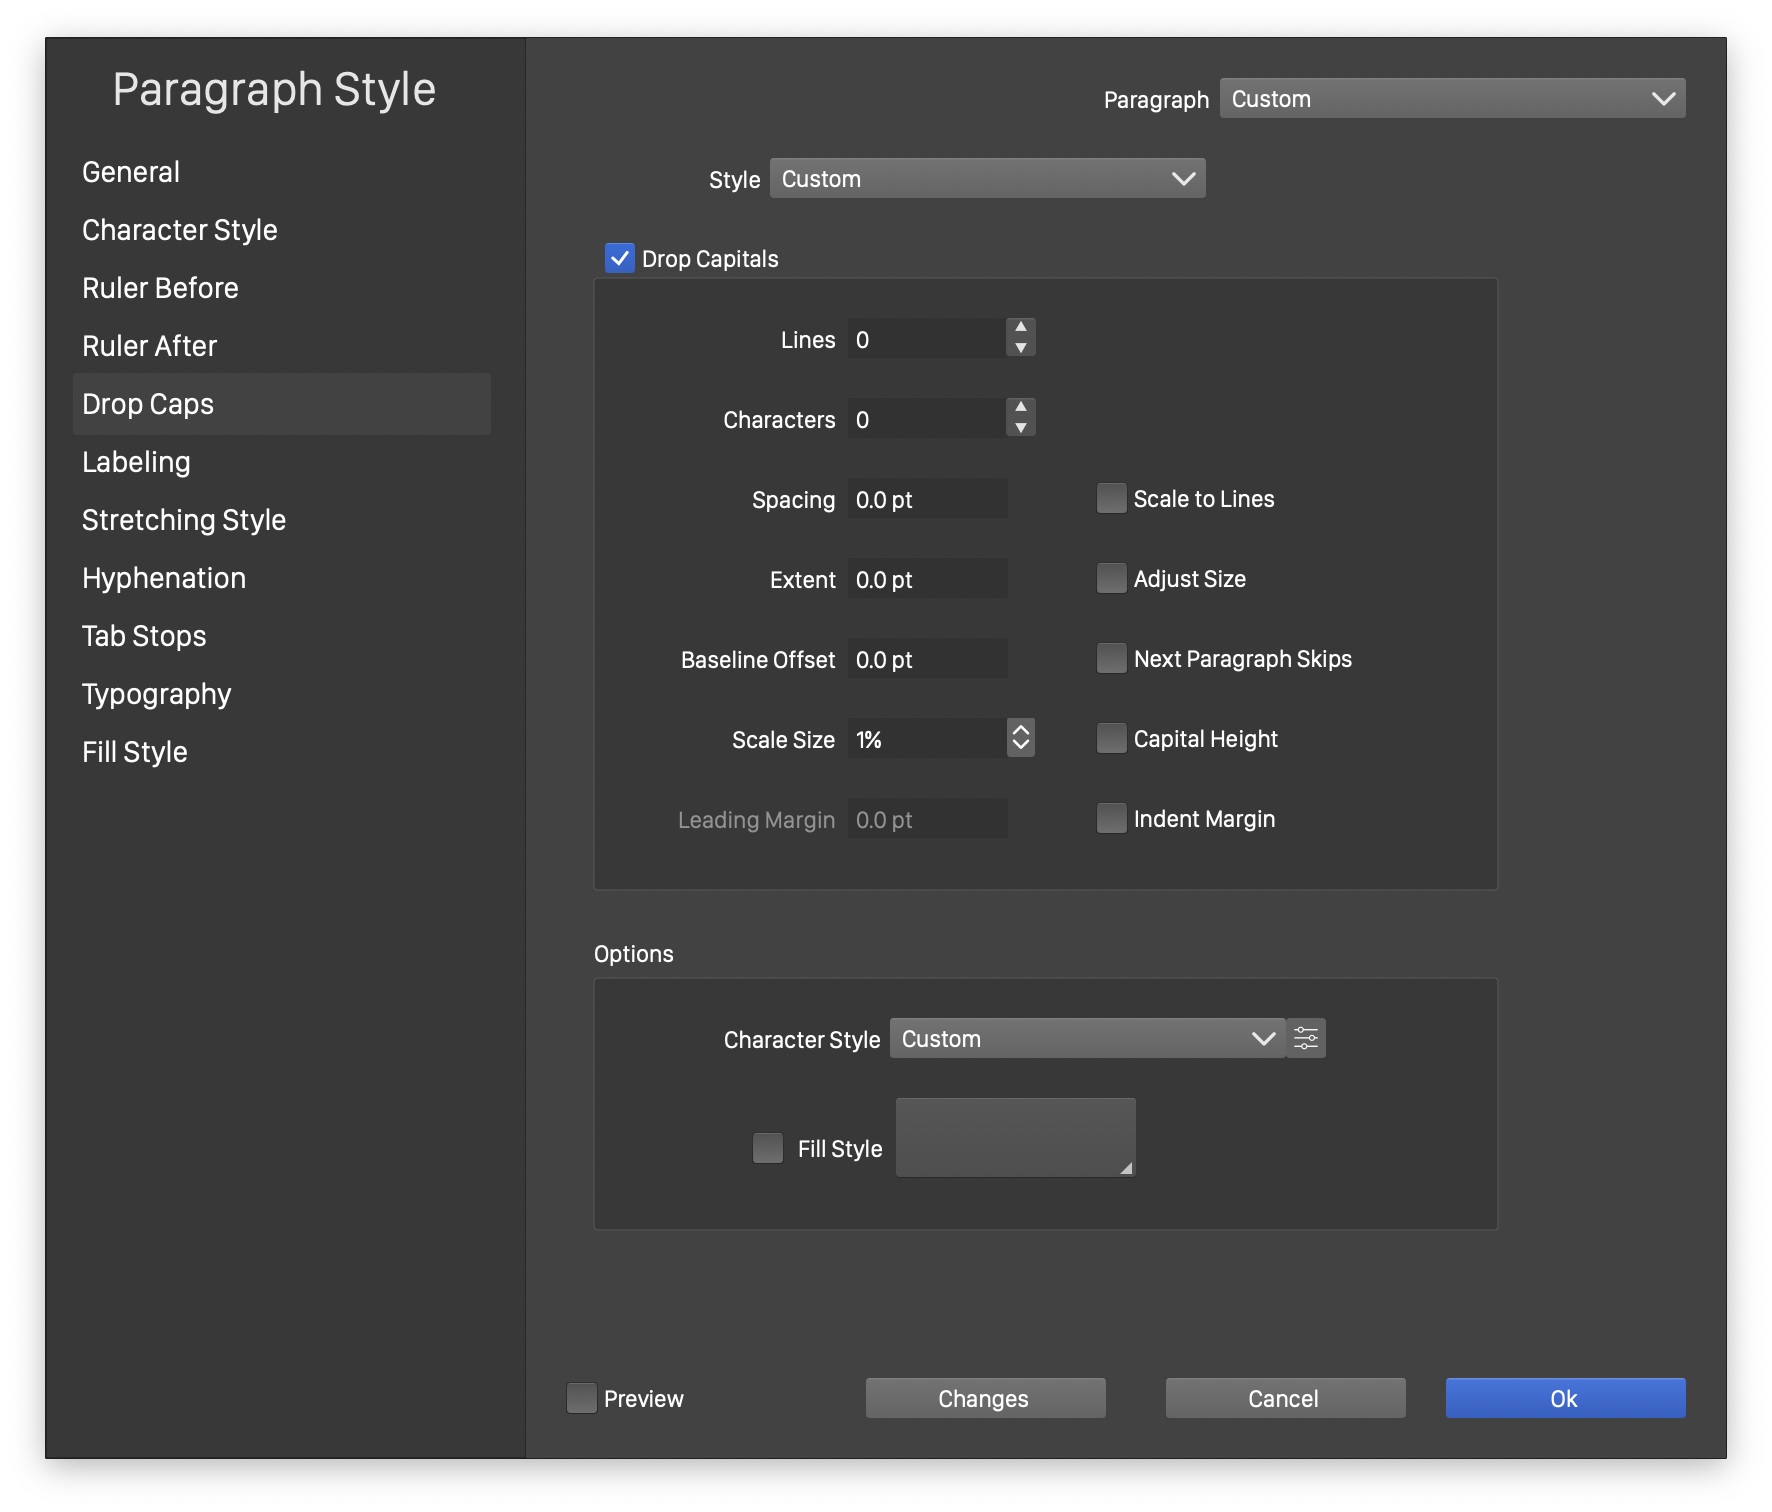
The Drop Capitals section of the Paragraph Style view.
-
Style - Opens a list of drop capital styles and presets. The drop capital options can be saved as styles (using the Create Style command) or as presets (using the Create Preset command).
-
Drop Capitals - Enable or disable the use of drop capitals in the paragraph.
-
Lines - Edit the number of lines used for the drop capital space.
-
Characters - Edit the number of characters shown in as a drop capital.
-
Spacing - Edit the amount of spacing between the drop capitals and the paragraph text.
-
Extent - Set a fixed space available for the drop capitals, regardless of the width of the characters.
-
Baseline Offset - Edit the amount of offset of the drop capitals from the default baseline.
-
Scale Size - Edit the amount of scaling of the font size used for drop capitals. By default, the font size is determined by the number of lines used for the drop capital space. This can be scaled using a relative percentage.
-
Leading Margin - Edit the amount leading reduction over the total available leading, when the Adjust Size option is enabled. The leading amount is used to calculate the font size used in the drop capitals.
-
Scale to Lines - Enable or disable the scaling of the font size used in the drop capitals to the extent of the selected number of lines.
-
Adjust Size - Enable or disable the adjustment of the total leading created by the text lines.
-
Next Paragraph Skips - Enable or disable the use of extra spacing for the next paragraph, to avoid overlapping with drop capitals of paragraphs with small number of lines.
-
Capital Height - Enable or disable the automatic calculation of the drop capital height from the selected number of lines.
-
Indent Margin - Enable or disable the indentation of the whole paragraph to a common margin after the drop capitals.
-
Options group contains the character and fill style selection used to show the drop capitals.
Labeling Options
The Labeling section contains the paragraph labeling options. The default labeling mode is None, adding no labels to the paragraph text. The labeling modes can be selected to Bullets or Numbering to add bullet points, or numbers to the paragraphs.
- Style - Open a list of previously saved paragraph labeling styles and presets. The current paragraph labeling options can be saved as a style using the Create Style command from the Style list. To save the labeling options as a preset, select the Create Preset command.
- Type - Select the paragraph labeling type. This can be:
- None - disabling paragraph labeling.
- Bullets - adds bullet points to the paragraphs, using the selected glyph.
- Numbering - adds numbering to the paragraphs, using a multi-level numbering scheme.
- Depending on the selection made in the Type field, the bullet point or numbering options can be edited as described below.
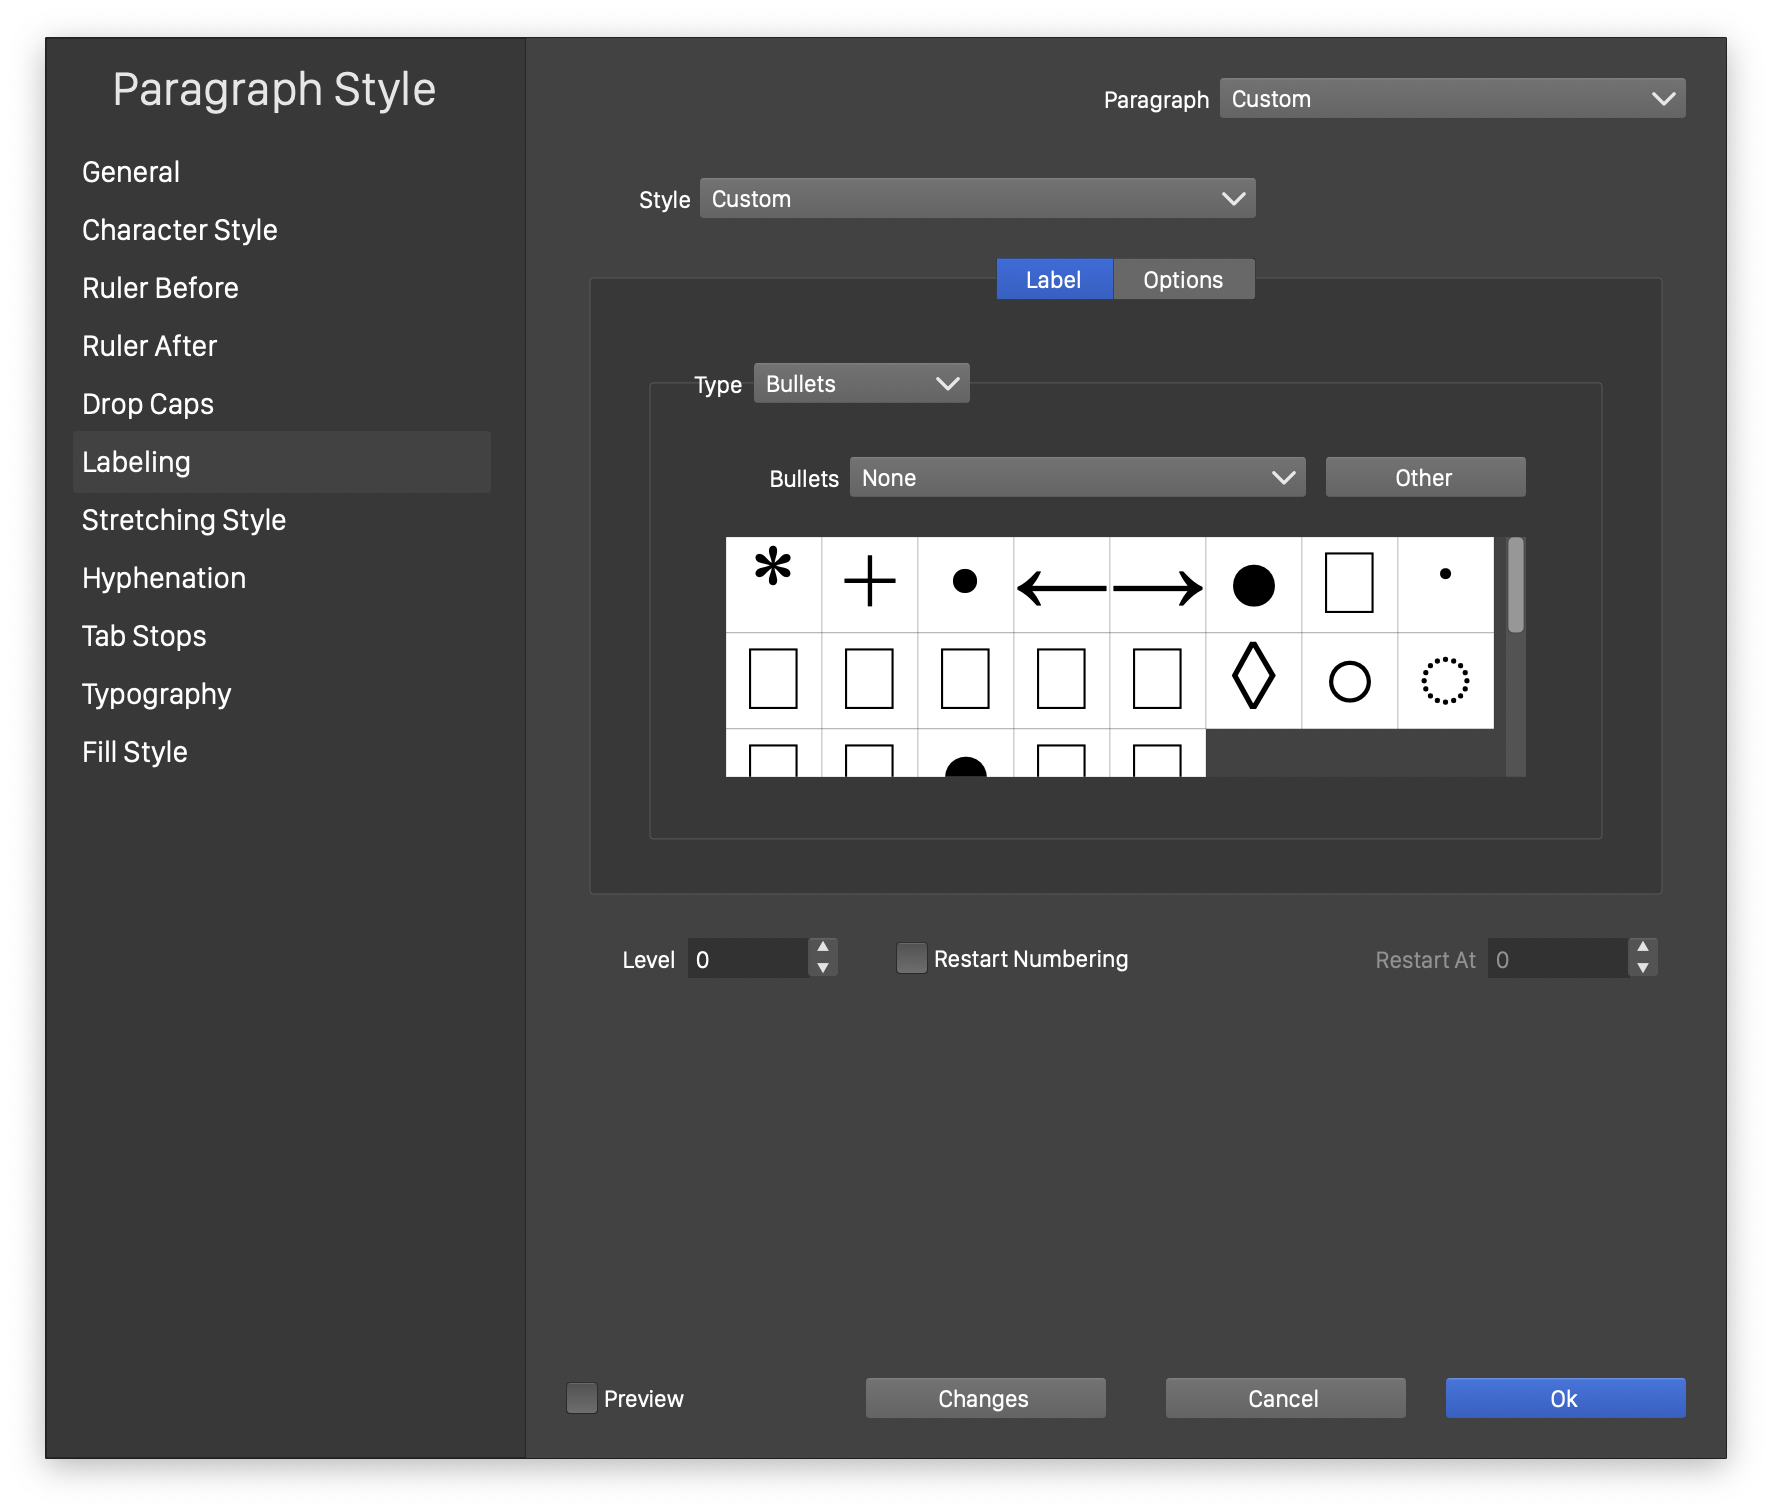
Setting up bullets in the Paragraph Style view.
The following options are available for the Bullets labeling mode:
- Bullets - Open a list of glyph presets, that can be used as bullet points.
- The glyph presets used as bullet points are also listed in the grid below the bullets drop box.
- Other - Open the glyph selector view, to select other glyphs or glyphs from other fonts. See the Glyphs section on how to use the glyph selector view.
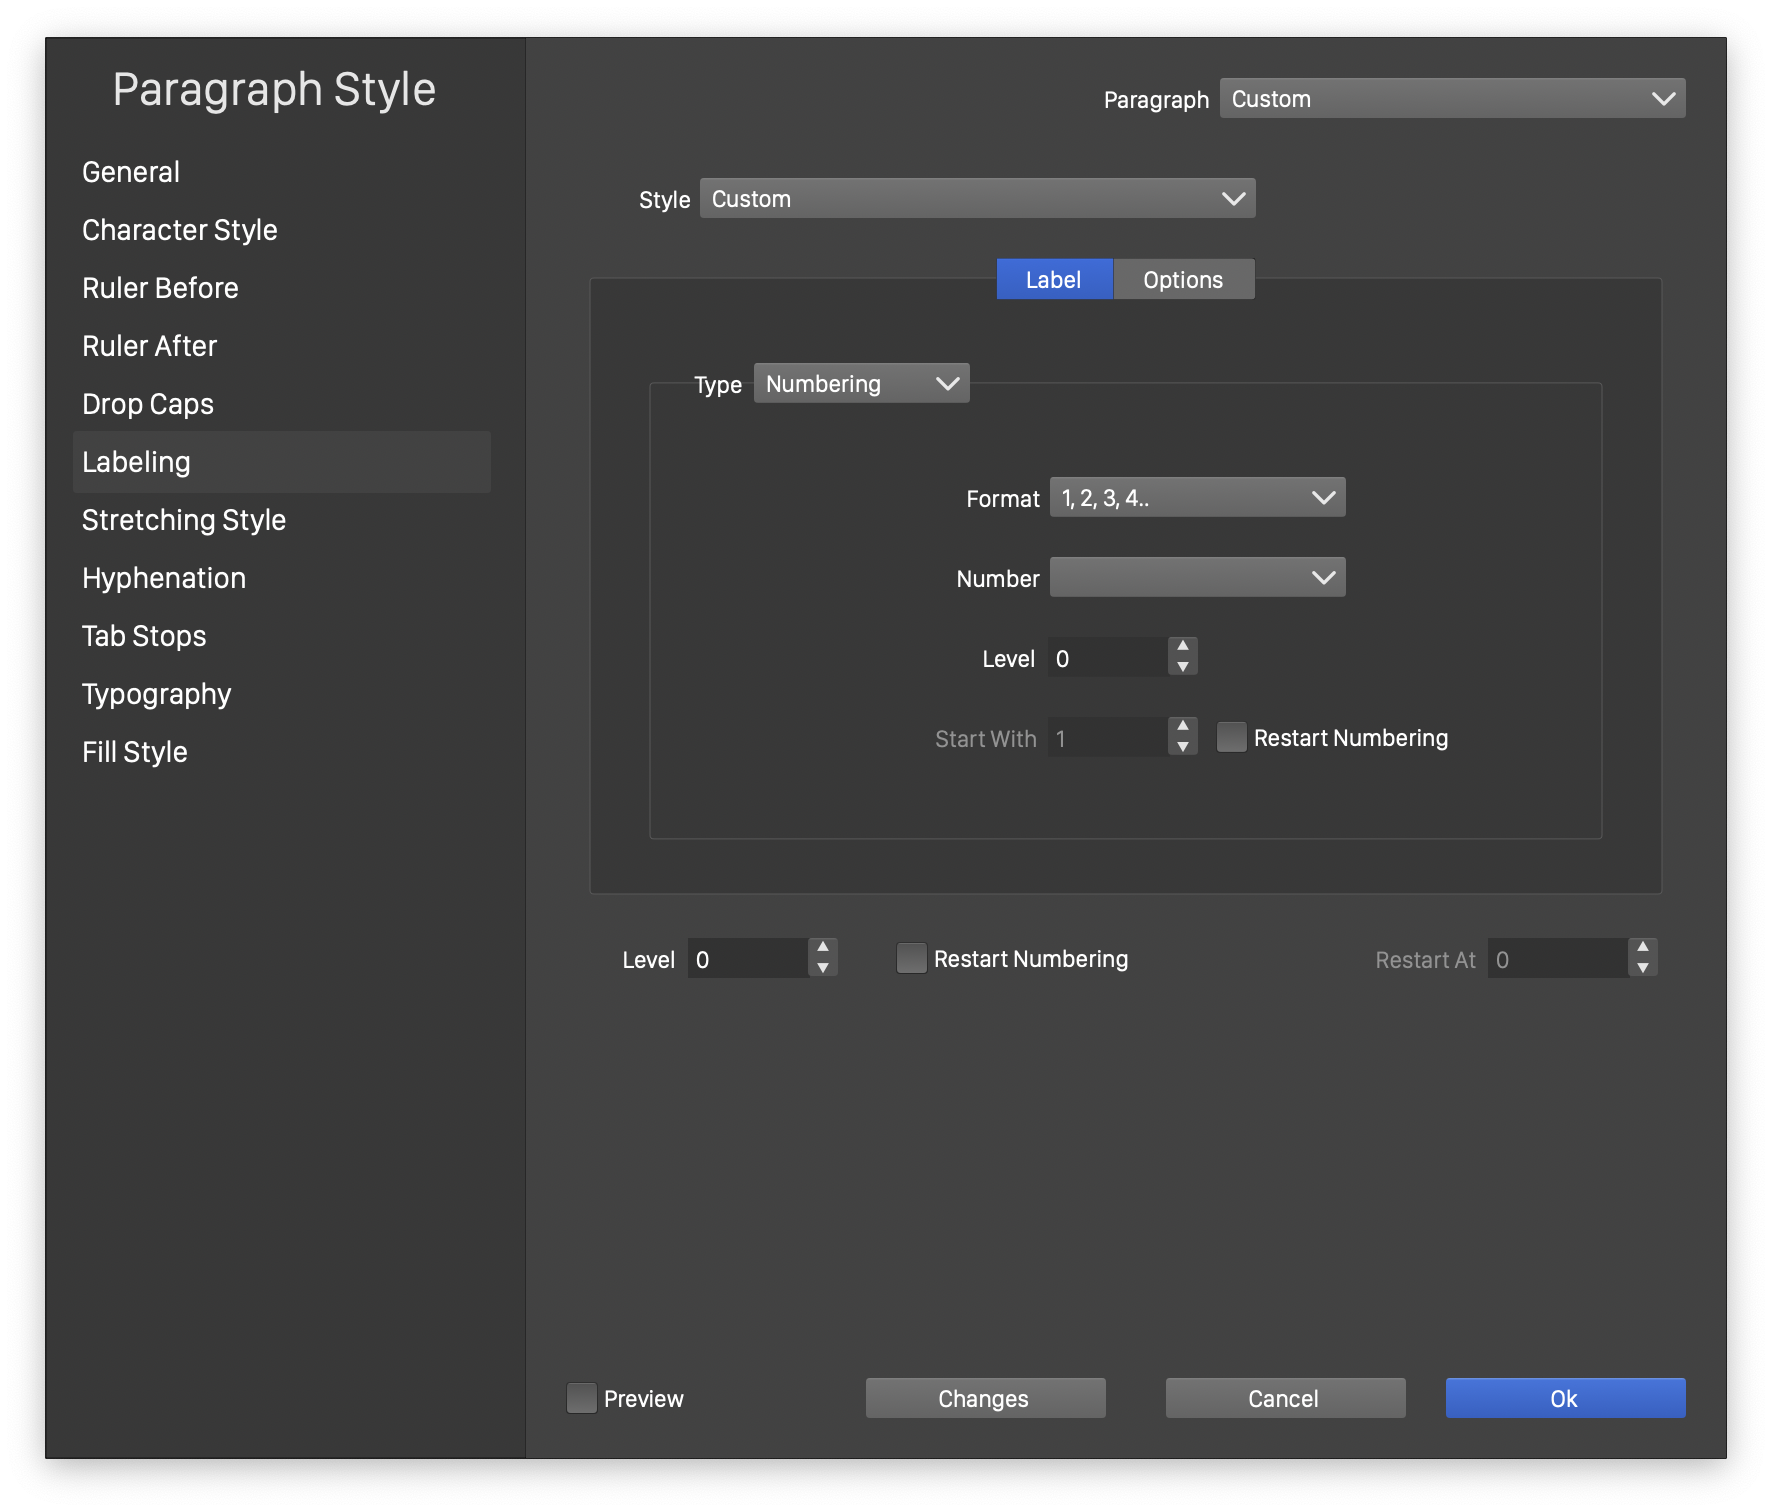
Paragraph numbering options.
The following options are available for the Numbering mode:
- Format - Opens a list of numbering formats. Select a numbering format to use in the paragraph numbering.
- Number - Edit the numbering text using a special formatting syntax. Additional text and a tab stops can be added to the automatic paragraph numbering. The following formatting syntax is used:
- ^t - adds a tab character to the numbering, to align the text to the next tab stop.
- ^b - adds a right indented tab character.
- ^# - adds the number from the next numbering level to the next using the format selected in the Format field. Multiple ^# codes can be used to setup multi-level numbering.
- Any other text is simply added to the numbering.
- If the Number field is empty a default, dot separated, numbering is used.
- Level - Edit the number of levels in the numbering scheme. Multi-level numbering can be used on a sequence of paragraphs, with each paragraph selecting a level.
- Restart Numbering - Enable or disable the restarting of paragraph numbering from a selected number.
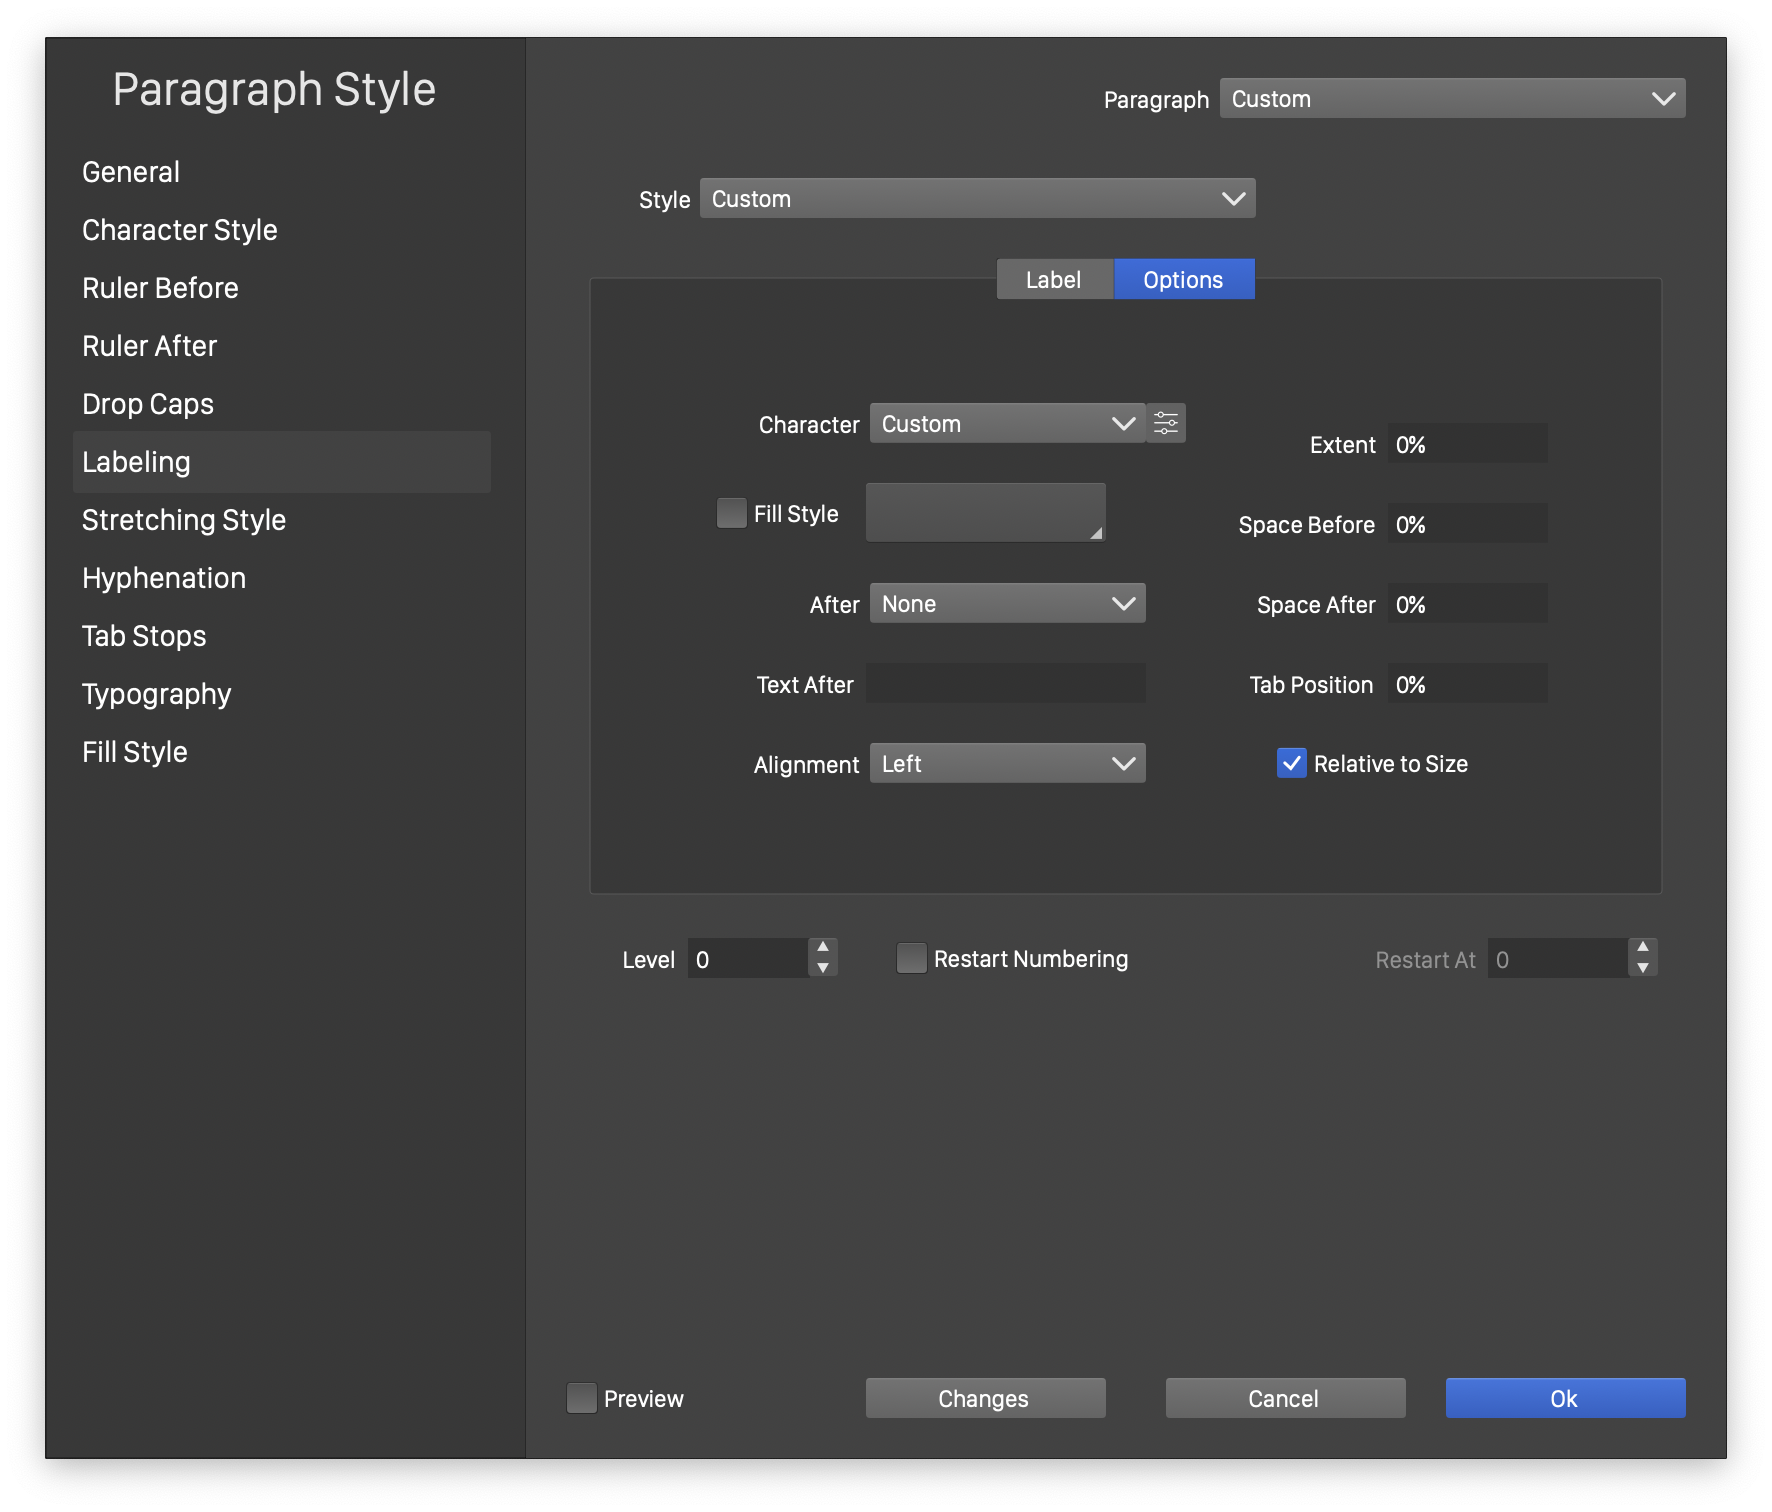
Common options.
The Options section contains options used for paragraph numbering:
- Character - Open a list of character styles and presets. Select a character style used in the paragraph labeling. To edit custom character formatting options, click on the button.
- Fill Style - Enable or disable the use of a separate fill style for the paragraph labeling. This option is disabled by default, showing the labels with the same fill and color as the paragraph text. When enabled, a different color or fill style can be selected, by clicking on the button next to the Fill Style check box.
- After - Select a bullet glyph that is automatically added after the paragraph label.
- Text After - Set a text that is automatically added after the paragraph label.
- Alignment - Select the alignment of the paragraph label, inside the available space.
- Extent - Edit the amount of extent added to the default extent used for numbering. The paragraph numbering is aligned inside this space.
- Space Before - Edit the amount of space added before the numbering.
- Space After - Edit the amount of space added after the numbering.
- Tab Position - Edit the tab stop position added after the numbering.
- Relative to Size - Enable or disable the use of relative values for the extent, spacing and tab position fields. When enabled, these values are set as percentages relative to the extent of the numbering text. When disabled, the size additions are set in absolute values.
- Level - Set the level of the current paragraph in a numbered paragraph flow. Paragraph levels can be set for paragraph styles without numbering, since these paragraphs may inherit numbering from a default paragraph style.
- Restart Numbering - Enable or disable the restarting of paragraph numbering at this paragraph.
- Restart At - Edit the restarting count of the paragraph numbering.
Stretching Options
The Stretching Style section edits the paragraph stretching options, used for aligned and justified text. The stretching options are used by the paragraph composer, to calculate word and character spacing, glyph and inline shape scaling, adjusting a line of text to fit into the available space in the text frame.
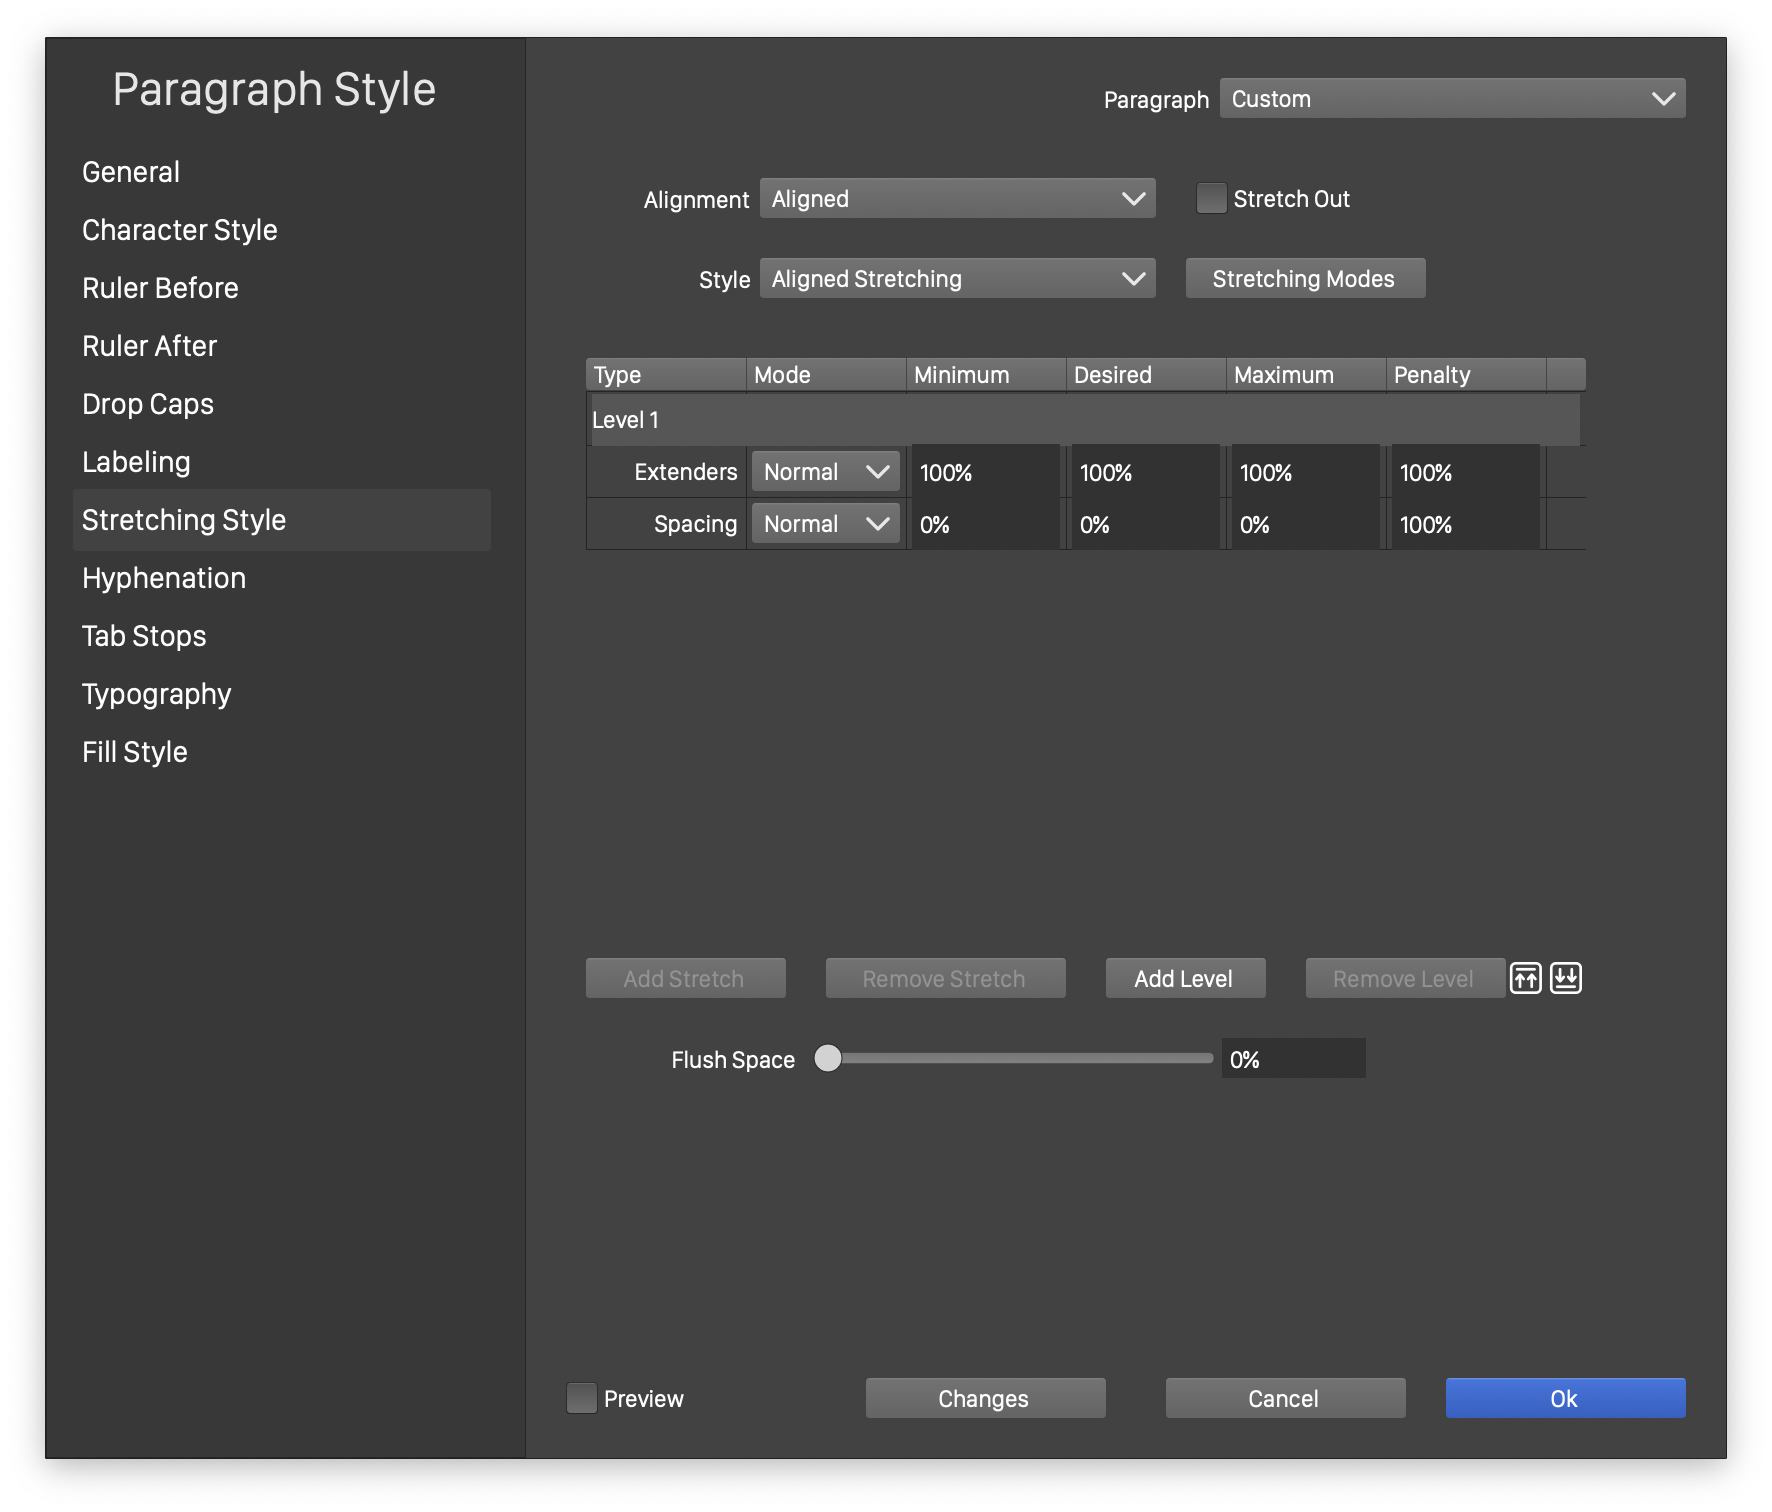
The Stretching section of the Paragraph Style view.
The stretching options can be set for aligned and justified text separately, by selecting the alignment mode in the Alignment field.
To set the stretching options of text aligned to left, center or right, select the Aligned mode in the Alignment field. When aligning text left, center or right, a small amount of stretching can be used to allow more freedom for the line breaking locations. For example, slightly reducing the allowed minimum word space, could result in better line breaking of aligned text.
To set the stretching options of justified text, select the Justified mode in the Alignment field. Justifying text requires to fill the space available for a line of text, by increasing or reducing word and character spaces, or by scaling glyphs and inline shapes. This is done by setting minimum, desired and maximum stretching amounts for changing widths of spaces or glyphs.
In some cases the leftover space is negative, caused by a line of text slightly longer than the available line space in the frame. The text composer will still try to fit the line, by reducing the spaces and glyph widths using the minimum scaling amounts.
The stretching of text is done by filling the available flush space. The amount of flush space to fill, is the space left over after breaking a line. The Flush Space field edits the amount of leftover space to fill.
- For Aligned text the Flush Space is 0%. That is, aligned text is not stretched or reduced.
- For Justified text the Flush Space is 100%. That is, justified text must be stretched to fill the available space. This can mean small reduction or extension of the line of text.
The Style - Opens a list of previously created stretching styles and presets. The stretching options can be saved as styles or presets, and reused in other paragraphs. To create a new stretching style, select the Create Style command from the menu opened from the Style field. To create a new stretching preset, select the Create Style command.
The stretching options are organized in levels. Each level defines a set of stretching settings, to scale word or character spaces, or glyph or inline shape widths. The stretching levels are applied on a line of text, until the desired line width is reached. The Stretch Out option is enabled for the last stretching level, filling the remaining space available for the line of text.
Each stretching level contains a number of stretching options, for typographic elements:
- Word - specifies how to scale word spaces.
- Character - specifies how to scale spaces between characters.
- Glyph - specifies how to stretch glyphs to reduce or enlarge the line of text.
- Inline Scale - specifies how to stretch inline objects and shapes.
The stretching amount for a typographic element is calculated based on the options provided for the level and row of that typographic element. Each level specifies stretching amounts, applied over sizes obtained from the previous level.
- The Mode column contains the selection of the stretching mode used to enable or disable the stretching values in that row. To stretch the typographic element associated with the row, the mode selection must match the stretching mode selected in the character options.
- The Minimum column contains the minimum stretching amount, allowed at that level for the typographic element.
- The Desired column contains the desired stretching amount at that level for the typographic element.
- The Maximum column contains the maximum stretching amount, allowed at that level for the typographic element.
- The Penalty column contains the penalty caused by using a stretching amount that is different from the desired value. The penalty will be proportional to the amount of stretching of the line of text. The penalty is used in the multi-line paragraph composer, to minimize the overall penalty caused by breaking text into multiple lines.
New levels can be created and removed, to design custom paragraph stretching schemes. Typographic elements can be added or removed from a level.
- Add Stretch - Open a menu of remaining typographic elements to add to the current stretching level. If all typographic elements are already added to a level, the Add Stretch button will be disabled.
- Remove Stretch - Remove the selected typographic element from the stretching options.
- Add Level - Open a menu of typographic elements, to create a new stretching level with the selected typographic element. The level is added at the end of the existing levels. Make sure to disable the Stretch Out option for the previous level, to allow spaces for the new last level also.
- Remove Level - Remove the selected level from the stretching options.
 - Move the selected stretching level one position up in the priority order.
 - Move the selected stretching level one position down in the priority order.
Hyphenation Options
The Hyphenation section contains hyphenation options used to enable and limit word breaking by hyphenation. Hyphenation of longer words is an important tool in improving the balance of lines in a paragraph of text. Too many consecutive hyphenations, or hyphenating short words can be typographically undesirable.
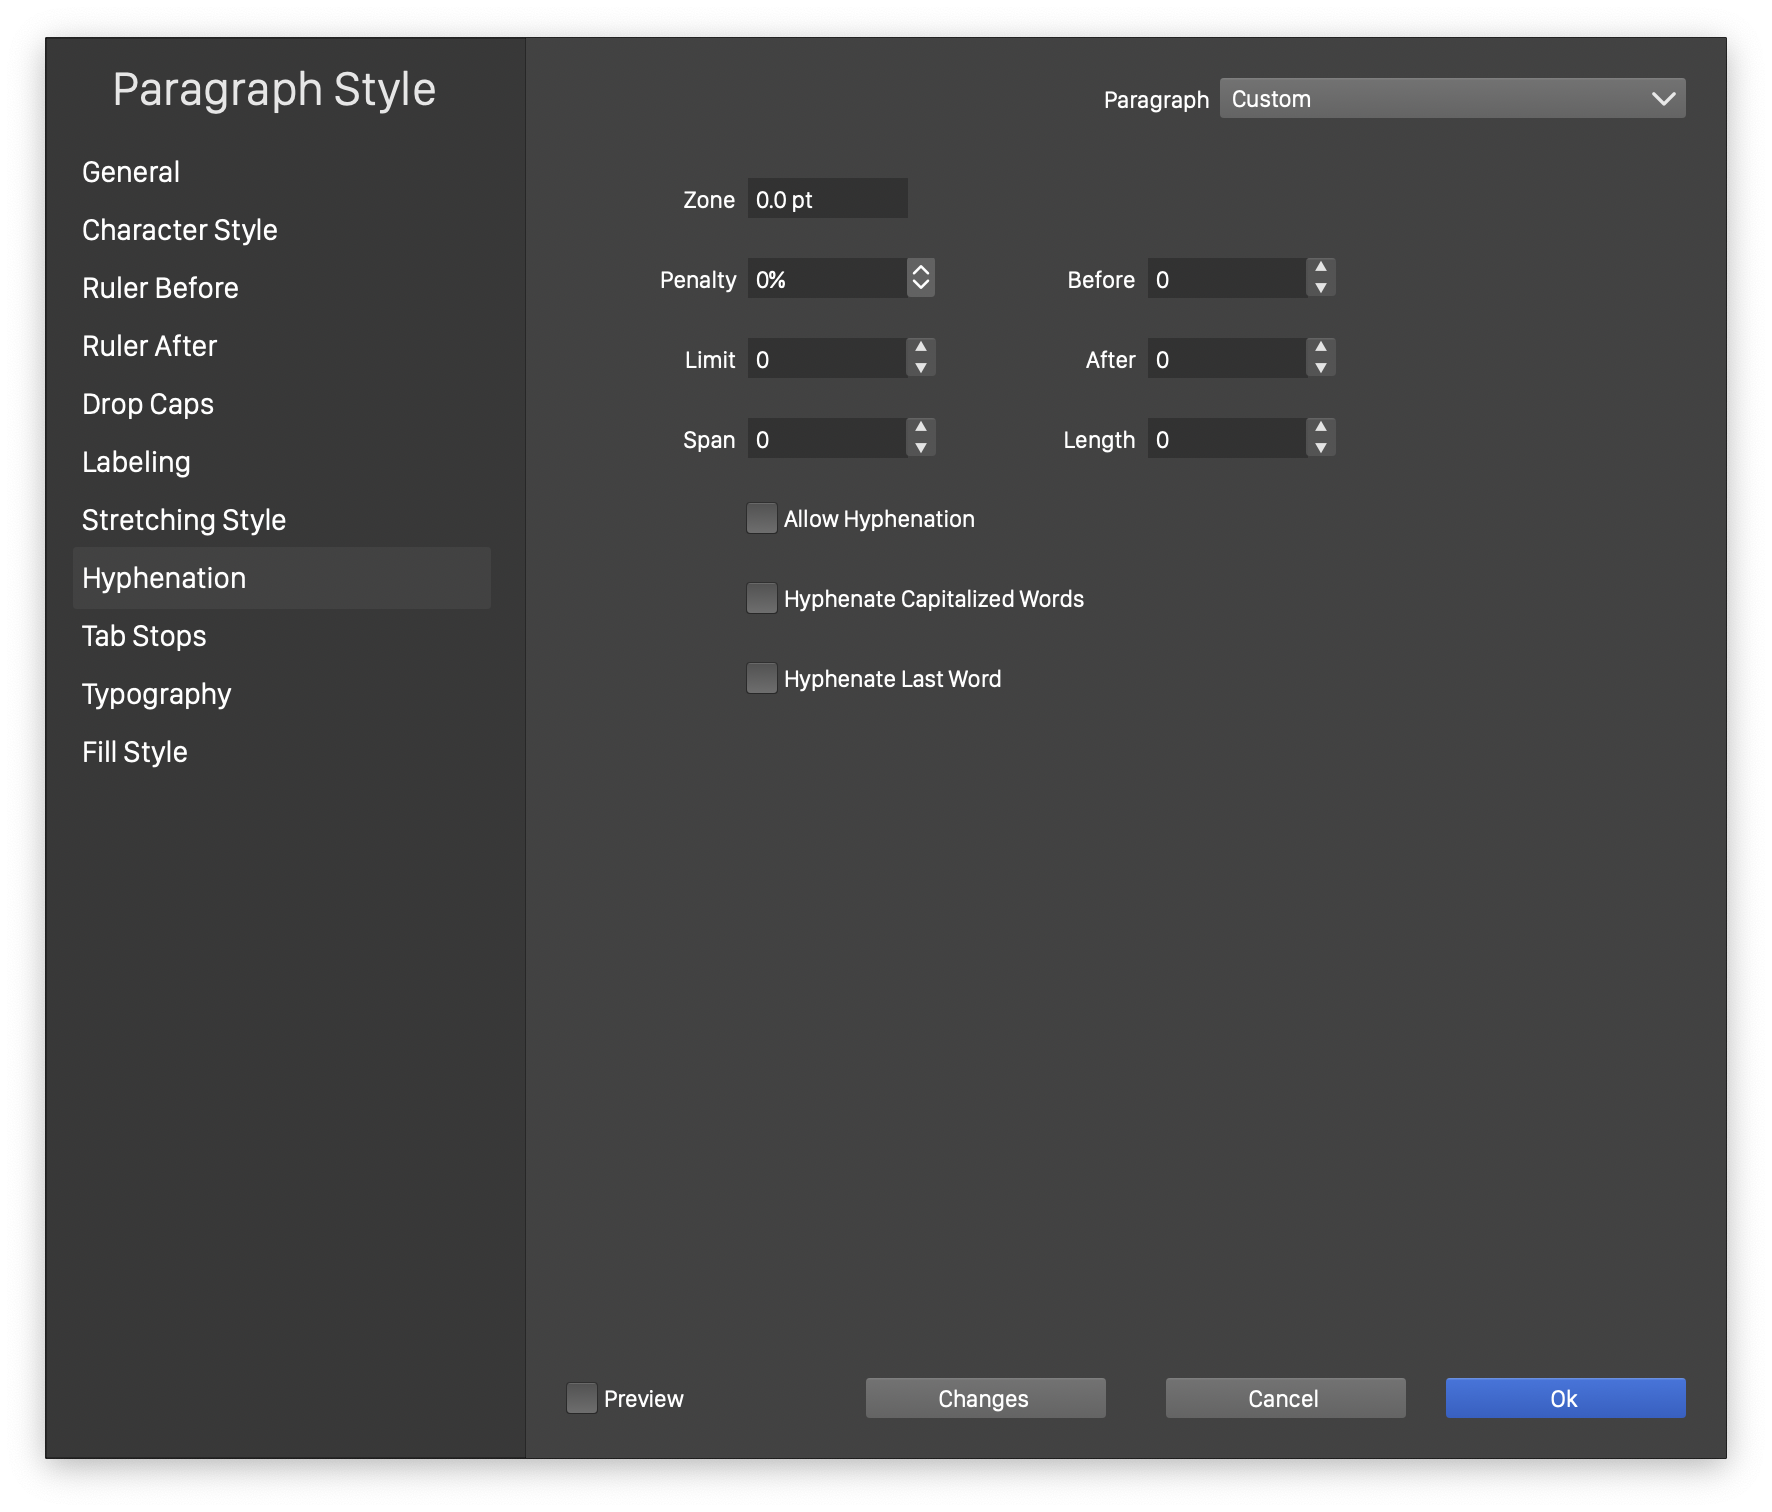
The Hyphenation section of the Paragraph Style view.
- Zone - Edit the minimum amount of leftover space required to try to hyphenate a word. With less space left in a line, the paragraph is either stretched, or aligned and a new line is created.
- Penalty - Edit the penalty caused by using hyphenation. The penalty value can be used with the multi-line paragraph composer, to adjust the balance between hyphenating words and stretching lines.
- Limit and Span fields edit the number of hyphenations allowed in a span of lines.
- Before - Edit the minimum number of characters in the first part of the hyphenated word.
- After - Edit the minimum number of characters in the last part of the hyphenated word.
- Length - Edit the minimum number of characters in a hyphenated word.
- Allow Hyphenation - Enable or disable hyphenation inside the paragraph.
- Hyphenate Capitalized Words - Enable or disable the hyphenation of capitalized words.
- Hyphenate Last Word - Enable or disable the hyphenation of the last word in a column or text frame.
Tab Stops Options
The Tab Stops section contains the tap positions of the paragraph, and the alignment of text at the tab positions. The tab stops are used to position tab characters at fixed positions. The Tab Stops section of the Paragraph Style view contains the same options as the Tab Stops editor view described in the Paragraph Style section.
Typography Options
The Typography section contains the typography settings of the default character style. The typography options may be changed locally by character option overrides.
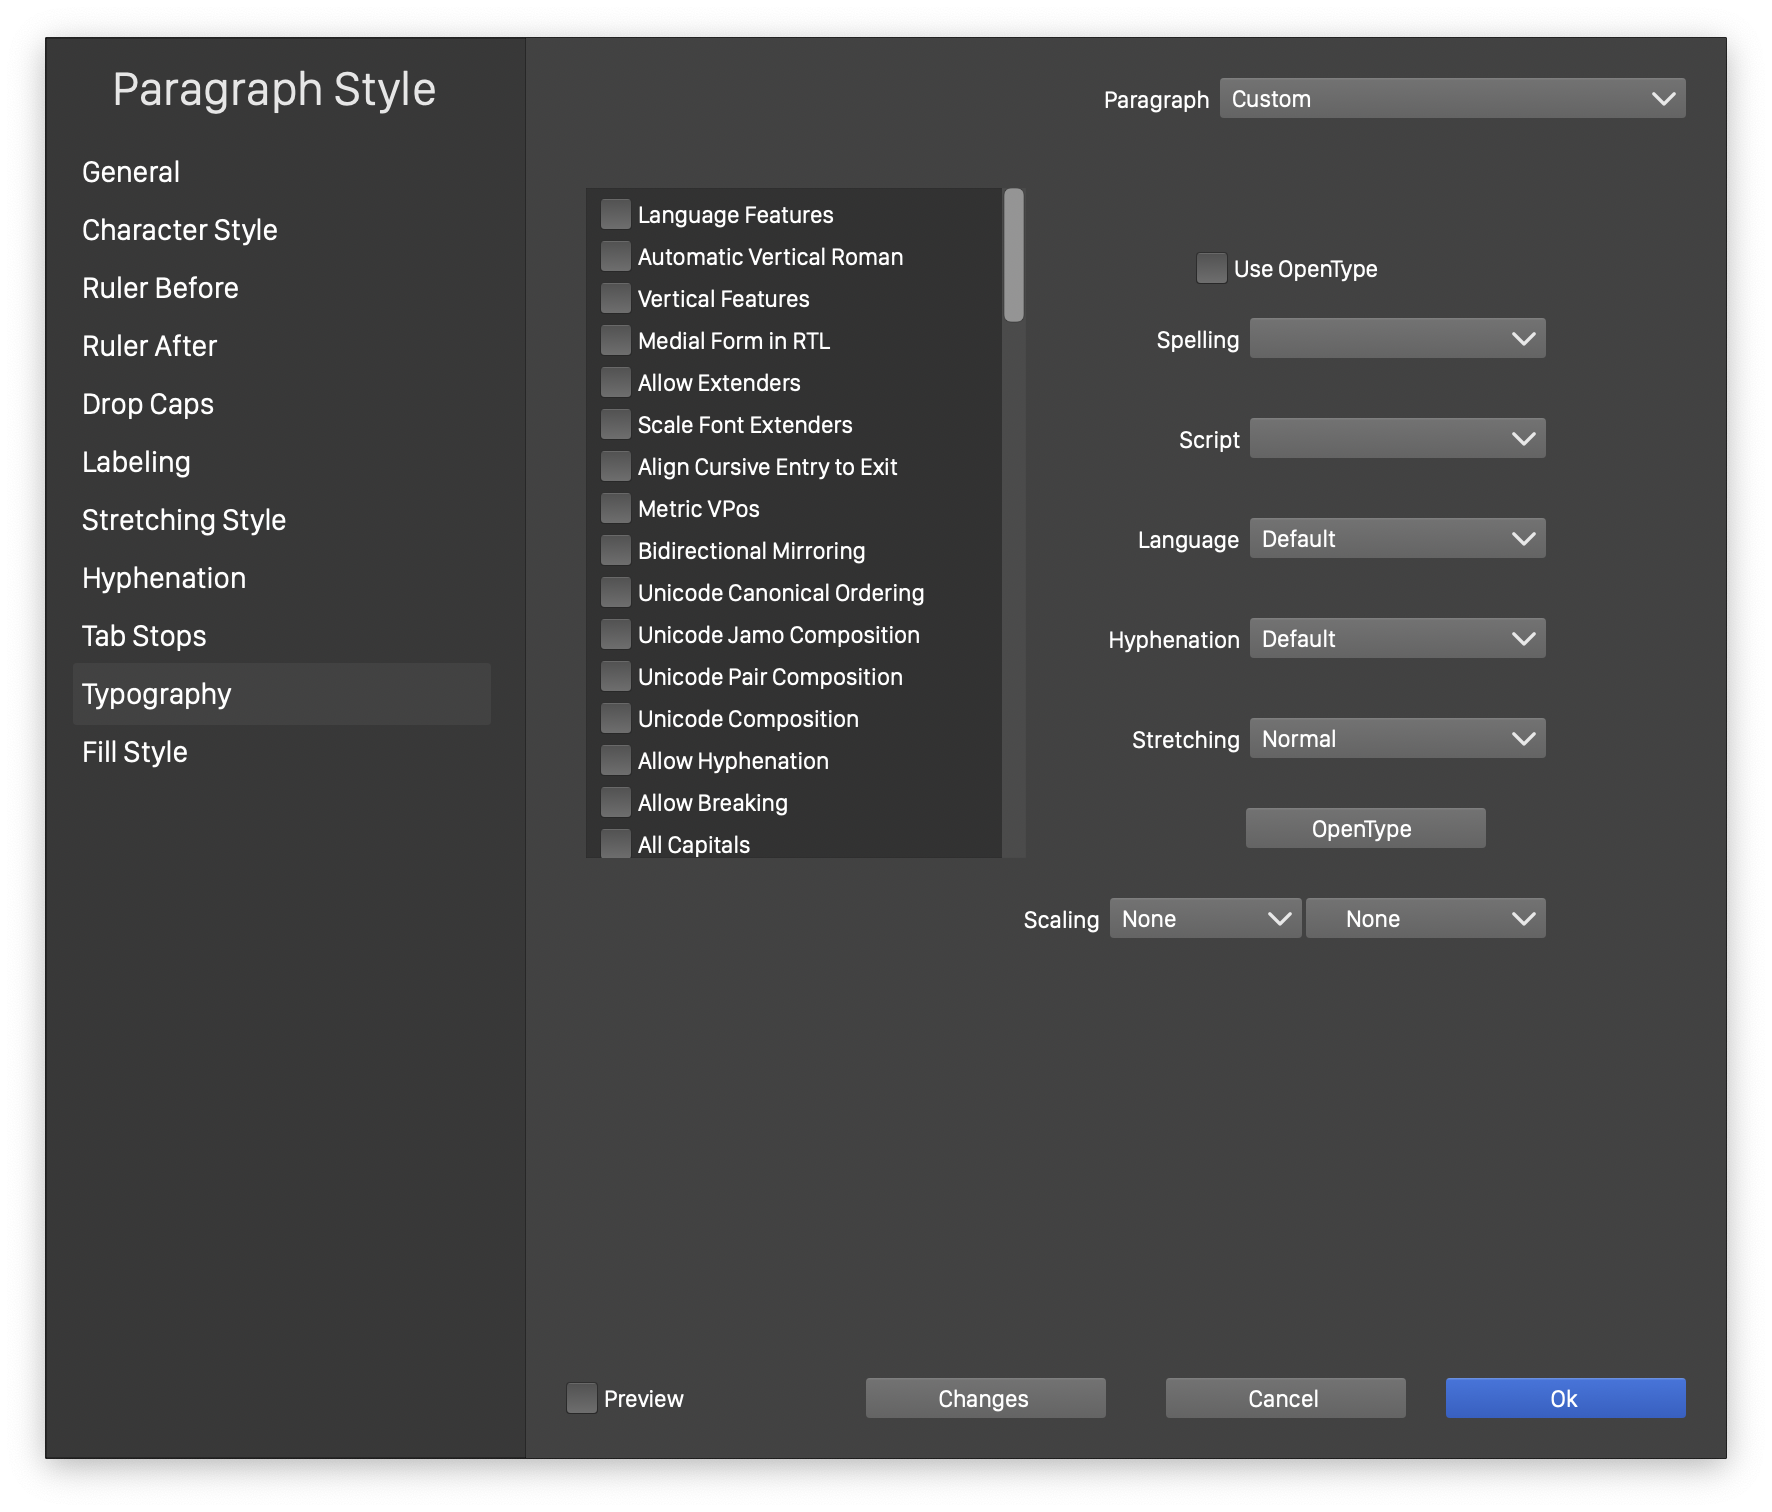
The Typography section of the Paragraph Style view.
- The list of check boxes is used to enable or disable various options in the character style. Most of these options are used to select OpenType features.
- Use OpenType - Enable or disable the use of OpenType features.
- Spelling - Select the spelling language.
- Script - Select a script, supported by the selected font.
- Language - Select the language used in selecting OpenType features from the current font.
- Hyphenation - Select the hyphenation dictionary for the text.
- Stretching - Select a stretching mode for the character format. The stretching mode determines how the glyphs are stretched when compositing a paragraph into a text frame.
- OpenType - Open a menu of OpenType features, to enable or disable individual features.
Fill Style Options
The Fill Style section contains the default fill style used by the paragraph text. The fill style may be changed locally for parts of the paragraph text using character option overrides.
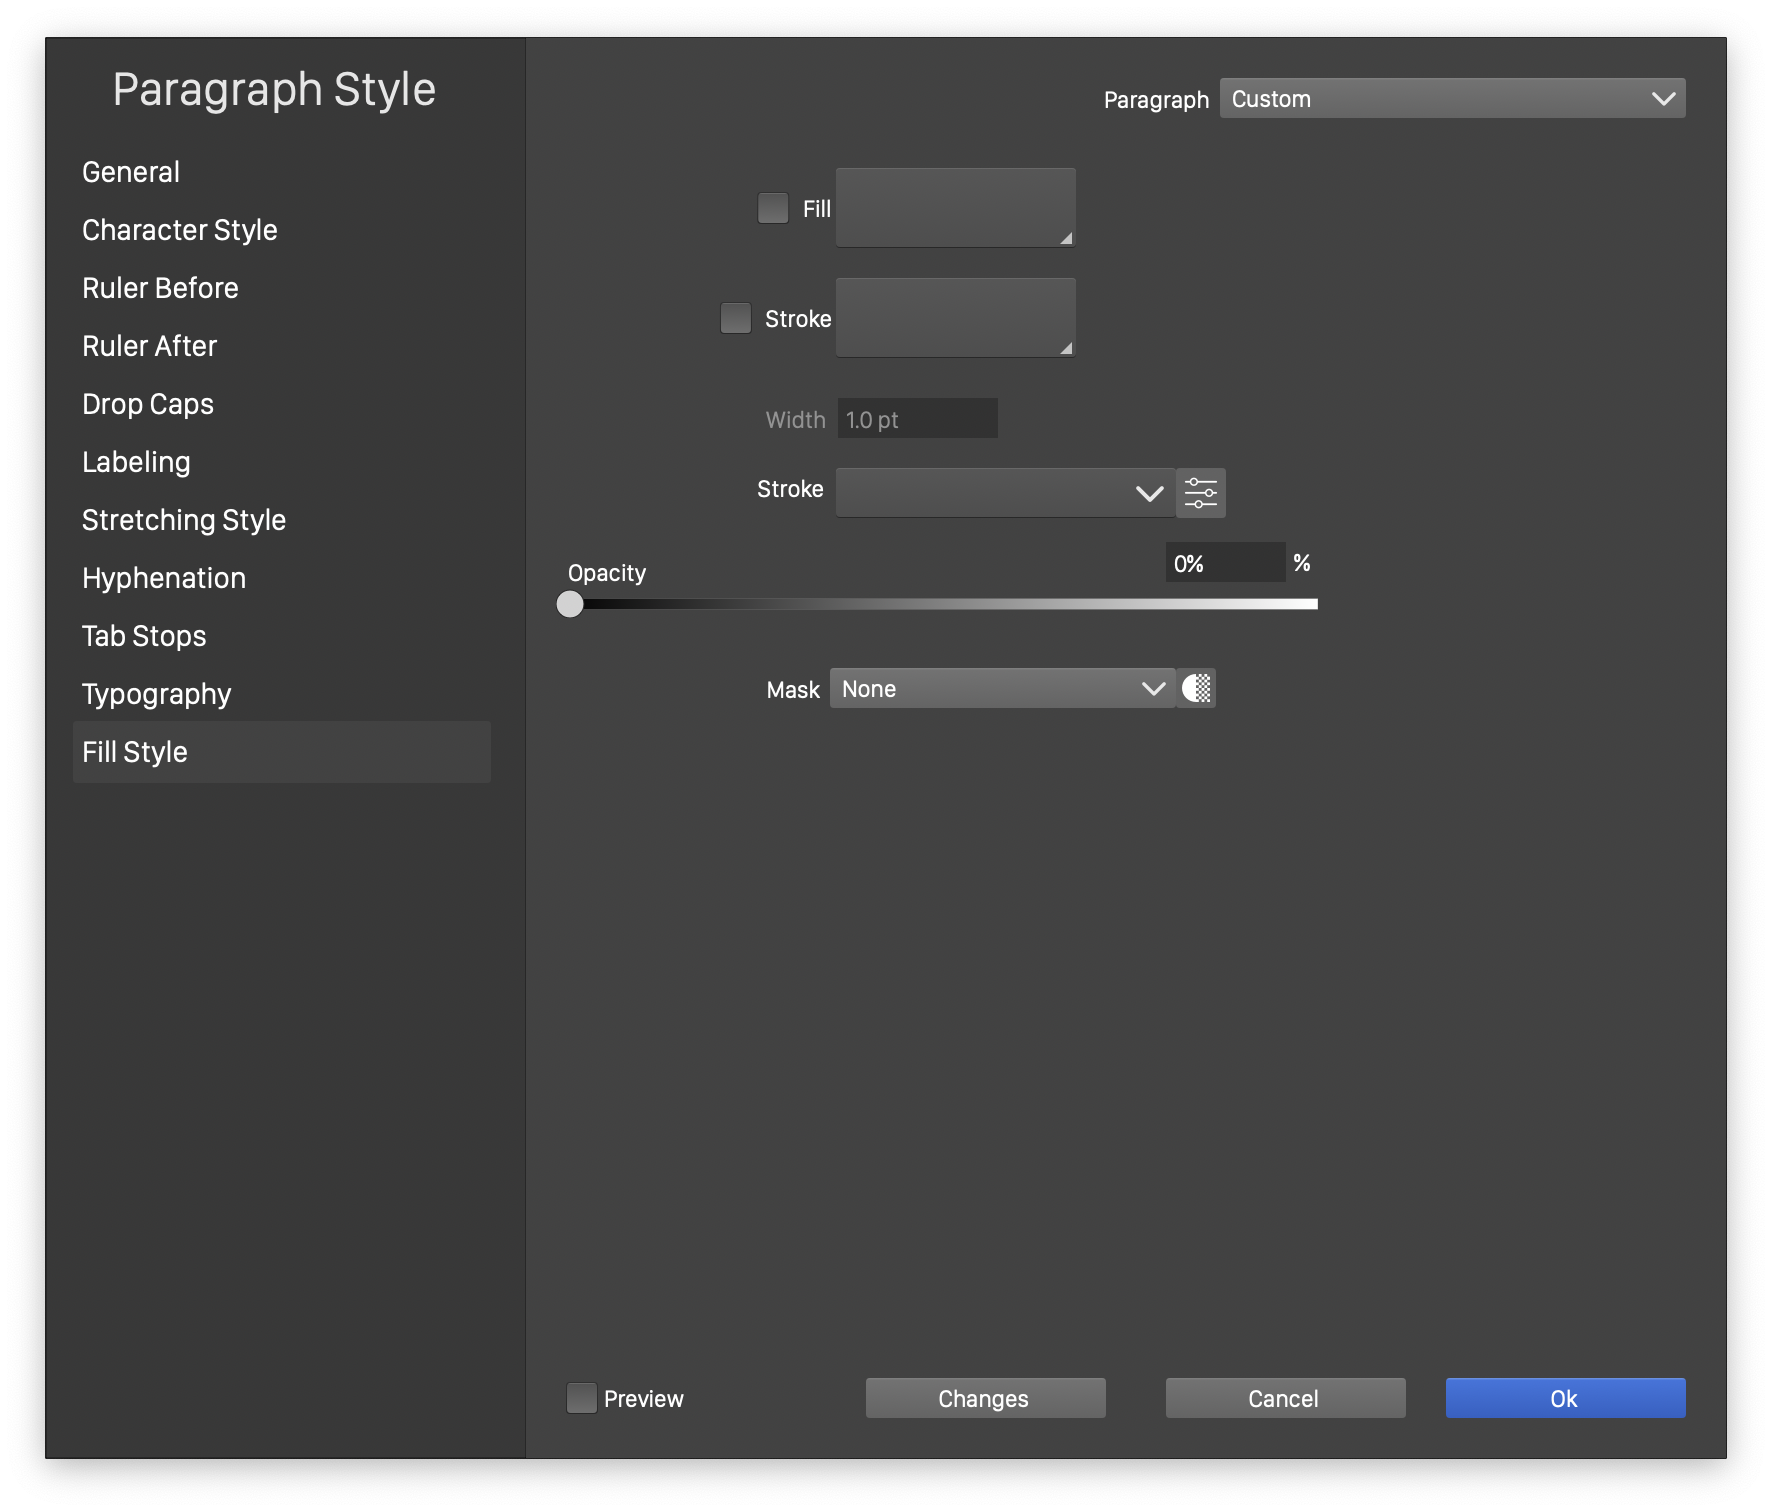
The Fill Style section of the Paragraph Style view.
- Fill - Enable or disable the use of a local fill style. When enabled, a fill style can be selected by clicking on the button next to the Fill check box. When disabled, the default fill style is used. In case of a text shape, the default fill style is the object fill.
- Stroke - Enable or disable the use of a local stroke style. When enabled, a stroke style can be selected by clicking on the button next to the Fill check box. When disabled, the default stroke style is used. In case of a text shape, the default stroke style is the object stroke.
- Width - Set the stroke width. This stroke width field is enabled only when the Stroke check box is checked.
- Stroke - Opens a list of stroke presets and styles, used to select the stroke for the characters. The stroke options can be edited using the button next to the drop box.
- Opacity - Set the opacity of the characters.
- Mask - Opens a list of transparency mask styles and presets. The
 button, next to the drop box can be used to edit the transparency mask options.
When selecting transparency masks for character sequences, it is recommended that a suitable mask is designed and tested first on a regular object. This mask is then saved as a style (or preset) and selected from the Mask list. Objects with Transparency Mask roles are also listed here.


