Symbols
A symbol is an object or a group of objects, that can be used in multiple places through the document, without copying the object. In VectorStyler, a symbol is a style type containing an object. All features supported for styles and are also supported for symbols, including object roles and references.
Symbols can be used to create repeating elements in a design or illustrations. A symbol is created, by saving an object as a symbol using the Symbols panel. When a symbol is added to the current canvas, a link is created to the symbol definition. The content of the object making up the symbol will not be copied. The content of symbol instances cannot be modified (except using style overrides). All changes made on the original symbol will be shown in all symbol instances.
To customize a symbol appearance, the symbol object must use one or more styles to set graphics or other attributes. The styles used in a symbol can be redefined locally using the Overrides panel. The symbol instance will retain the dynamic link to the symbol object, but some of the styles used in that object are redirected to new attributes.
To detach a symbol instance from the symbol object, use the Expand Symbol command of the Styles menu. Expanding the symbol copies the content from the symbol object, and replaces the symbol instance reference with the object copy. The expanded symbol will loose its reference to the symbol definition. The content of the object can be edited, and changes made to the symbol are not reflected anymore on the expanded object.
Using symbols enables a modular workflow, when creating complex designs with reusable graphics elements. Some of the benefits of using symbols are:
- Can instantiate symbols on any canvas and in any layer.
- Symbol instances have a very small memory footprint.
- Update multiple symbol instances, by editing a single symbol.
- Reuse symbols from other documents, using document linking. For more details, see the Linking Documents section.
- Insert symbols as characters in text.
- Use symbols as content in tiling patterns, artistic, pattern or scatter brushes.
- Customize symbol instances using style overrides.
- Replace symbols in a document or on the canvas using the Replace Objects command.
- Switch to different symbol definitions using style activation groups. For more details, see the Style Activation section.
The Symbols Panel
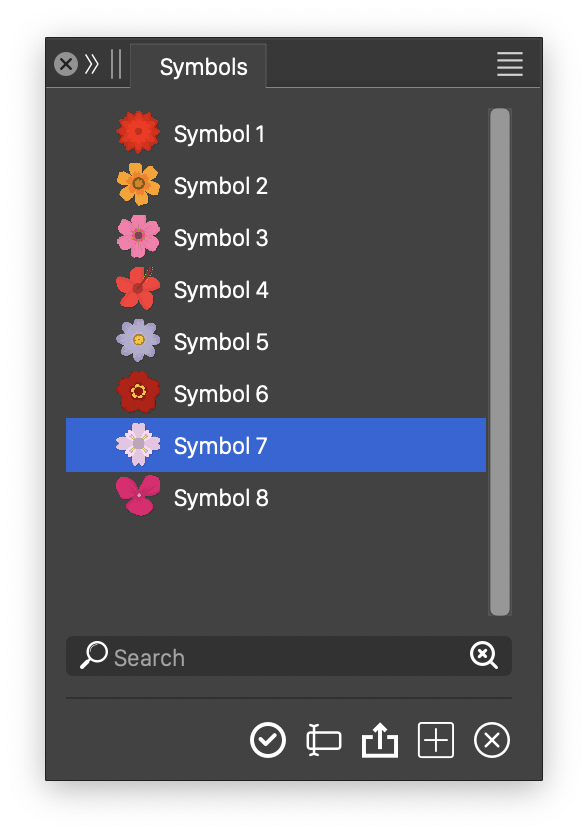
The Symbols panel is the primary tool for creating and selecting symbols in a document. The Symbols panel can be opened from the Window - Styles menu. The symbols panel contains a list or grid of symbols defined in the current document. Symbols can be object references with the Symbol role, or objects saved as symbols in the Symbols panel.

The Symbols panel
The symbols are stored in the same folder hierarchy as styles. The objects with the Symbol role, are shown in a separate folder, if the folder hierarchy is enabled. The search field below the list of symbols can be used to search for symbols by name. The searching mode can be configured in the Panel Options command of the Symbols panel menu, in the same way as in the Styles panel.
When a symbol instance is selected on the canvas, the corresponding symbol is highlighted in the symbol list.
The icon section in the Symbols panel provides access to the following commands:
 - Place the selected symbol into the current canvas. If a symbol instance is selected, it is replaced with the new symbol.
 - Edit the symbol name and shortcut access key. The symbol name and shortcut editing is the same as in the Styles section.
 - Replace the highlighted symbol content, with the content of the selected object on the canvas. This command is available only for symbols saved into the symbol list. Objects with the Symbol role cannot be updated in this way.
 - Create a new symbol from the selected object. The object content is copied and a new symbol is saved into the symbol list. Future changes on the object will not affect the saved symbol.
 - Remove the selected symbols from the panel. Symbols defined using the Symbol role can be removed only by removing the object in the document.
Creating Symbols
There are two ways to create symbols in VectorStyler:
- A symbol can be created by saving an object into the symbols list using the Symbols panel. In this case the object content is copied, and the symbol is stored in the style collection of the current document.
- A symbol can be defined by enabling the Symbol role on an object and setting a name for the object. This can be done using the Object Options command from the Object menu, or using the Layers panel. The symbol defined in this way will be shown in the Symbols panel, but can be removed only by removing the object. It is common to make these type of symbols on the Reference canvas, and then use them on an artwork canvas.
To create a symbol that is stored in the document style collection:
- Select the object that will be saved as a symbol.
- Select the
 button from the Symbols panel, or the Create Symbol command from the panel menu.
 - Set a name for the new symbol.
- After confirming the name, the symbol is added to the list of symbols.
To create a symbol using the object role:
- Select the object that will be used as a symbol.
- It is recommended that these objects are created on a Reference canvas, for better organization of the document content.
- Select the Object Options command from the Object menu.
- Set the object name and enable the Symbol role.
- After confirming the object options, the new symbol is shown in the Symbols panel.
- The object role can be set implicitly, by setting the canvas role of the reference canvas containing the object.
- Changes made to the original object, will reflect in all symbol instances.
Placing Symbols
A symbol can be inserted into the current layer or isolated group of the current canvas, or into the edited text at the cursor position. The symbols instances, placed into the document, are links to the symbol object. The symbol object is stored in the styles container of the document, or on a reference canvas with a Symbol role.
To place a symbol into the document:
- Select the symbol in the Symbols panel.
- Drag & drop the symbol into the document at the preferred location.
- Double click on the symbol, to insert it into the center of the document view region.
- To insert a symbol into a text, position the text cursor at the insertion location, and double click the symbol in the panel.
- To replace an existing symbol instance on the current canvas: select the symbol instance, and double click the symbol in the panel.
- The
 button can also be used to insert symbols, instead of double clicking.
The content of a symbol can be edited by isolating one of its symbol instances:
- Select the symbol instance on the current canvas.
- Double click on the symbol, to isolate it for editing.
- The symbol may contain a single group of objects. To reach these objects, a second double click may be necessary.
- Edit the objects inside the symbol, using the regular object editing features.
- All instances of the symbol will reflect the changes made in the isolated mode.
To edit a symbol instance content, without changing other instances of the symbol, the symbol must be expanded using the Expand Symbol command of the Styles menu. In this case all the content of the symbol instance is detached from the original symbol. Another option is to use clones of an object, instead of symbols. Partial changes can be made on clones, that are not affecting other clone instances.
Replacing Symbols
A symbol may have multiple instances in a document, on various canvases, or inserted into text flow. Occurrences of symbol instances can be replaced with an other symbol instance, using the Replace Symbol command from the Symbols panel menu.
To replace all instance of a symbol in the document:
- Select the symbol, whose instances are to be replaced in the document.
- Select the Replace Symbol command from the Symbols panel menu.
- Select the symbol from the Style field, to replace the previous symbol.
- After confirming the symbol selection, all symbol instances in the document using the previous symbol (selected in the panel), are replaced with the symbol selected with the replace symbol command.
Symbol Parameters
Symbol parameters (or component parameters as known in other applications) are style or variable definitions stored in symbols. When reusing symbols from external presets, the symbols can also provide named variables or styles to let users customize the symbol.
Symbol parameters are similar to style definitions and are stored at object (symbol) level. Layers may also have symbol parameters and may be reused as symbols.
The content of a symbol uses the styles and variables defined as symbol to set the various object attributes. Symbols are reused in documents where these parameters can then be modified.
When a parameters used in a symbol instance resolved, VectorStyler first looks in the current document or canvas for an override for that parameter. If none is found, then the default value specified in the symbol parameter is used.
A document or a canvas may redefine a symbol parameter to a different value, customizing the symbols instantiated on that canvas.
The symbol parameters are managed using the commands of the Styles - Symbol Parameters menu, as follows:
- Object Parameters - Edits the list of parameters associated with the selected object. This command can be used to setup parameters of a symbol at the symbol source (an object).
- Remove Parameters - Removes the parameters of the selected objects.
- Capture Parameters - Automatically generates symbol parameters from all variables and styles used in the selected object, and assigns these as parameters of the object.
- Synchronize Parameters - Synchronizes the symbol parameters with document or canvas level variables and styles using the names of the parameters.
- Publish Parameters - Publishes the symbol parameters at canvas level, so they are available for editing in the Styles panel when the Current Canvas Styles mode is selected.
The parameters of a symbol instance can also be changed from the Overrides panel.
Managing Symbols

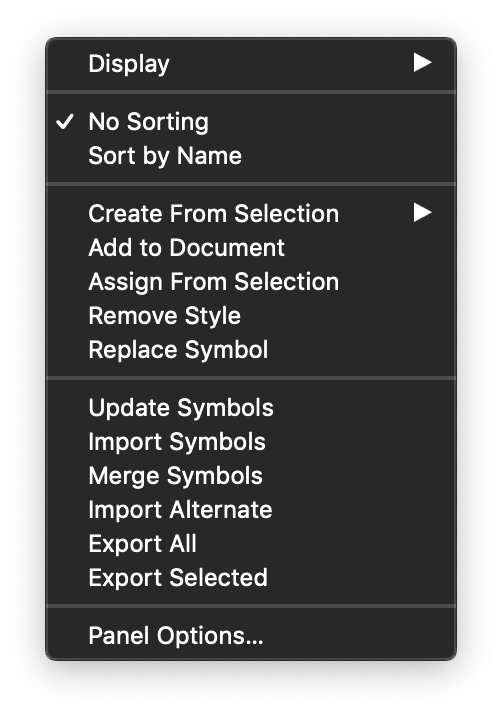
The Symbols panel menu
The symbols of a document can be managed using the Symbols panel, and the commands from the panel menu. Symbols that were defined using object roles, or reference canvases with the Symbol role, can be managed using regular object editing tools.
The Symbols panel menu contains the following commands and options:
- Display - Shows the options for listing the symbols in the panel. This can be grid or list with various sizes.
- Additional symbol preview sizes can be selected with the Panel Options command, in a the same way as in the Styles panel.
- Show Folders - Enable or disable the display of styles and symbols folders.
- No Sorting - Set the order of symbols in the panel, to the storage order.
- Sort by Name - Show the list of symbols in alphabetical order of their names.
- Add to Document - Place the selected symbol into the current canvas.
- Create Symbol - Create a new symbol from the selected object, and store the symbol in the style collection of the document.
- Assign from Selection - Replace the highlighted symbol content, with the selected object from the canvas.
- Remove - Delete the highlighted symbols. Symbols that are defined using the Symbol role, cannot be removed.
- Replace Symbol - Replace instances of the highlighted symbol, with an other symbol.
- Update Symbols - Update the symbols in the current document by loading symbols from a style file, or a VectorStyler file. Symbols are updated by finding symbols with the same name in the selected file.
- Import Symbols - Import symbols from a file, into a new symbol folder.
- Merge Symbols - Merge symbols of a file with the current set of symbols. The symbols are merged by replacing symbols with the same name, and appending the symbols with a name not present in the current list.
- Import Alternate - Import symbols from a file, and create an alternate symbol group, to be used with Style Activation.
- Export All - Export all symbols into a style file.
- Export Selected - Export the selected symbols into a style file.
- Export to Preset - Export the selected symbols as objects into a preset. The preset can be used to copy the symbols into other documents.
- Save to Preset - Save the group of symbols into a style preset. A style preset can be imported into other documents.
- Panel Options - Edit the Symbols panel configuration. This is the same as the configuration for the Styles panel.
9-Slice Scaling
Symbol instances placed onto a canvas can be scaled and stretched arbitrarily. When symbols represent user interface components, or design elements with nonuniform scaling requirements, the regular object scaling will not be sufficient.
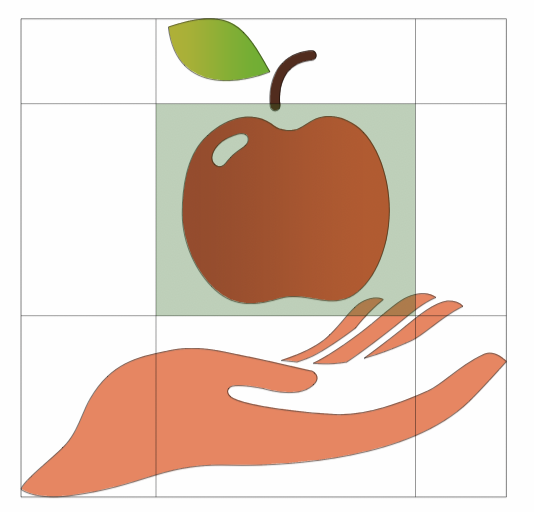
Symbol definitions can contain 9-slice scaling options, specifying how to scale the symbol. The 9-slice scaling divides the symbol into a grid, where each cell of the grid can have different scaling proportions. When the symbol instance is scaled, these scaling proportions are taken into account, to create a nonuniform scaling.

Editing a 9-slice scaling of a symbol.
To create a 9-slice scaling on a symbol:
- If the symbol was defined using the Symbol role, select the object defining the symbol. Otherwise double click on the symbol instance, and select the symbol object.
- If the symbol has no 9-slice definition, select the Create Slicing command from the Style menu.
- Select the Sliced Scaling
 tool in the application toolbox (inside the group of tools with artboard and export slices).
 - The selected object shows a 3X3 grid, of the current scaling options.
- Adjust the cell sizes of the grid to position the scaling margins.
- Each cell contains horizontal and vertical scaling values. The scaling values are used to determine how much that cell is scaled.
- Cells inside a column are scaled by the same amounts horizontally.
- Cells inside a row are scaled by the same amounts vertically.
- The default scaling proportions are set to 100% for inner cells, and 0% for margin cells, in both vertical and horizontal directions.
- To select a cell, click inside the cell. The selected cell is highlighted with a gray shade.
- The scaling amounts used in the selected cell can be edited in the Context panel or in the Properties panel.
- In typical designs, it is recommended to keep the original 3X3 grid and scaling amounts, and only adjust the grid margins.
In VectorStyler, it is possible to extend the sliced scaling of symbols into any grid, not just a 3X3 with 9 slices. Custom slicing grids can be used to create nonuniform scaling schemes for symbols, with multiple scaling regions for a symbol.
- To create a new column in the scaling grid, hold the Option (Mac) or Alt (Windows) key and click inside a cell. A new column is added to the slicing definition, creating a new horizontal scaling region.
- To create a new row in the scaling grid, hold the Shift key and click inside a cell. A new row is added to the slicing definition, creating a new vertical scaling region.
- The size and position of the rows and columns can be adjusted by dragging the cell margins.
- The amount of scaling inside a row or column can be set by selecting a cell, and setting the X or Y scaling proportions in the Context panel or in the Properties panel.
