
Blend Panel
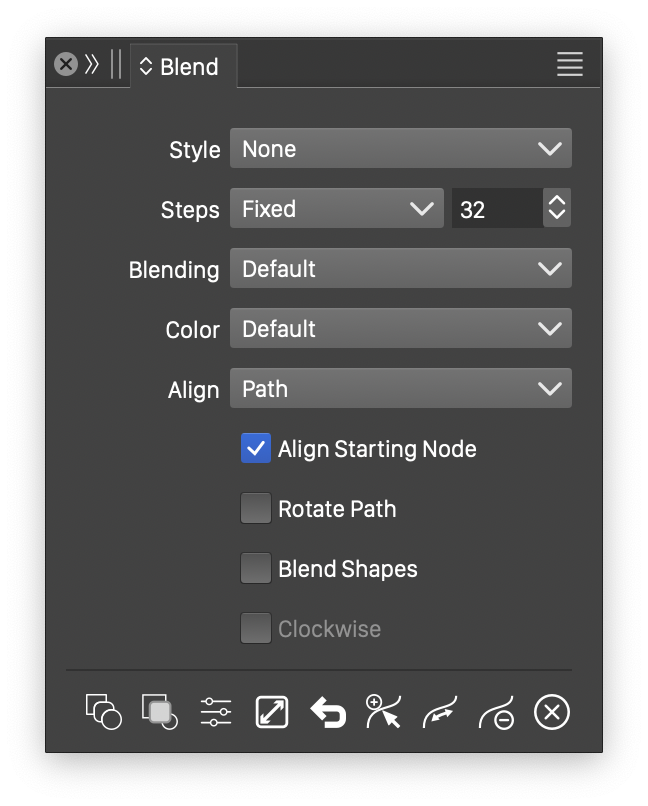
The blend panel.
The Blend panel, opened from the Effects - Blend or the Panel - Effects menu, provides a quick access to the creation of blend effects, and th selection of blend effect options. When a blend object is selected (the object containing the transitions), the blend panel will show the current options of the blend effect.
The Blend panel provides access to the following options:
- Style - Create or reuse existing blend object attribute styles and presets.
- Steps - Select the number of steps used to create the intermediary objects. The steps can be:
- Fixed - Set a fixed number of intermediary objects in the numeric field.
- Distance - Set the distance between intermediary objects.
- Smooth - Set the smoothness of the color transitions.
- Blending - Select the path blending scheme. The blending scheme controls how one path transitions into another.
- Color - Select the color mode used to create the color transitions.
- Align - Select a shape style, preset or object reference with a Shape role as the blend path. The blend path is used to position the original and intermediary objects.
- Align Starting Node - Check to automatically find a matching starting node between two paths for blending.
- Rotate Path - Enable or disable the rotation of intermediary shapes based on the direction of the blend path. This option has an effect only when a blend path is used.
- Blend Shapes - Enable or disable the blending of parametric shape properties for matching shapes. This option is disabled by default, resulting in the blending of shape curves. When enabled, matching shape type transitions are created, by transitioning the shape properties.
- Clockwise - Enable or disable clockwise color blending direction in color modes containing a hue channel.
The Blend panel icons provide access to the following options:
 - Creates a new blend effect between the selected objects.
 - Creates a new blended object. A blended object is an object containing a single blend step from the blending of two objects.
 - Opens the Blend Options view to access all options of the blend effect.
 - Expands the selected blend object into a group of the intermediary objects, and removes the blend effect.
 - Swaps the order of the original objects in the blend effect.
 - Sets the selected path as the blend path of the selected blend object.
 - Reverses the direction of the blend path.
 - Removes the blend path of the selected blend effect.
 - Removes the blend effect from the selected objects.
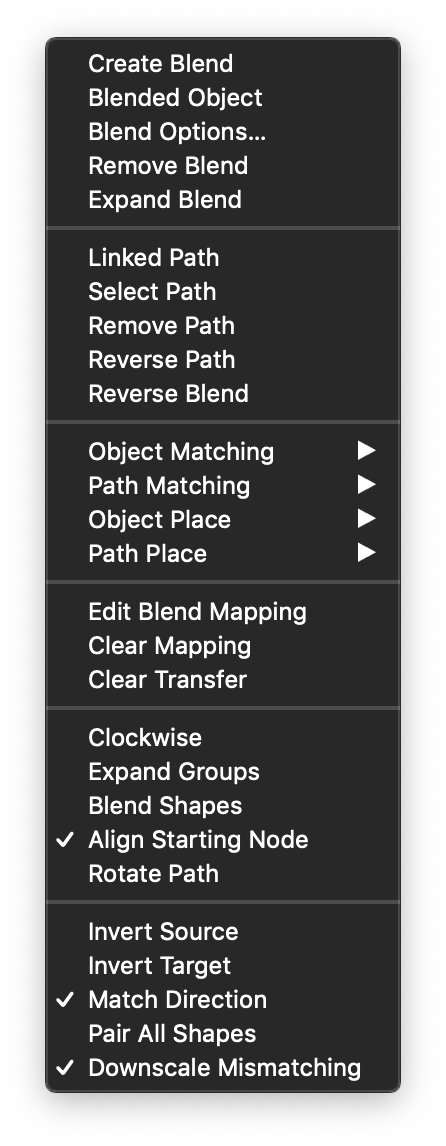
The blend panel menu.
Additional blend effect options are available from the Blend panel menu:
- Create Blend - Creates a blend effect between the selected objects.
- Blended Object - Creates a blended object between the two selected objects. The blending position of the blended object can be set in the Appearance panel.
- Blend Options - Opens the Blend Options view to access all options of the blend effect.
- Remove Blend - Removes the blend effect from the selected objects.
- Expand Blend - Expands the blend effect into a group of intermediary objects, and removes the blend object.
- Linked Path - Enables or disables the linking of the blend path to the object used to select the path.
- Select Path - Sets the selected path as the blend path of the selected blend object.
- Remove Path - Removes the blend path of the selected blend effect.
- Reverse Path - Reverses the direction of the blend path.
- Reverse Blend - Swaps the order of the original objects in the blend effect.
- Object Matching - Select the object matching scheme used when blending groups or symbols.
- Path Matching - Select the path matching scheme used when composite paths are blended.
- Object Place - Select the object blending trajectory.
- Path Place - Select the path blending trajectory of composite paths.
- Edit Blend Mapping - Activates the blend mapping editor.
The blend mapping editor is used to create custom transitions between locations of two shapes. The Blend Tools section contains a detailed description on how to use the blend mapping editor.
- Clear Mapping - Removes all blend mapping locations.
- Clear Transfer - Removes all transfer functions used to control shape or style.
- Clockwise - Enables or disables clockwise color blending direction in color modes containing a hue channel.
- Blend Shapes - Enables or disables the blending of parametric shape properties for matching shapes. This option is disabled by default, resulting in the blending of shape curves. When enabled, matching shape type transitions are created, by transitioning the shape properties.
- Expand Groups - Check to expand the group hierarchy of the blended objects, and match objects for blending over the whole content of the group or symbol. When unchecked, the blend hierarchy is maintained and internal groups are matched first.
- Align Starting Node - Check to automatically find a matching starting node between two paths for blending.
- Rotate Path - Enables or disables the rotation of intermediary shapes based on the direction of the blend path. This option has an effect only when a blend path is used.
- Invert Source - Reverses the shape direction of the starting object of the blend effect.
- Invert Target - Reverses the shape direction of the ending object of the blend effect.
- Match Direction - Enables or disables the automatic matching of closed shape directions.
- Pair all Shapes - Check to force the pairing of all shapes when blending.
- Downscale Mismatching - Check to downscale shapes when not paired.