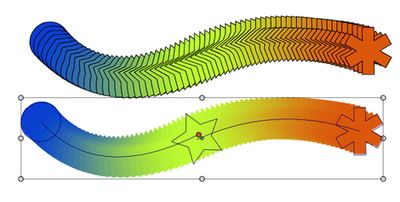
How to get the interpolated states of blends between shape variations to generate correctly
-
@b77 No, it was a positive remark by me!
-
@b77 So, one thing I have just noticed is that the new interactive transform shape effect helps tremendously. If you apply the effects congruently and then manipulate their values ( important to add an identity transform to the start shape ) you get proper results.
BUT: Of course sometimes you want to do blends between more exotic shapes, where shape effects aren't of much help..
-
@Nils Your question was about blending between shapes with shape effects applied?
-
@b77 No, it was more generally about how to approach this, just general advice. I think it's just a matter of experimentation to get this right. At least I already got it to work with rigorous use of shape effects.
I think what you said about the same number of nodes will help..
-
@Nils ,
In addition to the points @b77 already mentioned.
In VS, like in CorelDraw it is possible to append several blends to each other.
"Select the last blended Shape and the new Shape and blend it."Perhaps this could help, for example, to adjust a copied shape from a blend
a little bit to the desired shape and use it then as an intermediate Shape for another Blend.
-
@Nils said in How to get the interpolated states of blends between shape variations to generate correctly:
@vectoradmin Since I got your attention here: I've noticed that it's quite difficult to get the interpolated states of blends between shape variations to generate correctly. Do you have any general advice ( doesn't have to be detailed ) on how to approach this to get more consistency.
In some cases the Blend mapping tool might help: https://recordit.co/Sc4zRr81u1
Use double clicks to add mapping points at locations along the shapes, and then drag these to the proper place on each shape.
-
@vectoradmin After extensive fiddling yesterday I figured out how to get most shapes to blend perfectly.
For anyone who might be facing similar issues:
- always look closely and ensure the number of nodes is exactly equal in both shapes
- ensure symmetry
- for example, when blending a circle to a more complex curvey shape have the positions on the left side of the circle be reflected on the right side
- when there are tiny artifacts somewhere you know that you probably missed one or more nodes that sit closely together
-
@Nils said
- always look closely and ensure the number of nodes is exactly equal in both shapes
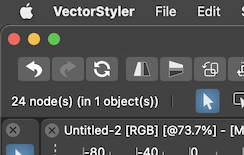
Btw, selecting all nodes displays their count on the left side of the context panel:

-
@b77 said in How to get the interpolated states of blends between shape variations to generate correctly:
Btw, selecting all nodes displays their count on the left side of the context panel
Glad you mentioned this. I had not noticed it and had dedicated the bottom area of the UI for that task. Maybe I'll assign another task down there since it counts for me already at the top as you pointed out
-
With all the tips here and after a lot of experimentation with the process I was able to make a simple "dripping" animation using the blend tool and batch exports.
Needless to say, once a certain workflow has been established, which may take some time, one could use VS for much more complex animations, which is a great thing!

-
smmoooooothhhh result
Finally, what tool did you use to make the animation ?
I assume you exported single frames, but then ?
-
@Subpath Just google gif maker, then choose one of the various results. Animation is just frames in sequence as you'll know.
-
Corel Draw 11 (sadly only this Version i think), had once a vector animation tool
called "Corel Rave". Basically it had all the vector tools from CorelDraw
with a timeline and a tweening function. You could save your Animation as Flash (.swf).Found a Video here:
Corel Rave Video
-
@Nils
...Just google gif maker, then....
thanks for the Info
-
@Nils Nice! Blending across multiple artboards?
-
@b77 You can just scale any scene down to make the various interpolated states fit the artboard and then increase your resolution correspondingly on export.
Why were you thinking of multiple artboards?
-
@Nils If the artboard count is the same with the blend count and you place the start object on the first artboard and the end object on the last one, each interpolation would be on the intermediary artboards.
Then after editing the interpolated objects (I guess with your a bit complex animation it involved expanding the blend object and editing the resulting shapes), you can use File > Export Artboards to get all the images for the Animated GIF with one click.
See the attached (very basic) example.
-
@b77 said in How to get the interpolated states of blends between shape variations to generate correctly:
I guess with your a bit complex animation it involved expanding the blend object and editing the resulting shapes
Surprisingly not. The above is all done without touching any interpolation results. Vs's blend tool is truly great.
If the artboard count is the same with the blend count and you place the start object on the first artboard and the end object on the last one, each interpolation would be on the intermediary artboards.
That sounds like a great way to emulate a crude timeline! Would also save the hassle of having to align stacked intermediate blends.
-
@b77 Here's the problem, though? This doesn't seem to work well with non-linear intensities. Any idea how to work around that? For example, if I have a group with two circles and I want to blend vertical translation inside the group non-linearly, then the intensity will reflect in the group's position aswell if I use the groups for the blend.
Also, there doesn't seem to be a way to only blend one axis of translation..
I guess I'll have to expand and then realign..
-
@Nils Do you refer to a way to simulate "closer" interpolations near the start and end objects (ease-in and ease-out)?
If so, it can be done (click the graph button in the Blend panel), but then this multiple artboards trick indeed doesn't work. It's good for repetitive, uniform-speed and -distance GIFs.
Although… you could simulate this "ease-in" and "ease-out" by opening the Animated GIF in an image editor and decreasing the ms values manually for the first and last frames.
If it's something else, you could post a test file.