How to get displacement effect?
-
Hi. I'm entirely new to VectorStyler, but fairly experienced in Affinity Designer. I know I need to get used to a different UI. I'm interested in playing with the displacement effect noted as a feature on the main site:

I searched, but I cannot find a tutorial. Can anyone point me in the right direction?
TIA.
-
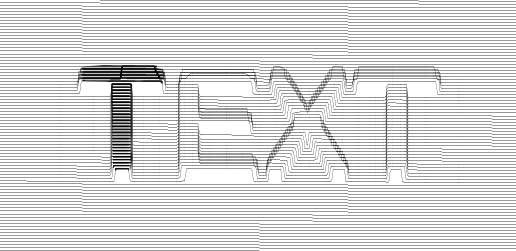
@ianrobertdouglas Attached an example here:
0_1670615988982_displacement1.vstylerSteps to create displacements:
- a displacement needs 2 objects, one is the "mask" to displace with, and the other is a group of (or a single) shapes to displace.
- create the mask object (in this example it is a text). This can be any group of objects, with colors, etc. Call this a mask from now on.
- select Object -> Object Options
- set a name for the "mask", in the above example it is "displacement"
- click on the Role button, and select "More Roles".
- here select "Filter Image" (these roles are listed in alphabetical order).
- confirm the role, and then confirm the object options.
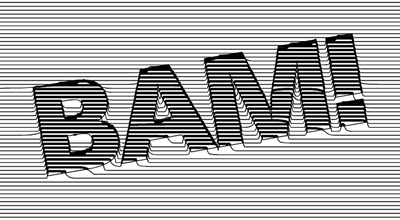
- now create the other object (or group), and lets call this the "shape". In the above example, this is a single Line Grid shape, but any collection of shapes will work here.
- open the Shape Effects panel (Panels->Effects->Shape Effects).
- select the "shape" object.
- in the Shape Effects panel click on the [+] icon in the bottom-left of the panel, and from the menu select Outline -> Displacement.
- The Shape Effect panel now contains a "Displacement" effect.
- open the effect options with the arrow
- here click on the Displace drop down and the "displacement" object (the mask object) should be listed here. Select it.
- set the other options, especially Amount and Direction.
- using the (...) button at the top-right corner of the effect options popover, you can access more options to experiment with.
-
@ianrobertdouglas Here's a short video with the basics: https://recordit.co/bJ3DtIBLeE
The steps:
- use the Text tool to add the text, and scale it up;
- assign a 'Filter Image' role to this object (Object menu > Object Role > Filter Image);
- use the Line Grid Shape tool to create the lines;
- in the context panel at the top, adjust the Spacing value;
- assign a displacement effect to the lines (Effects menu > Outline > Displacement);
- in the 'Shape Effect' window that shows up, click the 'Preview' checkboox, then…
- assign the text that has a 'Filter Image' role as the Displace source (pick it from the Displace dropmenu);
…then play with the text object and with the values of the Displacement effect (Panels menu > Effects > Shape Effects).
-
@VectorStyler @b77 Thank you both very much!
-
Hi and welcome to VectorStyler
I made some experiments with Strokes a while a go
wich may be helpful tooSee here:
https://www.vectorstyler.com/forum/topic/2307/attempts-of-a-kind-of-halftone-lines-in-vs -
@Subpath
Hi there, I want to combine the two above workflows and add more stroke width to the top of the displacement effect as shown below on the letter "T" example .
To do so I 've tried to add to the displacement text object the transparency content role, yet I struggle to get it to work properly.
Can anyone assist here please ?
Many thanks!
J
-
@jroth If there is no effect or role to do this, you can simply duplicate the object exactly on top (with copy & paste),
then increase/decrease the Amount value of its Displacement effect with 1 pt (if the line width is 1 pt).See the attached file: 0_1673106539290_Displacement example.vstyler
-
@jroth Currently there is no feature to change the stroke width with a non-destructive filter.
But it is possible to make an adjustment in a destructive way, by using the Stroke Width panel and the "Adjust Profile with Mask" from the panel menu.
-
@b77 That's a nice and simple way around the issue. I 've just tried and it works. Many thanks for your quick reply.
-
@VectorStyler I see, I will add the stroke width as a last step (either using the object duplication or break the object). Many thanks!
-
Hi @jroth
I used a copy of the Text as a clipping Object
and put a copy of the displacment strokes in
the clipping objectThis way you can control the Stroke width
on the Text the way you likedHere how to do it
create a copy of your displacement strokes
use Break apart to get rid of the Shape Effect
Object > Break aparti converted a copy of the Text to curves
and did a Combine Boolean on itthen i placed the copy of the displacement strokes
over the Text copy and put that strokes in the Clipboardthen select the Text copy and do a "past inside"
to edit the strokes inside the Text just
double click on the Texti used the File from @b77 my font is different but
i think you get itthe clipping Object

the Result
-
@Subpath Looks great! I did not know that a boolean combination can be done with strokes only. That"s very helpful. Many thanks ! J
-
you are welcome, nice that is helpful
Boolean combining is exactly the same thing
as combining in other vector programs.
So it is nothing special.
In VS you can find Combine under
the Boolean operations.And of course you can also combine strokes